Philips VTR9200 Скачать руководство пользователя страница 33

32      ZH

 ZH      33

中文

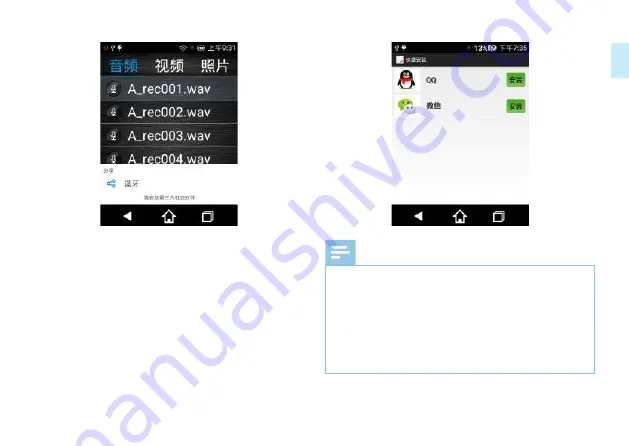
关于第三方软件下载说明:为了方便用户下载分享需要用到的

第三方软件应用,可以点击在应用软件里的“快捷安装”,进

入第三方软件安装链接,点击你要安装软件后面的“安装”就

可以跳到第三方软件安装界面,在第三方软件安装界面再点击

右上角“安装”就可以快速安装第三方软件了。

快捷安装界面参考:

注意

• 

第一次安装第三方软件,下载完第三方软件后,界面弹出

一个“禁止安装”的对话框,点击“设置”,界面直接弹

出“安全”设置界面,把”未知来源“点击打开,界面再

弹出一个对话框,点击“确认”,重新点击下载第三方软件。

• 

在录音或录像过程中,遇到第三方软件的弹出框时,建议

不要去点击,否则会自动中断录音或录像。

• 

退出微信界面或 QQ 界面,按底下中间的“Home”键退出。

打开“未知来源”方式参考界面:

Содержание VTR9200

Страница 1: ...English 50 中文 03 www philips com welcome VTR9200 使用手册 User Manual VTR9200 Register your product and get support at ...

Страница 2: ......

Страница 3: ...围 7 3 2 概览 7 4 开始使用 9 4 1 开 关机 9 4 2 充电方法 10 4 3 连接电脑 10 5 录音 11 5 1 录音模式介绍 11 5 2 使用外置麦克风录音 13 5 3 使用电话录音 13 6 录音播放模式 15 6 1 语音播放 16 6 2 变速播放 17 6 3 复读模式 17 6 4 删除文件 17 6 5 播放模式 19 7 录像模式 20 8 录像回放模式 22 8 1 录像回放 23 9 语音转文本模式 24 9 1 录音文件转文本 24 9 2 备忘录转文本 27 10 网络设置 29 11 应用介绍 30 ...

Страница 4: ...4 ZH 11 1 录音播放 30 11 2 视频回放 30 11 3 拍摄界面 30 11 4 语音转文本 31 11 5 文件 31 11 6 手机控制 35 11 7 专业工具 42 11 8 应用软件 42 11 9 录音设置 43 12 常见问题 48 13 技术参数 49 存储器 49 尺寸和重量 49 系统要求 49 录音 49 运行条件 49 ...

Страница 5: ...修信息等 www philips com 1 1 产品特点 一键录音 仅仅推上录音键即可实现录音 推下录音键保存 录音 一键录像 长按录像键即可实现录像 短按停止键保存录像 一键 WIFI 短按进入 WIFI 设置界面 内置高性能编解码芯片 支持无损音频播放 以常见的 MP3 格式及 WAV 格式录音 支持 192KHz 24 位 PCM 录音 声控录音功能 支持 WIFI 蓝牙 支持语音转文本功能 支持文件分享功能 支持手机远程控制 支持扩展 SD 卡 使用高速 USB 2 0 快速存取录音文件和数据 可作为大容量的 USB 存储设备 确保最大的兼容性 智能数字降噪 ...

Страница 6: ...设备附近或阳光直射的地方 请注意 切勿挤压电缆 特别是插头处 特别声明 使用本产品前请仔细阅读本说明书 如因人为操作 或不可抗力因素而导致数据丢失 本公司一概不予负责 特别 提醒用户小心操作 注意将资料另外备份 2 2 听力保护 使用耳机时请遵守下列原则 调整至合适的音量 切勿长时间使用耳机 特别需要注意 切勿将音量调至耳朵所能承受的范围之外 切勿将音量调至盖过周边环境的声音 在危险情况下请小心或暂停使用耳机 在驾驶汽车 骑自行车 玩滑板时 切勿使用耳机 否则会导 致交通意外 且违反相关法律法规 ...

Страница 7: ...ZH 7 中文 3 您的数码录音笔 3 1 供货范围 3 2 概览 a Line in 插孔 麦克风插孔 b 耳机插孔 c 电源开 关 d SD 卡插槽 e 删除键 f USB 接口 g 音量 ...

Страница 8: ...8 ZH h 显示屏 i 音量 j 播放 暂停 k 上一曲 l 内置麦克风 m 摄像头 n 指示灯 o 停止键 p 录音增益键 q 录像键 r 下一曲 s WIFI 快捷键 t AB 复读键 u 文件夹切换键 v 屏幕开 关键 w 录音键 x 设置键 y 变速播放键 z 扬声器 复位键 ...

Страница 9: ...向上拨至 ON 处 约 3 秒至 4 秒后开机 开机界面 显示飞利浦图标 如下图所示 然后机器进入录音回放界面 如下图所示 温馨提示 本机的开机 关机由开关键控制 具体如下 关机 在开机状态下 把开关键拨至 OFF 处 机器将自动关机 开机 在关机状态下 把开关键拨至 ON 处 3s 至 4s 后屏 幕上显示开机画面飞利浦图标 注 1 不能反复操作开关机 例如 开机过程不能关机 关机 过程 不能开机 否则会导致屏显示不良 2 录音笔死机复位 本机需要复位时 必须先把 电源开 关 键拨到 OFF 处 再按 复位键 进行复位 ...

Страница 10: ...电量显示是 100 是充满电 2 电量低于 20 以下 界面会弹出电量低提示框 这个对话框 要点击确认才能消失 3 电量低于 20 以下 界面会弹出电量低提示框 连接电脑或 连接充电器会自动消失 4 把 电源开 关 键拨到 OFF 处 关机充电 机器会自 动开机进入待机界面充电 4 3 连接电脑 录音笔可作为大容量的 USB 存储设备 并可方便地对文件进行 存储 备份和移动 可使用 USB 数据线将录音笔与电脑相连 且无须安装软件 连接电脑图标如下图所示 提示 在文件移入或移出录音笔时 请不要断开录音笔与电脑的 连接 否则会损坏文件 机器必须是开机状态才能连上电脑 如果机器在关机状态 连接 USB 会自动开机 但连不上电脑 请拔掉 USB 重新插 入连接 ...

Страница 11: ...读本节中的录音说明 1 在主菜单的录音设置菜单里选择 文件夹选择 选择所 需文件夹 2 在主菜单的录音设置里面的选择 录音类型 3 把 录音键 拨至 REC 处开始录音 请将内置麦克风 对准音源 4 按 键暂停录音 显示屏显示录音暂停图标 5 再次按下 键 继续录音 6 在录音过程中 按下 键 可选择 高 中 低 录音增益 请选择合适的增益等级以保证录音品质 增益设置参考界面 7 把 录音键 键拨至 STOP 处结束录音 并回到当前录 音文件的停止播放界面 录音参考界面如下图所示 ...

Страница 12: ...b 可录音时长 c 左右能量条 d 录音文件名 e 当前录音文件数 f 录音状态图标 g 当前录音的采样率和采样位数 h 总录音文件数 i Line in 录音图标 j 监听图标 k 声控图标 l 降噪图标 m 当前文件夹 n 录音标志 o 时钟 p 电量指示 注意 电池标记符显示空格时 表明低电 低电时系统会自动关 机 如果正在录音 系统会自动保存录音文件后退出录音 电量不足时 请及时充电 提示 录音前 请先设置所需的声控录音功能和录音类型 ...

Страница 13: ...能播放 关机状态和开机过程中不支持一键录音 请在开机完成后 才能一键录音 当电量提示低于 5 时 录音自动保存 停止录音 5 2 使用外置麦克风录音 当您使用外置麦克风录音时 请先将麦克风插入外置麦克风插 孔 并按照内置麦克风的录音模式进行录音 当您连接到外置 麦克风时 内置麦克风将自动关闭 外置麦克风录音的使用介绍 1 使用外置咪头设备录音时 要把外置咪头设备插入Line in孔 然后按照内置麦克风的录音模式进行录音 2 外置音源录音时 要使用 Line in 线 Line in 线的一头连 接外音源设备 另一头插入 Line in 插孔 然后按照内置麦克 风录音模式进行录音 注意 使用外置咪头设备录音时 录音音源要靠近外置咪头 声 音大小可通过录音增益调整 具体请查看 5 1 录音模式介 绍的录音增益设置 录制外音源时 请把外音源音量调到适当值 再录音 5 3 使用电话录音 电话录音的...

Страница 14: ...14 ZH 注意 电话录音不能设置录音增益 ...

Страница 15: ...ZH 15 中文 6 录音播放模式 录音完后将自动进入录音回放模式 或者在主界面点击 录音 播放 应用 进入录音回放 录音播放参考界面如下如所示 录音播放界面说明 a 当前文件夹 b 当前文件名 c 播放进度条 d 上一曲 e 当前播放时间 f 播放 暂停 ...

Страница 16: ... 语音播放 1 在录音文件停止播放模式下 按 键 选择所需文件夹 2 按 或 键 选择要播放的文件 3 按 键开始播放 4 使用 键或 键调节音量 5 按 键结束播放 6 播放过程中 按 键暂停播放 再次按下 键 将继续先前位置的播放 7 播放时长按 或 键 可快退或快进当前正 在播放的文件 提示 当耳机插入耳机插孔内 录音笔扬声器将停止工作 触摸屏的上一曲图标 可以切换上一个文件播放 触摸屏 的下一曲图标 可以切换到下一个文件播放 触摸播放 暂停图标 可以暂停播放或继续播放 触摸文件信息图标 可以查看当前录音文件的格式 速率 以及采样率 文件信息查看参考图 触摸当前文件夹图标 可以在 A B C D 文件夹切换 播放过程 拖动 播放进度条 可以快速快进 ...

Страница 17: ...读次数设置界面 选 择 AB 复读次数 短按 键进入 AB 复读起点 A 再次按 键将设置 AB 复读的终点 B 复读完后 录音文件播放停止 关于 AB 复读次数设置 1 播放录音过程中 短按 键弹出一个对话框 然后点 击 AB 复读次数 进入 AB 复读次数设置界面 可根据个人 需要对 AB 复读次数进行选择 AB 复读次数可以选择 1 次 2 次 3 次 4 次 5 次 AB 复读次数参考界面如下图 注 1 AB 复读过程 按 键暂停播放 AB 复读同时退出 2 AB 复读过程 按 键停止播放 AB 复读同时退出 3 AB 复读过程 使用 键或 键调节音量时 AB 复读 不退出 4 AB 复读过程 按 键播放上一个文件时 AB 复读同时 退出 按 键播放下一个文件时 AB 复读同时退出 6 4 删除文件 在停止播放录音文件界面下 长按 键 将弹出删除文件 选项框 下面为相关参考图片 ...

Страница 18: ...18 ZH 选择 删除单个 选项 将弹出删除单个文件对话框 下面为 相关参考图片 点击 确定 将会删除该文件 点击 取消 将放弃删除该文件 选择 删除全部 选项 将弹出删除当前文件夹里所有的录音 文件对话框 下面为相关参考图片 ...

Страница 19: ...可以在停止状态下 按 键 可以在 A B C D 四个文件夹之间进行切换或者点击 当前文件夹 切换 A B C D 四个文件夹 6 5 播放模式 在录音播放界面 短按 键弹出一个对话框 然后点击 播 放模式 进入播放模式设置界面 播放模式包括 单曲播放 随机播放 普通播放 全部播放 播放模式设置参考界面如下图 提示 单曲播放 一直循环播放选中的一曲文件 随机播放 随机播放当前选中目录的文件 普通播放 顺序播放选中目录的文件 全部播放完一遍当 前目录的文件后自动停止播放 全部播放 循环播放选中目录的文件 ...

Страница 20: ...20 ZH 7 录像模式 在开机状态下 长按 键 将进入录像模式 录像参考界面如下如所示 录像界面说明 a 录像预览界面 b 录像进度条 c 当前录像时间 d 单个录像文件总时间 e 录像状态 在录像状态 短按 键保存当前录像文件 ...

Страница 21: ...ZH 21 中文 注意 录像 20 分钟将自动保存 自动进入下一个录像文件 为了保证录像视频质量 建议在录像过程尽量保持机器平 稳 不能随意晃动 当电量提示低于 5 时 录像自动保存 停止录像 ...

Страница 22: ...22 ZH 8 录像回放模式 录像保存后 将自动进入录像文件选择列表界面 或在主界面 点击 视频回放 应用 进入录像文件列表选择界面 在录像 文件选择列表界面 点击需要播放的录像文件进行回放 录像 文件列表选择界面参考图片如下 注意 点击录像列表后的图标 出现 修改名称 删除视频 弹出框 弹出框的参考界面如图 点击 修改名称 可以对当前视频文件名称进行修改 修 改视频名称参考图片 ...

Страница 23: ... 删除文件 修改名称只支持数字和字母输入 不支持文字输入 8 1 录像回放 1 在录像文件选择列表界面 使用 键或 键 选择 所需播放的录像文件夹 2 按 键开始播放 3 播放过程中 使用 键或 键调节音量 4 按 键结束播放 回到录像文件选择列表界面 5 播放过程中 按 键暂停播放 再次按下 键 将继续先前位置的播放 6 播放时 长按 或 键 可快退或快进当前 正在播放的文件 提示 当耳机插入耳机插孔内 录音笔扬声器将停止工作 触摸播放 暂停图标 可以暂停播放或继续播放 播放录像过程 拖动 播放进度条 可以快进快退播放 录像文件播放参考界面如图 ...

Страница 24: ... 9 语音转文本模式 在主界面点击 语音文本 应用 将会打开语音转文本功能 参考界面如下 语音转文本包含录音文件转文本和备忘录转文本两个功能 录音文件转文本 将已录制好的音频文件转换成文本文件 备忘录转文本 可实时录制 并把语音转成文本文件 9 1 录音文件转文本 点击 录音文件转文本 可进入如下图录音文件转文本界面 1 点击 选择文件 进入录音文件选择界面 点击你要转 文本录音文件 选择文件 界面参考如下图 ...

Страница 25: ...ZH 25 中文 2 选择完要转写文件后 点击 语音转写 即可实现录音 文件转文本 语音转写参考界面如图 3 录音文件转写完成后 点击 打开编辑 功能 弹出键盘 这时可对文本文件进行编辑修改 编辑后请按 保存文件 对修改后文本进行文件保存 点击 关闭编辑 功能 不能对 文本文件编辑修改 编辑文本界面参考如下图 ...

Страница 26: ...后 底面的进度条显示白色 录音文件转写不支持录格式为 MP3 的文件 只支持录音文 件格式为 WAV 的 3 文本文件可以连电脑查看 4 文本文件在本机查看 在应用软件的资源管理按存储路 径查找相关文件点击打开就可以本机查看文本文件 5 在 文件选择 界面选择 SD 卡文件转写时 要插卡 操作方式参考设备存储文件录音转写 6 文本文件需在本机查看 在本机的主菜单的文件里拖动 上方字体可以看到文本 点击 文本 就可以查看文本文件 7 语音转文本功能的免费使用年限为一年 一年后客户如 需继续使用该功能 请自行联系软件运行商进行续费使用 ...

Страница 27: ...ZH 27 中文 语音转文本使用年限到期后参考界面如图 文本查看参考界面 9 2 备忘录转文本 点击 备忘录转文本 可进入如下图备忘录转文本界面 1 长按 话筒 圆圈按钮说话 说完话后松手 就可以实行 语音转文本 语音转文本参考界面 ...

Страница 28: ...28 ZH 2 文本框的编辑可参考录音文件转文本的文本框编辑 文本框编辑参考界面 3 录音转写文本后 点击 保存文件 即可保存文本文件 4 文本文件查看可参考录音文件转文本的文本文件查看 ...

Страница 29: ...你要连接的 WIFI 名称 3 然后弹出 WiFi 连接密码界面 输入密码 4 点击 连接 就可以连接上 WIFI 提示 选择途经一打开 WiFi 功能 不需要把 WiFi 设置 打开 图标划上右边 WiFi 功能是直接打开 途径二 1 点击主菜单的 专业工具 2 再点击 设置 进入设备设置界面 3 点击 WLAN 进入 WiFi 选择界面 4 WiFi 设置 打开 图标划上右边 打开 WiFi 设备 5 选择你要连接的 WIFI 名称 6 然后弹出 WiFi 连接密码界面 输入密码 7 点击 连接 就可以连接上 WIFI 网络设置参考界面如下图 ...

Страница 30: ...播放 视频回放 照相机 语音文本 网络分享 手机控制 专业工具 应用软件 录音设置等 主应用参考界面如下 注意 请不要自行安装对系统要求很高的大型应用 例如游戏 否则会影响本机性能 11 1 录音播放 用于回放录制的音频文件 请参考 6 1 录音回放模式 11 2 视频回放 用于回放录制的视频文件 请参考录像回放模式 11 3 拍摄界面 用于拍摄照片以及查看照片 11 3 1 拍摄界面 点击 照相机 进入拍摄预览界面 点击 拍照 图标 就可 以拍照 拍摄预览界面参下图 ...

Страница 31: ...ZH 31 中文 11 3 2 照片查看界面 拍照后 在拍摄预览界面的左下角可以看到照片 点击进去 就可以全屏查看照片 拍照后参照界面如下图 11 4 语音转文本 用于将音频转成语言文字 请参考语音转文本模式 11 5 文件 文件的功能主要是对音频 视频 照片以及文本文件进行查看 分享 修改名称和删除单个文件 分享功能是通过网络 蓝牙分享音频 视频和图片等文件 网 ...

Страница 32: ...32 ZH 络分享功能参考界面如下 长按你要分享的文件 将会弹出一个 分享 对话 框 如下图 点击 分享 选项 选择你要分享的途径 蓝牙或者网络 网络分享需要自己安装第三方软件 如微信 QQ 邮箱等才能 进行使用 分享 的参考界面如下图 ...

Страница 33: ...链接 点击你要安装软件后面的 安装 就 可以跳到第三方软件安装界面 在第三方软件安装界面再点击 右上角 安装 就可以快速安装第三方软件了 快捷安装界面参考 注意 第一次安装第三方软件 下载完第三方软件后 界面弹出 一个 禁止安装 的对话框 点击 设置 界面直接弹 出 安全 设置界面 把 未知来源 点击打开 界面再 弹出一个对话框 点击 确认 重新点击下载第三方软件 在录音或录像过程中 遇到第三方软件的弹出框时 建议 不要去点击 否则会自动中断录音或录像 退出微信界面或 QQ 界面 按底下中间的 Home 键退出 打开 未知来源 方式参考界面 ...

Страница 34: ...34 ZH 点击 修改名称 选项 可以修改当前文件名称 名称修改参考界面 点击 删除 将删除当前文件 注意 需要分享 SD 卡的录音 录像以及照片 要把主菜单的录音 设置把存储路径选择到 SD 卡 修改名称只支持数字和字母输入 不支持文字输入 ...

Страница 35: ... 1 VTR9200 机器设备端 APP 介绍 此功能可以和手机进行绑定 绑定后可通过手机对此设备进行 控制 手机控制包括手机端 App 下载和手机端绑定两个功能 参考界面如下 11 6 1 1App 下载 APP 点击 App 下载 将会弹出一个二维码 可以使 用手机的微信 QQ 百度等第三方软件进行扫描二维码下载手 机控制端 App APP 下载的二维码如下图 11 6 1 2 手机绑定 手机绑定 手机下载 APP 并成功登录后 点击手机绑定 ...

Страница 36: ...开手机端 VTR9200 APP 的绑定的扫描二维 码对准手机绑定的二维码进行扫描 扫描成功可以用手机控制 录音笔进行录音 录音监听 录音保存 录像 录像保存以及 录像监控等功能 注意 打开手机绑定二维码需要连接网络 手机绑定二维码如下 图 11 6 2 手机端 VTR9200 APP 介绍 11 6 2 1 手机端 APP 登录参考界面 注意 点击注册 输入手机号码以及登录密码对 App 进行注册 注册成功即可登录手机端 App ...

Страница 37: ...作 11 6 2 2 手机控制的具体使用方法 11 6 2 2 1 关于手机端 APP 下载 1 点击打开 APP 下载 的二维码 用手机端的微信 QQ 百 度等第三方软件的扫一扫 扫描设备端 APP 下载 的二维码 下载手机控制端 App 具体下载方式按照手机端提示下载安装 注意 手机端扫描设备端 APP 下载 时会显示一个安卓下载和 IOS 下载 安卓手机就点击安卓下载 苹果手机就点击 IOS 下载 参考界面如下图 11 6 2 2 2 手机端 APP 绑定机器设备 1 手机端 APP 下载完后 第一次注册登录手机端 APP 后 会自 ...

Страница 38: ...维码 手机对准设备端二维码进行扫描 手机可对 VTR9200 设 备成功绑定 11 6 2 2 3 手机端控制设备端录音 1 绑定成功后 手机端 APP 进入主菜单 可以进行手机端控制 设备端录音 2 点击 录音 设备端可以进入录音 手机端也在显示录音 提示 录音过程中 点击喇叭图标 手机端可以听到设备端录 音声音 手机端监听时间延迟 5 秒左右 手机端录音参考界面如下图 手机端录音参考界面如下图 3 点击 暂停录音 设备端录音会暂停 手机端也在显示暂 停录音 暂停录音参考界面 ...

Страница 39: ...ZH 39 中文 4 点击 完成录音 设备端录音会自动保存 手机端显示录 音完成 完成录音参考界面 11 6 2 2 4 手机端控制设备端录像 1 绑定成功后 手机端 APP 进入主菜单 可以进行手机端控制 设备端录像 2 点击 录像 进入录像界面 然后点击 开始录像 设备 端会自动进入录像 手机端显示 正在录像 手机端录像参考界面 ...

Страница 40: ...40 ZH 提示 录像过程中 点击手机端录像界面的右下角的录像监控图 标 手机端会显示一个图片 随时监看设备端录像 手机 端监看时间延迟五秒左右 手机端监看录像参考图 3 点击 完成录像 设备端录像自动保存 手机端也会显示 录像完成 手机端录像完成参考界面 ...

Страница 41: ... APP 进入主菜单 可以进行手机端绑定 设备 2 点击 绑定 进入二维码扫描 然后打开设备端的手机控 制的手机绑定二维码 手机端对设备端手机绑定二维码扫描 绑定设备 提示 1 二维码扫描只支持一次扫描 如果一次扫描失败后 请点 二维码扫描右上角的重置 重新扫描绑定 2 一台手机可以对多台机器设备进行绑定 但一台手机只能 控制其中的一台设备 3 当手机绑定多台设备时 可点击手机端 APP 进入主菜单 切 换 进入绑定设备的预览界面 进行对设备控制的切换 手机端设备切换参考界面如下图 ...

Страница 42: ...APP 退出 点击手机端 APP 主菜单的右上角的菜单图标 进入 VTR9200 菜单设置界面 点击 切换账号 进入选择退出 APP 界面 点击 确认 就可以退出手机端 APP 注意 1 手机控制功能一定要在网络连接良好的状态下才能正 常使用 2 使用手机控制功能 必须要把 WIFI 设备的休眠状态下保持 WLAN 网络连接设置为始终 3 如果不需要用手机控制 建议把机器的 WLAN 网络状态设置 成 WI FI 智能休眠 减少耗电量 只要网络良好 即可实行远程控制 没有区域的限制 11 7 专业工具 专业工具里包含 电子邮件 浏览器 日历和设置等功能应用 11 8 应用软件 应用软件里包含 计算器 时钟 通信录 图库 相机和资源 管理器 快捷安装 音乐以及用户自行下载的 app 等功能应用 ...

Страница 43: ...游戏 否 则会影响本机性能 应用软件参考界面如图 11 9 录音设置 录音设置里包含 存储路径 录音类型 文件夹选择 声控设置 录音监听和软件版本等功能应用 参考界面如下 存储路径 选择文件存储路径内存设备或 SD 卡 录音类型 选择录音时的录音类型 PCM N R HP SP LP Tel 文件夹选择 选择录音时的文件夹 A B C D 声控设置 打开或关闭录音时的声控功能 录音监听 打开或关闭录音时的监听功能 软件版本 查看当前的软件版本 11 9 1 存储路径 ...

Страница 44: ...像文件以及照 片保存在机身内存 存储路径选择 SD 卡 就是把所有录音文件 录像文件以及 照片保存在 SD 卡内 选择 SD 卡后 在界面的左上角有一个 SD 卡显示图标 不支持热插拔 SD 卡 需要插入 SD 卡 请先关机后再插卡 然后开机使用 TF 卡 当插入 SD 卡后 存储选择 SD 卡后 界面如果提示 SD 卡 不可用 是否格式化卡 这时说明插入的 SD 卡格式不支 持 要选择 确定 然后跳转到格式化卡界面 点击 格 式化 SD 卡 格式化 SD 卡后 SD 卡就可以正常使用了 格式化 SD 卡参考界面 ...

Страница 45: ...型 PCM 192K 24bit wav N R 48K 16bit wav HP 48K 16bit wav SP 44 1K 16bit mp3 LP 16K 16bit mp3 Tel 48K 16bit wav 录音类型参考界面 注意 当在嘈杂的环境中录音时 可以选择降噪录音 N R 减少噪 音 录音类型 Tel 只应用在电话录音 具体操作请参考 5 3 使 用电话录音 11 9 3 文件夹选择 选择录音时的文件夹 A B C D 文件夹参考界面如图 ...

Страница 46: ...界面先选择你所需要文件 保存的文件夹 再进行录音 其他方式切换文件夹的文件 只支持播放或删除功能 11 9 4 声控设置 打开或关闭录音时的声控功能 声控设置参考界面 提示 打开声控功能是指把录音键推到 REC 录音时 有声音时 可以自动录音 没有声音时 录音自动暂停 关闭声控功能指的是把录音键推到 REC 录音时 有声音 或没有声音 都能一直录音 打开声控功能 录音界面会显示 VOR 声控录音参考界面如图 4 声控功能 只支持 N R 48K 16bit wav HP 48K 16bit wav 两种录音类型 ...

Страница 47: ...ZH 47 中文 11 9 5 录音监听 打开或关闭录音时的监听功能 监听选择参考界面如图 注意 打开监听指的是录音键推到 REC 录音时 把耳机插入耳 机孔 带上耳机 可以监听到录音时 是否有声音输入 关闭监听功能后 录音键推到 REC 录音时 带上耳机不 能听到录音声音 11 9 6 软件版本 查看当前的软件版本 ...

Страница 48: ...时 请删除部分录音或将其移至外部存储设备 录音笔无法播放录音 1 电池电量已耗尽 请充电 2 在电脑上播放录音文件 如果遇到无法播放的录音文件时 请查看该文件属性 如果文件属性是 PCM 192K 24bit wav 录 音类型 由于该录音类型比特率过大 很多播放器不支持播放 建议下载一个千千静听或 KM 播放器进行播放 注意 下载第三方桌面软件 会把机器原本的桌面风格覆盖 导 致软件排序错乱 因此不建议下载第三方桌面软件 如果不小心下载第三方桌面软件 可以通过恢复出产设置 来恢复机器原本的桌面风格 录音笔使用时间长后 出现卡顿 可尝试恢复出产设置 恢 复出产时 要把文件先保存 恢复出产设置方法 在专业工具里面点击 设置 找到 备 份和重置 点击 恢复出产设置 就可以对机器恢复 出产设置 ...

Страница 49: ...笔在充满电后 连续录像约 5 小时 尺寸和重量 宽 高 深 61 x 17 5 x 136 mm 重量 含电池 199 g 系统要求 操作系统 Windows 7 Vista XP 2000 Mac OS X Linux 接口 USB 接口 录音 PCM 192K 24bit wav 比特率为 9216kbps 格式为 WAV N R 48K 16bit wav 比特率为 1536kbps 格式为 WAV HP 48K 16bit wav 比特率为 1536kbps 格式为 WAV SP 44 1K 16bit mp3 比特率为 128kbps 格式为 MP3 LP 16K 16bit mp3 比特率为 64kbps 格式为 MP3 Tel 48K 16bit wav 比特率为 1536kbps 格式为 WAV 运行条件 温度 5 45 C 空气湿度 10 90 不凝结 ...

Страница 50: ...3 Use a Telephone to Record 62 6 Voice Play Mode 64 6 1 Audio Play 65 6 2 Play Speed 66 6 3 Replay Mode 66 6 4 Delete Files 67 6 5 Playing Mode 68 7 Video Recording Mode 69 8 Video Playback Mode 71 8 1 Video Playback 72 9 Audio to Text Mode 73 9 1 Recorded File to Text 73 9 2 Memo to text 76 10 Network Setting 78 11 Introduction of Applications 79 11 1 Voice Play 79 11 2 Video Playback 79 11 3 Cam...

Страница 51: ...quently Asked Questions 97 Cannot switch on the device 97 Cannot record with the device 97 The device cannot play recorded audio 97 13 Technical Parameters 98 Storage 98 Dimensions and Weight 98 System Requirements 98 Recording 98 Operating Conditions 98 ...

Страница 52: ...to save file One touch Video Recording long press the Video Recording to start recording shortly press Stop to save file One touch WIFI setting shortly press WIFI to enter WIFI setting interface Built in high performance code chip support for lossless audio play Record in common MP3 and WAV format Support for 96KHZ sampling 24 bit PCM audio Voice activated recording Support for WIFI and Bluetooth ...

Страница 53: ...eration or causes of a force majeure Special attention should be given to correct operations and files back up 2 2 Hearing safety Observe the following guidelines when using your headphones Adjust to suitable volume do not use the earphone for a long time Please remember that do not turn the volume up beyond your tolerance Do not turn up the volume so high that you can t hear what s around you Whe...

Страница 54: ...cer digital recorder 3 1 What s in the box 3 2 Overview a Line in Jack Microphone Jack b Earphone Jack c Power On Power Off d SD Card Slot e Delete Button f USB Port g Volume h Display i Volume j Play Pause k Previous Track ...

Страница 55: ...or o Stop Button p Gain Voice Recording Button q Video Recording Button r Next Track s WIFI Shortcut t AB Replay Button u File Folder Switch Button v Display On Off Button w Voice Recording Button x Setting Button y Play Speed Button z Speaker Reset Button ...

Страница 56: ...ce as below Reminder The device is switched on or off by Power On Off as follows Power Off When in the power on state slide the Power On Off to Off to switch off the device automatically Power On When in the power off state slide the Power On Off to On to switch on the device and display Philips icon in around 3 to 4 seconds Reminders 1 Do not turn on and off for too many times For example do not ...

Страница 57: ...re the device is not out of power When the battery indicator shows the battery as being fully empty please charge the device promptly 4 2 Recharge 1 Connect the device with PC through USB cable 2 Use the specified charger to charge the device Reminders 1 When charging the recorder by using the charger the main menu will be displayed during charging regardless whether the power button is on or off ...

Страница 58: ...58 EN Reminder When moving files into or out of the device please do not disconnect the device from the computer otherwise the file can be damaged ...

Страница 59: ...ding please place the built in microphone towards the source of sound 4 Press button to pause recording then the display shows Pause 5 Press button again to resume recording 6 When recording press button to choose high medium or low for gain recording Please choose a suitable one in order to make your preferred quality recording Sample Reference Interface for Gain Setting 7 Slide the recording swi...

Страница 60: ...ion b Reminding recording time c Energy bar of right and left microphone d Current file name e Number of the current files f Recording status g Sampling rate and bit of the current recording h Total number of recorded files i Line in recording icon j Monitoring icon ...

Страница 61: ...can be stored in any of the A B C D folder Make a test recording to make sure that the Voice Tracer settings are correct If the recording time exceeds the usable storage of the device the recording stops after automatically saving the recorded file Please delete part of recording or move it to a computer When recording please do not cut off power otherwise loss or damage of recorded file may be re...

Страница 62: ...recording mode 2 When using external microphone for recording please use the Line in line One end of the Line in line is connected with the external microphone and the other end is inserted into the Line in socket and then follow the instructions on recording as the built in microphone recording mode Reminder When using an external microphone for recording the microphone should be placed near the ...

Страница 63: ...EN 63 English ...

Страница 64: ...y in the main interface to start audio playback Screenshot of voice play interface is as follows Voice play interface diagram a Current file folder b Current file name c Play progress bar d Previous track e Current play time f Play Pause g Next track h Total play time of the file i File information icon ...

Страница 65: ...o pause and press to continue playing 7 When playing press or for a few seconds to fast forward or backward Reminders When the earphone is plugged into the earphone socket the speaker will stop working Touch on the Previous icon and the previous audio will be played Touch on the Next icon and the next audio will be played Press Play Stop icon you can stop or resume playing Touch the File Info icon...

Страница 66: ... select AB replay times shortly press to enter the start point A of AB replay press again to set end point B of AB reply after replay is completed the playing of the audio file will be resumed About Setting of AB Replaying Times 1 When the recorded audio is being played short press to let a dialogue box pop up and then click AB Number of Replay Times Enter the setting interface on AB Replaying Tim...

Страница 67: ...aying mode ends 6 4 Delete Files On the stopped playing voice interface long press to pop up Delete File Option as below Select Delete One File option to pop up Confirmed Delete dialog box as below Click Yes to delete the file click No to cancel deletion Select Delete All Files option to pop up Confirmed Delete dialog box as below ...

Страница 68: ... a dialogue box show up Then click Paying Mode to enter into the playing mode interface The playing modes include singles play random play common play and All play See below on playing mode setting Reminder Singles Play One single file will be played for countless times Random Play Play the files in the current folder in a random manner Common Play The files will be played in sequence and playing ...

Страница 69: ...ording mode Screenshot of video recording interface is as follows Video recording interface diagram Video preview interface Video recording progress bar Current video recording time Total time of a single video file Video recording status When video recording shortly press to save the current recorded file ...

Страница 70: ...orded video automatically and skips into the next video recording file 2 To ensure quality of the recorded videos it is advised that the camera stays stable and steady and no shaking is allowed 3 When power is less than 5 the recorded video will be stored and recording stops ...

Страница 71: ...terface Click the video file for playback in the selection interface Screenshot of video file selection interface is as follows Reminders 1 Click the icon behind the video file selection interface to pop up Modify File Name and Delete Video box The interface popping up is shown below Click Modify File Name to modify name of the current video file The interface for modifying file name is shown belo...

Страница 72: ...Use or to adjust the volume 4 Press to end playing and return to the video selection menu 5 During playing press to suspend playing press again to resume replaying 6 During playing long press or to fast forward or rewind the current video Reminders When the earphone is inserted into the earphone the speaker of the recorder will stop working Touch the Play Stop icon to suspend or resume playing Dur...

Страница 73: ...onverted into text files Audio file to text Convert a recorded audio file into a text file Memo to text have real time recording and convert audio into a text file Note Function of voice text can be only realized with internet access Please press Save File to save the text file after editing it Text file can be only viewed through PC not by the device 9 1 Recorded File toText Click Recorded File t...

Страница 74: ...ction interface and click the file you want to convert to text The interface for Selecting Files is shown below 2 After selecting the file for conversion click Audio to Text to convert such file into text Interface for converting audio into text is shown below ...

Страница 75: ... the text is shown below 4 After audio is converted to text click Store File to store the text file Reminders 1 Use the Audio to Text only when there is network connection 2 When the text is converted the progress bar on the bottom shows white color The audio to text function does not support MP3 format it supports WAV format only 3 You can use a computer to view the text 4 When viewing the text v...

Страница 76: ...ion 9 2 Memo to text Click memo to text and enter the memo to text interface as shown below 1 Long press the Microphone icon to speak and release it when finished Audio is simultaneously converted into text during this process Interface for voice to text is shown below 2 For editing of text box please refer to audio to text editing function Text box editing interface is shown below ...

Страница 77: ...EN 77 English 3 After audio is converted into text click Save File to store such text file 4 For viewing of the text files please refer to the audio to text viewing function ...

Страница 78: ...oach to enable WIFI function there is no need to push the Open icon for WiFi setting to the right side WIFI function is directly enabled 2 Approach 1 Click the Professional Tools on the main menu 2 Click Setting and enter the device setting interface 3 Click WLAN to enter into the WIFI selection page 4 Push the Open icon of WIFI setting to the right and open WIFI device 5 Select the WIFI you want ...

Страница 79: ...ns is as follows Reminder Please do not install large applications which are demanding for the system such as games otherwise performance of the device can be affected 11 1Voice Play To play back recorded audio files Please refer to section 6 1 for the audio playback mode 11 2Video Playback To play back recorded video files Please refer to the video playback mode 11 3 Camera To take and view photo...

Страница 80: ...review it in the lower left corner If you click on it you can see it in full screen The interface for shooting photo is shown below 11 4Voice to Text To convert audio into text Please refer to the voice to text mode 11 5 Sharing via Internet Share your audio video and photos via internet and Bluetooth Screenshot of sharing interface is as follows ...

Страница 81: ...ds to pop up a Sharing dialog box as below Click Share option to select the sharing methods via Bluetooth or internet software for the third party has to be installed in case of sharing via internet such as WeChat QQ email the interface for Sharing is shown below ...

Страница 82: ...third party software page Click on Install to quick install such software in the upper right corner Reminder When installing third party software for the first time and the third party software is downloaded the interface will pop up a Prohibit Installing Click Setting and see the Security setting page click the Unknown Source and click Confirm button in a new dialogue box then re download the thi...

Страница 83: ...terface for modifying the file name is shown below Click Delete to delete the current file Reminder For audios videos and photos to be shared in SD card please set the storage path as the SD card in the main menu 11 6 Mobile Phone Control Introduction of Mobile APP for Model VTR920 ...

Страница 84: ...hat QQ Baidu and other third party software to scan the QR code to download the App The QR code for APP downloading is shown below 11 6 1 2 Mobile Phone Binding Mobile Phone Binding After downloading APP and successfully logging on click Mobile Phone Binding and you will see one QR code You can control the device via your phone to record and save audio video supervise video recording and perform o...

Страница 85: ...9200 11 6 2 1 Screenshot for Mobile Phone APP Logging Reminder 1 Click Register input mobile number and login password to register App You can log in the App after registration is completed successfully After login you can enter the main interface of App as below ...

Страница 86: ...such APP via APP Download after scanning Follow the instructions on the mobile phone for downloading Reminder When scanning for downloading you will see both Android and iOS versions Choose the appropriate version according to your phone type The interface is shown below 11 6 2 2 2 Binding Device with Mobile Number via Mobile APP 1 After mobile APP is downloaded register and log onto APP then a ca...

Страница 87: ... and then control recording via mobile phone 2 Click Recording the device enters recording mode and this also shows up on the mobile phone Reminder During recording click the loud speaker icon and you can hear the recorded sound via mobile phone Mobile phone monitoring time delay of about five seconds Mobile phone recording interface is shown below Mobile device monitoring recording interface is s...

Страница 88: ...he mobile phone will also show that recording has been suspended Suspending recording interface is shown below 4 Click Complete recording the recorded audios will be automatically stored and the mobile phone shows that recording has been completed Competing recording interface is shown below ...

Страница 89: ...ding the device automatically enters into video recording mode and the mobile phone also shows that the device is video recording Video recording interface is shown below Reminder During video recording click the video recording monitoring icon in the lower right corner of the interface then you can see a picture showing the real time image Mobile phone monitoring time delay of about five seconds ...

Страница 90: ...uctions on Binding Device with Mobile Phone 1 After binding is successful enter the main menu on mobile APP and then use mobile APP to bind the device with mobile phone 2 Click Binding enters into the bar code scanning mode then use the mobile phone to scan such bar code and the completes the binding process Reminders 1 Only one time is allowed for bar code scanning If you have failed during first...

Страница 91: ...trolled device is shown below 11 6 2 2 6 Setting on Recording Type on Mobile Phone Click the icon in the upper right corner of the main menu on the mobile APP enter into the VTR920 menu s setting click Settings and select the recording type During mobile phone controlled recording mode the recording type will be that as set on the mobile device Interface for recording type on mobile device 11 6 2 ...

Страница 92: ...terface of mobile App to record audio and video scan or switch over devices 11 7 ProfessionalTools Professional tools include e mail browser calendar and setting tools 11 8 Software Software includes calculator clock contacts photos camera resource manager quick installation music and other apps downloaded by the user Note Please do not install large applications which are demanding for the system...

Страница 93: ...n below Reminders 1 Selecting the device as the storage path means storing all recorded audios videos and photos in such device 2 Selecting SD card as the storage path means storing all recorded audios videos and photos in such SD card 3 When SD card is selected there is a SD card icon in the upper left corner of the interface 4 No hot plugging is supported If you need to insert SD card please tur...

Страница 94: ... card 11 9 2 Recording type Select the recording type PCM 192K 24bit wav N R 48K 16bit wav HP 48K 16bit wav SP 44 1K 16bit mp3 LP 16K 16bit mp3 or Tel 48K 16bit wav Recording Type interface is shown below Reminders 1 When recording is done in a noisy environment please select Noise Reduction Recording N R to reduce noise 2 Recording mode Tel is only used for telephone call recording For details pl...

Страница 95: ...Voice control setting Enable or disable the voice control function during recording Reminders 1 Enabling voice control function means pushing recording button to REC and automatic recording is enabled when there is sound When there is no sound the recording process stops 2 Disabling the voice control function means pushing the recording button to REC and recording continues regardless if there is ...

Страница 96: ...ring interface is shown below Reminders 1 Enabling monitoring function means pushing Recording button to REC inserting earphone into the earphone hole wearing the earphone and determining if there is sound input when monitoring 2 After shutting down the monitoring function push the Recording button to REC and wear earphone to hear if there is any sound 11 9 6 Software version view the current soft...

Страница 97: ...he device 1 Please recharge your device promptly when the battery is empty 2 The device s memory is full Please delete some recordings or move them to other storage devices The device cannot play recorded audio The battery is empty please recharge After long hours of use the recorder may experience failure issues Please set to Default Settings store files before doing so Reminder Method for Settin...

Страница 98: ... hours HP recording The device can record video for 4 hours after being fully charged Consecutive recording can reach up to around 5 hours Dimensions and Weight Width Height Depth 61 x 17 5 x 136 mm Weight with battery 199 g System Requirements Operating System Windows 7 Vista XP 2000 Mac OS X Linux Port USB Recording PCM 192K 24bit wav bit rate 9216kbps format WAV N R 48K 16bit wav bit rate 1536k...

Страница 99: ...VTR9200 ...

Страница 100: ...版权所有文档版本 1 0 2017 06 05 2017 Speech Processing Solutions GmbH ...

Отзывы: