background image

A

LLOCATING DECODER

E

NGLISH

12

12

8

8

II  ddoonn’’tt  kknnoow

w  tthhee  cchhaannnneellss  ffoorr  m

myy  TTVV  ssttaattiioonnss

4

4

No problem. Hold down the button 

P

P

to start

the automatic channel search. A changing channel

number will appear on screen. Continue the

automatic channel search until you have found the

desired TV station

PPRRO

OBBLLEEM

M

8

Press O

OK

K to store the TV channel found.The

screen will briefly show “

STORED

”

PPRRO

OBBLLEEM

M

8

8

II   ccaannnnoott   ffiinndd   tthhee   TTVV   cchhaannnneellss   ffrroom

m   m

myy   ssaatteelllliittee

rreecceeiivveerr

4

4

These do not have to be stored as actual TV

channels.On your video recorder, select programm
number “

E2

”. Individual TV channels must be

selected on the actual satellite receiver itself

9

Finish manual sorting of TV channels by

pressing the M

MEEN

NU

U  button or return to step

3

to allocate additional TV channels

1

Use 

==

PP-- and 

;;

PP++ or the number keys 00--99 to

select the TV channel, which will in future be

automatically decoded by your decoder

A

Allllooccaattiinngg  ddeeccooddeerr

2

Press the M

MEEN

NU

U  button

PP

A

ARRD

DO

ON

N

??

W

Whhaatt  iiss  aa  ddeeccooddeerr??
Like a deciphering machine, a decoder (available in TV

and video stores) deciphers the TV channels for which

additional charges must be paid. Without the

appropriate decoder, you will receive these TV

channels distorted.

Содержание VR 510/07

Страница 1: ... position display type Page 19 Reset display tape position Page 20 Searching for tape position with picture picture search Page 20 Searching for tape position without picture forward wind and rewind Page 20 Searching automatically for tape position index search Page 21 Finding a blank position on tape automatically Page 21 Still picture slow motion Page 22 Optimizing tracking Page 23 Optimizing st...

Страница 2: ...VR 510 07 Operation instructions with ...

Страница 3: ...io on ns s T TV V Q QS S ä Reduce TV volume T TV V S S P P ä Increase TV volume T TV V P P ä Select nextTV programme number T TV V P P ä Select previousTV programme number T TV V M MU UT TE E y y ä Switch sound on off T TV V S ST TA AN ND DB BY Y O ON N m m ä Switch TV on off A Ac cc ce es ss so or ri ie es s 4 Operating instructions 4 Quick Start Guide 4 Remote control 4 Batteries 4 Aerial cable ...

Страница 4: ...y there are some components which are constantly operational To switch off the video recorder completely you must disconnect it from the power supply The video recorder does not contain any components that can be repaired by the customer Make sure that air can circulate freely through the ventilation slots on the video recorder Make sure that no objects or liquids enter the video recorder If liqui...

Страница 5: ...s introduced Instead of having to enter many different details date starting time finish time programme which was often tiresome and liable to errors all you have to do is enter a number up to nine digits long which can be found in any TV programme listing Once you have done that all the relevant details for the recording are stored VIDEO Plus and PlusCode are registered trademarks of the Gemstar ...

Страница 6: ... observe the following conditions If your new plug uses a built in fuse this should be a 3A fuse If your new plug does not contain a built in fuse please do not use any fuses in your fusebox with a rating of more than 5A Please destroy the old cut off plug so that it cannot be used elsewhere 4 Connect the blue cable neutral N to the terminal in the plug which is marked with the letter N or coloure...

Страница 7: ... enclosed a mains cable enclosed and a scart cable P PA AR RD DO ON N W Wh ha at t i is s a a s sc ca ar rt t c ca ab bl le e The scart or Euro AV cable serves as the universal recording and playback connector for picture sound and control signals With this type of connection there is practically no loss of quality during the signal transfer We recommend that you use a scart cable available from s...

Страница 8: ...owing cables provided with your new video recorder ready An aerial cable and a mains cable 2 Switch off your TV set C Co on nn ne ec ct ti in ng g t to o a a T TV V s se et t w wi it th ho ou ut t a a s sc ca ar rt t s so oc ck ke et t 8 You can find more details in the chapter Initial Installation 7 Your set should automatically switch over to the programme number allocated to video recorder oper...

Страница 9: ...the matching of the selected programme numbers on the TV set 4 4 Check the cable connections 3 Remove the aerial cable plug from the back of yourTV set and insert it into the aerial socket 2 2on the back of the video recorder 4 Take the enclosed aerial cable and connect the appropriate end to the aerial socket of your TV set and to the TV socket 3 3 on the back of the video recorder CONGRATULATION...

Страница 10: ...FOUND hhhh_______________ PLEASE WAIT 3 The initial setting of channel date and time is completed T TI IP P T Th he e T Te el le et te ex xt t c cl lo oc ck k r re es se et ts s a au ut to om ma at ti ic ca al ll ly y If a TV channel which has Teletext is stored as programme number P01 the video recorder automatically takes in the date and time from the text function The change from summer to wint...

Страница 11: ...setting To search for a normal channel the NO setting must be selected P PA AR RD DO ON N W Wh ha at t i is s a a c ch ha an nn ne el l o or r a a s sp pe ec ci ia al l c ch ha an nn ne el l TV channels are transmitted on precisely defined frequency ranges These ranges are also referred to as channels Each channel has its own TV station allocated to it Most cable and satellite TV providers supply ...

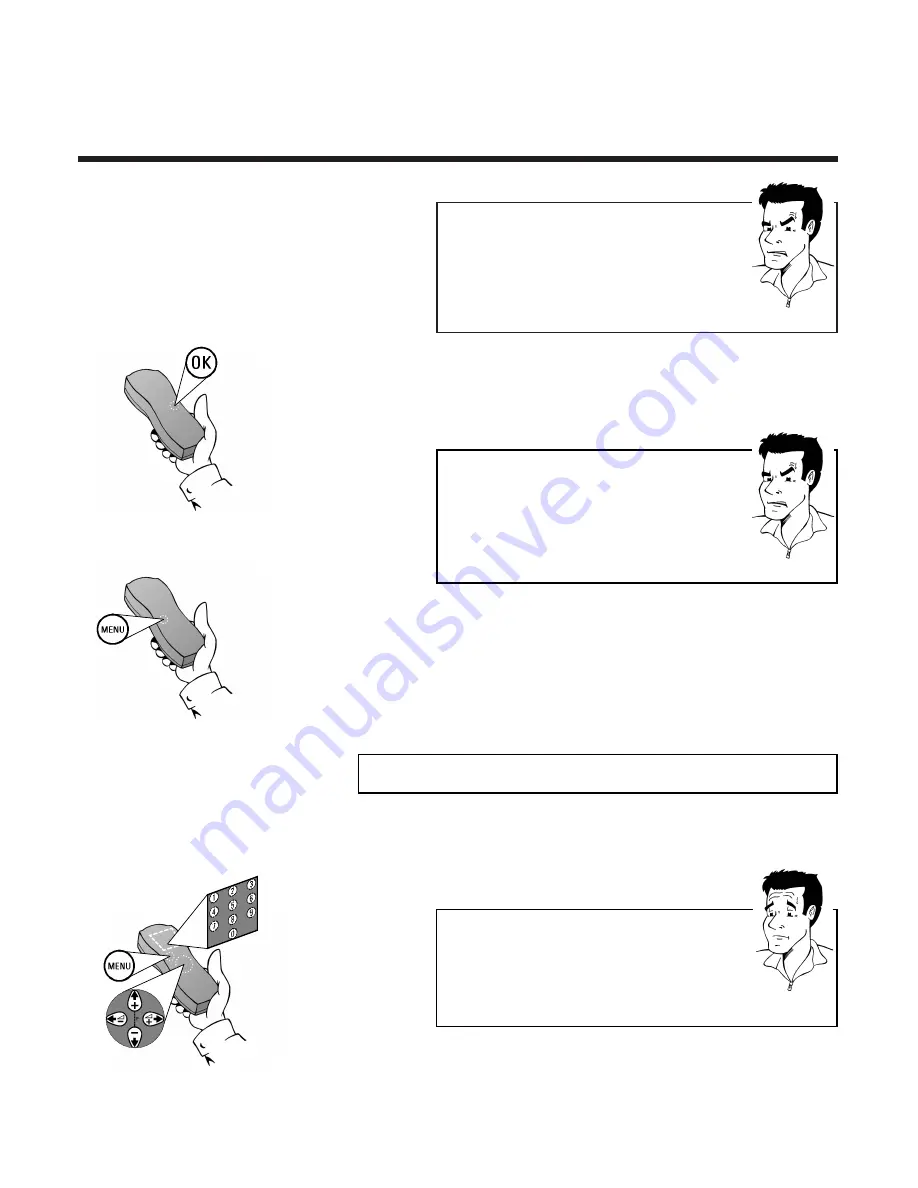
Страница 12: ... ei iv ve er r 4 4 These do not have to be stored as actual TV channels On your video recorder select programm number E2 Individual TV channels must be selected on the actual satellite receiver itself 9 Finish manual sorting of TV channels by pressing the M ME EN NU U button or return to step 3 to allocate additional TV channels 1 Use P P and P P or the number keys 0 0 9 9 to select the TV channel...

Страница 13: ...e allocated P PA AR RD DO ON N W Wh ha at t i is s a an n o on n s sc cr re ee en n m me en nu u The on screen menu takes the mystery out of using your new video recorder All settings and recording steps can be done easily via the on screen menu by following the corresponding instructions on the screen 6 Confirm with O OK K and leave the on screen menu with the M ME EN NU U button The screen will ...

Страница 14: ...ttings 3 Use P P or P P to select the option AUTO INSTALL automatic channel search and confirm with O OK K 2 Press the M ME EN NU U button on the remote control The on screen menu appears 8 8 T Th he e v vi id de eo o r re ec co or rd de er r i is s n no ot t f fi in nd di in ng g a al ll l t th he e T TV V c ch ha an nn ne el ls s 4 4 In exceptional cases it may happen that the set does not find ...

Страница 15: ...elect the option TV CHANNEL ALLOC and confirm with O OK K 2 Press the M ME EN NU U button on the remote control The on screen menu appears 4 Use S S P P or Q QS S to select the TV channel to be allocated a programme position 5 S So or rt ti in ng g Press S SE EL LE EC CT T to allocate theTV channel to the programme position set P 01 C Cl le ea ar ri in ng g Delete the TV channel set with C CL LE E...

Страница 16: ...is incorrect enter the current time with the number keys 0 0 9 9 8 Leave the on screen menu with the M ME EN NU U button 2 Use P P or P P to select the option CLOCK and confirm with O OK K 1 Press the M ME EN NU U button on the remote control The on screen menu appears If the display shows an incorrect time or the time and date must be reset manually 7 Check the settings displayed for year month d...

Страница 17: ...or P P Confirm O OK K Enter 0 0 9 9 or S P and QS Interrupt S ST TA AN ND DB BY Y O ON N m m Abandon M ME EN NU U I In n t th he e e ev ve en nt t o of f a a p po ow we er r c cu ut t Channel data are stored for around 1 year time and timer data remain in the memory of the video recorder for around 3 hours You can check and or change many functions and settings of your video recorder via the main ...

Страница 18: ...lter out picture and sound interference There is nothing wrong with the video recorder P PR RO OB BL LE EM M T TI IP P A Au ut to om ma at ti ic c s sw wi it tc ch h o of ff f Many functions pause still picture search switch themselves off automatically after a short time in order to protect the cassette and to save energy W Wh ha at t d do oe es s V VH HS S m me ea an n The Video Home System VHS ...

Страница 19: ...th a minus sign 8 8 A Af ft te er r i in ns se er rt ti in ng g a a c ca as ss se et tt te e t th he e v vi id de eo o r re ec co or rd de er r s sh ho ow ws s n no o r re em ma ai in ni in ng g p pl la ay yi in ng g t ti im me e 4 4 The set needs a little time to calculate the remaining playing time After a few seconds the display should change from to the corresponding value P PR RO OB BL LE EM ...

Страница 20: ...rw wa ar rd d w wi in nd d R Re ew wi in nd d 3 Interrupt the search wherever you like with the Playback button G 2 Press H rewind or I forward F FO OR R E EX XP PE ER RT TS S S Sw wi it tc ch hi in ng g b be et tw we ee en n r re ew wi in nd d f fo or rw wa ar rd d w wi in nd d a an nd d p pi ic ct tu ur re e s se ea ar rc ch h i in ns st ta an nt t v vi ie ew w When winding the tape backwards or...

Страница 21: ...hese positions can be found again quickly and easily later by pressing a button 1 Press the Index button E and then the Stop button h F Fi in nd di in ng g a a b bl la an nk k p po os si it ti io on n o on n t ta ap pe e a au ut to om ma at ti ic ca al ll ly y 2 The video recorder searches for the next blank part longer than one minute of the tape and automatically switches to pause P PR RO OB BL ...

Страница 22: ... R several times in succession in order to move the picture forward frame by frame F FO OR R E EX XP PE ER RT TS S P Pl la ay y c co om mp pa ac ct t V VH HS S c ca as ss se et tt te es s You can of course also use this video recorder to play back compact VHS cassettes To do this you will need the appropriate cassette adapter Its dimensions match those of a normal VHS cassette The adapter is recog...

Страница 23: ...m the display P PR RO OB BL LE EM M W Wh ha at t i is s t tr ra ac ck ki in ng g Tracking is the name given to the process of optimizing picture and sound playback During this process the speed of the tape is adjusted in such a way that all kinds of interference are removed or in the case of old VHS cassettes minimized T Tr ra ac ck ki in ng g a ad dj ju us st tm me en nt t i is s r re et ta ai in...

Страница 24: ... minute cassette This chapter explains how to set the desired recording speed Selecting the recording speed 1 Switch on theTV set and if necessary select the programme number set for video recorder operation W Wh ha at t i is s e er ra as se e p pr ro ot te ec ct ti io on n VHS cassettes can be protected from over recording by breaking off a thin strip of plastic arrow This erase protection can be...

Страница 25: ...de ev vi ic ce e 4 4 Signals from additional devices such as a camcorder other video recorder PCs etc are received via the scart socket of the video recorder The programme numbers E1 and E2 are allocated for these sources S Se el le ec ct ti in ng g t th he e r re ec co or rd di in ng g s sp pe ee ed d You have the option of two playback and recording speeds Standard Play SP offers the usual first...

Страница 26: ...dard Play or LP Long Play or AUTO Auto Long Play 4 Confirm with O OK K The screen will show the message STORED 5 Stop selection of recording speed with M ME EN NU U P PA AR RD DO ON N S St ta an nd da ar rd d P Pl la ay y L Lo on ng g P Pl la ay y A Au ut to o L Lo on ng g P Pl la ay y Standard Play SP offers the usual first class picture quality By using Long Play LP you can with somewhat reduced...

Страница 27: ...l The on screen menu appears 6 Use P PS S or Q QS S to select the setting ON to activate automatic recording from a satellite receiver or OFF to deactivate it Confirm with O OK K The screen will show the message STORED 4 Use P P or P P to select the option SPECIAL SETTINGS and confirm with O OK K 5 Use P P or P P to select the option SAT RECORDING 7 Programme the data on the satellite receiver for...

Страница 28: ...correctly recognise theVPS signal of a TV channel 8 8 I I g ge et t t th he e e er rr ro or r m me es ss sa ag ge e SELECT PROG NR 4 4 You have entered a correct PlusCode programming number but automatic recognition of the correct TV channel has failed Please enter the programme number under which your video recorder has stored the desired TV channel using the buttons 0 0 9 9 and confirm with O OK...

Страница 29: ...t programmes will be completely recorded even if they are rescheduled In the input box START use S SE EL LE EC CT T to switch recognition of these signals on or off F FO OR R E EX XP PE ER RT TS S S Se el le ec ct ti in ng g t th he e r re ec co or rd di in ng g s sp pe ee ed d You have the option of two playback and recording speeds Standard Play SP offers the usual first class picture quality By...

Страница 30: ...r recording without erase protection E Er rr ro or r m me es ss sa ag ge e A AL LL L T TI IM ME ER RS S O OC CC CU UP PI IE ED D All the available memory locations in your video recorder for timer and VIDEO Plus programming are full Delete a programmed recording see chapter Delete a programmed recording k k a an nd d o or r v v a ar re e f fl la as sh hi in ng g i in n t th he e d di is sp pl la a...

Страница 31: ...n manually deleted Your video recorder can store up to six timer programmings 4 Use S S P P or Q QS S to select the input field DATE and enter the date of your desired recording P PA AR RD DO ON N F FO OR R E EX XP PE ER RT TS S 5 Use S S P P or Q QS S to select the input field PROG and enter the programme number under which the video recorder has stored the desired TV channel F FO OR R E EX XP PE...

Страница 32: ...tected from over recording by breaking off a thin strip of plastic arrow This erase protection can be overridden by sticking one or more strips of adhesive tape tightly over the gap which has been created F FO OR R E EX XP PE ER RT TS S S Se el le ec ct ti in ng g t th he e r re ec co or rd di in ng g s sp pe ee ed d You have the option of two playback and recording speeds Standard Play SP offers ...

Страница 33: ...utton Press S ST TA AN ND DB BY Y O ON N m m in order to make the programmed recording Warning if you do not do this the video recorder will not record C Ca as ss se et tt te e i is s e ej je ec ct te ed d a af ft te er r p pr ro og gr ra am mm mi in ng g A cassette with erase protection was inserted Please deactivate the erase protection or insert another cassette which is ready for recording C C...

Страница 34: ...d PDC signals Programme Delivery Control are transmitted by TV channels at the start and end of transmissions and ensure that programmes will be completely recorded even if they are rescheduled Use S SE EL LE EC CT T to switch recognition of these signals on VPS PDC appears in the display or off 3 Confirm with the T TU UR RB BO O T TI IM ME ER R button 4 The display shows a suggestion for the end ...

Страница 35: ...med but there is no cassette in the machine Insert a cassette ready for recording without erase protection C Ca as ss se et tt te e i is s e ej je ec ct te ed d a af ft te er r p pr ro og gr ra am mm mi in ng g A cassette with erase protection was inserted Please deactivate the erase protection or insert another cassette which is ready for recording C Ca as ss se et tt te e i is s e ej je ec ct te...

Страница 36: ...e Standby button m m 1 Press the T TI IM ME ER R button k k on the remote control t tw wi ic ce e 2 Use the buttons P P or P P to select the memory location in the display which you want to check change delete W Wh ha at t i is s a a m me em mo or ry y l lo oc ca at ti io on n For technical reasons your video recorder has access to a limited number of drawers in which you can store your programmin...

Страница 37: ...l of course be recorded 2 To deactivate the child lock press the C CH HI IL LD D L LO OC CK K button u for a few seconds until u disappears 1 Press the C CH HI IL LD D L LO OC CK K u button for a few seconds until the display shows u The child lock is now activated Switch off the video recorder with the Standby button m m on the remote control The set can now only be switched on with the remote co...

Страница 38: ...etting ON continuous playback or OFF no continuous playback and confirm with O OK K The screen will show the message STORED 3 Use P P or P P to select the option REPEAT PLAY 7 Press the Playback button C C to start the playback or continuous playback depending on the setting 5 Complete the adjustment of continuous playback with the M ME EN NU U button 6 Insert a cassette without erase protection P...

Страница 39: ... playback perform the steps 1 3 again and select AUTO P PA AR RD DO ON N T TV V s sy ys st te em ms s Other countries other TV systems In central Europe transmissions are broadcast in the PAL System Phase Alternation Line Standard while in France SECAM Séquentiel à mémoire is used In some countries USA and Japan TV viewers receive their programmes as an NTSC signal National Television System Commi...

Страница 40: ...g ON OSD information on or OFF OSD information off and confirm with O OK K 3 Use P P or P P to select the option OSD 5 Complete the adjustment of the OSD information with the M ME EN NU U button SPECIAL SETTINGS OSD ON CLOCK DISPLAY OFF COUNTER QT LEFTP SAT RECORDING OFF REPEAT PLAY OFF OK MAIN MENU CLOCK AUTO INSTALL MANUAL SEARCH TV CHANNEL ALLOC RECORD SPEED AUTO STANDBY TV SYSTEM SPECIAL SETTI...

Страница 41: ...a ak ke e d du ub bb bi in ng g a au ud di ib bl le e When dubbing video recordings the mono track is recorded with a new sound signal The original stereo signal is retained To make dubbing audible you must select the MIX or MONO sound channel setting 1 Press the M ME EN NU U button on the remote control The on screen menu appears 2 Use P P or P P to select the option SPECIAL SETTINGS and confirm ...

Страница 42: ...ch these signals are transmitted 1 Switch the video recorder on and make sure there is no cassette in the video recorder 3 The video recorder will now transmit a test image on this frequency 2 Press at the same time the S ST TO OP P button h h on the remote control and the S ST TO OP P E EJ JE EC CT T button J J on the front of the video recorder until the modulator frequency of the set appears in...

Страница 43: ...or r If you have connected the video recorder to theTV set with a scart cable you can switch off the modulator when there is interference with the picture or sound see below 1 Switch the video recorder on and make sure there is no cassette in the video recorder 3 The video recorder will now transmit a test image on this frequency 2 Press at the same time the S ST TO OP P button h h on the remote c...

Страница 44: ...ted to video operation 4 4 Check that theTV channel number allocated to video operation is correct 4 4 Cable connection loose missing Check the connections N No o r re ec co or rd di in ng g p po os ss si ib bl le e 4 4TV channel not stored or wrongly selected 4 4 Cassette with erase protection inserted PROBLEM POSSIBLE CAUSE SOLUTION P Pr ro og gr ra am mm me ed d r re ec co or rd di in ng g n no...

Страница 45: ...ENGLISH NOTES 45 45 N No ot te es s ...

Страница 46: ...NOTES ENGLISH 46 46 N No ot te es s ...

Страница 47: ... picture search I ä In Stop or Standby mode Forward wind tape ä During playback Forward picture search PLAY K ä Play back recorded cassette V Vi id de eo o r re ec co or rd de er r d di is sp pl la ay y 7 6 5 Current operating mode Long Play Child lock activated No function Timer Enter date Timer Enter start time Timer Enter programme Timer Enter finish time VPS PDC signal detected Tape position i...

Страница 48: ...3103 166 25231 0095 ω VR 510 07 ENGLISH ...

Отзывы: