M
AINTENANCE
P
ROCEDURES
: D
ISPLAY
PCB A
SSEMBLY
R
EPLACEMENT
0 2 . 9 6 7 8 . 0 0 1 0 G
55
2
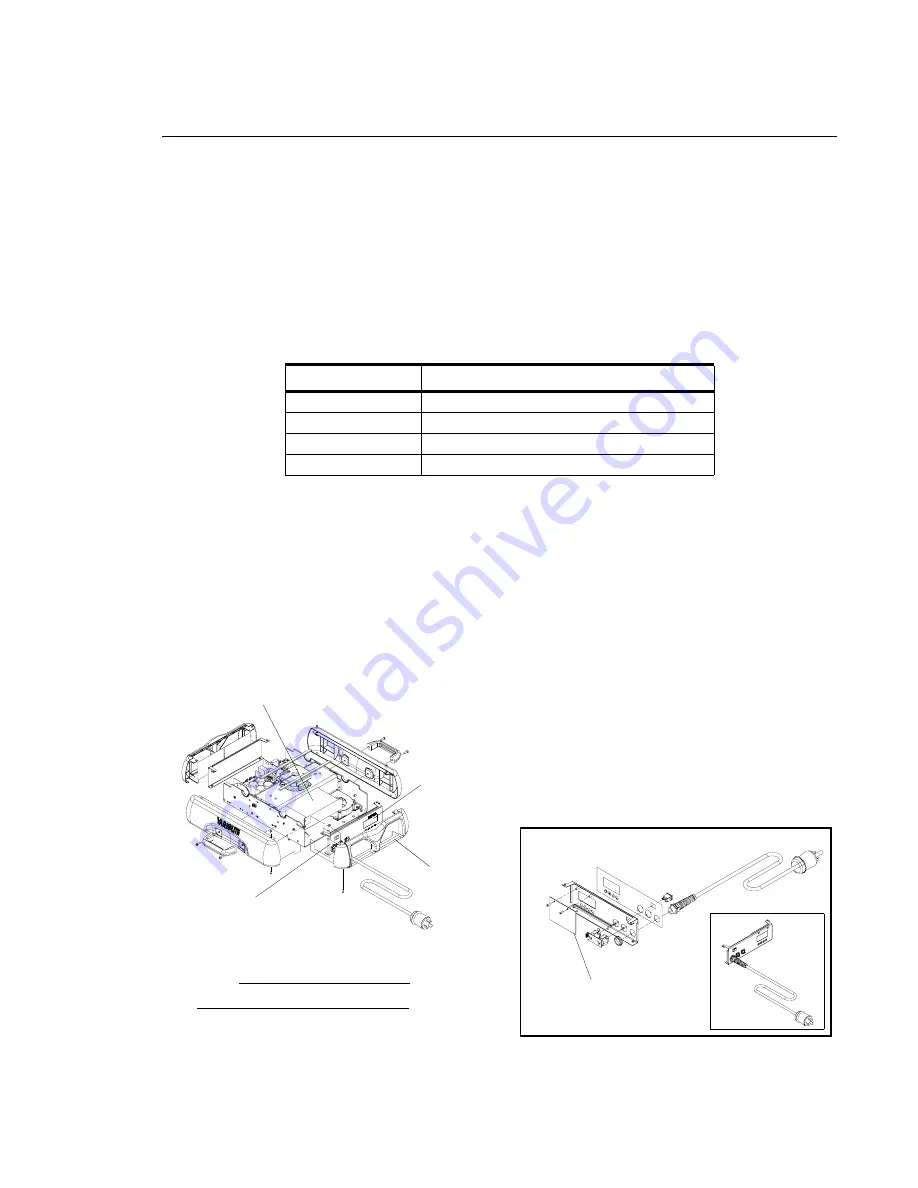
Display PCB Assembly Replacement
VL Part No: 24.9678.3825
Repair/Replacement Procedure
Step
1. Disconnect luminaire AC input cable from power source.
Step
2. At enclosure, remove two 6-32x1/4" LG PPZ screws from display side cover and remove
cover.
Step
3. At power supply, disconnect wiring:
Step
4. Remove one 6-32x3/8" LG PPZ screw.
Step
5. Loosen two 6-32x3/8" LG PPZ screws and slide LVS towards upper enclosure fan to
remove.
Step
6. At Display PCB, remove two 6-32x3/8" PPZ screws, remove Display stiffener bracket and
lift PCB out of slot on bottom of chassis.
Step
7. Carefully disconnect wiring from PCB.
Step
8. Replace by performing steps 2 through 7 in reverse order.
Figure 2-21: VL3000 Display PCB Assembly Replacement
Location
Connector
N
White AC Wires
L
Black AC Wires
V +
Red DC Wires
V -
Black DC Wires
Display
Display
Display PCB
Display Panel
Display Panel Assembly
LVS Power Supply
Some components not shown for clarity.
NOTE:
Assembly
Cover
Содержание VL3000
Страница 1: ......
Страница 13: ...FOREWORD 02 9678 0010 G xi ...
Страница 14: ...VARI LITE VL3000 VL3000 Q SERVICE MANUAL xii 02 9678 0010 G ...
Страница 74: ...VARI LITE VL3000 VL3000 Q SERVICE MANUAL 56 02 9678 0010 G Notes ...
Страница 158: ...VARI LITE VL3000 VL3000 Q SERVICE MANUAL 140 02 9678 0010 G Notes ...
Страница 164: ...VARI LITE VL3000 VL3000 Q SERVICE MANUAL 146 02 9678 0010 G Notes ...
Страница 216: ...VARI LITE VL3000 VL3000 Q SERVICE MANUAL 198 02 9678 0010 G Notes ...
Страница 217: ......


