background image

13

optimum frequency channel for transmission. 

However, if you still experience interference, 

you have the additional option to manually 

change the channel between 5 available 

options. Press 

CHANNEL

 on the remote 

control for 3 seconds to adjust to a channel 

with minimal interference.

Change to a different wireless channel

1

  Press 

CHANNEL

 on the remote control 

for 3 seconds to enter the RF channel 

adjustment mode.

All source LEDs flash 3 times to show 


»

the current RF channel.

2

  Press 

CHANNEL

 on the remote control 

again to change to the next RF channel.

One or more source LED shows the 


»

current switched RF channel.
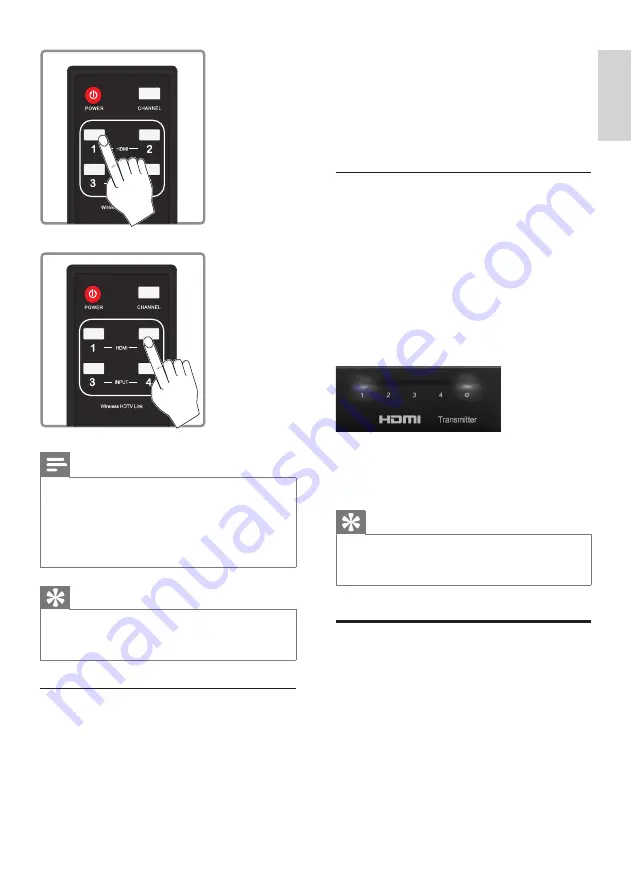
  

3

  Leave the remote control idle for 10 

seconds to exit the RF adjustment mode.

The current source LED displays.


»

Tip

For more information about the switching 


patterns of the LED indicators, see the section 

on “Troubleshooting”.

Enter the standby mode

You can choose between 2 standby modes 

on the transmitter: the listen mode and sleep 

mode. 

If your HDTV and HD devices are CEC 

compliant: 

(see the user manual of your HDTV and HD 

devices for more information)


Note

It takes longer time to switch from the 


HDMI/component connection to the HDMI 

connection (around 10 seconds) than from 

the component connection to the HDMI/

component connection to the component 

connection.

Tip

For more information on the LED indicator 


status, see the section on “LED indicator 

status of the transmitter”.

How to avoid interference

Other devices, like cordless phone, Wireless 

Access points use a similar frequency band as 

the SWW1800. When they are positioned 

in neighborhood of the SWW1800, it is 

possible to experience no or noisy picture 

or diminished sound quality. At startup, the 

SWW1800 automatically searches for an 

English

EN

Содержание SWW1800/12

Страница 1: ...Register your product and get support at www philips com welcome SWW1800 12 EN User manual ...

Страница 2: ......

Страница 3: ... 9 Install remote control batteries 10 4 Activate the SWW1800 function and set up the link 11 Turn on the power of your HDTV 11 LED indicator status of the receiver 11 Activate the wireless link 11 Enter the standby mode 13 5 Position the transmitter and receiver 15 6 Wallmount the receiver 16 7 Technical data 17 Supported resolution 17 Product specifications 17 8 Troubleshooting 19 9 Glossary 21 ...

Страница 4: ...e fallen into the apparatus the apparatus has been exposed to rain or moisture does not operate normally or has been dropped n Battery usage CAUTION To prevent battery leakage which may result in bodily injury property damage or damage to the unit Install all batteries correctly and as marked on the unit 1 Important Safety Know these safety symbols This bolt of lightning indicates uninsulated mate...

Страница 5: ...cal rules on separate collection of batteries because correct disposal helps to prevent negative Do not mix batteries old and new or carbon and alkaline etc Remove batteries when the unit is not used for a long time o Apparatus shall not be exposed to dripping or splashing p Do not place any sources of danger on the apparatus e g liquid filled objects lighted candles q This product may contain lea...

Страница 6: ...ntains batteries covered by the European Directive 2006 66 EC which cannot be disposed of with normal household waste Please inform yourself about the local rules on separate collection of batteries The correct disposal of batteries helps prevent potentially negative consequences on the environment and human health Battery disposal information Batteries contain substances that may pollute the envi...

Страница 7: ...ase and welcome to Philips To fully benefit from the support that Philips offers register your product at www philips com welcome What is in the box Note Make sure you have all these items in the box Contact your dealer for any missing or damaged items Transmitter Receiver Remote control Transmitter SOURCE 1 SOURCE 2 SOURCE 3 SOURCE 4 1 2 3 4 Receiver E n g l i s h EN ...

Страница 8: ...e satellite cable ADSL set top box blu ray DVD player and game console Note The transmitter can support two devices running on HDMI cable and another two running on YPbPr component video signals at the same time Connect the receiver to your HDTV set Control the transmitter with the remote control DC IN HDMI OUT 2 1 Front view Power indicator 1 2 3 4 Source indicators Top view Power button with LED...

Страница 9: ...ed to the DC IN connector of the receiver Connect the other end of the power adaptor to a power socket DC IN 5V HDMI OUT HDMI OUT 1 2 3 Installation Connect the transmitter to your HD devices You can connect 4 video sources to the transmitter at the same time two with the HDMI connection and two with the component connection but only one source can be selected and played 1 Connect video source to ...

Страница 10: ... batteries in fire Risk of decreased battery life Never mix different brands or types of batteries Risk of product damage When the remote control is not used for long periods remove the batteries 1 Open the battery compartment 2 Insert two AAA batteries with correct polarity as indicated 3 Close the battery compartment EN ...

Страница 11: ...ction on Enter the standby mode Activate the wireless link Switch on the transmitter Press on the remote control or transmitter in standby mode to turn it on 4 Activate the SWW1800 function and set up the link Turn on the power of your HDTV 1 Go to the source menu under the settings menu of your HDTV 2 Select the HDMI input to which the receiver is connected Note You cannot control the receiver wi...

Страница 12: ...deo format NoModeSupport Fail to find the video source device NO SIGNAL Select the source on the transmitter Press the source buttons 1 HDMI 2 HDMI 3 INPUT 4 INPUT on the remote control or transmitter until you see the available video from your device Note In standby mode a red power LED displays on the transmitter Depending on equipment and the input selected between input selection start up and ...

Страница 13: ...e switching patterns of the LED indicators see the section on Troubleshooting Enter the standby mode You can choose between 2 standby modes on the transmitter the listen mode and sleep mode If your HDTV and HD devices are CEC compliant see the user manual of your HDTV and HD devices for more information Note It takes longer time to switch from the HDMI component connection to the HDMI connection a...

Страница 14: ...lid purple Note The power consumption in the listen mode is higher than the power consumption in the sleep mode If you need to switch your transmitter from listen mode to sleep mode for power saving Press and hold on the remote control of the transmitter The HDTV projector enters the sleep mode The LED indicators of the transmitter and receiver become solid red If your HDTV and HD device are not C...

Страница 15: ...by its environment and the obstruction between the transmitter and receiver If you use a 5 GHz WLAN or cordless phone it is possible to have interferences Press CHANNEL on the remote control to adjust the channel Tip For more information see the section on How to avoid interference In the interest of optimum transmission do not place the transmitter of receiver in a metal enclosure or place a larg...

Страница 16: ...hoose a spot near the TV 2 Drill two holes in the wall Ensure the distance between the two holes is 4 5mm 3 Punch the supplied plastic wall anchors into the two holes on the wall 4 Put the two screws into the plastic wall anchors and leave 3 2mm to mount the receiver on 5 Hook the receiver on the wall EN ...

Страница 17: ...frequencies 5 16 5 24GHz Power supply Input AC 100 240V 0 4A 50 60Hz Output DC5V 3A 15W Operating temperature 0 40 C Regulations CE 7 Technical data Supported resolution Video resolution and frequency HDMI in Component in 480i 720 1440 x480i 59 94Hz 480i 720 1440 x480i 60Hz 480p 640x480p 59 94 60Hz 480p 720x480p 59 94Hz 480p 720x480p 60Hz 576i 720 1440 x576i 50Hz 576p 720x576p 50Hz 720p 1280x720p ...

Страница 18: ...o Tone Blue Red Source LED Dimensions 180 W x 140 L x 39 H mm Transmitter interfaces A V interfaces YPbPr input Two sets of RCA connectors Analog audio L R input Two sets of RCA connectors HDMI input Two Type A HDMI output Control signal interfaces IR sensor Power interface Power input 5V DC jack Switches Front power switch Yes One tack switch Source selection switch Yes Four tack switch LEDs Stat...

Страница 19: ...e the wireless channel manually Tip For more information check the section on Change to a different wireless channel 8 Troubleshooting There is no video displayed on my TV screen Verify the POWER LED and SOURCE LED indicator on the transmitter Flashing blue power LED Ensure the transmission range between receiver and transmitter is not over 20m or 66ft transmission distance with no obstruction bet...

Страница 20: ...volume control is adjusted correctly Ensure the TV volume is not set to minimum or the sound is not muted Ensure the audio cables of the transmitter are connected correctly Ensure the Audio format is recognized supported Tip For more information check the section on Product specification When I press on the HD device the HDTV does not switch the input channels Check if your HDTV and HD device are ...

Страница 21: ...components of the signal are maintained separately The YPbPr signals are derived from the red green and blue RGB colors captured by a scanner or digital camera and RGB is converted into brightness and two color difference signals for TV video 9 Glossary A ADSL Asymmetric Digital Subscriber Line It is a data communications technology that enables faster data transmission over high speed broadband n...

Страница 22: ...0682 Printed in Taiwan 2009 Koninklijke Philips Electronics N V All rights reserved SWW1800_12_UM_EN_V3 0 ...

Отзывы: