background image

32

EN

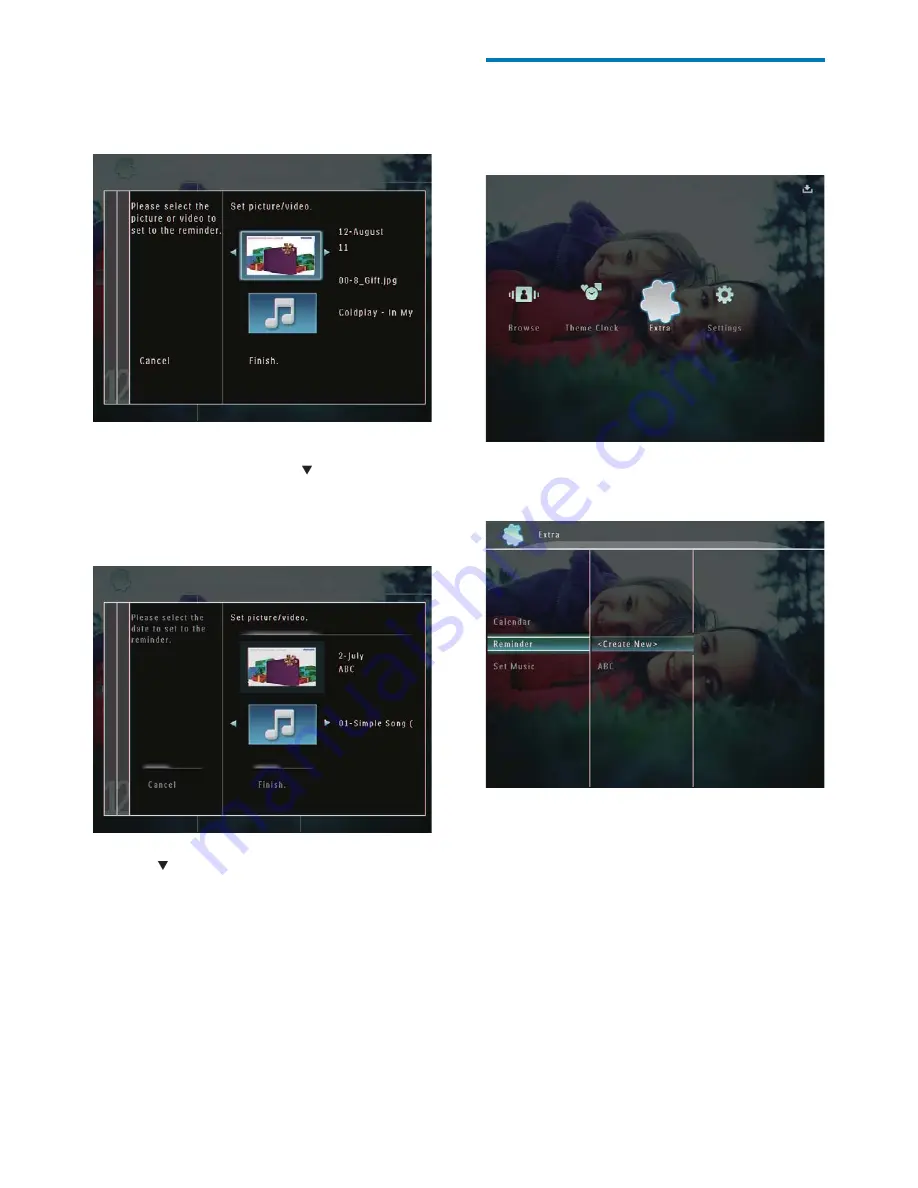
Edit a reminder

1

  In the home screen, select  

[Extra]

 and 

then tap

OK

 to confi rm.

2

 Select 


[Reminder]

, and then tap  

OK

 to 

confi rm.

8

  Select a photo or video fi le, and then tap 

OK

 to confi rm.

A preview message is displayed.

»

To select background music for the 

»

reminder photo, tap    to select 
the music icon and then tap  

OK

 to 

confi rm. Select a music fi le, and then 
tap

OK

 to confi rm.

9

 Tap 

  to select

[Finish]

, and then tap  

OK

to confi rm.

Содержание SPH8008

Страница 1: ...Register your product and get support at SPH8008 SPH8208 PhotoFrame EN User manual ...

Страница 2: ...onformity with the following standards EN301 489 1 V1 8 1 2008 04 EN301 489 17 V1 3 2 2008 04 EN300 328 V1 7 1 2006 10 EN55022 2006 A1 2007 EN61000 3 2 2006 EN61000 3 3 1995 A1 2001 A2 2005 EN61000 4 2 2001 EN61000 4 3 2006 EN61000 4 4 2004 EN61000 4 5 2006 EN61000 4 6 2007 EN61000 4 11 2004 IEC 60950 1 2005 EN62311 2008 title and or number and date of issue of the standards following the provisio...

Страница 3: ...photo video file to the Favorites album 21 Copy a photo video file 22 Move a photo video file 22 Delete a photo video file 23 Rotate a photo 23 Select a photo effect 24 Group photos by name date 25 Select several photos at a time 25 Remove photos video or music files from the Favorites album 26 Manage an album 26 Create an album 27 Rename an album 28 6 Show date time in slideshow 29 7 Create a reminder...

Страница 4: ...ns 53 13 Appendix 54 Send photos via Bluetooth connection by your mobile phone 54 14 Glossary 55 Need help Please visit www philips com welcome where you can access a full set of supporting materials such as user manual the latest software updates and answers to frequently asked questions ...

Страница 5: ...nts are user serviceable Do not open or remove covers to the inside of the product Repairs may only be done by Philips Service Centres and official repair shops Failure to do so shall void any warranty stated or implied Any operation expressly prohibited in this manual any adjustments or assembly procedures not recommended or authorised in this manual shall void the warranty The making of unauthori...

Страница 6: ...ake back initiatives and recycling programs whenever possible preferably in cooperation with competitors There is currently a system of recycling up and running in the European countries such asThe Netherlands Belgium Norway Sweden and Denmark In U S A Philips Consumer Lifestyle North America has contributed funds for the Electronic Industries Alliance EIA Electronics Recycling Project and state r...

Страница 7: ...t in battery a b c d North Europe Information Nordic Countries VARNING FÖRSÄKRA DIG OM ATT HUVUDBRYTARE OCH UTTAG ÄR LÄTÅTKOMLIGA NÄR DU STÄLLER DIN UTRUSTNING PÅPLATS Placering Ventilation ADVARSEL SØRGVED PLACERINGEN FOR AT NETLEDNINGENS STIK OG STIKKONTAKT ER NEMTTILGÆNGELIGE Paikka Ilmankierto VAROITUS SIJOITA LAITE SITEN ETTÄVERKKOJOHTO VOIDAANTARVITTAESSA HELPOSTI IRROTTAA PISTORASIASTA Plas...

Страница 8: ... may be used to endorse or promote products derived from this software without specific prior written permission THIS SOFTWARE IS PROVIDED BY THE COPYRIGHT HOLDERS AND CONTRIBUTORS AS IS AND ANY EXPRESS OR IMPLIED WARRANTIES INCLUDING BUT NOT LIMITEDTO THE IMPLIED WARRANTIES OF MERCHANTABILITY AND FITNESS FOR A PARTICULAR PURPOSE ARE DISCLAIMED IN NO EVENT SHALLTHE COPYRIGHT OWNER OR CONTRIBUTORS B...

Страница 9: ... MPEG 1 MPEG 4 or H 263 format MP3 music as background Theme clock You can use Philips PhotoFrame Manager an application software on a PC to transfer photos or video music files from a PC to the PhotoFrame easily by drag and drop For details refer to the User Manual of Philips PhotoFrame Manager in the supplied CD ROM With Bluetooth connectivity available on the PhotoFrame you can set up wireless c...

Страница 10: ...8 EN CD ROM including Digital User Manual Philips PhotoFrame Manager Software and User Manual Quick Start Guide 1 2 3 Quick start guide Get started Play Setup Eng PhotoFrame ...

Страница 11: ... USB cable to PC b Slot for a USB flash drive c SD MMC xD MS MS Pro Duo Slot for an SD MMC xD MS MS Pro Duo card d Turn on off the PhotoFrame e Speakers f Dock connector Connect the charging dock g h f e e d a b c g RESET Restore the system h Kensington lock ...

Страница 12: ...an image Switch modes Album mode thumbnail mode slideshow mode zoom out 2 times zoom out 4 times a b c d e f d Up down slider Scroll up down at high speed Select the upper item Increase the volume Select the item below Decrease the volume e OK Display slideshow Play Pause slideshow video Confirm a selection f Left right slider Scroll left right at high speed Select the left item Select the right it...

Страница 13: ...product it will be damaged Note For the first time use of your PhotoFrame charge the built in battery Approximate time for charging the built in battery Set on 5 hours Set off 2 5 hours Standby mode 3 hours 1 Connect the supplied power cord to the supplied charging dock fix the cord to the cord channel and then connect the power cord to a power supply socket 2 Connect the PhotoFrame to the charging ...

Страница 14: ...nd the PhotoFrame status as follows Icon Status Battery level 0 19 Battery level 20 39 Battery level 40 59 Battery level 60 79 Battery level 80 100 PhotoFrame in dock AC powered not under charge PhotoFrame under charge To turn off the PhotoFrame press and hold for about 2 seconds Transfer photos or video music files Transfer by Philips PhotoFrame Manager recommended way Caution Do not disconnect th...

Страница 15: ...Tip If Philips PhotoFrame Manager does not start automatically you can double click its icon on the desktop of your PC to start it You can also transfer photos or video music files from the PhotoFrame to a PC Actual transfer speed may vary based on the operating system and software configuration of a PC Transfer by storage device Caution Do not remove a storage device from the PhotoFrame when files a...

Страница 16: ...ntee the operations for all types of memory card media 1 Open the cover on the right rear of the PhotoFrame 2 Insert a storage device into the PhotoFrame firmly An option menu is displayed 3 Select Transfer and then tap OK to confirm A confirmation message is displayed ...

Страница 17: ... the PhotoFrame To select specific photos or video music files 1 Select No and then tap OK to confirm 2 Select a folder and then tap and OK to select deselect photos or video music files 3 Tap to continue the transfer operation 4 Select a destination album on the PhotoFrame and then tap OK to confirm Files are transferred to the PhotoFrame To remove a storage device pull it out from the PhotoFrame ...

Страница 18: ...sic files available photos are played with background music by default During photo slideshow To zoom in an image tap To zoom out an image which is zoomed in tap To select the previous next photo tap To pause tap OK To resume tap OK again To view photos video files in thumbnail mode tap To view photos video files in album mode tap twice To view photos in filmstrip mode fast swipe the left right slider...

Страница 19: ...ow mode Play video Note The PhotoFrame plays most video clips of a digital still camera in M JPEG avi mov MPEG 1 mpg MPEG 4 avi mov mp4 H 263 avi mov format Some video clips might have compatibility issues when played on your PhotoFrame Before playing ensure that these video clips are compatible with your PhotoFrame Some video clips in a format which is not compatible well with your PhotoFrame lik...

Страница 20: ... fast swipe the left right slider from left to right 1 time 2X fast forward 2 times 4X fast forward 3 times normal speed During fast forward tap OK to resume normal play During play you can also manage the video file 1 During play tap An option menu is displayed 2 Select an option and then tap OK to confirm Repeat Play Loop Play in a loop Play Once Play once Viewing Format Full Screen Play in full s...

Страница 21: ...y all music files in the folder tap OK to confirm To play a single music file tap to access the folder select a music file and then tap OK to confirm If you have set music before In Play Background Music menu select Turn On and then tapOKto confirm Selected music files are played To stop music play In Play Background Music menu select Turn Off and then tap OK to confirm ...

Страница 22: ...creen select Theme Clock and then tap OK to confirm 2 Select Show Current and then tap OK to confirm To select and install another theme clock Note You can download a theme clock and save it in an SD card before you install it 1 In Theme Clock menu select Select Other and then tap OK to confirm 2 Select a theme clock and then tap OK to confirm After the theme clock is installed it is displayed automat...

Страница 23: ...owse and then tap OK to confirm Photos video files are displayed in album mode 2 Select an album and then tap to access the album 3 Tap to browse photos video files in the album Tip If you select an album and then tap OK photos video files in the selected album are displayed in slideshow Add a photo video file to the Favorites album 1 In album mode select a photo and then tap An option menu is displaye...

Страница 24: ...album mode select a photo and then tap An option menu is displayed 2 Select Copy and then tap OK to confirm 3 Select a storage device and a destination album and then tap OK to confirm Move a photo video file 1 In album mode select a photo and then tap An option menu is displayed ...

Страница 25: ...confirm Delete a photo video file 1 In album mode select a photo and then tap An option menu is displayed 2 Select Delete and then tap OK to confirm A confirmation message is displayed 3 Select Yes and then tap OK to confirm Rotate a photo 1 In album mode select a photo and then tap An option menu is displayed ...

Страница 26: ...onfirm 3 Tap to select an option and then tap OK to confirm Select a photo effect 1 In album mode select a photo and then tap An option menu is displayed 2 Select Photo Style and then tap OK to confirm 3 Select an effect and then tap OK to confirm ...

Страница 27: ... displayed alphabetically in an ascending order from top left to bottom right If you group photos by time photos are displayed chronologically in a descending order from top left to bottom right from the recent to the previous Select several photos at a time 1 In album mode select a photo and then tap An option menu is displayed 2 Select Select Multiple and then tap OK to confirm 3 Tap and OK to se...

Страница 28: ... Select Yes and then tap OK to confirm Manage an album 1 In the home screen select Browse and then tap OK to confirm Remove photos video or music files from the Favorites album 1 In the album mode select the Favorites album and them tap to confirm 2 Select photos files to be removed and then tap An option menu is displayed ...

Страница 29: ...n tap OK to confirm A keypad is displayed 2 To enter the name up to 24 characters select an alphabet number and then tap OK to confirm To switch between uppercase and lowercase select a A on the displayed keypad and then tap OK to confirm Photos are displayed in album mode 2 Select an album and then tap An option menu is displayed If the Favorites album is selected a different option menu is displaye...

Страница 30: ... Enter and then tap OK to confirm Rename an album Note Ensure that albums are grouped by name 1 In the option menu select Rename and then tap OK to confirm A keypad is displayed 2 To enter the name up to 24 characters select an alphabet number and then tap OK to confirm To switch between uppercase and lowercase select a A on the displayed keypad and then tap OK to confirm ...

Страница 31: ... glis h Month Week Clock 6 Show date time in slideshow 1 In the home screen select Extra and then tap OK to confirm 2 Select Calendar and then tap OK to confirm 3 Select Month Week Clock and then tap OK to confirm ...

Страница 32: ...30 EN To play slideshow without date time shown select Off and then tap OK to confirm In calendar mode You can tap to access the option menu to manage the photo displayed ...

Страница 33: ...switch between uppercase and lowercase select a A on the displayed keypad and then tap OK to confirm 6 When the name is complete select Enter and then tap OK to confirm A preview message is displayed 7 Tap OK to confirm Photos video files are displayed in thumbnail mode 7 Create a reminder Note Ensure that you set time and date correctly on the PhotoFrame 1 In the home screen select Extra and then tap...

Страница 34: ...hen tap OK to confirm 8 Select a photo or video file and then tap OK to confirm A preview message is displayed To select background music for the reminder photo tap to select the music icon and then tap OK to confirm Select a music file and then tap OK to confirm 9 Tap to select Finish and then tap OK to confirm ...

Страница 35: ...EN 33 E n g lish 3 Select a reminder and then tap to confirm An option menu is displayed 4 Select an option to go on ...

Страница 36: ...ckground You can select a background border color for photos that are smaller than the PhotoFrame display 1 In the home screen select Settings and then tap OK to confirm 8 Slideshow setting Select a transition effect 1 In the home screen select Settings and then tap OK to confirm 2 Select Slideshow and then tap OK to confirm ...

Страница 37: ...ith picture distortion 2 Select Slideshow and then tap OK to confirm 3 Select Background Color and then tap OK to confirm 4 Select RadiantColor a background colour Auto Fit and then tap OK to confirm If you select RadiantColor the PhotoFrame extends the color on the edges of a photo that is smaller than the full screen to fill the screen without black bars or aspect ratio distortion ...

Страница 38: ...how display You can select type of file to be displayed in slideshow mode 1 In the home screen select Settings and then tap OK to confirm 2 Select Slideshow and then tap OK to confirm 3 Select File Type and then tap OK to confirm 4 To display photos and videos in slideshow mode select Photo Video and then tap OK to confirm ...

Страница 39: ...rm To stop collage display select Settings Slideshow Collage Single and then tap OK to confirm Display collage photos 1 In the home screen select Settings and then tap OK to confirm 2 Select Slideshow and then tap OK to confirm 3 Select Collage and then tap OK to confirm ...

Страница 40: ...est view 1 In the home screen select Settings and then tap OK to confirm 9 Other settings Use the quick menu In the quick menu you can access directly to some most frequently used settings 1 In the home screen press The quick menu is displayed 2 Select an option and then tap OK to confirm Select an on screen language 1 In the home screen select Settings and then tap OK to confirm ...

Страница 41: ...ct Settings and then tap OK to confirm 2 Select Time and Date and then tap OK to confirm 2 Select Brightness and then tap OK to confirm 3 In the Brightness menu select Manual Adjust and then tap OK to confirm 4 Tap to adjust brightness and then tap OK to confirm ...

Страница 42: ...hotoFrame to turn on or off the display automatically When the display automatically turns off your PhotoFrame goes to standby sleep mode Note Ensure that your PhotoFrame is turned on Ensure that the current time of the PhotoFrame is set correctly 3 Select Set Time Set Date and then tap OK to confirm 4 Tap to adjust minute hour day month year and then tap OK to confirm Set time date format 1 In the ...

Страница 43: ...can press to wake up the PhotoFrame When your PhotoFrame is powered by built in battery After long time without operation the backlight brightness of the display lowers and then the whole set goes to standby mode 1 In the home screen select Settings and then tap OK to confirm 2 Select Smart Power and then tap OK to confirm 3 Select Timer and then tap 4 Select Set on Timer Set off Timer and then tap ...

Страница 44: ...ntation and then tap OK to confirm 3 Select On and then tap OK to confirm Hibernate your PhotoFrame 1 In the home screen select Settings and then tap OK to confirm 2 Select Hibernate and then tap OK to confirm 3 Select an option and then tap OK to confirm To disable hibernate function select Never and then tap OK to confirm After the selected period your PhotoFrame hibernates To get your PhotoFrame out ...

Страница 45: ...ge device from accidental deletes you can disable the delete function on a storage device 1 In the home screen select Settings and then tap OK to confirm 2 Select Memory card and then tap OK to confirm Turn on off button sound 1 In the home screen select Settings and then tap OK to confirm 2 Select Set Beep and then tap OK to confirm 3 Select On Off and then tap OK to confirm ...

Страница 46: ...n and then tap OK to confirm The demo function is activated 3 Select Delete Enable Delete Disable and then tap OK to confirm Set Demo Note The demo function is only effective during photo slideshow 1 In the home screen select Settings and then tap OK to confirm ...

Страница 47: ... are saved in the Bluetooth album You can access or manage the Bluetooth album the same way you access or manage other albums on the PhotoFrame Set up Bluetooth connection With your PhotoFrame you can set up Bluetooth connection with a device like a mobile phone Once a device is recognized it is automatically accepted when it tries to connect with the PhotoFrame 1 In the home screen select Setting...

Страница 48: ... pin code is complete 7 Select Enter and then tap OK to confirm Set Bluetooth pin code To keep security you can set a pin code from 1 to 16 digits on the PhotoFrame The default pin code is 0000 1 In the home screen select Settings and then tap OK to confirm 2 Select Bluetooth and then tap OK to confirm 3 Select Security and then tap OK to confirm ...

Страница 49: ...nd then tap OK to confirm 2 Select Info and then tap OK to confirm 8 To set the pin code on select Pin Code On and then tap OK to confirm To set the pin code off select Pin Code Off and then tap OK to confirm View information of the PhotoFrame You can find the friendly name the memory status and the firmware version of the PhotoFrame 1 In the home screen select Settings and then tap OK to confirm ...

Страница 50: ...to confirm A confirmation message is displayed 3 Select Friendly Name and then tap OK to confirm A key pad is displayed 4 To enter the name up to 24 characters select an alphabet number and then tap OK to confirm To switch between uppercase and lowercase select a A on the displayed keypad and then tap OK to confirm 5 When the name is complete select Enter and then tap OK to confirm ...

Страница 51: ...EN 49 E n g lish 4 Select Yes and then tap OK to confirm All settings on the PhotoFrame are set to factory default ...

Страница 52: ...otoFrame The earlier software is unavailable online 1 Visit www philips com support 2 Search for your PhotoFrame and go to the software section 3 Download the latest software onto the root directory of an SD card 4 Insert the SD card into the PhotoFrame 5 Turn on the PhotoFrame A confirmation message is displayed 6 Select Yes and then tap OK to confirm When the update is complete the PhotoFrame rebo...

Страница 53: ... cable to PC Charging dock Quick start guide CD ROM including User Manual Philips PhotoFrame Manager 11 Product information Note Product information is subject to change without prior notice Picture Display Viewing angle C R 10 130 H 110 V Lifetime to 50 brightness 20000 hr Aspect ratio 4 3 Panel resolution 800 x 600 Brightness typical 220 cd m Contrast ratio typical 300 1 Photo format support JPE...

Страница 54: ...ite Sepia Slideshow setting Transition Effect Background Color FileType Collage multiple pictures Screen background Black White Gray Auto fit Radiant color Setup function Brightness adjustment Language Status Event reminder Beep on off Set time and date Clock display enable disable Auto on off Slideshow System status Firmware version Remaining memory Plug Play Compatibility WindowsVista Windows XP ...

Страница 55: ...y asked questions Is the LCD screen touch enabled The LCD screen is not touch enabled After you turn on the PhotoFrame you can use the touch boarder on the front panel to control the PhotoFrame Can I use the PhotoFrame to delete photos on a memory card Yes it supports operations to delete photos on external devices such as a memory card Ensure that you enable the delete function on a memory card a...

Страница 56: ...peration procedure may vary based on different mobile phones On your mobile phone 1 Select photos to be sent to the PhotoFrame 2 Select Send Bluetooth and then confirm the selection Your Philips PhotoFrame is searched 3 If a pin code is required enter the pin code 0000 by default of the PhotoFrame 4 Select Send and then confirm the selection Selected photos are sent to and saved in the Bluetooth alb...

Страница 57: ...erts Group 1 or MPEG 1 Audio Layer 3 With the MP3 format one CD R or CD RW can contain about 10 times more data than a regular CD 14 Glossary A Aspect ratio Aspect ratio refers to the length to height ratio ofTV screens The ratio of a standardTV is 4 3 while the ratio of a high definition or wideTV is 16 9 The letter box allows you to enjoy a picture with a wider perspective on a standard 4 3 scree...

Страница 58: ... MMC but are slightly thicker 2 1mm vs 1 4mm and SD Card readers accept both formats Cards up to 4GB are available T Thumbnail A thumbnail is reduced size versions of a picture that is used to make it easier to recognize an them Thumbnails serve the same role for images as a normal text index does for words X xD Card EXtreme Digital Picture Card A flash memory card used in digital cameras ...

Страница 59: ...12NC 2009 Koninklijke Philips Electronics N V All rights reserved UM_V2 0G_V1 0 Document order number ...

Отзывы: