Philips SPF4308 Скачать руководство пользователя страница 25

24

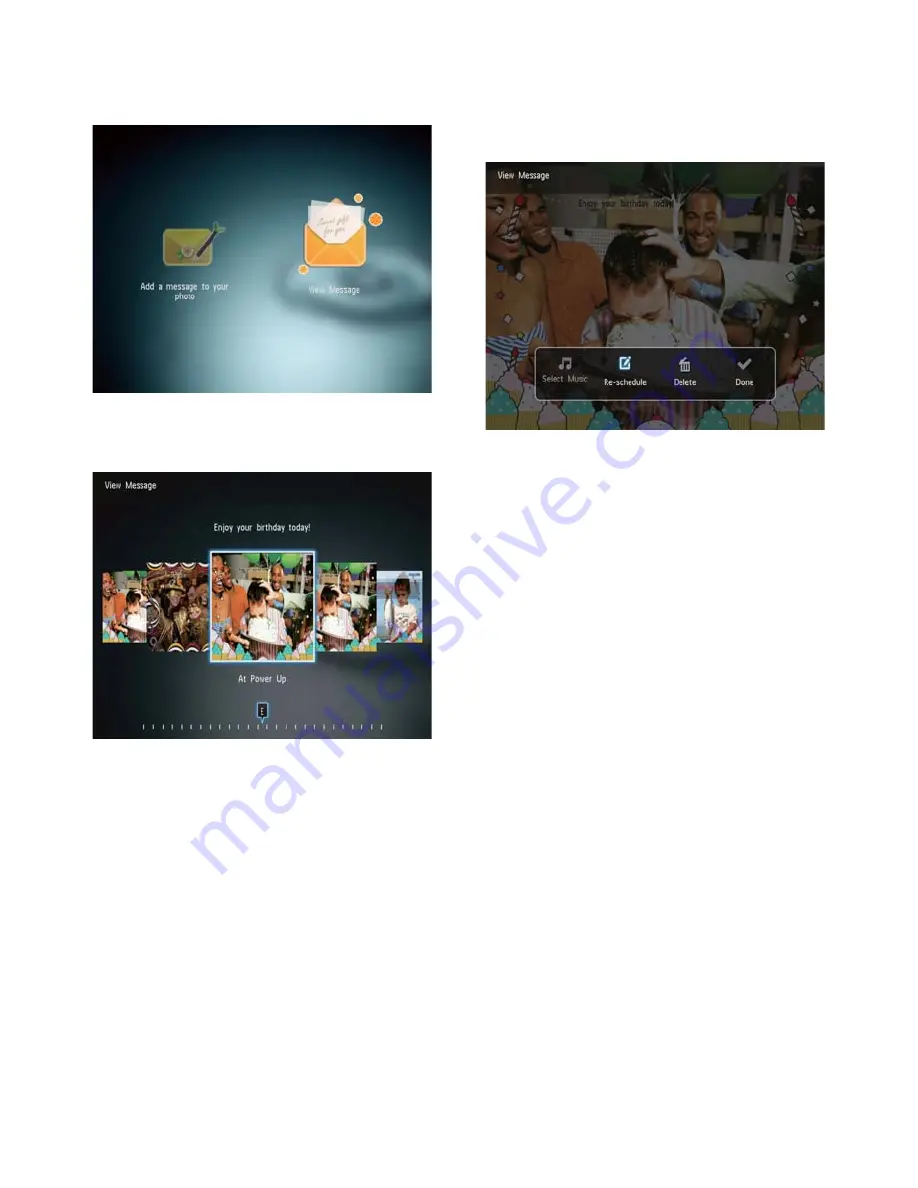
To change music (SPF4508/SPF4528), 

• 

reschedule or delete the message, press 

MENU

 and then select an option to 

continue. 


To go back to the message browser 

• 

screen, select 

[Done]

 and then press 

OK

.

2

 Select 

[View Message]

, and then press 

OK

.


3

  Select a message template, and then 

press 

OK

.


A message template is displayed.


»

EN

Содержание SPF4308

Страница 1: ...Register your product and get support at SPF4308 SPF4328 SPF4508 SPF4528 PhotoFrame EN User manual ...

Страница 2: ...mation of the PhotoFrame 33 Reset all settings to factory default 34 9 Upgrade the PhotoFrame 35 10 Product information 36 Video features SPF4508 SPF4528 36 Contents 1 Important 3 Safety 3 Safety precautions and maintenance 3 Notice 3 Respect copyrights 3 Recycling 3 North Europe Information Nordic Countries 4 Class II statement 4 2 Your PhotoFrame 5 Introduction 5 What s in the box 5 Overview of ...

Страница 3: ...questions 38 12 Glossary 39 Need help Please visit www philips com welcome where you can access a full set of supporting materials such as user manual the latest software updates and answers to frequently asked questions EN ...

Страница 4: ...ts The correct disposal of your old product helps prevent potentially negative consequences on the environment and human health 1 Important Safety Safety precautions and maintenance Never touch push rub or strike the screen with hard objects as this may damage the screen permanently When the product is not used for long periods unplug it Before you clean the screen turn off and unplug the power co...

Страница 5: ...TLEDNINGENS STIK OG STIKKONTAKT ER NEMT TILGÆNGELIGE Paikka Ilmankierto VAROITUS SIJOITA LAITE SITEN ETTÄ VERKKOJOHTO VOIDAAN TARVITTAESSA HELPOSTI IRROTTAA PISTORASIASTA Plassering Ventilasjon ADVARSEL NÅR DETTE UTSTYRET PLASSERES MÅ DU PASSE PÅ AT KONTAKTENE FOR STØMTILFØRSEL ER LETTE Å NÅ Class II statement Class II equipment symbol This symbol indicates that this product has a double insulatio...

Страница 6: ...n your purchase and welcome to Philips To fully benefit from the support that Philips offers register your product at www philips com welcome Introduction With Philips Digital PhotoFrame SPF4308 SPF4328 you can use the PhotoFrame to Display JPEG photos Create gift messages With Philips Digital PhotoFrame SPF4508 SPF4528 you can use the PhotoFrame to Display JPEG photos Play video clips from camera ...

Страница 7: ...oFrame a Press to turn on the PhotoFrame Press and hold to turn off the PhotoFrame Press to switch modes slideshow clock calendar b Press to return to the previous step Press and hold to go to the home screen c OK Joystick Press to confirm a selection Press to pause or resume play Move up down left right to select the upper lower right left option d MENU Press to enter exit the menu a k j i c b d e...

Страница 8: ...e the controls only as stated in this user manual Always follow the instructions in this chapter in sequence If you contact Philips you will be asked for the model and serial number of this apparatus The model number and serial number are on the back of the apparatus Write the numbers here Model No __________________________ Serial No ___________________________ Install the stand To place the Phot...

Страница 9: ...disconnect the storage device from the PhotoFrame during media transfer The PhotoFrame supports most types of the following storage device Secure Digital SD Secure Digital High Capacity SDHC Multimedia Card MMC Memory Stick MS Memory Stick Pro MS Pro Turn on the PhotoFrame Note When you connect the PhotoFrame to a power supply the PhotoFrame turns on automatically 1 When the PhotoFrame is turned o...

Страница 10: ...otoFrame 1 Insert a storage device into the PhotoFrame An option menu is displayed Play Photos SPF4308 SPF4328 Play Inserted Content SPF4508 SPF4528 Select it to play media on the storage device Browse Select it to browse media on the storage device Copy to PhotoFrame Select it to start transfer operation 2 Select Copy to PhotoFrame and then press OK A confirmation message is displayed To select al...

Страница 11: ...uations alphabet or numbers aA Switch between upper and lower case Enter a blank space Enter a line break Transfer photos with a computer Caution Do not disconnect the PhotoFrame from the computer during media transfer 1 Connect a USB cable to the PhotoFrame and to the computer You can drag and drop the media from the computer to an album on the PhotoFrame 2 When the transfer is complete disconnec...

Страница 12: ...opy Copy the photo to another album Delete Delete the photo Select Background Music SPF4508 SPF4528 Select music or turn on off the background music for photo slideshow Brightness Move the joystick up down to adjust the brightness of display Zoom Zoom and crop a photo 4 Play Display photos Note You can display JPEG photos in slideshow mode on the PhotoFrame 1 If there is no message created before ...

Страница 13: ... the joystick downwards twice to enter the keypad 3 To enter the name select an alphabet number and then press OK Zoom and crop a photo When the view mode is selected as single you can zoom in a photo crop it and save it as a new photo as follows 1 In slideshow mode press MENU An option menu is displayed 2 Move the joystick downwards repeatedly to select Zoom 3 Press OK repeatedly to zoom in the p...

Страница 14: ...se and lowercase select aA on the displayed keypad and then press OK 4 When the name is complete select and then press OK 5 Press OK to start the saving process Play videos SPF4508 SPF4528 Note SPF4508 SPF4528 plays most video clips of a digital still camera in M JPEG avi mov MPEG 1 mpg dat avi mov and MPEG 4 avi mov mp4 format Some video clips might have compatibility issues when played on your P...

Страница 15: ...c To select all music in the folder continue with Step 6 Manage videos SPF4508 SPF4528 You can take the following steps to manage the videos that you play 1 During play press MENU An option menu is displayed 2 Select an option and then press OK Add to Favorites Add the video to the Favorites album on the PhotoFrame Copy Copy the video to another album Delete Delete the video Repeat Play in Loop Pl...

Страница 16: ... press MENU The music menu is displayed 2 Select an option to continue Copy music to another folder Delete music Adjust the volume of music To select a piece of music in the folder move the joystick right and then select the music 6 Press OK If you have already selected music In Select Background Music menu select Music On and then pressOK Selected music files are played E n gl i s h EN ...

Страница 17: ...Album Create an album Copy Copy media on the device to another album Move Move media on the device to another album Delete Delete media on the device Group by Group media on the device by name or date 5 Browse Browse and manage albums and media You can browse and manage albums and media in wave mode or album mode Wave mode Album mode Browse albums 1 In the home screen select Browse and then press ...

Страница 18: ...ia 1 Select Copy and then press OK 2 Select a destination album and then press OK to start copy Move media 1 Select Move and then press OK 2 Select a destination album and then press OK to start move Album menu Add to Favorites Add media in the album to the Favorites album Copy Copy media in the album to another album Move Move media in the album to another album Delete Delete media in the album R...

Страница 19: ...y the selected media in slideshow mode Rotate photos 1 Select Rotate and then press OK 2 Select an angle to rotate and then press OK Delete media 1 Select Delete and then press OK A confirmation message is displayed 2 Select Yes and then press OK to start deletion To cancel the operation hold Group media You can group media in an album by date or name 1 Select Group by and then press OK 2 Select a ...

Страница 20: ...e 1 In the clock menu select Select Clock and then press OK 2 Move the joystick left right to select a clock or calendar template and then press OK To go back to the home screen hold 6 Clock Display the clock 1 In the home screen select Clock and then press OK A clock calendar is displayed Clock menu 1 When a clock calendar is displayed press MENU to enter the clock menu Select Clock Move the joys...

Страница 21: ...Edit the text of the message Set the real time and date if applicable 4 Select Done 7 Message Create a message Note If there is no message created before at power up select Personalize Frame to add a message to your photo or to view a message 1 In the home screen select Message and then press OK 2 Select Add a message to your photo and then press OK EN ...

Страница 22: ...en the name is complete select and then press OK Edit a message 1 In the home screen select Message and then press OK The screen prompts you to schedule the message 5 Schedule the message Message Name Enter the name For details see Enter the name of a message Repeat Select a repeat frequency Set Date Set the date or day Set Time Set the time 6 After you complete the message select Done and press O...

Страница 23: ... a message 1 Select Change Photo and then press OK 2 Select a photo available on the PhotoFrame and then press OK To edit the text of a message 1 Select Edit Message and then press OK 2 Select a preset template and then press OK The keypad is displayed 3 Move the joystick downwards twice to enter the keypad 4 To enter the text select an alphabet number and then press OK 2 Select Add a message to y...

Страница 24: ...method see Know these keypad icons To switch between uppercase and lowercase select aA on the displayed keypad and then press OK 5 After you enter the text select and then press OK 6 Move the joystick up down right left to position the text and then press OK 7 Move the joystick up down right left to select the color or font of the text and then press OK E n gl i s h EN ...

Страница 25: ...te the message press MENU and then select an option to continue To go back to the message browser screen select Done and then press OK 2 Select View Message and then press OK 3 Select a message template and then press OK A message template is displayed EN ...

Страница 26: ...OK 2 Select Brightness and then press OK 3 Move the joystick up down to adjust brightness and then press OK Set time date 1 In the home screen select Settings and then press OK 8 Settings Select an on screen language 1 In the home screen select Settings and then press OK 2 Select Language and then press OK 3 Select a language and then press OK E n gl i s h EN ...

Страница 27: ...e that the current time of the PhotoFrame is set correctly 1 In the home screen select Settings and then press OK 2 Select Time and Date and then press OK 3 Select Set Time Set Date and then press OK 4 Move the joystick up down right left to adjust minute hour day month year and then press OK Set time date format 1 In the home screen select Settings and then press OK 2 Select Time and Date and the...

Страница 28: ...iod the PhotoFrame hibernates 2 Select SmartPower and then press OK 3 Select Timer and then press OK 4 Select Set On Time Set Off Time and then press OK To switch off the SmartPower function select Off and then press OK 5 Move the joystick up down right left to set time and then press OK Tip When the PhotoFrame is in standby sleep mode you can press to wake up the PhotoFrame E n gl i s h EN ...

Страница 29: ... and then press OK To disable the hibernation function select Never and then press OK To get the PhotoFrame out of hibernation press Set auto orientation With the auto orientation function you can play photos in the correct orientation depending on the horizontal vertical orientation of the PhotoFrame 1 In the home screen select Settings and then press OK 2 Select Auto orientate and then press OK ...

Страница 30: ...off the button sound select Off and then press OK Protect Unprotect content on a storage device With the PhotoFrame you can delete content on a storage device available on the PhotoFrame To protect content on a storage device from accidental deletion you can disable the deletion function on a storage device 1 In the home screen select Settings and then press OK E n gl i s h EN ...

Страница 31: ... OK 4 Select a slideshow interval and then press OK Set demo on off Note The demo function is effective during photo or video slideshow 1 In the home screen select Settings and then press OK 2 Select Demo and then press OK 3 Select On and then press OK The demo function is activated When Demo mode is ON the photo frame will play the DEMO slideshow automatically once the power cable is connected Du...

Страница 32: ...n the home screen select Settings and then press OK 2 Select Slideshow and then press OK Select slideshow sequence 1 In the home screen select Settings and then press OK 2 Select Slideshow and then press OK 3 Select Shuffle and then press OK 4 To display slideshow randomly select On and then press OK To display slideshow in sequence select Off and then press OK Select view mode for slideshow 1 In t...

Страница 33: ...photo with a background color 3 Select Transition Effect and then press OK 4 Select a transition effect and then press OK Select background color You can select a background border color for photos that are smaller than the PhotoFrame display 1 In the home screen select Settings and then press OK 2 Select Slideshow and then press OK 3 Select Background Color and then press OK 4 Select RadiantColor...

Страница 34: ...select Settings and then press OK 2 Select Info The information of the PhotoFrame is displayed on the screen If you select Auto fit the PhotoFrame extends a photo to fill the screen with picture distortion Power meter 1 In the home screen select Settings and then press OK 2 Select Power Meter and then press OK 3 To show the power meter select On and then press OK To hide the power meter select Off a...

Страница 35: ...Settings and then press OK 2 Select Default Settings and then press OK A confirmation message is displayed 3 Select Yes and then press OK All settings on the PhotoFrame are set to factory default To cancel the operation select No in the prompt message and then press OK EN ...

Страница 36: ...toFrame The earlier software is unavailable on line 1 Visit www philips com support 2 Search for your PhotoFrame and go to the software section 3 Download the latest software onto the root directory of an SD card 4 Insert the SD card into the PhotoFrame 5 Turn on the PhotoFrame A confirmation message is displayed 6 Select Yes and then press OK to confirm When the upgrade is complete the PhotoFrame r...

Страница 37: ...C 100 240V 50 60Hz 0 3A Output DC 9V 1 1A Adaptor Region SSW 1918EU Europe Russia and Singapore SSW 1918UK U K and Hong Kong SSW 1918AU Australia and New Zealand SSW 1918CN China 10 Product information Note Product information is subject to change without prior notice Picture Display Viewing angle C R 10 140 H 120 V Lifetime to 50 brightness 20000 hr Aspect ratio 4 3 Panel resolution 800 x 600 Bri...

Страница 38: ...rename group add to the favorites album multi selection Photo management Copy move delete rotate add to the favorites album color tone group multi selection Clock Clock calendar set time and date Background music Message Create message view message Slideshow setting Transition effect background color view mode interval shuffle color tone Color tone Black and white Sepia other colors Screen backgrou...

Страница 39: ... using different storage devices on the PhotoFrame 11 Frequently asked questions Is the LCD screen touch enabled The LCD screen is not touch enabled Use the buttons on the back to control the PhotoFrame Can I use the PhotoFrame to delete photos on a memory card Yes it supports operations to delete photos on an external device such as a memory card Ensure that you enable the deletion function on a ...

Страница 40: ... A thumbnail is reduced size versions of a picture that is used to make it easier to recognize an them Thumbnails serve the same role for images as a normal text index does for words 12 Glossary A Aspect ratio Aspect ratio refers to the length to height ratio of TV screens The ratio of a standard TV is 4 3 while the ratio of a high definition or wide TV is 16 9 The letter box allows you to enjoy a ...

Страница 41: ... 2010 Koninklijke Philips Electronics N V All rights reserved UM_V2 1 ...

Отзывы: