background image

Philips Digital Photo Frame

Identifying the parts

EN - 6

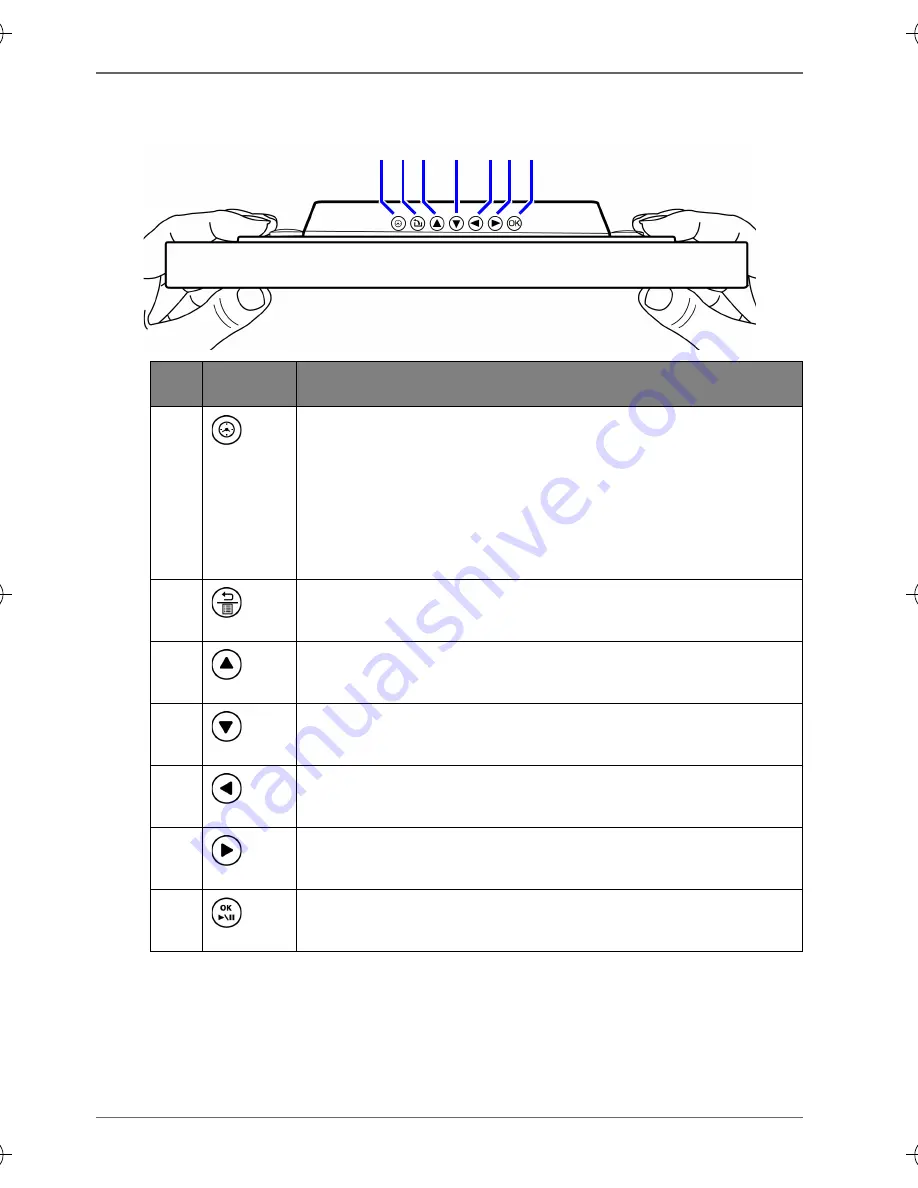
Using the control buttons

1 23 4 56 7

No. Button Description

1

Clock button

■ 

Press this button to switch between 
Slideshow view and Clock view.

■ 

Press this button to switch between Collage 
view and Clock view, when a Collage effect 
has been selected.

2

Return button

Returns to the previous page.

3

Up button

Moves up.

4

Down button

Moves down.

5

Left/Previous button

Moves left/selects the previous item.

6

Right/Next button

Moves right/selects the next item.

7

OK button

Confirms the selection.

GN104F00_GN-A18-G7_UM_en.book  Page 6  Monday, September 14, 2009  10:57 PM

Содержание SPF3410

Страница 1: ...SPF3410 G7 Digital PhotoFrame User Manual www philips com welcome ...

Страница 2: ...on to notify any person of such revision or changes Safety instructions Before operating the PhotoFrame carefully read and follow the instructions below Retain this User Manual for future reference Read the safety and operating instructions carefully before using the product All warnings on the product and in the operating instructions should be observed Do not place this product under direct sunl...

Страница 3: ...eat emitting from this product or any signs of malfunction disconnect the PhotoFrame from the power immediately and contact your dealer for inspection or service Use a smooth soft cloth to clean the surface of the screen Do not use liquid cleaners or glass cleaners If a foreign substance or water gets in this product turn the power off immediately and disconnect the power adapter Next remove the f...

Страница 4: ...d 11 Connecting to power 12 Inserting a memory card 13 Compatible memory card formats 14 Copying files to internal memory 15 Operating the PhotoFrame 16 Basic operations 17 Setting date and time 17 Selecting a mode 18 Displaying the clock 18 Photo mode 19 Selecting a picture 20 Zooming the picture 20 Playing a slideshow 21 Rotating a picture automatically 21 Collage mode 22 Switching between Colla...

Страница 5: ...of contents EN iv Setup mode 27 Options in the Setup mode 28 Frequently asked questions 30 Service and Warranty 30 Regulation and compliance 31 Recycling 31 Appendix 32 Specifications 32 List of compatible memory cards and USB drives 34 ...

Страница 6: ...duct please read through this entire User Manual before use Key features This PhotoFrame is mainly equipped with the following features Clear and bright photos Enables you to play back photos that are stored in a memory card or in a USB flash drive Allows you to select a power saving mode for your PhotoFrame using the Smart Energy Saver feature Allows you to play back photos in slideshow with vari...

Страница 7: ...s 1 Digital PhotoFrame x 1 2 AC power adapter x 1 3 Magnetic remote control with CR2025 lithium battery x 1 4 Quick Start Guide x 1 5 User Manual x 1 6 Registration Card x 1 Actual product appearance may vary from the illustrations shown in this User Manual Available accessories may vary depending on the area where you purchased the PhotoFrame ...

Страница 8: ...ntifying the parts Left view No Description 1 CF memory card slot Allows for a CompactFlash CF card You can play back photos stored in the inserted card or copy photos from or to the inserted card See Inserting a memory card on page 13 for details 1 2 3 4 5 6 ...

Страница 9: ...ory card on page 13 for details 3 USB port Allows for a USB flash drive You can play back photos stored in the inserted drive 4 Mini USB port Allows you to connect the PhotoFrame to a computer so the files can be transferred from your computer to the PhotoFrame 5 Power switch Slide the power switch to turn on or turn off the PhotoFrame See Inserting a memory card on page 13 for details 6 Power jac...

Страница 10: ...ou to hang the PhotoFrame horizontally on a wall without extending the adjustable foot stand 3 Hanging slot for portrait wall mounting Allows you to hang the PhotoFrame vertically on a wall without extending the adjustable foot stand 4 Adjustable foot stand See Using the adjustable foot stand on page 11 for details 5 Kensington security slot You can attach an anti theft Kensington lock and cable t...

Страница 11: ...deshow view and Clock view Press this button to switch between Collage view and Clock view when a Collage effect has been selected 2 Return button Returns to the previous page 3 Up button Moves up 4 Down button Moves down 5 Left Previous button Moves left selects the previous item 6 Right Next button Moves right selects the next item 7 OK button Confirms the selection ...

Страница 12: ... using the remote control for the first time No Description 1 ON OFF Press this button to turn on off the screen backlight 2 SETUP Press this button to access the Setup mode 3 ZOOM OUT Press this button to zoom out the selected picture in Single view 4 LEFT PREVIOUS Moves left moves to the previous item 1 2 3 4 5 6 7 8 9 10 11 12 13 14 ...

Страница 13: ...icture you like to the Favorite disk area in the internal memory For details refer to Source mode on page 23 and File mode on page 25 8 COLLAGE During slideshow press this button to enter Collage view slideshow with the Collage effect When in Collage view press this button repeatedly to toggle through different Collage effects See Switching between Collage view and Clock view on page 22 for detail...

Страница 14: ...ed remote control is magnetic With its magnetic backing you can attach it to the top left area on the back of the PhotoFrame as illustrated below 13 RETURN Press this button to cancel current action and or to go back to the last page 14 DOWN Moves down No Description ...

Страница 15: ...y holder into the remote control Protect the battery from overheating or excessive moisture Failure to replace the battery in the correct manner may result in damage to the battery Use only the approved specified batteries Properly recycle or dispose of used batteries according to local guidelines and regulations Do not throw batteries into fire This may result in an explosion If the battery is co...

Страница 16: ...sing the adjustable foot stand Pop out the back stand as shown and adjust the length of the back stand so the PhotoFrame can stand up right It is recommended to place the PhotoFrame horizontally because this direction provides the best viewing and operating experience ...

Страница 17: ...wall without extending the adjustable foot stand Connecting to power 1 Place your PhotoFrame on a flat surface 2 Connect the power adapter as below 1 and slide the power switch to the ON position 2 Power systems and plug types may vary depending on your country region To turn off the PhotoFrame slide the power switch to the OFF position ...

Страница 18: ...y back the preloaded photos with no memory card inserted To play back your own photos insert a picture loaded memory card or USB flash drive into the corresponding slot on the left side of the PhotoFrame To insert the memory card Insert the memory card into the memory card slot as illustrated below SD SDHC MultiMediaCard Memory Stick Memory Stick PRO xD Picture Card Memory Stick Duo Memory Stick P...

Страница 19: ...turned on or turned off The PhotoFrame supports both Windows and MAC operating systems However when formatting your memory cards use FAT16 and FAT32 file systems in Windows only Formatting memory cards with NTFS or MAC is not supported Memory card formats Maximum capacity Secure Digital SD SDHC 32GB microSD microSDHC A card adapter is required 8GB miniSD miniSDHC A card adapter is required 2GB Mul...

Страница 20: ...ed in the inserted memory card or USB flash drive select Yes and press to proceed To view your photos without copying them to the PhotoFrame highlight NO and press The photos will start to play automatically off your memory card or USB flash drive To copy all the photos contained in the inserted memory card or USB flash drive select Yes and press to proceed Do not remove the memory card or USB fla...

Страница 21: ...Press any control button to bring up the OSD toolbar When using the control buttons press the button corresponding to the icon shown on the screen as by its function or in its order The OSD toolbar hides automatically when the PhotoFrame is idle You can press any button to bring up the toolbar In this User Manual instructions or examples provided are based upon operation with the remote control To...

Страница 22: ...Press repeatedly until you return to the main menu 4 Press to select Setup and then press 5 Press to select Time Setup and then press 6 Press or to go to Current Date a Press to set the year and then press b Press to set the month and then press c Press to set the date and then press 7 Press to select Current Time and then press a Press to set the hour and then press b Press to set the minute and ...

Страница 23: ...des Photo Collage Calendar File Source and Setup Displaying the clock The Clock view provides four skin types of clock display Press twice to display the Clock view When in Clock view press to select a desired type Please go to Time Setup under the Setup mode to set the Time Analog view A Digital view A Digital view B Analog view B ...

Страница 24: ...me including Internal Memory Favorite and Pre installed Library in a memory card or in the inserted USB flash drive The PhotoFrame supports the JPEG jpg and BMP bmp file formats Move up down left and right Return Confirm selection OSD toolbar Collage view Clock view Current mode Currently selected picture Picture thumbnail list ...

Страница 25: ...Press to select a picture you want to see 2 To view the selected picture in full screen press to enter Single view 3 To rotate the picture clockwise each time by 90 degrees press Zooming the picture 1 When in Single view press to enter Zoom view 2 Press repeatedly to zoom in the selected picture Previous next file OSD toolbar Collage view Clock view Return Zoom in Rotate Slideshow view ...

Страница 26: ...er Single view press To re start the slideshow press again Rotating a picture automatically The PhotoFrame has a built in tilt sensor that allows auto rotation of photos Follow the instructions below to enable auto rotation 1 When the PhotoFrame is placed in horizontal position rotate the PhotoFrame 90 degrees clockwise to enable auto rotation 2 When the PhotoFrame is placed in vertical position r...

Страница 27: ...s to confirm selection Switching between Collage view and Clock view If you have set a Collage effect in the Collage or Setup mode you can press repeatedly to switch between Collage view and Clock view When in Clock view press to select a desired clock type See Displaying the clock on page 18 for more details If you have not set any Collage effect pressing repeatedly will allow you to switch betwe...

Страница 28: ... set the Calendar Source mode The Source mode allows you to select the source of the photos to be displayed on the PhotoFrame Press to select from the following source options Card displays the photos stored in the inserted SD SDHC MMC MS MS PRO or xD memory card USB displays the photos in the inserted USB flash drive CF displays the photos in the inserted CF card Internal Memory displays the phot...

Страница 29: ...isplays the photos copied to the Favorite disk area in the internal memory Pre installed Library displays the preloaded photos in Pre installed Library You cannot copy photos to or from Pre installed Library You cannot delete photos in Pre installed Library ...

Страница 30: ...hotoFrame including Internal Memory Favorite and Pre installed Library in the inserted memory card or in the inserted USB flash drive such as the file size After you enter the File mode press to select a file and its thumbnail or detailed information will be seen in the preview window to the right File list Moveup down Return Confirm selection OSD toolbar Collage view Clock view Select deselect a ...

Страница 31: ... this step to select more files 2 Press to open the file edit menu Select Delete to delete the selected file s Press to confirm or cancel the action Select Copy and then press to choose to copy the selected file s to the internal memory Copy to Memory to the inserted memory card Copy to Card or to the inserted USB flash drive Copy to USB ...

Страница 32: ...The Setup mode allows you to adjust settings on slideshow display time OSD languages startup and factory default settings Setup options menu Moveup down Return Confirm selection OSD toolbar Collage view Clock view return to the last submenu Open the submenu ...

Страница 33: ...creen backlight automatically during 9 00 p m and 7 00 a m Save 20 reduces 20 backlight level Save 50 reduces 50 backlight level Picture quality is not affected by using the Smart Energy Saver feature Slideshow Setup Interval Time selects the slideshow interval between photos Effect selects the transition effect Smart Cropping selects to display photos in original size or full screen Display Setup...

Страница 34: ... according to the on schedule You can also set Birthdays Wedding date and Holidays to automatically enable Collage effects on these particular days Clock skin Sets up clock skin to be applied in Clock view Language Sets up the On Screen Display OSD language Set to Default Returns all the settings back to system default Startup Setup Sets up the first mode to enter upon turning on the PhotoFrame Pr...

Страница 35: ...e To exercise your rights under this warranty you must provide proof of purchase in the form of an original sales receipt that shows the product name and the date of purchase For customer support or to obtain warranty service please call toll free 1 877 784 0999 or visit our website www philips com support What memory card formats are compatible with the PhotoFrame SD SDHC MMC MS MS PRO xD and CF ...

Страница 36: ...n the user is encouraged to try to correct the interference by one of the following measures Reorient or relocate the receiving antenna Increase the separation between the equipment and receiver Connect the equipment into an outlet on a circuit different from that to which the receiver is connected Consult the dealer or an experienced radio TV technician for help Recycling To minimize harm to the ...

Страница 37: ...MC MS MS PRO and xD using the 5 in 1 memory card slot CF using the CF memory card slot Supported Flash Drive USB flash drive using the USB port Supported Image File Format JPEG and BMP up to 20 M pixel USB Port USB Host Type A Mini USB Port USB Device Mini B USB 1 1 2 0 Compliant Yes Built in Internal Memory for data storage 128MB Memory Card Slots 5 in 1 card slot CF card slot Photo Collage Featu...

Страница 38: ...able Playback Mode Full Screen browse Slideshow view Thumbnail view and Zoom in Zoom out Language Support English French Spanish Portuguese German Dutch and Italian Color Adjustment Gamma Color Correction Yes Brightness Adjustment Yes Contrast Adjustment Yes Auto Rotation with built in tilt sensor Yes Item Description ...

Страница 39: ...e center for assistance Capacity Memory card formats SD miniSD microSD MMC MS xD 8MB Panasonic Toshiba 16MB Panasonic SanDisk Sony MS Olympus Pretec 32MB Sony MS Duo Sony MS 64MB Dick Smith SanDisk MS Duo Sony MS Lexar MS 128MB Olympus 256MB Toshiba SanDisk Sony MS Olympus M type 512MB Transcend 80X SanDisk PQI MMC Plus SanDisk MS PRO Fujifilm M type Transcend Transcend Transcend Kodak Olympus M t...

Страница 40: ...Apacer 60X A DATA SanDisk Ultra II MS Duo Fujifilm M type PhotoFast Ultra Apacer Panasonic class 4 Transcend Kingston SanDisk RiDATA RiTEK Panasonic 2GB A DATA Panasonic PQI Fujifilm H type SanDisk Stargem Transcend Olympus M type Toshiba Kingston Olympus M type Silicon Power 80X Panasonic class 2 Transcend Apacer 60X FDC RiDATA Capacity Memory card formats SD miniSD microSD MMC MS xD ...

Страница 41: ...ilicon Power class 6 SanDisk MS Duo Kingston RiDATA SanDisk Toshiba SDHC Transcend Transcend SDHC 8GB Toshiba SDHC SanDisk SanDisk M2 Transcend SDHC A DATA SDHC SanDisk Apacer Kingston 16GB Transcend class 6 SanDisk MS PRO Duo 32GB PNY Capacity Memory card formats SD miniSD microSD MMC MS xD ...

Страница 42: ...I Hi Speed Kodak Transcend 256MB Transcend 1GB FDC Transcend JF110 A DATA 80X A DATA MY FLASH Transcend JF130 A DATA 2GB Transcend 133X A DATA MY FLASH SanDisk Ultra II Transcend JF V30 Kingston Elite Pro High Speed aigo L8202 FDC 4GB RiDATA 233X Kingston Data Traveler 8GB TOPRAM TDK 16GB Transcend 133X Apacer AH321 Transcend JFV10 ...

Страница 43: ...Philips Digital Photo Frame Appendix EN 38 Memo ...

Страница 44: ... 2009 Koninklijke Philips N V All rights reserved P N 4J 0SW09 002 ...

Отзывы: