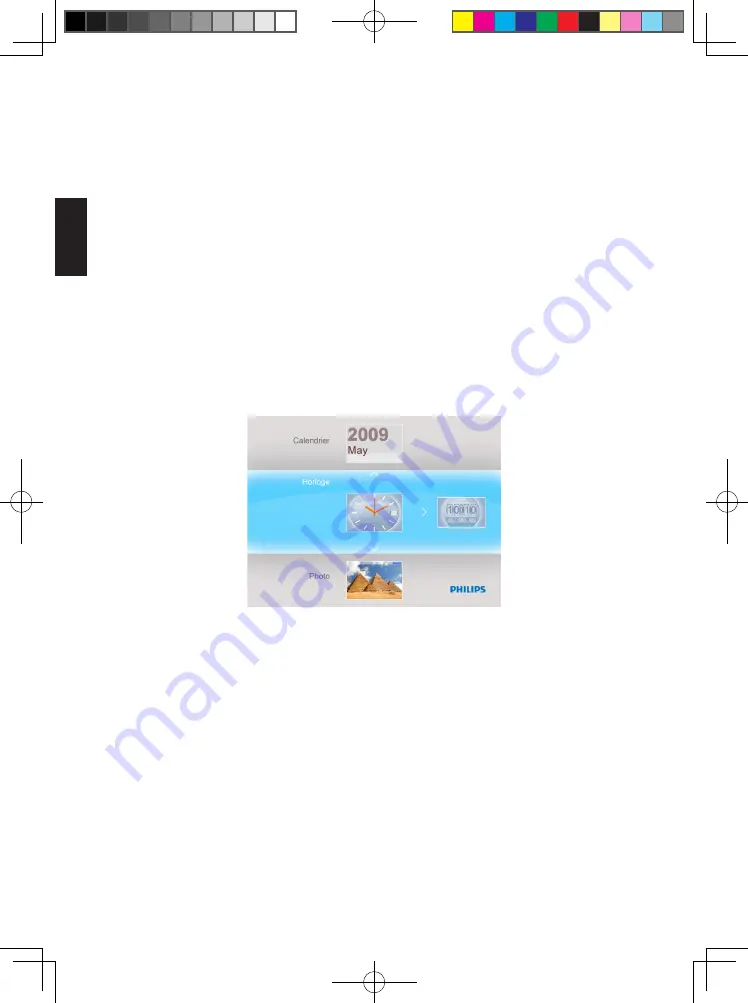
Philips SPF 3408/G7 Скачать руководство пользователя страница 50

12

Français

4.2 Horloge

L’Horloge peut être visualisée dans deux habillages ou modes d’affichage 

différents.

• Dans le menu principal, sélectionnez 

Horloge

,appuyez sur les boutons 

Gauche


ou 

Droite

 pour sélectionner l’habillage ou l’affichage, puis appuyez sur 

OK

 pour 

afficher l’horloge en plein écran.

• En mode plein écran, appuyez sur les boutons 

Gauche

 ou 

Droite

 pour changer d’

habillage de l’horloge. 

• Appuyez sur 

OK

 pour revenir au menu 

Horloge

.

Remarque :


Pour régler l’heure, allez dans le menu 

Réglage

 puis dans le sous-menu 

Date et 

Heure

.

Philips Eros 8DN UM_0914_book.indb   12

2009/9/17   上午 09:13:41

Содержание SPF 3408/G7

Страница 1: ...obtenir de l aide sur Para registrar su producto y obtener ayuda técnica acceda a www philips com welcome PhotoFrame Model Number Numéro de Modèle Modelo Número SPF 3408 G7 SPF 3408T G7 EN User Manual Mode d Emploi FR ES Manual de Usuario Philips Eros 8DN UM_0914_book indb 1 2009 9 17 上午 09 13 33 ...

Страница 2: ...Philips Eros 8DN UM_0914_book indb 4 2009 9 17 上午 09 13 33 ...

Страница 3: ...Production Highlights 8 3 Getting Started 9 3 1 Stand PhotoFrame Assembly 9 3 2 Connecting the Power Adapter 9 3 3 Turning on your PhotoFrame 10 3 4 Turning off your PhotoFrame 10 3 5 Main Menu 10 3 5 1 Accessing the Main Menu 10 3 5 2 Accessing Sub Menu Options 10 4 Using your PhotoFrame 11 4 1 Calendar 11 4 2 Clock 12 4 3 Photo 13 4 3 1 View Photo 13 4 3 2 Photo Selection 14 4 3 3 Photo Menu 14 ...

Страница 4: ...htness 23 4 5 3 Language 24 4 5 4 Reset 24 4 5 6 Delete All 24 4 5 7 Smart Copy 25 4 6 Date and Time 26 4 7 Auto Orientation 27 4 8 Zoom In Out or Pan Function 27 5 Technical Data 28 6 Frequently Asked Questions 29 7 Service and Warranty 30 Philips Eros 8DN UM_0914_book indb 6 2009 9 17 上午 09 13 33 ...

Страница 5: ...ns Principales du Produit 8 3 Démarrage 9 3 1 Assemblage du Support PhotoFrame 9 3 2 Brancher l Adaptateur d Alimentation 9 3 3 Allumer le PhotoFrame 10 3 4 Eteindre le PhotoFrame 10 3 5 Menu Principal 10 3 5 1 Accéder au Menu Principal 10 3 5 2 Accéder aux Options de Sous Menu 10 4 Utilisation du PhotoFrame 11 4 1 Calendrier 11 4 2 Horloge 12 4 3 Photo 13 4 3 1 Afficher les Photos 13 4 3 2 Sélect...

Страница 6: ...23 4 5 3 Langue 24 4 5 4 Réinitisaliser 24 4 5 5 Supprimer Tous 25 4 5 6 Smart Copie 25 4 6 La date et l Heure 26 4 7 Orientation Automatique 27 4 8 Zoom Avant Arrière ou Pan 27 5 Spécifications 28 6 Foire aux Questions 29 7 Service et Garantie 30 Philips Eros 8DN UM_0914_book indb 8 2009 9 17 上午 09 13 33 ...

Страница 7: ... Características Destacadas 8 3 Cómo Empezar 9 3 1 Ensamblaje Soporte PhotoFrame 9 3 2 Conexión del Adaptador de Alimentación 9 3 3 Encendido del PhotoFrame 10 3 4 Apagado del PhotoFrame 10 3 5 Menú Principal 10 3 5 1 Acceso al Menú Principal 10 3 5 2 Acceso a las Opciones del Submenú 10 4 Utilización de su PhotoFrame 11 4 1 Calendario 11 4 2 Reloj 12 4 3 Fotografías 13 4 3 1 Ver Fotografías 13 4 ...

Страница 8: ...oma 24 4 5 4 Restablecer 24 4 5 5 Borrar Todos 24 4 5 6 Smart Copia 25 4 6 Fecha y Hora 26 4 7 Orientación Automática 27 4 8 Función de Aumento Reducción de Zoom o Desplazam 27 5 Datos Técnicos 28 6 Preguntas más Frecuentes 29 7 Asistencia Técnica y Garantía 30 Philips Eros 8DN UM_0914_book indb 10 2009 9 17 上午 09 13 33 ...

Страница 9: ...tally to fit the photos on display You can place it on a flat surface in a room or hang it on the wall using the wall mounting hole Mounting your Frame on the Wall Use wall anchoring hardware to anchor your frame securely to your wall Wall mounting hole Philips Eros 8DN UM_0914_book indb 1 2009 9 17 上午 09 13 33 ...

Страница 10: ...if you need to clean it with a slightly damp cloth The screen may be wiped with a dry cloth when the power is off However never use alcohol solvents or ammonia based liquids Consult a service technician if the PhotoFrame does not operate normally when you have followed the instructions in this manual The casing cover should be opened only by qualified service personnel Keep the PhotoFrame out of d...

Страница 11: ...rame Do Not Hit or Scratch The LCD panel of PhotoFrame is made of glass and is therefore sensitive to abnormal force and sharp edges Screen Cleaning Use only a dry soft cloth to clean your screen Keep the Stand Clear from Cables Make sure the stand of your PhotoFrame is clear from cables as cables could snap the stand out of PhotoFrame Temperature and Humidity Limitations Operating temperature 0 4...

Страница 12: ... AC DC power adapter Quick start guide Remote control User manual PhotoFrame Quick start guide User manual AC DC power adapter Remote control PhotoFrame User manual 4XLFN VWDUW JXLGH 3KRWR UDPH RQQHFW 6HWXS 9LHZ Philips Eros 8DN UM_0914_book indb 4 2009 9 17 上午 09 13 34 ...

Страница 13: ...t Next item 3 Up Previous item Zoom in 4 Down Next item Zoom out 5 OK Enter submenu Validate process Confirm selections 6 Exit Exit menu Exit process Exit slideshow 7 EZ Access Toggle Button Play slideshow Change play mode Change between photo and clock Use your PhotoFrame by pressing the control buttons in the back Philips Eros 8DN UM_0914_book indb 5 2009 9 17 上午 09 13 34 ...

Страница 14: ...l Buttons Illustration Function Go to collage Navigation buttons Confirm the selection enter the menu Rotate Exit the current menu Smart Energy Saver EZ Access Toggle button Philips Eros 8DN UM_0914_book indb 6 2009 9 17 上午 09 13 34 ...

Страница 15: ...nal memory to internal memory and return to Slideshow Show the images in memory device when the copy completed you can also choose No and return to Slideshow If no selections made in 15 seconds the PhotoFrame starts the slideshow automatically Note 1 Do not remove the memory device immediately after inserting it into the PhotoFrame or when PhotoFrame is reading the photos in the memory card USB dr...

Страница 16: ...s Day Mother s Day Christmas Wedding and Birthday Built in 128MB memory to store your pictures available storage capacity will be less Supports the most popular memory cards SD MMC MMC xD MS MS Pro MS Duo Thumbnail view and slideshow effect Collage Display Auto Picture Rotation Angle Switch 2 3 2 Removing a Memory Device USB Flash Drive To remove the SD MMC MMC xD MS MS Pro MS Duo cards or a USB f...

Страница 17: ... the best viewing angle Note For safety reasons and best stability Philips recommends adjusting the stand with the angle defined by the two click positions Using other positions may cause the PhotoFrame to fall and it is the responsibility of the user 3 2 Connecting the Power Adapter Connect the supplied power adapter from PhotoFrame to a power outlet ON OFF Philips Eros 8DN UM_0914_book indb 9 20...

Страница 18: ... PhotoFrame 3 5 Main Menu 3 5 1 Accessing the Main Menu Press OK button during a slide show or clock mode to access the main menu 3 5 2 Accessing Sub Menu Options To access the sub menu options starting from the main menu Press OK during a slideshow or clock mode Press Up and Down to select the required sub menu Press OK to access the menu To exit from the menu press Exit again to return to the sl...

Страница 19: ...r Down to view the months It will automatically advance or go to the previous month when you press the Up or Down button Press OK to go back to the current month When displaying the current month press OK to go back to the Calendar menu Note To set the date please go into the Setting menu and go into the submenu of Date and Time Philips Eros 8DN UM_0914_book indb 11 2009 9 17 上午 09 13 35 ...

Страница 20: ...ct skins or displays and press OK to display clock in full screen In full screen mode press Left or Right to switch to different skins for clock displays Press OK to go back to the Clock menu Note To set the time please go into the Setting menu and go into the sub menu of Date and Time Philips Eros 8DN UM_0914_book indb 12 2009 9 17 上午 09 13 35 ...

Страница 21: ... Right to select a photo Press EZ Access Toggle button to play the photos in slideshow mode immediately Photos will automatically slide one by one when Left or Right is pressed 4 3 1 2 Thumbnail Mode A large number of Photos can be viewed quickly using the thumbnail mode In the main menu select the Photo menu Use Left or Right to select the photo source to browse Press the EZ Access Toggle button ...

Страница 22: ...e Photo menu can be accessed directly from the Thumbnail by pressing the OK button 4 3 3 1 Color Effects In the thumbnail mode select the photos to which you want to add effects Press OK button to access the Photo menu options Use Up or Down to go to Color Effects Use Left or Right to go to your desired effect Press OK to apply effect Press Exit button to leave this menu and go back to the main me...

Страница 23: ...mediately Photos will automatically slide one by one when Left or Right is pressed 4 3 3 3 Brightness In the Thumbnail mode select the photos to which you want to add effects Press OK button to access the Photo menu options Use Left or Right to go to your desired effect Press OK to apply effect Press Exit button to leave this menu and go back to the main menu Press OK to apply effect Press Exit bu...

Страница 24: ...e Use Right to select Yes Press OK to confirm the deletion When you delete a photo PhotoFrame will return to the Photo menu after completion 4 3 3 5 Rotate The PhotoFrame can change the orientation of photos In the thumbnail mode select the photo you want to rotate Press OK button to access the Photo menu options Use Down to go to Rotate Use Left or Right to go to the orientation Philips Eros 8DN ...

Страница 25: ...n to access the Photo menu options Use Down to go to Ratio Use Left or Right to select the Full Screen or Actual Size photo Press Exit button to leave this menu and go back to the main menu 4 3 3 7 Copy You can copy photos stored on a memory device to the PhotoFrame s internal memory or from the internal memory to a memory device plugged in the PhotoFrame Philips Eros 8DN UM_0914_book indb 17 2009...

Страница 26: ...o start copying 4 4 Slideshow Setting 4 4 1 Interval Use this function to select how long each photo will be displayed during the slideshow In the main menu use Down to access the Setting menu Use Left and press the OK button to access the Slideshow Setting menu Use Up to go to the Interval sub menu Use Left or Right to select the desired transition time 3 Seconds default 10 Seconds 30 Seconds 1 M...

Страница 27: ...to access the Setting menu Use Right and press the OK button to access the Slideshow Setting menu Use Up or Down to access the Play Mode Use Left or Right to go to Random Repeat all or Single Press OK to confirm Press Exit to leave this menu and go back to the main menu Philips Eros 8DN UM_0914_book indb 19 2009 9 17 上午 09 13 38 ...

Страница 28: ...lk Snail Scroll Grid Random Press OK to confirm Press Exit button to leave this menu and go back to the main menu Note This function applies to all the slideshows stored on all media Random plays different effects out of sequence during the slideshow transition 4 4 4 Collage Set Collage slideshow to view multiple photos arranged on the screen at the same time In the main menu Use Down to access th...

Страница 29: ...e the setting The PhotoFrame will return to the slideshow menu right after the layout configuration is finished Press Exit button to leave the Slideshow menu and press OK to play the collage picture Note 1 In Collage mode the PhotoFrame only plays the photos that are arranged in your selected layout Note 2 Auto orientation function still works for collage slideshow Philips Eros 8DN UM_0914_book in...

Страница 30: ...rmal during daytime 7 00AM 21 00PM When you select Save 20 or Save 50 it will operate at that indicated power consumption rate full time In the main menu use Down to access the Setting menu Use Left or Right to access the General Setting menu Use Up or Down to access the Smart Energy Saver setting menu Use Left or Right to select Scheduler 50 Scheduler 100 Save 20 Save 50 Press the OK button to co...

Страница 31: ...o select Off Press the OK button to confirm the selection 4 5 2 Brightness Change the brightness settings of the PhotoFrame to achieve the best photo view In the main menu use Down to access the Setting menu Use Right to access the General Setting options Use Up or Down to access the brightness control Use Left or Right to select the level of brightness Darker Normal and Brighter Press OK button t...

Страница 32: ...e to the factory default setting In the main menu use Down to access the Setting menu Use Right to access the General Setting option Use Up or Down to access the Reset menu Use Left or Right to select Yes or No Press the OK button to confirm your setting and return to the Setting menu Press Exit to leave this menu and go back to the main menu 4 5 5 Delete All Use this section to delete the photos ...

Страница 33: ...own to access the Smart Copy menu Use Left or Right to select Album or Original to resize your photos or not Press the OK button to confirm your setting and return to the Setting menu Press Exit to leave this menu and go back to the main menu Note The PhotoFrame will warn the user with an insufficient memory space message when there is no enough free internal memory left to hold the photos the use...

Страница 34: ...1 Set Date In the Date and Time setting menu use Left or Right to adjust the date Use Up and Down to move between day month and year Press the OK button to confirm the set date 4 6 2 Set Time In the Date and Time setting menu use Left or Right to adjust the time Use Up or Down to move between hours and minutes Press the OK button to confirm the set time Philips Eros 8DN UM_0914_book indb 26 2009 9...

Страница 35: ...unction to change the view of the photos In slideshow mode press OK to the main menu Press EZ Access Toggle button to slideshow Press Left or Right to change slideshow photo and enter photo view photo in Pause state Pause icon will disappear after 3s Press Up and Down key to Zoom In Out Press OK to pan and use Pan Function to move Up Down Left Right key Press OK or Exit to photo slideshow again Ph...

Страница 36: ... orientation Buttons Buttons and controls 7 control key buttons 1 EZ ACCESS TOGGLE key to change between photo and clock 1 key each to go Up Down Right or Left 1 OK key to go to main menu edit menu and confirm 1 Exit key to exit Features Playback mode Slideshow Thumbnail browse Slideshow setting Interval Play mode Transition effects Collage OSD languages English French German Dutch Spanish Portugu...

Страница 37: ...pport a connection to a PC via the USB port The USB port is only for a USB flash drive Can I print photos from PhotoFrame No it does not support direct photo printing Why doesn t my PhotoFrame show some of my photos Digital cameras take photos and store them in JPEG format according to camera industry standards Digital PhotoFrame is designed to show photos following the same industry standards Som...

Страница 38: ...he instructions may cause interference to radio communications However there is no guarantee that interference will not occur in a particular installation If this equipment does cause interference to radio or television reception which can be determined by turning the equipment off and on the user is encouraged to try to correct the interference by one of the following measures Reorient or relocat...

Страница 39: ... affichées Vous pouvez le poser sur une surface plate dans une pièce ou le suspendre sur un mur en utilisant le trou de fixation murale Installer Votre Cadre sur le Mur Utilisez le matériel de fixation mural pour accrocher votre cadre en toute sécurité sur votre mur Trou de fixation murale Philips Eros 8DN UM_0914_book indb 1 2009 9 17 上午 09 13 40 ...

Страница 40: ...isez un chiffon légèrement humide L écran doit être nettoyé avec un chiffon sec quand il est éteint N utilisez jamais de l alcool de solvant ou de liquides avec de l ammoniaque Consultez un technicien d entretien si le PhotoFrame ne fonctionne pas normalement et que vous avez suivi toutes les instructions de ce manuel Le couvercle du boîtier ne doit être ouvert que par un réparateur qualifié Garde...

Страница 41: ... est en verre et est donc fragile et facile à se casser en cas d impact anormal ou de contact avec des objets tranchants Nettoyage de l Ecran Utilisez uniquement un chiffon doux et sec pour nettoyer votre écran Le Support ne doit pas être Enchevêtré dans les Câbles Assurez vous que le pied de support de votre PhotoFrame n est pas enchevêtré dans les câbles car ceux ci pourraient faire tomber le Ph...

Страница 42: ...CC Guide de démarrage rapide Télécommande Mode d emploi PhotoFrame Guide de démarrage rapide Mode d emploi Adaptateur de courant CA CC Télécommande PhotoFrame Mode d emploi Guide de démarrage rapide 3KRWR UDPH RQQHFWHU 5 JODJHV 9LVXDOLVHU Philips Eros 8DN UM_0914_book indb 4 2009 9 17 上午 09 13 40 ...

Страница 43: ...lément précédent Zoom avant 4 Bas Elément suivant Zoom arrière 5 OK Ouvrir le sous menu Valider le processus Confirmer les sélections 6 Quitter Quitter le menu Quitter le processus Quitter le Diaporama 7 Bouton d Accès Ra pide EZ Play slideshow Changer de mode de lecture Passer de photo à horloge Utilisez votre PhotoFrame en appuyant sur les boutons de commande à l arrière Philips Eros 8DN UM_0914...

Страница 44: ...llustration Fonction Aller dans montage Boutons de navigation Confirmer la sélection ouvrir le menu Faire tourner Quitter le menu courant Smart Energy Saver Bouton d accès rapide EZ Philips Eros 8DN UM_0914_book indb 6 2009 9 17 上午 09 13 40 ...

Страница 45: ... mémoire interne puis retourner au Diaporama afficher les images dans l appareil de mémoire une fois le copiage terminé vous pouvez aussi choisir Non pour retourner au Diaporama si aucune sélection n est effectuée dans les 15 secondes le PhotoFrame lancera automatiquement le Diaporama Remarque 1 Ne retirez pas l appareil de mémoire immédiatement après l avoir inséré dans le PhotoFrame ou quand le ...

Страница 46: ...te des mères Noël Mariage et Anniversaire Mémoire intégrée de 128 Mo pour sauvegarder vos images la capacité de sauvegarde sera inférieure Prend en charge les cartes mémoire les plus communes SD MMC MMC xD MS MS Pro MS Duo Vue en vignettes et effets Diaporama Affichage du Montage Rotation d image automatique Changement d angle 2 3 2 Retirer un Appareil de Mémoire une Clé USB Pour retirer les carte...

Страница 47: ...Pour des raisons de sécurité et de meilleure stabilité Philips recommande d ajuster le support à l angle déterminé par les positions des deux clics L usage d autres positions peut faire tomber le PhotoFrame ceci sera la responsabilité de l utilisateur 3 2 Brancher l Adaptateur d Alimentation Branchez l adaptateur d alimentation fourni sur le PhotoFrame et sur une prise de courant murale ON OFF Arr...

Страница 48: ...3 5 Menu Principal 3 5 1 Accéder au Menu Principal Appuyez sur OK en mode Diaporama ou horloge pour accéder au menu principal 3 5 2 Accéder aux Options de Sous Menu Pour accéder aux options de sous menu depuis le menu principal Appuyez sur OK en mode Diaporama ou horloge Appuyez sur Haut et Bas pour sélectionner le sous menu désiré Appuyez sur OK pour ouvrir le menu Pour quitter le menu appuyez de...

Страница 49: ... sur Haut ou Bas pour voir le mois Passera automatiquement au mois suivant ou précédent lorsque vous appuyez sur le bouton Haut ou Bas Appuyez sur OK pour revenir au mois courant Lorsque le mois courant est affiché appuyez sur OK pour revenir au menu du Calendrier Remarque Pour régler la date allez dans le menu Réglage puis dans le sous menu Date et Heure Philips Eros 8DN UM_0914_book indb 11 2009...

Страница 50: ...ur sélectionner l habillage ou l affichage puis appuyez sur OK pour afficher l horloge en plein écran En mode plein écran appuyez sur les boutons Gauche ou Droite pour changer d habillage de l horloge Appuyez sur OK pour revenir au menu Horloge Remarque Pour régler l heure allez dans le menu Réglage puis dans le sous menu Date et Heure Philips Eros 8DN UM_0914_book indb 12 2009 9 17 上午 09 13 41 ...

Страница 51: ...puyez sur le Bouton d Accès Rapide EZ pour afficher immédiatement les photos en mode Diaporama Les photos défileront automatiquement une à une lorsque vous appuyez sur les boutons Gauche ou Droite 4 3 1 2 Mode Vignette Vous pouvez visionner un grand nombre de photos en utilisant le Mode Vignette Dans le menu principal sélectionnez le menu Photo Appuyez sur les boutons Gauche ou Droite pour sélecti...

Страница 52: ...to depuis la vignette en appuyant sur le bouton OK 4 3 3 1 Effets de Couleur En Mode Vignette sélectionnez les photos auxquelles vous souhaitez ajouter des effets Appuyez sur OK pour accéder aux options du menu Photo Appuyez sur les boutons Haut ou Bas pour aller dans Effets de Couleur Appuyez sur les boutons Gauche ou Droite pour sélectionner l effet désiré Appuyez sur OK pour appliquer l effet A...

Страница 53: ... photos défileront automatiquement une à une lorsque vous appuyez sur les boutons Gauche ou Droite 4 3 3 3 Luminosité En Mode Vignette sélectionnez les photos auxquelles vous souhaitez ajouter des effets Appuyez sur OK pour accéder aux options du menu Photo Appuyez sur les boutons Gauche ou Droite pour sélectionner l effet désiré Appuyez sur OK pour appliquer l effet Appuyez sur Quitter pour quitt...

Страница 54: ... sélectionner Oui Appuyez sur OK pour confirmer la suppression Lorsque vous supprimez une photo PhotoFrame retournera au menu Photo une fois l action terminée 4 3 3 5 Tourner Le PhotoFrame peut changer l orientation des photos En Mode Vignette sélectionnez la photo que vous souhaitez faire tourner Appuyez sur OK pour accéder aux options du menu Photo Appuyez sur le bouton Bas pour aller dans Tourn...

Страница 55: ...oto Appuyez sur le bouton Bas pour aller dans Tourner Appuyez sur les boutons Gauche ou Droite pour sélectionner Plein Ecran ou Taille Actuelle Appuyez sur Quitter pour quitter ce menu et revenir au menu principal 4 3 3 7 Copier Vous pouvez copier les photos enregistrées sur un appareil de mémoire vers la mémoire interne du PhotoFrame ou bien depuis la mémoire interne vers un appareil de mémoire b...

Страница 56: ...encer le copiage 4 4 La Mise en Diaporama 4 4 1 Intervalle Utilisez cette fonction pour sélectionner la durée d affichage de chaque photo dans le Diaporama Dans le menu principal appuyez sur le bouton Bas pour accéder au menu Réglage Appuyez sur le bouton Gauche et appuyez sur OK pour accéder au menu La Mise en Diaporama Appuyez sur le bouton Haut pour aller dans le menu Intervalle Appuyez sur les...

Страница 57: ...yez sur le bouton Droite et appuyez sur OK pour accéder au menu La Mise en Diaporama Appuyez sur les boutons Haut ou Bas pour accéder au Mode de Lecture Appuyez sur les boutons Gauche ou Droite pour aller sur Unique Tout Répéter ou Aléatoire Appuyez sur OK pour confirmer Appuyez sur Quitter pour quitter ce menu et revenir au menu principal Philips Eros 8DN UM_0914_book indb 19 2009 9 17 上午 09 13 4...

Страница 58: ...Soie Escargot Déroulement Grille Aléatoire Appuyez sur OK pour confirmer Appuyez sur Quitter pour quitter ce menu et revenir au menu principal Remarque Cette fonction s applique à tous les diaporamas enregistrés sur tous les médias La fonction Aléatoire joue différents effets pendant la transition du Diaporama 4 4 4 Collage Sélectionnez Diaporama Montage pour afficher plusieurs photos en même temp...

Страница 59: ...ur sauvegarder le réglage Le PhotoFrame reviendra au menu diaporama dès que la configuration est terminée Appuyez sur Quitter pour quitter le menu Diaporama et appuyez sur OK pour lire le montage de photos Remarque 1 En Mode Montage le PhotoFrame lit uniquement les photos se trouvant dans le montage que vous avez fait Remarque 2 La fonction Orientation automatique fonctionne encore pour le Diapora...

Страница 60: ...r 50 l appareil fonctionnera en permanence avec la consommation de courant indiquée Dans le menu principal appuyez sur le bouton Bas pour accéder au menu Réglage Appuyez sur les boutons Gauche ou Droite pour accéder au menu Réglages Généraux Appuyez sur les boutons Haut ou Bas pour accéder au menu de réglage de Smart Energy Saver Appuyez sur les boutons Gauche ou Droite pour sélectionner Planifica...

Страница 61: ...ner Désactivé Appuyez sur OK bouton pour confirmer la sélection 4 5 2 Luminosité Changez le réglage de la luminosité du PhotoFrame pour obtenir une image optimale Dans le menu principal appuyez sur le bouton Bas pour accéder au menu Réglage Appuyez sur le bouton de Droite pour accéder aux options de Mise en Général Appuyez sur les boutons Haut ou Bas pour accéder au contrôle de la luminosité Appuy...

Страница 62: ...ur le bouton Bas pour accéder au menu Réglage Appuyez sur le bouton de Droite pour accéder aux options de Mise en Général Appuyez sur les boutons Haut ou Bas pour accéder au menu Réinitisaliser Appuyez sur les boutons Gauche ou Droite pour sélectionner Oui ou Non Appuyez sur OK pour confirmer votre réglage et revenir au menu Réglage Appuyez sur Quitter pour quitter ce menu et revenir au menu princ...

Страница 63: ...Appuyez sur les boutons Haut ou Bas pour accéder au menu Smart Copie Appuyez sur les boutons Gauche ou Droite pour sélectionner Resize ou Original et modifier ou non la taille de vos photos Appuyez sur OK pour confirmer votre réglage et revenir au menu Réglage Appuyez sur Quitter pour quitter ce menu et revenir au menu principal Remarque Le PhotoFrame avertira l utilisateur avec un message quand l...

Страница 64: ...age Date et Heure appuyez sur les boutons Gauche ou Droite pour ajuster la date Appuyez sur les boutons Haut et Bas pour passer entre les jours les mois et les années Appuyez sur OK pour confirmer la date réglée 4 6 2 Régler l Heure Dans le menu de réglage Date et Heure appuyez sur les boutons Gauche ou Droite pour régler l heure Appuyez sur les boutons Haut ou Bas pour passer entre les heures et ...

Страница 65: ...ama appuyez sur OK pour accéder au menu principal Appuyez sur le Bouton d Accès Rapide EZ pour aller au Diaporama Appuyez sur Gauche ou Droite pour changer les photos du Diaporama et entrer en vue de photos photo en état Pause L icône de Pause disparaîtra après 3 secondes Appuyez sur les boutons Haut et Bas pour Zoomer en Avant Arrière Appuyez sur OK pour panner et utilisez la fonction Pan pour dé...

Страница 66: ...boutons de commande 1 BOUTON D ACCES RAPIDE EZ pour passer entre photo et horloge 1 touche pour Haut Bas Droite et Gauche 1 touche OK pour aller dans le menu principal éditer le menu et confirmer 1 touche Quitter pour quitter Caractéristiques Mode de lecture Diaporama parcourir les Vignettes Réglages du Diaporama Intervalle Mode de lecture Effets de transition Montage Langues d affichage à l écran...

Страница 67: ...t USB sert uniquement pour les lecteurs flash USB Puis je imprimer des photos à partir du PhotoFrame Non il ne prend pas en charge l impression directe des photos Pourquoi le PhotoFrame n affiche pas certaines de mes photos Les appareils photo numériques prennent des photos et les enregistrent en format JPEG selon des normes de l industrie de l appareil photo Le PhotoFrame est conçu pour afficher ...

Страница 68: ...st pas installé ou utilisé selon les instructions peut causer des interférences sur les communications radio Cependant il n est aucunement garanti qu aucune interférence ne se produira sur une installation spécifique Si cet appareil produit des interférences sur la réception radio ou télé ce qui peut être déterminé en allumant et en éteignant l appareil l utilisateur est encouragé à essayer de cor...

Страница 69: ...las fotos mostradas en pantalla Puede colocarlo sobre una superficie plana en una habitación o colgarlo en la pared utilizando el orificio de montaje en pared Montaje del Marco en la Pared Utilice hardware de sujeción a la pared para anclar su marco de forma segura Orificio de montaje en pared Philips Eros 8DN UM_0914_book indb 1 2009 9 17 上午 09 13 46 ...

Страница 70: ...piarlo con un paño ligeramente humedecido Puede limpiar la pantalla con un paño seco cuando el aparato esté apagado Pero no debe utilizar alcohol disolventes o líquidos que contengan amoníaco Consulte a un técnico si el PhotoFrame no funciona adecuadamente una vez que usted haya seguido las instrucciones de este manual La carcasa sólo debe ser abierta por personal técnico cualificado Mantenga el P...

Страница 71: ...uras El panel de cristal líquido del PhotoFrame está hecho de cristal y por lo tanto es muy sensible a una presión excesiva o a bordes afilados Limpieza de la Pantalla Utilice sólo un paño seco y suave para limpiar su pantalla Mantenga el Soporte Alejado de los Cables Asegúrese de que el soporte de su PhotoFrame no esté en contacto con los cables ya que éstos podrían desplazar el soporte del Photo...

Страница 72: ...de inicio rápido Mando a distancia Manual de usuario PhotoFrame Guía de inicio rápido Manual de usuario Adaptador de alimentacion CA CC Mando a distancia PhotoFrame Manual de usuario Guía de inicio rápido 3KRWR UDPH RQHFWDU RQILJXUDFLµQ 9LVWD Philips Eros 8DN UM_0914_book indb 4 2009 9 17 上午 09 13 47 ...

Страница 73: ... Previous item Zoom in 4 Abajo Next item Zoom out 5 ACEPTAR Acceder al submenú Validar proceso Confirmar selección 6 Salir Salir de menú Salir de proceso Salir de Secuencia de diapositivas 7 Botón Interruptor para Acceso Fácil Play slideshow Cambiar modo de reproducción Cambiar de foto a reloj Utilice su PhotoFrame pulsando los botones de control en la parte posterior Philips Eros 8DN UM_0914_book...

Страница 74: ...ncia IlIustración Función Ir a collage Botones de navegación Confirmar selección acceder a menú Rotar Salir del menú actual Smart Energy Saver Botón Interruptor para Acceso Fácil Philips Eros 8DN UM_0914_book indb 6 2009 9 17 上午 09 13 47 ...

Страница 75: ...cia de diapositivas Muestra las imágenes del dispositivo de memoria una vez que el proceso de copia esté completado También puede elegir No y regresar a la Secuencia de diapositivas Si no elije ninguna opción en el plazo de 15 segundos el PhotoFrame comenzará la secuencia de diapositivas de forma automática Nota 1 No extraiga el dispositivo de memoria inmediatamente después de haberlo insertado en...

Страница 76: ...a y Cumpleaños Memoria integrada de 128MB para almacenar sus imágenes La capacidad de almacenamiento será menor Compatible con las tarjetas de memoria más utilizadas en el mercado SD MMC MMC xD MS MS Pro MS Duo Vistas en miniatura y efecto secuencia de diapositivas Vista en Collage Rotación automática de la imagen Cambio de ángulo 2 3 2 Extracción de un Dispositivo de Memoria Memoria Flash USB Par...

Страница 77: ...visualización Nota Por cuestiones de seguridad y para una óptima estabilidad Philips recomienda que se ajuste el soporte con el ángulo definido por las dos marcas de posición El uso de otras posiciones puede provocar una caída del PhotoFrame de la que el usuario será responsable 3 2 Conexión del Adaptador de Alimentación Conecte el adaptador de alimentación proporcionado con el PhotoFrame a una fu...

Страница 78: ...oFrame 3 5 Menú Principal 3 5 1 Acceso al Menú Principal Pulse el botón ACEPTAR durante una secuencia de diapositivas o en modo reloj para acceder al menú principal 3 5 2 Acceso a las Opciones del Submenú Para acceder a las opciones del submenú partiendo del menú principal Pulse ACEPTAR durante una secuencia de diapositivas o en modo reloj Pulse Arriba y Abajo para seleccionar el submenú deseado P...

Страница 79: ...mpleta Pulse Arriba o Abajo para visualizar el mes Avanzará automáticamente o irá al mes anterior cuando pulse el botón Arriba o Abajo Pulse ACEPTAR para volver al mes actual Cuando se muestre en pantalla el mes actual pulse ACEPTAR para regresar al menú Calendario Nota Para configurar la fecha acceda al menú Configuración y a continuación al submenú Fecha y Hora Philips Eros 8DN UM_0914_book indb...

Страница 80: ... visualización y pulse ACEPTAR para visualizar el reloj en modo pantalla completa En modo pantalla completa pulse Izquierda o Derecha para cambiar el diseño en la visualización del reloj Pulse ACEPTAR para regresar al menú Reloj Nota Para configurar la hora acceda al menú Configuración y a continuación a Fecha y Hora en el submenú Philips Eros 8DN UM_0914_book indb 12 2009 9 17 上午 09 13 48 ...

Страница 81: ...a Fotografías Pulse el Botón Interruptor para Acceso Fácil para reproducir las fotos en modo secuencia de diapositivas de forma inmediata Las fotos se mostrarán una a una de forma automática cuando pulse Izquierda o Derecha 4 3 1 2 Modo Miniatura Puede visualizar de forma rápida un gran número de fotos por medio del modo miniatura En el menú principal seleccione el menú Fotografías Utilice Izquier...

Страница 82: ...l menú Fotografías directamente desde Miniaturas pulsando el botón ACEPTAR 4 3 3 1 Efectos de Color En el modo miniaturas seleccione las fotos a las que desea añadir efectos Pulse el botón ACEPTAR para acceder a las opciones del menú Fotografías Utilice Arriba o Abajo para acceder a Efectos de Color Utilice Izquierda o Derecha para acceder al efecto deseado Pulse ACEPTAR para aplicar el efecto Pul...

Страница 83: ...nmediata Las fotos se mostrarán una a una de forma automática cuando pulse Izquierda o Derecha 4 3 3 3 Brillo En el Modo Miniaturas seleccione las fotos a las que desea añadir efectos Pulse el botón ACEPTAR para acceder a las opciones del menú Fotografías Utilice Izquierda o Derecha para acceder al efecto deseado Pulse ACEPTAR para aplicar el efecto Pulse el botón Salir para abandonar este menú y ...

Страница 84: ...onar Sí Pulse ACEPTAR para confirmar la eliminación Si elimina una foto PhotoFrame volverá al menú Fotografías una vez llevada a cabo la operación 4 3 3 5 Girar PhotoFrame puede cambiar la orientación de las fotos En el modo miniaturas seleccione la foto que desea rotar Pulse el botón ACEPTAR para acceder a las opciones del menú Fotografías Utilice Abajo para acceder a Girar Utilice Izquierda o De...

Страница 85: ...ones del menú Fotografías Utilice Abajo para acceder a Relación Utilice Izquierda o Derecha para seleccionar la foto en Pantalla Completa o Tamaño Real Pulse el botón Salir para abandonar este menú y regresar al menú principal 4 3 3 7 Copiar Puede copiar fotos almacenadas en un dispositivo de memoria a la memoria interna del PhotoFrame o desde la memoria interna a un dispositivo de memoria conecta...

Страница 86: ...ar 4 4 Presentación 4 4 1 Intervalo Utilice esta función para seleccionar el tiempo durante el que se mostrará cada foto durante la secuencia de diapositivas En el menú principal utilice Abajo para acceder al menú Configuración Utilice Derecha y pulse el botón ACEPTAR para acceder a las opciones del menú Presentación Utilice Arriba para acceder al menú Intervalo Utilice Izquierda o Derecha para se...

Страница 87: ... menú Configuración Utilice Derecha y pulse el botón ACEPTAR para acceder a las opciones del menú Presentación Utilice Arriba o Abajo para acceder al Modo de Reproducción Utilice Izquierda o Derecha para acceder a Simple Repetir Todo Aleatorio Pulse ACEPTAR para confirmar Pulse Salir para abandonar este menú y regresar al menú principal Philips Eros 8DN UM_0914_book indb 19 2009 9 17 上午 09 13 50 ...

Страница 88: ...eatorio Pulse ACEPTAR para confirmar Pulse el botón Salir para abandonar este menú y regresar al menú principal Nota Esta función se aplica a todas las presentaciones de diapositivas almacenadas en los dispositivos Aleatorio reproduce diferentes efectos sin seguir un orden durante la transición de diapositivas 4 4 4 Collage Configure la secuencia de diapositivas en Collage para visualizar múltiple...

Страница 89: ...á al menú Secuencia de diapositivas en cuanto se haya completado la configuración de presentación Pulse el botón Salir para abandonar el menú de Presentación de diapositivas y pulse ACEPTAR para reproducir la imagen en collage Nota 1 En el modo Collage PhotoFrame sólo reproduce las fotos dispuestas en la presentación que usted haya seleccionado Nota 2 La función de Auto orientación funciona tambié...

Страница 90: ...one Ahorrar un 20 o Ahorrar un 50 funcionará con el porcentaje de consumo de energía indicado en todo momento En el menú principal utilice Abajo para acceder al menú Configuración Utilice Izquierda o Derecha para acceder al menú Configuración General Utilice Arriba o Abajo para acceder al menú de configuración Smart Energy Saver Utilice Izquierda o Derecha para seleccionar el Programador de 50 Pro...

Страница 91: ...Derecha para seleccionar Desactivado Pulse el botón ACEPTAR para confirmar la selección 4 5 2 Brillo Cambiar la configuración de brillo del PhotoFrame para conseguir la mejor visualización de fotos En el menú principal utilice Abajo para acceder al menú Configuración Utilice Derecha para acceder a las opciones de Configuración General Utilice Arriba o Abajo para acceder al control de brillo Pulse ...

Страница 92: ...ncipal utilice Abajo para acceder al menú Configuración Utilice Derecha para acceder a las opciones de Configuración General Utilice Arriba o Abajo para acceder al menú de Restablecer Pulse Izquierda o Derecha para seleccionar Sí o No Pulse ACEPTAR para confirmar su configuración y regresar al menú Configuración Pulse Salir para abandonar este menú y regresar al menú principal 4 5 5 Borrar Todos U...

Страница 93: ...para acceder al menú de Smart Copia Utilice Izquierda o Derecha para seleccionar Tamaño u Original para redimensionar las fotos si lo desea Pulse ACEPTAR para confirmar su configuración y regresar al menú Configuración Pulse Salir para abandonar este menú y regresar al menú principal Nota El PhotoFrame le advertirá al usuario con un mensaje de memoria insuficiente cuando no hay suficiente espacio ...

Страница 94: ... Derecha en el menú de configuración Fecha y Hora para ajustar la fecha Utilice los botones Arriba y Abajo para cambiar el día el mes y el año Pulse el botón ACEPTAR para confirmar la fecha establecida 4 6 2 Configuración de la Hora Utilice los botones Izquierda o Derecha en el menú de configuración Fecha y Hora para ajustar la hora Utilice los botones Arriba o Abajo para cambiar las horas y los m...

Страница 95: ...l Pulse el Botón Interruptor para Acceso Fácil para iniciar la secuencia de diapositivas Pulse el botón Izquierda o Derecha para cambiar la foto de la secuencia de diapositivas y acceder a la vista de foto foto en estado de Pausa El icono de pausa desaparecerá después de 3 segundos Pulse los botones Arriba y Abajo para utilizar la función de acercar alejar Zoom Pulse el botón ACEPTAR para desplaza...

Страница 96: ...s de control 1 BOTÓN INTERRUPTOR PARA ACCESO FÁCIL para cambiar entre los modos de foto y reloj 1 botón para desplazarse hacia Arriba Abajo la Derecha o la Izquierda 1 botón ACEPTAR para acceder al menú principal o al menú de edición y para confirmar 1 botón Salir para salir Características Modo de reproducción Secuencia de diapositivas y Exploración de miniaturas Configuración de secuencia de dia...

Страница 97: ...diante el puerto USB El puerto USB sirve únicamente para un dispositivo de memoria en miniatura USB Puedo imprimir fotos desde el PhotoFrame No no admite la impresión directa de fotos Por qué mi dispositivo PhotoFrame no muestra algunas de mis fotos Las cámaras digitales capturan fotos y las almacenan en formato JPEG de acuerdo con las normas industriales para cámaras El PhotoFrame Digital ha sido...

Страница 98: ...uerdo con las instrucciones puede ocasionar interferencias en las comunicaciones por radio Sin embargo no existe garantía de que no se produzcan interferencias en una instalación en particular En caso de que este equipo sí produzca interferencias en la recepción de radio o televisión hecho que puede determinarse al encender y apagar el equipo se recomienda al usuario que trate de corregir la inter...

Страница 99: ...Philips Eros 8DN UM_0914_book indb 31 2009 9 17 上午 09 13 52 ...

Страница 100: ... 2009 Koninklijke Philips N V All rights reserved Philips Eros 8DN UM_0914_book indb 34 2009 9 17 上午 09 13 52 ...

Отзывы: