background image

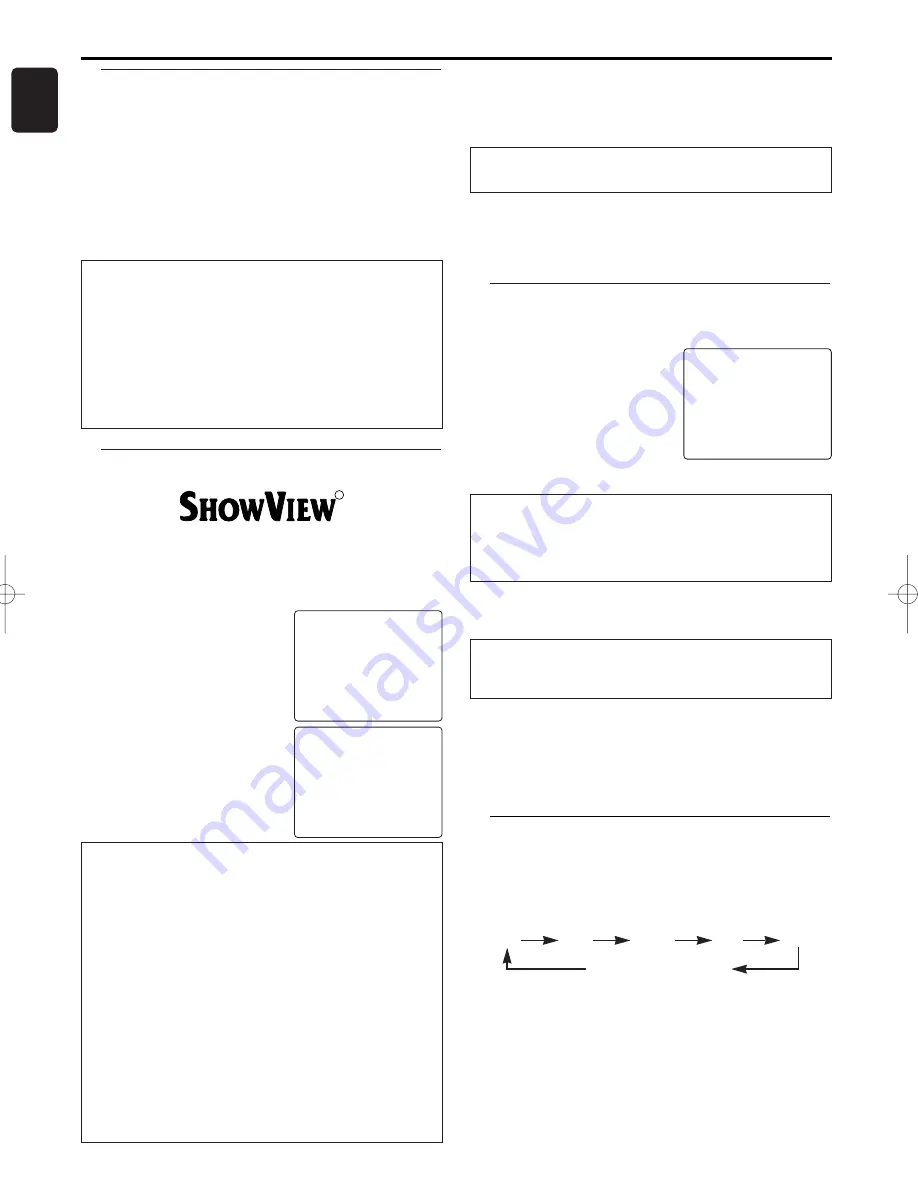
OTR (One Touch Recording)

This function enables you to set a recording length simply by
pressing RECORD on the DVD/VCR.

1

Follow steps 1 to 2 in “Recording without automatic switch-
off” section.

2

Press RECORD on the DVD/VCR repeatedly until the desired
recording length appears.

0:00

0:30

1:00....

7:30

8:00

REC (Normal recording)

• Recording stops when 0:00 is reached.

To check time remaining during an OTR

Press DISPLAY.

To change the recording length during an OTR

Press RECORD until the desired length appears.

To stop an OTR before recording is finished

Press STOP.

To cancel the OTR but continue recording

Press RECORD repeatedly until “REC” appears in the upper
left corner of the TV screen.

General information

Use a TIMER programming to automatically start and stop a
recording at a later time or date.The DVD/VCR will switch to
the right programme number and begin recording at the cor-
rect time.With this DVD/VCR, you can pre-programme up to
eight recordings within a period of one year.To make a pro-
grammed recording, your DVD/VCR needs to know:
* the date you want to make the recording
* the programme number of the TV channel
* the start and stop time of the recording
* VPS or PDC on or off
This information is saved in a TIMER block.

12

English

What is 'VPS/PDC'?

'VPS' (Video Programming System)/ 'PDC' (Programme Delivery
Control) are used to control the start and duration of TV channel
recordings. If a TV programme starts earlier or ends later than
scheduled, the DVD/VCR will turn on and off at the correct time.

What do I need to know about 'VPS/PDC'?

Usually the VPS or PDC time is the same than the start time. But
if your TV guide shows a VPS or PDC time which is different from
the programme’s scheduled start time, e.g. 20.10 (VPS/PDC
20.14), you must enter the VPS/PDC time exact to the minute. If
you want a start time different from the VPS/PDC time, you must
switch VPS/PDC  off.

Programming a recording (with the
'S

HOW

V

IEW

® system')

You no longer need to tediously enter the date, programme
number, start and end time. All the information needed for pro-
gramming is contained in the S

HOW

V

IEW

-programming number.

You can find this S

HOW

V

IEW

number in most TV listing maga-

zines written next to the concerned programme.

1

Press SV/V+.

2

Enter the entire S

HOW

V

IEW

num-

ber.This number is up to 9 digits
long and can be found next to the
start time of the TV programme in
your TV listing magazine. [e.g: 1-
234-5 or 1 234 5]
If you make a mistake, you can
clear your input with CLEAR.

3

Press SV/V+.

4

Select ONCE, DAILY, or WEEKLY
recording with 

K

/

L

.Then press 

B

.

R

ShowView system

ShowView No.

12345 – – – –

SET=SV/V+
CORRECT=CLEAR
END=EXIT

ShowView system

ONCE
DAILY
WEEKLY

SELECT 

K L

CHOOSE 

B

END=EXIT

Selecting once/daily/weekly recordings

Using 

K

/

L

, select from the following options:

'ONCE':

Recording once

'DAILY':

Repeated daily recordings (Monday to Friday)

'WEEKLY.': Repeated weekly recordings (every week on the same

day)

'- -' appears at PROG. .

* The programme number of the TV channel has not yet been

assigned to the S

HOW

V

IEW

number. Using the numerical key

pads, select the corresponding programme number (name) of
the TV  channel.

The following message appears on the screen:'ERROR'

* The  entered  S

HOW

V

IEW

number is incorrect. Correct your input

or end with STATUS/EXIT.

* Check the time/date (see chapter 'Installing your video', section

'Setting the time and date').

* A daily recording was entered for the wrong day. Daily pro-

gramming can only be used for recordings to be made from
Monday to Friday.

The following message appears on the screen:'TIMER
NOT COMPLETED'

* The channel is wrong.

5

The decoded data appears after confirmation.You can go back
to change the data. Select the corresponding input field using

B

or CLEAR. Change the data with numerical key pad.

6

When all inputs are correct, press STATUS/EXIT.The program-
ming information is stored in a Timer block.

7

Insert a cassette with an intact security tab (unprotected).

8

Press TIMER  SET.
'RECORD TIMER' will light up on the DVD/VCR display.

Switching on 'VPS/PDC' in the 'START' input field

Select 'VPS/PDC' using 

B

or CLEAR. Press '1' to switch off

'VPS/PDC' or press '2' to switch on 'VPS/PDC'.

Programming a recording (without the
S

HOW

V

IEW

® system)

1

Press VCR, then DISC/VCR MENU.

2

Select 'TIMER' with 

K

/

L

.Then

press 

B

.

3

Select ONCE, DAILY, or WEEKLY
recording with 

K

/

L

.Then press 

B

.

If all Timer blocks are in use, ‘FULL’
will appear on the OSD.

4

Select the desired Timer block with
numerical key pads. (The flashing
number indicates an empty TIMER block.)

5

Enter the Start time (START) End time (STOP), Programme
number (PROG.),VPS/PDC information and the Date with
numerical key pads.

6

When all inputs are correct, press STATUS/EXIT.The program-
ming information is stored in a TIMER block.

7

Insert a cassette with an intact security tab (unprotected).

8

Press TIMER  SET.

Selecting once/daily/weekly recordings

Using 

K

/

L

, select from the following options:

'ONCE':

Recording once

'DAILY':

Repeated daily recordings (Monday to Friday)

'WEEKLY.': Repeated weekly recordings (every week on the same

day)

Programme numbers of the ' AV1 ' , ' AV2 ' and ' AV3'
scart socket

You can also programme recordings from external sources via
scart socket AV1(TV), AV2 (DECODER) or AV3(FRONT).

SELECT 

K L

CHOOSE 

B

ONCE
DAILY
WEEKLY
TIMER LIST

END=EXIT

Programming a Recording (TIMER)

Содержание ShowView DVD757VR

Страница 1: ...AAA AAA 1 Digital Video Disc Player Video Cassette Recorder DVD757VR DVD757VR R ...

Страница 2: ...If the DVD VCR is brought directly from a cold to a warm location or is placed in a very damp room moisture may condense on the lens of the disc unit inside the DVD VCR player Should this occur the DVD VCR would not operate normally Leave the player on for about one hour with no disc in the DVD VCR until normal playback is possible The mechanical parts of the set contain self lubricating bear ings...

Страница 3: ...rolled recording from a satellite receiver RECORD LINK 11 Direct Record 11 Switching Direct Record on or off 11 Direct dubbing 11 Recording From DVD To VCR 11 3 English Contents Programming a Recording TIMER General information 12 Programming a recording with the SHOWVIEW system 12 Programming a recording without the SHOWVIEW system 12 OTR One Touch Recording 12 How to check or delete a programmed...

Страница 4: ...DVD Stays on when the A B repeat function is on 23 B DVD VCR Stays on when the inserted disc or cassette is being played back 24 k DVD VCR Lights up when the inserted disc comes to a pause DVD Lights up when the playback is in a still or in a slow mode VCR 25 Digital Display DVD VCR Displays how long a current title or track has been played back When a chapter or track has switched the number of a...

Страница 5: ...TURN to return previous or remove setup menu DVD 23 AUDIO to choose audio languages or sound modes DVD to choose sound modes VCR 24 SLOW to view tape playback in slow motion VCR 25 RECORD to record the TV channel selected at this moment or press repeatedly to start a One Touch Recording VCR 26 PAUSE k pause playback temporarily frame by frame playback DVD pause playback and during recording tempor...

Страница 6: ...ooks of your TV VCR Stereo System or other devices as necessary to make the best con nections Make one of the following connections depending on the capabilities of your existing equipment The following guidelines are options for the best picture and sound quality available on your DVD VCR Picture 1 Use SCART RGB Output DVD VCR AV1 TV for best pic ture quality for DVD features 2 Use S VIDEO Output...

Страница 7: ...e exhausted or not to be used for a long time Do not use old and new or different types of batteries in combination Batteries contain chemical substances so they should be disposed off properly and kept away from children External Input Mode for VCR features To receive the signal from an external input decoder satellite receiver video camera another VCR etc connect to the AV2 DECODER socket and en...

Страница 8: ...text regardless of this setting 1 Press VCR then DISC VCR MENU 2 Press K L to select INITIAL SET UP then press B 3 Press K L to select LANGUAGE then press B 4 Select the desired language with K L 5 To end press STATUS EXIT SELECT K L ENGLISH FRANÇAIS ESPAÑOL DEUTSCH ITALIANO SVENSKA NEDERLANDS END EXIT Setting Up your DVD VCR Automatic Channel Setup You can programme the tuner to scan only the cha...

Страница 9: ...XIT What is RF out channel This electronic component in the DVD VCR allows the device to transmit audio and video signals via the aerial cable These signals can be received on a TV set just like TV channels What is RF out channel frequency This frequency or channel indicates the channel on which the audio or video signal is transmitted If you cannot get an interference free picture and sound switc...

Страница 10: ...is is not a fault in your DVD VCR The screen shows 0 01 20 If you rewind a cassette from the tape position 0 00 00 the counter will show for instance 0 01 20 the cassette was rewound to 1 minute and 20 seconds before 0 00 00 minus is not shown in the display is displayed in the REM counter This counter will automatically recognise the length of the tape In addition when you put in a cassette the D...

Страница 11: ...ecording where you want to insert the new recording 2 Look at the last minute of the old recording playback 3 Press PAUSE k at the tape position where the new recording is to go and press RECORD I 4 Now start recording as usual by pressing RECORD I on the remote control 5 Stop recording with STOP C Direct Record With Direct Record you can record the right TV channel in seconds even if your DVD VCR...

Страница 12: ...KLY recording with K L Then press B R ShowView system ShowView No 12345 SET SV V CORRECT CLEAR END EXIT ShowView system ONCE DAILY WEEKLY SELECT K L CHOOSE B END EXIT Selecting once daily weekly recordings Using K L select from the following options ONCE Recording once DAILY Repeated daily recordings Monday to Friday WEEKLY Repeated weekly recordings every week on the same day appears at PROG The ...

Страница 13: ...us so that the sta tus display is not recorded when copying videocassettes 1 Press VCR then DISC VCR MENU 2 Press K L to select VCR SET UP then press B 3 Press K L to select STATUS DIS PLAY then press B 4 Press K L to select ON or OFF then press B 5 To end press STATUS EXIT SELECT K L CHOOSE B STATUS DISPLAY ON BLUE BACKGROUND ON CLOCK DISPLAY ON END EXIT Which settings can I choose ON Shows the s...

Страница 14: ...tions can be carried out using the menu bar on the TV screen DVD V CD Pause 1 During playback press PAUSE k Playback will pause and sound will be muted 2 To continue playback press PLAY B B DVD V CD Disc Menus 1 Press DVD then DISC VCR MENU The DVD main menu will appear 2 If the feature is not available symbol may appear on the TV screen 3 If disc menu is available on the disc audio language subti...

Страница 15: ...discs only x2 zoom is available on video CDs Playing a Disc DVD V Track There are three ways to begin playback on an Audio CD at a spe cific Track Using the Numerical key pads 1 Press numerical key pads to enter the desired Track number Playback will start at the selected track For single digit tracks 1 9 press a single number eg track 3 press 3 To play track 26 press 10 2 6 on the numerical butto...

Страница 16: ...EG files are accompanied by icon Maximum of 255 folders can be recognized Maximum of 256 files can be recognized Up to 8 hierarchies can be created This player recommends the use of files recorded at the below specifications Sampling frequency 44 1kHz or 48kHz Constant bit rate 112kbps 320kbps 3 MP3 OK PLAY JPEG MP3 FOLDER On Screen Information You can check the MP3 files during playback 1 Press D...

Страница 17: ...ck the current Track will be dis played on the TV screen a The elapsed and remaining playing time of the current total track will be displayed 2 Press DISPLAY again to show current Total Track a The elapsed and remaining playing time of the current total track will be displayed 3 Press DISPLAY the third time to remove the display Subtitle Language The DVD VCR allows you to select a language for su...

Страница 18: ...The default setting is OFF Dolby Digital Set to ON when the player is connect ed to Dolby Digital Decoder ON Output by Dolby Digital OFF Convert the Dolby Digital to PCM The default setting is ON DOWN SAMPLING Set to ON when outputting in 48kHz The default setting is ON When playing disc with copyright Protection If you select OFF copyright protection will be activated and sound will be down sampl...

Страница 19: ...acing up Check if the disc is defective by trying another disc Reset the unit by switching the DVD VCR off then on again Aim the remote control directly at the sensor on the front of the DVD VCR Reduce the distance to the DVD VCR Replace the batteries in the remote control Re insert the batteries with their polarities signs as indicated To completely reset the DVD VCR unplug the AC cord from the A...

Страница 20: ...Kirundi 6460 Korean KOR 5761 Kurdish 5767 L N Laothian 5861 Latin 5847 Latvian Lettish 5868 Lingala 5860 Lithuanian 5866 Macedonian 5957 Malagasy 5953 Malay 5965 Malayalam 5958 Maltese 5966 Maori 5955 Marathi 5964 Moldavian 5961 Mongolian 5960 Nauru 6047 Nepali 6051 Norwegian NOR 6061 O R Occitan 6149 Oriya 6164 Oromo Afan 6159 Panjabi 6247 Pashto Pushto 6265 Persian 5247 Polish 6258 Portuguese PO...

Страница 21: ...va 35a 119048 MOSCOW RUSSIA Phone 095 937 9300 PHILIPS INFO CENTER Fegistrasse 5 8957 Spreitenbach SUISSE Tel 0844 800 544 PHILIPS CUSTOMER CARE CENTER Twee Stationsstraat 80 80 Rue des Deux Gares 1070 BURSSEL BRUXELLES BELGIUM for BENELUX Tel 070 222303 PHILIPS Österreichische Philips Industrie GmbH Triesterstrasse 64 1101 Wien AUSTRIA Tel 0810 001 203 PHILIPS INFO CENTER Alexanderstrasse 1 20099...

Отзывы: