background image

70

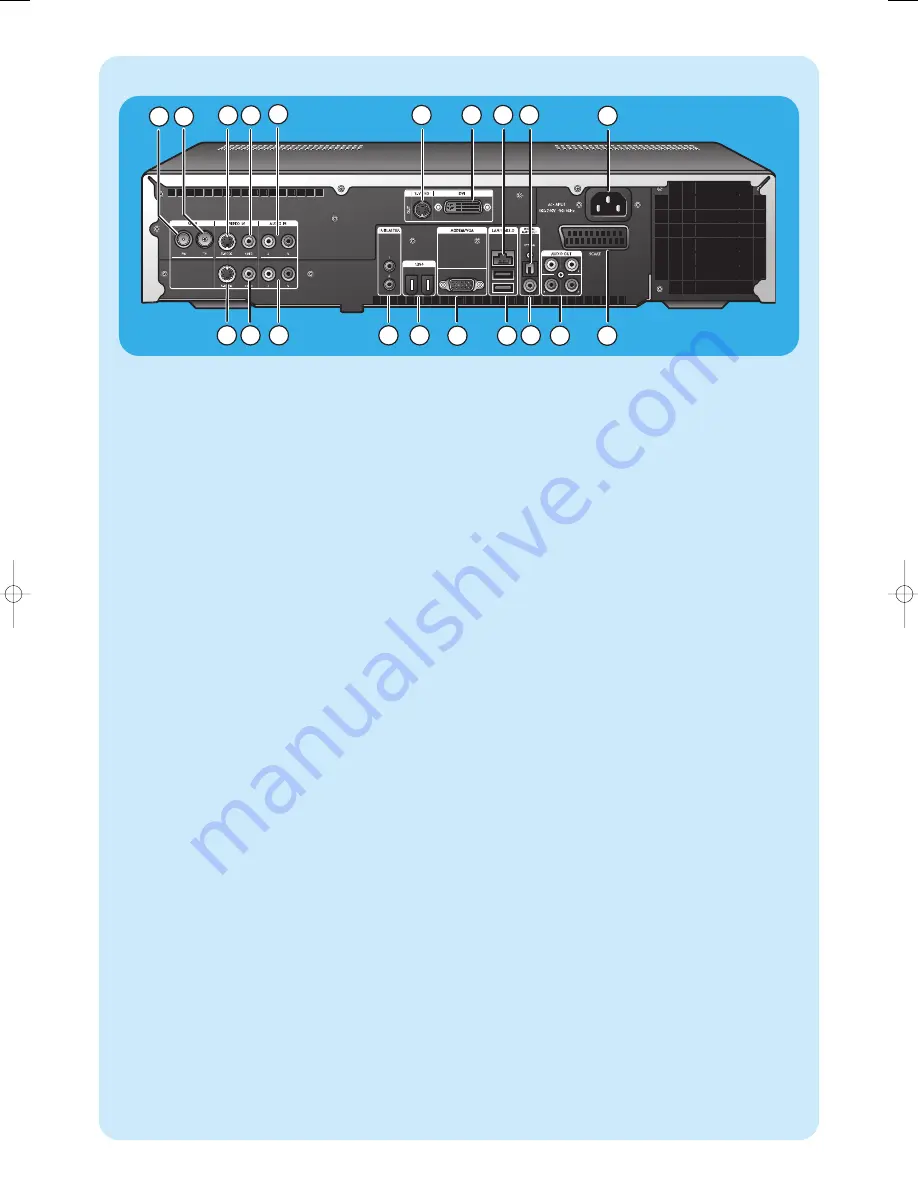
Vue arrière

3

6

4

5

10

15

14

16

17 18

19

20

7

8

9

12

11

13

1

2

1

RF IN - FM - Radio

Branchement du système de réception par câble ou d’une
antenne FM de toit (d’une impédance de 75 W [ohms]).

2

RF IN - TV

Branchement au système de réception par câble.

3

VIDEO IN 

1

- S-Video

Connecteur d’entrée vidéo pour raccordement au 
connecteur de sortie SVideo d’un téléviseur, décodeur
câble/satellite, lecteur/enregistreur de DVD, etc.

4

VIDEO IN 

1

-Video (CVBS)

Connecteur d’entrée vidéo pour raccordement au 
connecteur de sortie CVBS (vidéo composite) d’un 
téléviseur, décodeur câble/satellite, lecteur/enregistreur
de DVD, etc.

5

AUDIO IN 

1

Connecteur d’entrée audio pour raccordement aux con-
necteurs de sortie audio d’un décodeur câble/satellite,
lecteur/enregistreur de DVD, équipement audio, etc.

6

S-VIDEO OUT

Connecteur de sortie pour le raccordement au connec-
teur d’entrée d’équipements d’enregistrement SVideo
(DVD, magnétoscope) ou d’un téléviseur compatible 
SVideo.

7

DVI OUT

Connecteur de sortie DVID (Digital Video Interface –
Digital only) pour le raccordement au connecteur
d’entrée DVID d’un écran compatible ou d’un téléviseur
à écran plat.

8

LAN

Raccordement à votre réseau local.

9

DIGITAL AUDIO - Optical - Out

Connecteur de sortie optique pour raccordement au
connecteur d’entrée optique d’un récepteur, d’un télévi-
seur ou d’un matériel d’enregistrement (graveur de CD,
magnétoscope, etc.).

10 AC-INPUT (100-240V - 50/60Hz)

Raccordement du Media Center au secteur.

11 VIDEO IN 

2

- S-Video

Connecteur d’entrée vidéo pour raccordement au con-
necteur de sortie SVideo d’un téléviseur, décodeur
câble/satellite, lecteur/enregistreur de DVD, etc.

12 VIDEO IN 2 - Video (CVBS)

Connecteur d’entrée vidéo pour raccordement au con-
necteur de sortie CVBS (vidéo composite) d’un télévi-
seur, décodeur câble/satellite, lecteur/enregistreur de
DVD, etc.

13 AUDIO IN 2

Connecteur d’entrée audio pour raccordement aux
connecteurs de sortie audio d’un décodeur câble/satelli-
te, lecteur/enregistreur de DVD, équipement audio, etc.

14 IR (Infrarouge) BLASTER (2 x)

Branchement d’un répartiteur IR (infrarouge) pour
sélectionner les canaux sur votre décodeur câble/satelli-
te avec la télécommande du Media Center.

15 1394 (Firewire / i.LINK) - 6 broches (2 x)

Raccordement de périphériques et de matériels compa-
tibles IEEE 1394 / Firewire / i.LINK tels qu’un disque dur
externe nécessitant deux broches supplémentaires pour
l’alimentation.

16 VGA

Raccordement à un moniteur VGA (Video Graphics
Array) ou à un téléviseur à écran plat.

17 USB 2.0 (2 x)

Branchement de périphériques USB 1.1 et 2.0.

18 DIGITAL AUDIO - COAXIAL - Out

Connecteur de sortie coaxial pour le raccordement au
connecteur coaxial d’entrée d’un récepteur ou d’un
matériel d’enregistrement (par ex., un graveur de DVD).

19 AUDIO OUT (2 x)

Connecteur de sortie audio stéréo pour le raccorde-
ment au connecteur d’entrée audio d’un récepteur ou
d’un matériel d’enregistrement (par ex., un graveur de
DVD).

20 SCART (RGB / CVBS)

Raccordement au connecteur d’entrée Péritel d’un télé-
viseur.

Remarque : les antennes pour réseau local sans fil (802.11b/g)

sont intégrées à l’appareil. Il n’est donc pas nécessai-
re d’y brancher un adaptateur sans fil pour intégrer
le Media Center à votre réseau sans fil.

MCP9350i-23_FR.qxd  04-04-2006  09:19  Pagina 70

Содержание Showline MCP9350I

Страница 1: ...Media Center MCP9350i 23 Schnellinstallationsanleitung 2 Quick install guide 34 Guide d installation rapide 66 DE EN FR ...

Страница 2: ...350i benötigen besuchen Sie bitte die Support Webseite von Philips www philips com support Wenden Sie sich bitte an den Philips Helpdesk wenn Ihr Problem mit dem Besuch der Webseite nicht gelöst werden kann Deutschland 0180 5007 532 0 20 Min ...

Страница 3: ... HDMI Kabel Digitales Audio Cinchkabel koaxial 2 x IR Blaster für Set Top Box Stereo Audio Cinchkabel S Video Kabel Ethernetkabel FM Antennenkabel TV Antennenkabel 1m TV Antennenkabel 10 cm SCART zu SVHS CVBS Adapter Netzkabel Drahtlose Tastatur 3 x AA Batterien Netzkabel MCP 9350i 23 Netzkabel MCP 9350i 21 Netzkabel MCP 9350i 22 ...

Страница 4: ...s Media Centers 19 Microsoft Windows Setup 19 Media Center Setup Assistent 19 Manuelle Kanalsuche 22 Einrichten von zusätzlicher Software 22 Einstellungen ändern 23 Ändern der Bildschirmauflösung 23 Einstellen des Seitenverhältnisses 24 4 Zusätzliche Anschlüsse 26 Anschluss eines Mikrofons 26 Anschluss von Kopfhörern 26 Anschluss einer Videokamera oder einer anderen tragbaren externen Quelle 26 An...

Страница 5: ...kt halten Spielt den Track in Zeitlupe ab wenn sich die DVD im Pausemodus befindet einmal drücken 6 STOP 9 Stoppt die Wiedergabe 7 PLAY PAUSE Startet die Wiedergabe Stoppt die Wiedergabe 8 SMART MEDIA Zum Einführen einer Smart Media Speicherkarte 9 COMPACT FLASH TYPE 1 11 MICRODRIVE Zum Einführen einer Compact Flash Speicherkarte 10 MMC SD Zum Einführen einer MMC SD MultiMedia Card Secure Digital ...

Страница 6: ...m Anschluss des S Video Ausgangs eines Fernsehers einer Set Top Box für Kabel Satellitenempfang eines DVD Players Recorders etc 12 VIDEO IN 2 Video CVBS Videoeingangsbuchse zum Anschluss des CVBS FABS CompositeVideosignal Ausgangs eines Fernsehers einer Set Top Box für Kabel Satellitenempfang eines DVD Players Recorders etc 13 AUDIO IN 2 Stereo Audioeingangsbuchsen zum Anschluss der Audio Ausgänge...

Страница 7: ... Kehrt zurück zum vorherigen Bildschirm 6 1 2 3 4 Tasten für die Bewegung des Cursors nach links recht oben unten Menü Navigationstasten 7 MENÜ Zeigt das Menü der aktuell im optischen Laufwerk eingelegten DVD an 8 Öffnet das Menü der Microsoft Windows XP Media Center Home Edition 9 Lautstärke Reduziert oder erhöht die Lautstärke Ihres Philips TV Geräts Zum Einstellen der Lautstärke der Fernsehgerä...

Страница 8: ...stelligen Programm Kanalnummern 17 Programm Programm Kanal zurück und weiter 18 TV Aufzeichnung Schnellwahltaste für TV Programme die auf der Festplatte des Media Centers gespeichert sind 19 OK Auswahl der gewünschten Aktion oder des gewünschten Fensters verhält sich wie die Enter Taste 20 i Liefert Informationen über das aktuell gewählte TV Programm Liefert zusätzliche Möglichkeiten innerhalb der...

Страница 9: ... Meine Bilder Menü des Media Centers 7 Eigene TV Kanäle Öffnet das Meine TV Kanäle Menü des Media Centers 8 Eigene Videos Öffnet das Eigene Videos Menü des Media Centers 9 Springt im Medium Video und oder Audio jeweils einen Musik Track oder ein DVD Kapitel zurück 10 CD Wiedergabe und DVD Player Bild Musik 11 Stoppt das aktuell abgespielte oder aufzeichnende Medium 12 Springt im Medium Video und o...

Страница 10: ... von Anschluss Ihr TV Gerät Monitor ausgerüstet ist bevor Sie eine Verbindung her stellen Sie finden Ihren Anschluss im oben abgebildeten Überblick Die Reihenfolge 1 6 zeigt auch die Rangfolge der Bildqualität für die verschiedenen Anschlüsse an ACHTUNG Vergewissern Sie sich dass das Media Center ausgeschaltet und vom Netz getrennt ist bevor Sie Geräte anschließen Hinweise Sofern nicht anders ange...

Страница 11: ...wischen der Buchse HDMI IN des TV Monitors und der Buchse DVI OUT 7 des Media Centers Ziehen Sie die Schrauben des DVI Anschlusses Wählen Sie SPDIF oder Analog in Audio Menü des Fernsehens Weitere Information siehe die Bedienungsanleitung des Fernsehens VGA Video input VGA IN TV Monitor VGA 3 VGA Verbindung Verbinden Sie ein VGA Kabel nicht mitgeliefert mit der VGA IN Buchse des TV Geräts Monitors...

Страница 12: ...chwarzweiß sein Vergewissern Sie sich zum Lösen des Problems dass das Videogerät den S Video Ausgang verwendet Schlagen Sie hierzu im Handbuch Ihrer Videoausrüstung nach SCART CVBS Anschluss von Videogeräten z B Set Top Box Video equipment S VIDEO OUT AUDIO OUT L R S Video Verbindung Die S Video Verbindung bietet die beste Bildqualität 1 Verbinden Sie das S Video Kabel mit der S VIDEO OUT Buchse d...

Страница 13: ...ing device L AUDIO IN R Analoge Audioverbindung Verbinden Sie das Stereo Audio Cinchkabel mit den AUDIO IN L R Buchsen des Monitors TV Geräts Receivers oder Aufzeichnungsgeräts und den AUDIO OUT L R Buchsen 20 des Media Centers Analog IR Set top box Anschluss eines IR Blasters 1 Entfernen Sie das Klebeband vom Infrarotsensor des IR Blasters 3 Stellen Sie den IR Blaster vor das IR Empfängerauge der...

Страница 14: ...rbindung benötigen Es gibt drei Möglichkeiten das Media Center an das Internet anzuschließen 1 mit dem Ethernet Kabel über ein DSL Digital Subscriber Line Modem wenn Sie ein Kabelnetzwerk haben 3 mit einer drahtlosen Verbindung über ein DSL Digital Subscriber Line Modem wenn Sie ein drahtloses Netzwerk haben Wenn Sie das Media Center per Kabel oder drahtlos an ein bestehendes Heimnetzwerk mit eine...

Страница 15: ...it Ihrem Netzwerkadapter geliefert wurde Verschlüsselung Die Verschlüsselung des drahtlosen Netzwerkes kann entweder ein WEP oder ein WPA Code sein WEP Wired Equivalent Privacy liefert einen grundle genden Schutz für Heimnetzwerke und verwendet eine 64 oder 128 Bit Verschlüsselung 64 Bit 5 ASCII Zeichen oder 10 HEX Zeichen oder 128 Bit 13 ASCII Zeichen oder 26 HEX Zeichen WPA Wi Fi Protected Acces...

Страница 16: ...hieben Sie die FM Antenne bis Sie den besten Empfang gefunden haben Sichern Sie die Antenne dann in dieser Position Wallsocket 10cm Anschluss der TV Antenne 1 Trennen Sie die Verbindung der TV Antenne mit dem Kabelantennensystem 2 Verbinden Sie das 10 cm lange TV Antennenkabel mit der RF IN TV Buchse 2 des Media Centers und dem Kabel Antennensystem Anschluss von Antennen 1 Entfernen Sie die Abdeck...

Страница 17: ... 1 geht aus Drücken Sie die y STANDBY ON Taste 1 erneut um das Media Center zurück in den Stromsparmodus zu schalten Wechsel in den Bereitschaftsmodus Wenn das Media Center eingeschaltet wird Bereitschaft Ein Anzeige aus drücken Sie die y Bereitschaftstaste 1 auf der Fernbedienung um das Media Center in den Bereitschaftsmodus zu schalten Die Anzeige für Bereitschaft Ein 1 leuchtet rot auf Um das M...

Страница 18: ...e Anzeige Bereitschaft Ein auf der STANDBY ON Taste 1 geht aus 5 Drücken Sie die CONNECT RF KEYBOARD Taste 17 am Media Center 6 Drücken Sie die Taste 1 auf der Tastatur Das Media Center kann jetzt Befehle von der drahtlosen Tastatur empfangen Hinweis Wird es über einen Zeitraum von 5 Minuten nicht ver wendet schaltet die Tastatur in den Bereitschaftsmodus Sie können die Tastatur wieder aktivieren ...

Страница 19: ...n wird wählen Sie Ja und geben Sie den Namen dieser Domain ein 7 Wählen Sie Fertigstellen Microsoft Windows Setup Nachdem Sie Ihr Media Center zum ersten Mal einschalten wird der Eingangsbildschirm des Microsoft Windows Setups angezeigt Befolgen Sie die Anweisungen auf dem Bildschirm um dieses Setup zu fertigzustellen Hinweise Achten Sie darauf Ihren Monitor oder Ihr Fernsehgerät anzuschalten und ...

Страница 20: ...Namen Ihres Netzwerks ein und klicken Sie auf Weiter Wenn Ihr Netzwerk geschützt ist wählen Sie Ja und klicken Sie auf Weiter Geben Sie Ihren Netzwerkschlüssel ein WEP oder WPA ein und klicken Sie auf Weiter Hinweis Bei der Verschlüsselung sind Groß und Kleinschreibung von Bedeutung Das bedeutet dass ABC nicht dasselbe ist wie aBc Media Center Setup Assistent Erforderliches Setup Der Media Center ...

Страница 21: ...n anpassen 1 Wählen Sie eine Anzeigeart 2 Wählen den Verbindungstyp Ihrer Anzeige Hinweis Wenn Sie den SCART Ausgang 21 des Media Centers verwenden wählen Sie Komponente YpbPr 3 Passen Sie die Anzeigeeinstellungen in Anzeigekalibrierung entsprechend Ihrer persönlichen Vorlieben an Hinweis Wenn Sie eine falsche Anzeigeeinstellung wählen kann der Bildschirm schwarz werden Bitte warten Sie etwa 15 Se...

Страница 22: ...aten werden als MPEG 2 Videostream encodiert Eine DVR MS Datei kann auch mit einem Kopierschutz versehen werden so dass sie nur auf dem Media Center abgespielt werden kann Die Module PMM und PMM Transcoder Add on arbeiten zusammen und ermöglichen Ihnen so die Übertragung von Media Center Inhalten auf einen Philips Streamium Client Wir empfehlen Ihnen diese Module nur dann zu verwenden wenn Sie die...

Страница 23: ...sung ändern drücken Sie die OK Taste 19 und wählen Sie Ja im Fenster 10 Verwenden Sie Ihre Tastatur und Maus um die neue Auflösung im dann erscheinenden Fenster Windows XP Anzeigeeigenschaften einzustellen 11 Klicken Sie nach Fertigstellung auf die Vergrößerungstaste des Fensters oben rechts im Media Center Fenster um das Media Center Fenster wieder im Vollbildmodus anzuzeigen Ändern der Bildschir...

Страница 24: ...n einstellen können Auflösung 720 x 576 SCART angeschlossen Standard CRT TV Monitor Auflösung 720 x 576 SCART angeschlossen Standard CRT TV Monitor Auflösung für ein Seitenverhältnis von 16 9 z B 1280 x 720 oder 1920 x 1080 DVI VGA oder HDMI angeschlossen Flachbildschirm Fernseher Monitor Plasma oder LCD Standardbild schirm Es wer den weder Videos noch DVDs abgespielt Videos oder DVDs mit einem Se...

Страница 25: ...imiert entfernt werden ohne das Seitenverhältnis des dargestellten Bildes zu ver zerren Stellen Sie das Seitenverhältnis des wiedergegebe nen Inhalts Video oder DVD ein 1 Drücken Sie die i Taste 20 auf Ihrer Fernbedienung 2 Wählen Sie Zoom und drücken Sie die OK Taste 19 3 Wählen Sie das beste Seitenverhältnis für Ihren Fall 1 2 oder 3 D Stellen Sie die Grafikeinstellungen des Media Centers auf ei...

Страница 26: ...nden Sie den USB Anschluss Ihrer Kamera mit dem USB 2 0 Eingang 15 vorne am Media Center Verwenden Sie hierzu ein USB 2 0 Kabel nicht mitgeliefert Hinweise Verbinden Sie die Kamera unbedingt mit dem Media Center bevor Sie das DV Capture Programm starten Vergewissern Sie sich dass Sie das DV Capture Programm verlassen bevor Sie die Kamera wieder vom Anschluss tren nen Bitte überprüfen Sie ob zusätz...

Страница 27: ...tplattenlaufwerk optisches Laufwerk Portable Media Player Verbinden Sie den Firewire IEEE1394 i LINK Anschluss Ihres tragbaren Media Players z B einen MP3 Player ein Festplattenlaufwerk oder eine Fotokamera mit dem FIREWIRE IEEE1394 i LINK Anschluss 16 vorne am Media Center Verwenden Sie hierzuein Firewire Kabel mit 4 Pins IEEE1394 i LINK nicht mitgeliefert ODER Verbinden Sie den USB Anschluss Ihr...

Страница 28: ... Media Centers eingeschoben werden MS und MS PRO Speicherkarten Sticks können in das MS MS PRO Laufwerk 11 des Media Centers eingeschoben werden Wird eine Speicherkarte zum ersten Mal in die Steckplätze für Speicherkarten SMART MEDIA 8 COMPACT FLASH TYPE 1 11 MICRODRIVE 9 MMC SD 10 oder MS MS PRO 11 des Media Centers eingeschoben erstellt der Explorer vier neue Laufwerksbuchstaben Einen Buchstaben...

Страница 29: ...h Erklärung über die Einhaltung von Sicherheitsvorschriften Dieses Produkt entspricht auch den inter nationalen Sicherheitsanforderungen für Informationstechnik Einrichtungen IEC EN 60950 1 und ist ordnungsgemäß mit dem CE Zeichen für die Verwendung in der Europäischen Union gekennzeichnet Warnhinweise zur Lithiumbatterie SACHTUNG Es besteht ein Explosionsrisiko wenn die Batterien mit Batterien vo...

Страница 30: ...kation notwendig 2 400 2 4835 GHz Belgien Für die Verwendung auf Privatgeländen für den Innen und Außenbetrieb unter 300 m Aktionsradius 2 400 2 4835 GHz Für die Verwendung auf Privatgeländen für den Außenbetrieb und für den Betrieb über öffentlichen Geländen mit einem Aktionsradius über 300 m ist eine Lizenz der IBPT BIPT erforderlich 2 400 2 4835 GHz Drahtlose Interoperabilität Das MCP9350i Medi...

Страница 31: ...mweltschutzbestimmungen entsorgt werden Sicherheitsinformationen Elektrische magnetische und elektromagnetische Felder EMF 1 Philips Royal Electronics produziert und vertreibt viele Endverbraucherprodukte die wie jedes elektronische Gerät die allgemeine Fähigkeit haben elektromagnetische Signale abzugeben und zu empfangen 2 Eines von Philips wichtigsten Geschäftsprinzipien ist es alle notwendigen ...

Страница 32: ...gen zur getrennten Sammlung von Elektro und Elektronik Altgeräten in Ihrem Land Richten Sie sich bitte nach den geltenden Bestimmungen in Ihrem Land und entsorgen Sie Altgeräte nicht über Ihren Haushaltsabfall Durch die korrekte Entsorgung Ihrer Altgeräte werden Umwelt und Menschen vor möglichen negativen Folgen geschützt Der Herstellung nicht autorisierter Kopieren von kopiergeschütztem Material ...

Страница 33: ...33 Notes ...

Страница 34: ...need help with your MCP9350i please visit the Philips support website www philips com support If the website does not provide the solution you are looking for please contact the Philips helpdesk UK 0906 1010 017 0 15 min ...

Страница 35: ...I cable Digital audio cinch coaxial cable 2 x IR blaster for set top box Stereo audio cinch cable S Video cable Ethernet cable FM antenna cable TV antenna cable 1 m TV antenna cable 10 cm SCART to SVHS CVBS adapter Power cable Wireless keyboard 3 x AA batteries Power cable MCP 9350i 23 Power cable MCP 9350i 21 Power cable MCP 9350i 22 ...

Страница 36: ...oard 18 3 Setup of your Philips Media Center 19 Microsoft Windows setup 19 Media Center setup wizard 20 Manual channel search 22 Additional software setup 22 Changing settings 22 Changing screen resolution 23 Adjusting aspect ratio 24 4 Additional connections 26 Connecting a microphone 26 Connecting headphones 26 Connecting a video camera or other portable external source 26 Connecting a portable ...

Страница 37: ...keep pres sed Plays the track in slow motion when the DVD is in pause mode press once 6 STOP 9 Stops playback 7 PLAY PAUSE Starts playback Pauses playback 8 SMART MEDIA For inserting a Smart Media memory card 9 COMPACT FLASH TYPE 1 11 MICRODRIVE For inserting a Compact Flash memory card 10 MMC SD For inserting an MMC SD MultiMedia Card Secure Digital card memory card from a digital camera for exa ...

Страница 38: ...put socket for connecting to the S Video output socket of a TV cable satellite set top box DVD player recorder etc 12 VIDEO IN 2 Video CVBS Video input socket for connecting to the CVBS compo site video output socket of a TV cable satellite set top box DVD player recorder etc 13 AUDIO IN 2 Stereo audio input sockets for connecting to the audio output sockets of a cable satellite set top box DVD pl...

Страница 39: ...PC mode text on off 4 Guide Opens the electronic TV program guide 5 Back Returns to the previous screen 6 1 2 3 4 Cursor left right up and down keys Menu navigation keys 7 MENU Displays the menu of the DVD currently in the optical drive 8 Opens Microsoft Windows XP Media Center edition home menu 9 Volume Adjusts the volume of your Philips TV down and up For adjusting the volume of other TV brands ...

Страница 40: ...gle and double digit program channel numbers 17 Program Program channel down and up 18 Recorded TV Shortcut to TV programs recorded on the Media Center hard disk 19 OK Selects your desired action or window functions like the Enter key 20 i Provides information about the currently selected TV pro gram Provides extra possibilities within different menus 21 Live TV Shortcut for viewing live TV 22 Red...

Страница 41: ...nter 6 My Pictures Opens the My Pictures menu of the Media Center 7 My TV Opens the My TV menu of the Media Center 8 My Videos Opens the My Videos menu of the Media Center 9 Moves the media video and or audio backwards one music track or one DVD chapter at a time 10 Plays the CD and DVD player images music 11 Stops media currently playing or recording 12 Moves the media video and or audio forward ...

Страница 42: ...itor is equipped with before making any connections You can locate your connector in the overview below The sequence 1 6 also indicates the order of picture quality of the various connectors CAUTION Be sure the Media Center is switched off and disconnected from the mains before making any con nections Notes Unless indicated otherwise all Media Center inputs and outputs mentioned are located on the...

Страница 43: ...ded Connect the DVI D to HDMI cable between the HDMI IN socket of the TV monitor and the DVI OUT socket 7 of the Media Center Tighten the screws of the DVI connector Select SPDIF or Analogue in the Audio menu of the TV For more information see the manual of your TV VGA Video input VGA IN TV Monitor VGA 3 VGA connection Connect an VGA cable not supplied to the VGA IN socket the TV monitor and the V...

Страница 44: ...o connection the picture may be black white To solve this problem make sure that the video equipment uses S Video as output For this see the User manual that came with your video equipment SCART CVBS Connecting video e g set top box Video equipment S VIDEO OUT AUDIO OUT L R S Video connection S Video connection offers the best picture quality 1 Connect the S Video cable between the S VIDEO OUT soc...

Страница 45: ...XIAL output 19 of the Media Center Receiver Recording device L AUDIO IN R Analog audio connection Connect the stereo audio cinch cable between the AUDIO IN L R sockets of the monitor TV receiver or recording device and the AUDIO OUT L R sockets 20 of the Media Center Analog IR Set top box Connecting an IR blaster 1 Remove the adhesive tape from the infrared sensor of the IR blaster 3 Place the IR ...

Страница 46: ...nection The Media Center offers three possible ways for connecting to the Internet 1 via the ethernet cable to a DSL Digital Subscriber Line modem if you have a wired network 2 wireless connection to a DSL Digital Subscriber Line modem if you have a wireless network If you connect either wired or wireless the Media Center to an existing home network with centrally shared broadband Internet access ...

Страница 47: ...s base station To check this open the program that came with your network adapter Encryption key The wireless encryption key can be either a WEP code or a WPA code WEP Wired Equivalent Privacy provides basic protec tion for home networks and uses 64 or 128 bit encryption keys 64 bit 5 characters ASCII or 10 characters HEX or 128 bit 13 characters ASCII or 26 characters HEX WPA Wi Fi Protected Acce...

Страница 48: ... the direction of the FM antenna until you find the strongest reception Then secure the anten na in that position Wallsocket 10cm TV antenna connection 1 Disconnect the TV antenna cable from the cable anten na system 2 Connect the 10 cm TV antenna cable to the RF IN TV socket 2 of the Media Center and to the cable antenna system Connecting antennas 1 Remove the battery compartment cover and insert...

Страница 49: ...e Standby On indicator 1 goes out Press the y STANDBY ON key 1 again to put the Media Center back to low power mode Switching to standby When the Media Center is switched on Standby On indicator out press the y Standby key 1 on the remote control to place the Media Center in standby mode The Standby On indicator 1 lights up red To switch the Media Center on again from standby mode press the y Stan...

Страница 50: ... Media Center The Standby On indicator on the STANDBY ON key 1 goes out 5 Press the CONNECT RF KEYBOARD key 17 on the Media Center 6 Press the key 1 on the keyboard The Media Center is now able to receive commands from the wireless keyboard Note When not used for 5 minutes the keyboard switches to standby You can activate the keyboard again by pressing any key except the left and right mouse keys ...

Страница 51: ...rt of a domain select Yes and enter the name of this domain 7 Select Finish Microsoft Windows setup After switching on your Media Center for the first time the initial Microsoft Windows setup screen is displayed Follow the on screen instructions to complete this setup Notes Before switching on the Media Center be sure to switch on your monitor or TV first and select a channel for the Media Center ...

Страница 52: ...e meaning that ABC is not the same as aBC 6 If you have a permanent connection to the Internet always on DSL or cable connection selectYes and click Next 7 Click Test to test your Internet connection If your connection is not working check connectors and cables check your router settings contact your Internet service provider Media Center setup wizard Required Setup Media Center setup wizard guide...

Страница 53: ...djust display settings 1 Select your display type 2 Select the connection type of your display Note If you are using the SCART output 21 of the Media Center select Component YpbPr 3 Adjust display settings to your personal preferences in Display Calibration Note If you select a wrong display setting the screen may turn black Please wait for about 15 seconds then the on screen infor mation will be ...

Страница 54: ...ontained in a DVR MS file is encoded as MPEG 2 video stream A DVR MS file can also be copy pro tected allowing playback only on the Media Center The PMM and PMM add on transcoder modules work together to enable you to stream Media Center content to a Philips Streamium Client We advise you to install these modules only when you intend to use the PMM PMM add on transcoder feature To se tup PMM doubl...

Страница 55: ... Display Settings window and the OK key 19 7 Select Next and press the OK key 19 to display the list of controls in the Display Calibration window 8 Select Aspect Ratio Shape and press the OK key 19 9 Select Change Screen Resolution press the OK key 19 and select Yes in the inset window 10 Use your keyboard and mouse to set the new resolu tion in the Windows XP Display Properties window that appea...

Страница 56: ...ect ratio in various situations Resolution 720 x 576 SCART connected Standard CRT TV monitor Resolution 720 x 576 SCART connected Standard CRT TV monitor Resolution that gives a 16 9 aspect ratio e g 1280 x 720 or 1920 x 1080 DVI VGA or HDMI connected Flat screen TV monitor plasma or LCD Standard screen No video or DVD is played Video or DVD with a 4 3 aspect ratio is played Video or DVD with a 16...

Страница 57: ...ved without distorting the aspect ratio of the displayed image or without displaying only part of the image Adjust the aspect ratio of the played content video or DVD 1 Press the i key 20 on the remote control 2 Select Zoom and press the OK key 19 3 Select the best aspect ratio option for your situation 1 2 or 3 D Adjust the Media Center graphic settings to a 16 9 resolution that gives the best pi...

Страница 58: ...able not supplied OR Connect the USB connector of your camera to the USB 2 0 input 15 on the front of the Media Center For this use a USB 2 0 cable not supplied Notes Be sure to connect the camera to the Media Center before starting the DV Capture program Be sure to exit the DV Capture program before disconnec ting the camera Please check to see if additional software is required to sup port your ...

Страница 59: ...onnecting an xternal drive HDD optical drive Portable Media Player Connect the Firewire IEEE1394 i LINK connector of your portable media player e g an MP3 player Hard Disk Drive or photo camera to the FIREWIRE IEEE1394 i LINK connector 16 on the front of the Media Center For this use a 4 pin firewire IEEE1394 i LINK cable not supplied OR Connect the USB connector of your portable media player e g ...

Страница 60: ...ted into the MMC SD drive 10 of the Media Center MS and MS PRO memory cards sticks can be inserted into the MS MS PRO drive 11 of the Media Center The first time a memory card is inserted in one of the memory card drives SMART MEDIA 8 COMPACT FLASH TYPE 1 11 MICRODRIVE 9 MMC SD 10 or MS MS PRO 11 of the Media Center the explorer creates four new drive letters One for each drive So if the last driv...

Страница 61: ...This product also complies with international safety requirements for Information Technology Equipment IEC EN 60950 1 and is properly CE labeled for use within the European Union Lithium Battery Caution Statement SCAUTION Risk of explosion if the batteries are replaced with an incorrect type Batteries should be recycled where possible Disposal of used batteries must be in accordance with local env...

Страница 62: ...try of Post and Telecommunication 2 400 2 4835 GHz Belgium For use in private premises indoor or outdoor use less than 300m operating range 2 400 2 4835 GHz For use in private premises outdoor use and above public areas exceeding 300m operating range a license from IBPT BIPT is required 2 400 2 4835 GHz Wireless interoperability The MCP9350i Media Center is designed to be interoperable with any wi...

Страница 63: ...ion products and their components must be disposed of in accordance with all appli cable local environmental regulations Safety Information Electric Magnetic and Electromagnetic Fields EMF 1 Philips Royal Electronics manufactures and sells many products targeted at consumers which like any electronic appara tus in general have the ability to emit and receive electro magnetic signals 2 One of Phili...

Страница 64: ...rate collection system for electrical and electronic pro ducts Please act according to your local rules and do not dispose of your old products with your normal household waste The correct disposal of your old product will help prevent potential negative conse quences for the environment and human health The making of unauthorized copies of copy protected material including computer programmes fil...

Страница 65: ...65 Notes ...

Страница 66: ...de pour votre MCP9350i visitez le site web d assistance technique de Philips www philips com support Si vous n y trouvez pas la réponse à votre problème contactez le service d assistance utilisateurs de Philips France 08 9165 0006 0 23 min ...

Страница 67: ... audio numérique 2 répartiteurs IR pour décodeurs Câble coaxial audio stéréo Câble SVideo Câble Ethernet Câble d antenne FM Câble d antenne TV 1 m Câble d antenne TV 10 cm Adaptateur Péritel SVHS CVBS Cordon d alimentation 3 piles AA pour clavier sans fil Cordon d alimentation MCP 9350i 23 Cordon d alimentation MCP 9350i 21 Cordon d alimentation MCP 9350i 22 ...

Страница 68: ...er 19 Configuration de Microsoft Windows 19 Assistant de configuration de Media Center 20 Recherche manuelle des canaux 22 Installation d autres logiciels 22 Modification des paramétres 23 Changement de résolution d écran 23 Réglage du rapport largeur hauteur 24 4 Autres branchements 26 Branchement d un microphone 26 Branchement d un casque 26 Branchement d une caméra vidéo ou autre source portabl...

Страница 69: ... Lecture de la piste au ralenti lorsque le DVD est en mode pause appuyer une fois 6 STOP 9 Arrêt de la lecture 7 PLAY PAUSE Lancement de la lecture Suspension de la lecture 8 SMART MEDIA Insertion d une carte mémoire Smart Media 9 COMPACT FLASH TYPE 1 11 MICRODRIVE Insertion d une carte mémoire Compact Flash 10 MMC SD Insertion de la carte mémoire MMC SD MultiMedia Card Secure Digital par exemple ...

Страница 70: ...vidéo pour raccordement au con necteur de sortie SVideo d un téléviseur décodeur câble satellite lecteur enregistreur de DVD etc 12 VIDEO IN 2 Video CVBS Connecteur d entrée vidéo pour raccordement au con necteur de sortie CVBS vidéo composite d un télévi seur décodeur câble satellite lecteur enregistreur de DVD etc 13 AUDIO IN 2 Connecteur d entrée audio pour raccordement aux connecteurs de sorti...

Страница 71: ...Retour à l écran précédent 6 1 2 3 4 Touches de navigation gauche droite haut et bas Touches de navigation dans les menus 7 MENU Affiche le menu du DVD qui se trouve dans le lecteur optique 8 Ouvre le menu principal de Microsoft Windows XP Media Center edition 9 Volume Réduit ou augmente le volume de votre téléviseur Philips Pour régler le volume d autres marques de téléviseur repor tez vous au ma...

Страница 72: ...canal à un et à deux chiffres 17 Programme Programme canal précédent et suivant 18 TV enregistrée Raccourci vers les émissions RV enregistrées sur le disque dur du Media Center 19 OK Sélectionne l option ou la fenêtre souhaitée fonctionne comme la touche Enter 20 i Affiche des informations sur l émission TV sélectionnée Offre d autres possibilités dans les différents menus 21 TV en direct Raccourc...

Страница 73: ...u Mes images du Media Center 7 My TV Ouvre le menu Ma TV du Media Center 8 My Videos Ouvre le menu Mes vidéos du Media Center 9 Permet de passer directement à la piste musicale précé dente support vidéo et ou audio ou au chapitre de DVD précédent 10 Lance la lecture des images ou de la musique sur le lec teur de CD ou de DVD 11 Arrête la lecture ou l enregistrement en cours 12 Permet de passer dir...

Страница 74: ...viseur écran avant d effectuer tout branchement Vous trouverez votre connecteur en consultant l illustration ci dessous La séquence 1 6 indique également le niveau de qualité d affichage des différents connecteurs ATTENTION Assurez vous que le Media Center est éteint et débranché du secteur avant d effectuer les autres branchements Remarques Sauf indication contraire toutes les entrées et sorties ...

Страница 75: ... est pas un défaut HDMI HDMI IN HD TV Monitor HDMI 2 Connexion HDMI recommandée Branchez le câble DVID HDMI sur la prise HDMI IN du téléviseur écran et la prise DVI OUT 7 du Media Center Serrez les vis du connecteur DVI Sélectionnez SPDIF ou Analogue dans le menu Audio du téléviseur Pour de plus amples informations voir le manuel de votre téléviseur VGA Video input VGA IN TV Monitor VGA 3 Connexio...

Страница 76: ...oir et blanc Pour résoudre ce problème vérifiez que le matériel vidéo utilise la sortie SVideo Pour ce faire consultez le manuel de l utilisateur fourni avec votre matériel vidéo SCART CVBS Branchement vidéo par ex décodeur Video equipment S VIDEO OUT AUDIO OUT L R Connexion SVideo La connexion SVideo offre la meilleure qualité d image 1 Branchez le câble S Video sur la prise S VIDEO OUT du matéri...

Страница 77: ...u Media Center Receiver Recording device L AUDIO IN R Connexion audio analogique Branchez le câble audio coaxial stéréo aux connecteurs AUDIO IN L R de l écran du téléviseur du récepteur ou du matériel d enregistrement et aux prises AUDIO OUT L R 20 du Media Center Analog IR Set top box Raccordement à un répartiteur IR 1 Retirez le ruban adhésif du capteur infrarouge du répartiteur IR 3 Placez le ...

Страница 78: ...nnexion à Internet 1 via le câble Ethernet à un modem DSL Digital Subscriber Line si vous disposez d un réseau câblé 2 par une connexion sans fil à un modem DSL si vous avez un réseau sans fil Si vous raccordez en mode filaire ou sans fil le Media Center à un réseau domestique existant disposant d un accès Internet partagé par tous les ordinateurs vous pouvez raccorder le Media Center directement ...

Страница 79: ...programme fourni avec votre carte réseau Clé de chiffrement la clé de chiffrement peut être un code WEP ou un code WPA WEP Wired Equivalent Privacy assure une protection élémentaire des réseaux domestiques au moyen de clés de chiffrement de 64 ou 128 bits 64 bits 5 caractères ASCII ou 10 caractères hexadécimaux ou 128 bits 13 caractères ASCII ou 26 caractères hexa décimaux WPA Wi Fi Protected Acce...

Страница 80: ...irections jus qu à ce que la réception soit optimale Fixez ensuite l antenne dans cette position Wallsocket 10cm Branchement d antennes de télévision 1 Débranchez le câble d antenne TV du système de réception par câble 2 Branchez le câble d antenne TV de 10 cm au connec teur RF IN TV 2 du Media Center et au système de réception par câble Branchement d antennes 1 Ouvrez le couvercle du compartiment...

Страница 81: ...cateur de veille marche 1 s éteint Appuyez sur la touche y STANDBY ON 1 une nouvelle fois pour remettre le Media Center en veille Mise en veille Lorsque le Media Center est allumé indicateur de veil le marche éteint appuyez sur la touche y Standby 1 de la télécommande pour le mettre en veille L indicateur de veille marche 1 s allume alors en rouge Pour réactiver le Media Center lorsqu il est en ve...

Страница 82: ...teur de veille marche sur la touche STANDBY ON 1 s éteint 5 Appuyez sur la touche CONNECT RF KEYBOARD 17 du Media Center 6 Appuyez sur la touche 1 du clavier Le Media Center est désormais en mesure de recevoir les commandes du clavier sans fil Remarque Lorsqu il est inactif 5 minutes le clavier passe en mode veille Vous pouvez le réactiver en appuyant sur une touche quelconque à l exception des bo...

Страница 83: ... fait partie d un domaine cliquez sur Oui puis saisissez le nom du domaine 7 Sélectionnez Terminé Configuration de Microsoft Windows Lorsque vous allumez le Media Center pour la première fois l écran de configuration de Microsoft Windows apparaît Suivez les instructions à l écran pour terminer l installation Remarques Avant d utiliser le Media Center n oubliez pas d allumer votre écran ou un télév...

Страница 84: ... votre réseau est protégé sélectionnez Oui puis cli quez sur Suivant Saisissez votre clé de réseau WEP ou WPA puis cli quez sur Suivant Remarque la clé de chiffrement est sensible à la casse autre ment dit ABC est différent de aBC 6 Si vous disposez d une connexion Internet permanente DSL ou câble sélectionnez Oui puis cliquez sur Suivant Assistant de configuration de Media Center Configuration re...

Страница 85: ... Center à l écran Cette option vous permet d ajuster l affichage 1 Sélectionnez votre type d écran 2 Sélectionnez le type de connexion de votre écran Remarque si vous utilisez la sortie Péritel SCART 21 du Media Center sélectionnez Component YpbPr 3 Ajustez les paramètres d affichage selon vos préférences personnelles dans Display Calibration étalonnage de l é cran Remarque Si vous sélectionnez un...

Страница 86: ...fie Digital Video Recorder Microsoft La vidéo d un fichier DVRMS est encodée sous la forme d une trame vidéo MPEG2 Un fichier DVRMS peut également être protégé contre la copie pour autoriser sa lecture exclusivement sur le Media Center Conjointement le PMM et l extension transcodeur PMM vous permettent de diffuser du contenu Media Center sur un client Philips Streamium Nous vous conseillons d inst...

Страница 87: ...r la résolution appuyez sur la touche OK 19 puis sélectionnez Oui dans la fenêtre incrustée 10 Utilisez le clavier et la souris pour définir la nouvelle résolution dans la fenêtre des propriétés d affichage de Windows XP qui s ouvre alors 11 Lorsque vous avez terminé cliquez sur la case d afficha ge plein écran dans l angle supérieur droit de la fenêtre de Media Center pour restaurer l affichage e...

Страница 88: ...ée TV tube cathodique écran standard Résolution 720 x 576 Prise Péritel connectée TV tube cathodique écran standard Résolution présentant un rapport largeur hauteur 16 9 par ex 1280 x 720 ou 1920 x 1080 Connexion DVI VGA ou HDMI TV moniteur à écran plat plasma ou LCD Écran standard ni vidéo ni DVD en cours de lecture Lecture d une vidéo ou d un DVD avec un rapport largeur hauteur de 4 3 Lecture d ...

Страница 89: ...réduite supprimées sans fausser le rapport largeur hauteur de l image ou sans afficher seulement une partie de celle ci Réglez le rapport largeur hauteur du con tenu affiché vidéo ou DVD 1 Appuyez sur la touche i 20 de la télécommande 2 Sélectionnez Zoom puis appuyez sur la touche OK 19 3 Sélectionnez le meilleur rapport largeur hauteur pour cette situation situation 1 2 ou 3 D Réglez l affichage ...

Страница 90: ...urni OU Branchez le connecteur USB de votre caméscope au port d entrée USB 2 0 15 situé sur le devant du Media Center Pour ce faire utilisez un câble USB 2 0 non fourni Remarques Veillez à brancher le caméscope au Media Center avant de lancer le programme DV Capture N oubliez pas de refermer le programme DV Capture avant de débrancher le caméscope Vérifiez si un logiciel supplémentaire est nécessa...

Страница 91: ...externe disque dur lecteur optique Portable Media Player Branchez le connecteur Firewire IEEE1394 i LINK de votre lecteur multimédia portable lecteur MP3 disque dur ou appareil photo au connecteur FIREWIRE IEEE394 Firewire i LINK 16 situé sur le devant du Media Center Pour ce faire utilisez un câble Firewire IEEE1394 i LINK à 4 broches non fourni OU Branchez le connecteur USB de votre lecteur mult...

Страница 92: ... le lecteur MMC SD 10 du Media Center Les cartes mémoire memory sticks MS et MS PRO peuvent être insérées dans le lecteur MS MS PRO drive 11 du Media Center La première fois que vous insérez une carte mémoire dans l un des lecteurs de carte SMART MEDIA 8 COMPACT FLASH TYPE 1 11 MICRODRIVE 9 MMC SD 10 ou MS MS PRO 11 du Media Center l explorateur crée quat re nouvelles lettres de lecteur une par le...

Страница 93: ...ernant la sécurité Ce produit est également conforme aux exigences de sécurité internationales relatives aux équipements informatiques à la norme IEC EN 60950 1 et il est estampillé CE et peut à ce titre être utilisé en Union Européenne Avertissement concernant les piles au lithium SATTENTION Risque d explosion si les piles sont remplacées par des piles incompatibles Dans la mesure du possible ell...

Страница 94: ...sation à demander au ministère italien des postes et télécommunications 2 400 2 4835 GHz Belgique utilisation dans des locaux privés en intérieur ou à l extérieur rayon d utilisation inférieur à 300 m 2 400 2 4835 GHz utilisation dans des locaux privés l utilisation en extérieur et dans les lieux publics au delà d un rayon de 300 m nécessite une licence IBPT BIPT 2 400 2 4835 GHz Interopérabilité ...

Страница 95: ...doivent être éliminés conformément à la réglementation environnementale locale en vigueur Sécurité champs électriques magnétiques et électromagnétiques 1 Philips Royal Electronics fabrique et commercialise de nombreux produits s adressant au grand public qui à l instar de tout équipement électronique ont tendance à émettre et à recevoir des ondes électromagnétiques 2 L un des principes fondamentau...

Страница 96: ...produits électriques et électroniques en fin de vie Conformez vous à la législation en vigueur et ne jetez pas vos produits avec les déchets ménagers Seule une mise au rebut adéquate des produits peut empêcher la contamination de l environnement et ses effets nocifs sur la santé Toute reproduction sans autorisation des documents couverts par copyright tels que les logiciels fichiers contenus de di...

Страница 97: ...97 Notes ...

Страница 98: ......

Страница 99: ......

Страница 100: ...without notice Trademarks are the property of Koninklijke Philips Electronics N V or their respective owners 2006 Koninklijke Philips Electronics N V All rights reserved www philips com 3122 475 00 016 Printed in Czech Republic NM RR 4205 ...

Отзывы: