background image

© 2010 Koninklijke Philips Electronics N.V.

All rights reserved.

PT9000_12_UM_V2.0

Содержание PT9000

Страница 1: ... 2010 Koninklijke Philips Electronics N V All rights reserved PT9000_12_UM_V2 0 ...

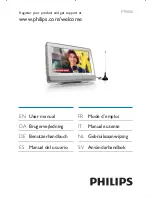
Страница 2: ...ur product and get support at www philips com welcome PT9000 EN User manual DA Brugervejledning DE Benutzerhandbuch ES Manual del usuario FR Mode d emploi IT Manuale utente NL Gebruiksaanwijzing SV Användarhandbok ...

Страница 3: ...Connect a USB device 17 Connect an SD card 17 Connect an external device 18 4 Get started 19 Charge the bulit in battery 19 Install remote control battery 20 Install the stand 21 Use the Home menu 21 Set time and date 22 First time settings 22 Manual search 23 5 Watch TV 25 Turn on 25 Switch channels 25 Adjust volume level 25 View program information DTV 25 Use the electronic program guide DTV 26 ...

Страница 4: ... a theme clock 30 Use the counter 30 Set the alarm timer 30 Watch connected devices 31 7 Adjust settings 32 8 Mount the set 34 TestTV reception quality 34 Preparation 34 Mounting the set 35 9 Product information 37 Product information 37 USB playability information 37 10 Troubleshooting 39 ...

Страница 5: ...ider than the other A grounding type plug has two blades and a third grounding prong The wide blade or the third prong are provided for your safety If the provided plug does not fit into your outlet consult an electrician for replacement of the obsolete outlet Caution To prevent electric shock match the wide blade of the plug to the wide slot fully insert j Protect the power cord from being walked ...

Страница 6: ...such as sunshine fire or the like p Apparatus shall not be exposed to dripping or splashing q Do not place any sources of danger on the apparatus e g liquid filled objects lighted candles r Where the MAINS plug or an appliance coupler is used as the disconnect device the disconnect device shall remain readily operable Warning Never remove the casing of this apparatus Never lubricate any part of this...

Страница 7: ...afe volume level Set your volume control at a low setting Slowly increase the sound until you can hear it comfortably and clearly without distortion Listen for reasonable periods of time Prolonged exposure to sound even at normally safe levels can also cause hearing loss Be sure to use your equipment reasonably and take appropriate breaks Be sure to observe the following guidelines when using your...

Страница 8: ...ed and reused if disassembled by a specialized company Please observe the local regulations regarding the disposal of packaging materials exhausted batteries and old equipment Norge Typeskilt finnes på apparatens underside Observer Nettbryteren er sekundert innkoplet Den innebygde netdelen er derfor ikke frakoplet nettet så lenge apparatet er tilsluttet nettkontakten For å redusere faren for brann ...

Страница 9: ...cluding computer programs files broadcasts and sound recordings may be an infringement of copyrights and constitute a criminal offence This equipment should not be used for such purposes Recording and playback of material might require consent See Copyright Act 1956 and The Performer s Protection Acts 1958 to 1972 ABOUT DIVX VIDEO DivX is a digital video format created by DivX Inc This is an officia...

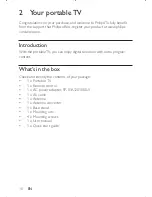
Страница 10: ...lcome Introduction With the portableTV you can enjoy digital television with extra program content What s in the box Check and identify the contents of your package 1 x Portable TV 1 x Remote control 1 x AC power adapter SP 01A1201000 V 1 x AV cable 1 x Antenna 1 x Antenna converter 1 x Base stand 1 x Mounting arm 4 x Mounting screws 1 x User manual 1 x Quick start guide EN ...

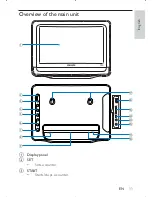
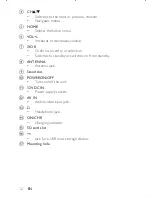
Страница 11: ...11 Overview of the main unit a Display panel b SET Sets a counter c START Starts stops a counter HOME b a p o n m l k j c d e f g i h q English EN ...

Страница 12: ... OK Confirms an entry or selection Switches to standby or switches on from standby h ANTENNA Antenna jack i Stand slot j POWERON OFF Turns on off the unit k 12V DC IN Power supply socket l AV IN Audio video input jack m Headphone jack n ON CHR Charging indicator o SD card slot p Jack for a USB mass storage device q Mounting hole EN ...

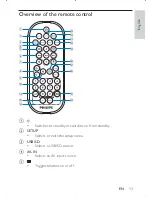
Страница 13: ...itches to standby or switches on from standby b SETUP Selects or exits the setup menu c USB SD Selects a USB SD source d AV IN Selects an AV input source e Toggles teletext on or off a b c e g d f h i j p q r s t v w u k l m n o English EN ...

Страница 14: ...pauses play g Stop h Increases or decreases volume i Mutes or unmutes volume j 0 9 Numeric keypad k Rotates an image l SET Sets a counter m Color keys Selects tasks or options Switches Teletext pages n START Starts stops a counter o Switches the aspect ratio p CH CH Switches to the next or previous channel q Displays program information if available r LIST Accesses or exits the favorite list EN ...

Страница 15: ...ide EPG on or off Enabled on digital channels only t OPTIONS Accesses options relating to the current activity or selection u CLOCK Selects the clock mode v DTV RADIO Selects the digital TV Radio mode w ATV Selects the analog TV mode English EN ...

Страница 16: ...u can connect the unit to the supplied antenna or home antenna not supplied to receiveTV program 1 Connect the supplied antenna to the antenna jack Tip For better reception connect the set to home antenna Connect power 1 Connect the supplied AC adaptor to the set and to the AC outlet EN ...

Страница 17: ...17 Connect a USB device 1 Connect a USB storage device to socket Connect an SD card 1 Connect an SD card to the SD card slot English EN ...

Страница 18: ...device to watch contents on the set 1 Connect an external device to the set with AV cables Match the color of the AV cables not supplied with the jacks the yellow cable is for the yellow video jack the red white cable is for the red white audio jacks AV OUT EN ...

Страница 19: ..._______________ Serial No ___________________________ Charge the bulit in battery Caution Risk of product damage Make sure that the power supply voltage corresponds to the voltage printed on the base of the set Use only the supplied AC adaptor to charge the battery Danger of explosion if battery is incorrectly replaced Replace only with the same or equivalent type Note The type plate is located un...

Страница 20: ...low charge mode To charge the set when it is powered on 1 Slide the POWERON OFF switch to the ON position The set is powered on 2 Connect the supplied AC adaptor to the set and to the AC outlet The charge indicator turns to orange It takes less than 15 hours to fully charge the built in battery When the built in battery is fully charged the charge indicator turns to green Install remote control ba...

Страница 21: ... Close the battery compartment Install the stand You can use the stand to place theTV set on a flat surface To install the stand 1 Align the stand with the slot at the bottom of the set 2 Fit the stand into the slot until it locks into place Use the Home menu 1 Press HOME to display the home menu To watch DTTV programs or listen to DTTV radio select TV Digital To watch analog TV programs select TV ...

Страница 22: ... On 5 Set time and date To set the time and date select Set time Set date To set the date and time format select Set date format Set time format First time settings Set up DTTV channels 1 Press DTV RADIO to switch to the DTTV mode 2 Press SETUP You are prompted to select your country 3 Press to select your country then press You are prompted to perform the auto channel search 4 Select Auto search ...

Страница 23: ... the first found channel press To change channels press CH or CH on the main unit Manual search You can searchTV channels manually Search DTTV channels manually 1 Press DTV RADIO 2 Press SETUP The setup menu is displayed 3 Select DTTV Manual search The manual search screen is displayed 4 Press to add new channels 5 Select channel number then press The manual search starts The number ofTV and radio ...

Страница 24: ...V setup menu is displayed 3 Select Manual search Manual search 4 Press The manual search starts The number of available analogTV channels is displayed after the manual search ends To exit manual search press SETUP EN ...

Страница 25: ...ion Switch to standby 1 To switch the unit to standby mode press on the main unit for 3 seconds To switch on the unit from standby mode press on the main unit Switch channels 1 Press CH CH or Number keys on the remote control You can also press CH on the main unit to switch channels Adjust volume level Press to increase decrease the volume level Press to mute unmute sound View program information ...

Страница 26: ...or control the viewing features Follow the instructions on the teletext screen Use the electronic program guide DTV EPG is an on screen guide available for digitalTV programs You can navigate select and view programs by time or title 1 Select a channel in the digital TV mode 2 Press EPG The Electronic Program Guide menu is displayed 3 Press to select a program 4 Press The brief information of this...

Страница 27: ...e red button You are asked to enter the password 3308 by default To hide the channel press the yellow button To add the channel to your favorite list press the green button Play options 1 During play press SETUP to select some play options 2 Follow the on screen instructions English EN ...

Страница 28: ...play press To select the previous or next audio file press or To stop play press To exit and return to the main menu press HOME on the main unit Note Philips does not guarantee compatibility with all USB SD devices NTFS New Technology File System data format is not supported Play photos Note Make sure that the USB SD device contains JEPG files 1 Connect a USB SD device to the set 2 Press USB SD to s...

Страница 29: ...s and alternate audio tracks Note Video rented or purchased through the DivX VOD Video on Demand service can be played only on the device to which it is registered Enter this set s DivX registration code when you rent or purchase video from www divx com vod This set can play DivX video files that are up to 4GB in size Always stop play before you disconnect a USB device 1 Connect a USB SD device to ...

Страница 30: ...usic in the clock display if you connect a USB SD device with audio files and JEPG files to the set Use the counter 1 At any operation mode press SET repeatedly to set the countdown duration 2 Press START The timer starts counting down When countdown ends the alarm rings To stop the alarm press START Set the alarm timer Note Make sure that you set the clock correctly 1 Press SETUP The setup menu is ...

Страница 31: ...tch connected devices Note Make sure that external devices are connected to the set and work normally 1 Turn on the connected device 2 Press AV IN The contents from the connected device is displayed To change brightness and contrast settings press SETUP and select Brightness or Contrast To exit and return to the main menu press HOME on the main unit English EN ...

Страница 32: ...ge Select on screen display language DivX VOD Get DivX registration code DivX subtitles Select DivX subtitle language Set password Change password Factory settings Restore factory settings Video Brightness Adjust screen brightness Contrast Adjust screen contrast Audio Downmix Adjust down mix settings Audio CH Set audio output channel DTTV Auto search Search channels automatically Manual search Sea...

Страница 33: ...time synchronization on off Alarm Set alarm on off Set Alarm Time Set alarm time Photo Frequency Select intervals for JPEG play Transition Select the effect for slide show Format Select display format Display Select photo display mode Version Check the version information 3 Press to go back to the previous menu 4 Press SETUP to exit English EN ...

Страница 34: ... Connect the supplied antenna to ANTENNA jack 2 Place the main unit as close to open area or window as possible 3 Adjust the place of the main unit until you get good signal reception Preparation Note Ask a friend or professional personnel to safely mount the product under your kitchen cabinet a Find a mounting location near a wall outlet b Use the mounting template to test the design and thicknes...

Страница 35: ...set on a board that is at least 15mm thick 1 Find a spot near a wall outlet and an antenna jack 2 Verify the correct mounting direction 3 Attach the mounting arm to the mounting surface Make sure that the mounting plate is parallel to the mounting surface 4 Fix the supplied screws vertically and firmly into the board 5 Detach all the connections from the set English EN ...

Страница 36: ...36 6 Align the mounting holes 7 Hook the set onto the mounting arm until locked securely 8 Make all the connections EN ...

Страница 37: ...e range 0 40 C 32 104 F TV system DVB T Analogue TV Speaker 2 x 1 5W RMS USB 2 0 Card SD memory card USB playability information Compatible USB devices USB flash memory USB 2 0 or USB 1 1 USB flash players USB 2 0 or USB 1 1 memory cards requires an additional card reader to work with this unit Supported formats USB or memory file format FAT12 FAT16 FAT32 sector size 512 bytes MP3 bit rate data rate ...

Страница 38: ...imum length 128 bytes Unsupported formats Empty albums an empty album is an album that does not contain MP3 WMA files and is not be shown in the display Unsupported file formats are skipped For example Word documents doc or MP3 files with extension dlf are ignored and not played AAC WAV PCM audio files DRM protected WMA files wav m4a m4p mp4 aac WMA files in Lossless format EN ...

Страница 39: ...e is power at the AC outlet Check if the built in battery is drained No response to the remote control Ensure that the path between the remote control and the player is clear from obstacles From a close distance point the remote control directly at the player Replace the remote control batteries The function does not work for this disc Refer to the disc instructions No sound Adjust the volume TV r...

Страница 40: ...has exceeded a certain limit This phenomenon is not a malfunction The formats of these files are not supported Timer does not work Set the clock correctly Switch on the timer Clock timer setting erased Power has been interrupted or the power plug has been disconnected Reset the clock timer EN ...

Отзывы: