background image

10

L

Lo

og

gg

giin

ng

g  yyo

ou

urr  rru

un

nn

niin

ng

g  a

ac

cttiivviittiie

ess

Press 

S

SD

DM

M

for 2 seconds to power on the monitor.  

Press 

R

RU

UN

N

and wait for a beep.  

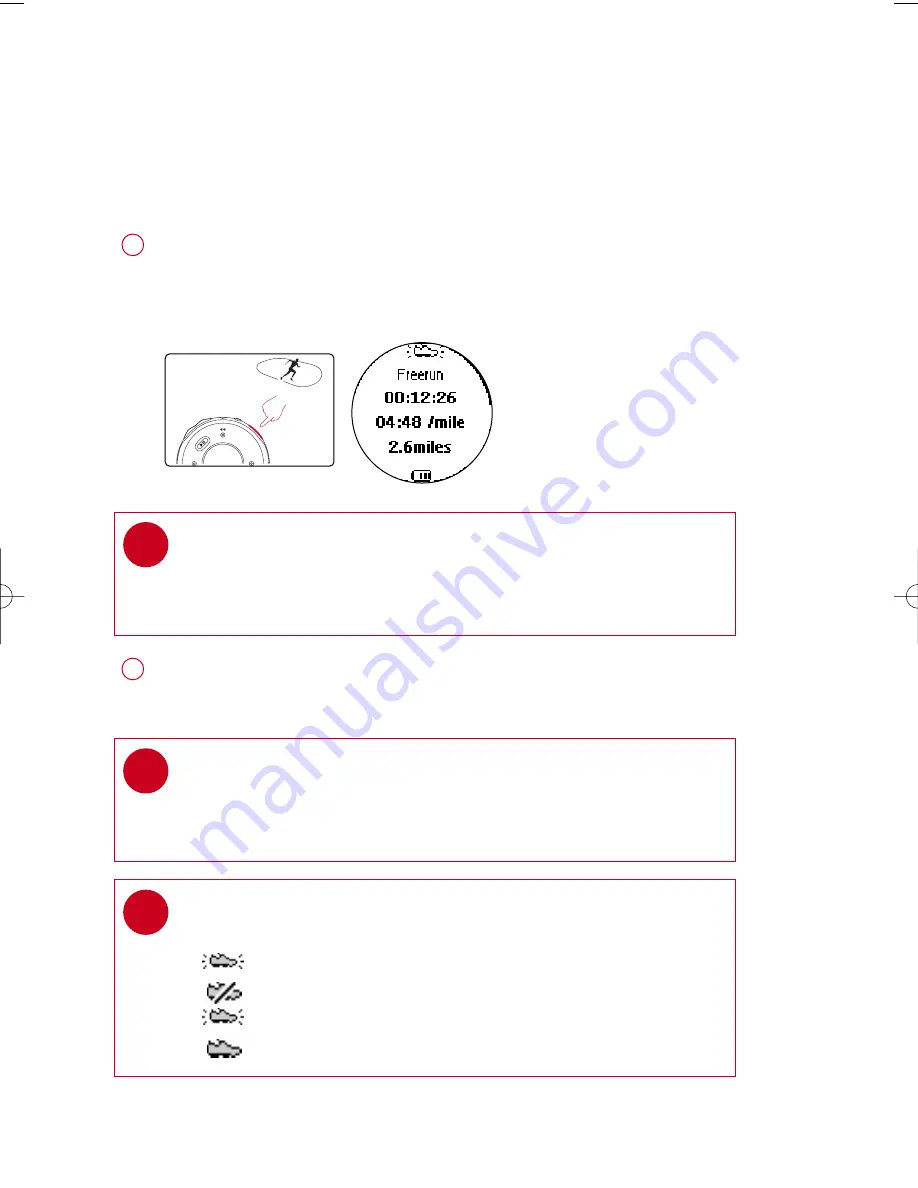
The screen will display an SDM connection status icon.
Start running.  Your running activities will now be logged.

1

TIP

Any radio playback will stop as you start logging your running activities.  
You can select an item from the music mode to accompany your running.  
(See page 4 for more information.)

Press 

R

RU

UN

N

briefly to pause logging.

Press 

R

RU

UN

N

briefly again to resume logging.

2

*Actual display varies with use

TIP

Check your SDM connection status from the following icons:

SDM active

SDM inactive

(blinking) SDM trying to establish connection

SDM not yet sychronized (see page 7)

To keep your workout log synchronized with summer / winter timing, please connect
your player to your computer and start DMM before logging your running activities.

TIP

Use pause to log your running more accurately. 
Press R

RU

UN

N briefly to pause logging after the beep.

Press R

RU

UN

N briefly again to resume logging and start running.

PSA260-eng.qxd  7/8/04  2:48 PM  Page 10

Содержание PSA260

Страница 1: ......

Страница 2: ...o complete installation 1 O Or rg ga an niiz ze e a an nd d t tr ra an ns sf fe er r m mu us siic c v viia a D DM MM M M Mu us siic cm ma at tc ch h Launch DMM Musicmatch on your PC from Windows desktop or S St ta ar rt t menu Organize and transfer music files from your computer to your player 4 TIP Please refer to your computer s manual for the exact position of your USB port Look for the USB sym...

Страница 3: ...ormation 5 H He ea ad dp ph ho on ne es s j ja ac ck k Connects headphones 6 R Ru un n Starts stops recording running activities 7 V Vo oiic ce e f fe ee ed db ba ac ck k Activates running feedback 8 3 3 5 5 Up Previous Fast rewind 9 2 2 Right 0 4 4 6 6 Down Next Fast forward U US SB B p po or rt t Open cover to connect to computer charge your player C Ch ha ar rg giin ng g s so oc ck ke et t S SD...

Страница 4: ... tr ra as st t L La an ng gu ua ag ge e S Sy yn nc ch hr ro on niiz ze e Press and hold 2 2 to power on See specific chapters for details of each setting 2 e g Playlist001 PlaylistXXX e g A Z Preset 1 Preset 10 Autosearch 3 3 1 1 2 2 4 4 Up Down Left Right 1 4 4 e g A Z e g A Z e g A Z R Ru un nn niin ng g H Hiis st to or ry y List of Freerun logs by date C Ca al liib br ra at tiio on n M Ma an nu...

Страница 5: ... er ra at tiio on n Library options Artists list Playscreen Press 3 3 3 3 for the previous or 4 4 for the next track Press 3 3 to play the same track again Press and hold 4 4 to fast forward or 3 3 to rewind in a track during playback 4 Press and hold 2 2 to power off Your player will save your current music playback status and resume next time you power on 5 Press 2 2 to pause during playback 3 A...

Страница 6: ...brary option Press 2 2 on A Ar rt tiis st t to display the artist library Press 2 2 for the next or 1 1 for the previous level of library 2 Artists list in alphabetical order Press and hold 4 4 for 2 seconds to scroll down quickly Press and hold 3 3 for 2 seconds to scroll up quickly Release button to stop scrolling 3 Browsing tracks quickly 1 Actual display varies with use 5 ...

Страница 7: ...o stay in place during running 2 TBD TBD After running is completed terminate the logging see page 11 Press and hold S SD DM M for 2 seconds to power off your monitor after use 4 TIP Batteries contain chemical substances so they should be disposed of properly Incorrect use of batteries can cause the electrolyte leakage and will corrode the compartment or cuase the batteries to burst Remove the bat...

Страница 8: ...ds The speed and distance monitor light will blink rapidly x3 Wait for the player screen to display S Sy yn nc ch hr ro on niiz ze e c co om mp pl le et te e Your player is now synchronized with your monitor 3 6 S E C S Sy yn nc ch hr ro on niiz ziin ng g p pl la ay ye er r w wiit th h s sp pe ee ed d a an nd d d diis st ta an nc ce e m mo on niit to or r Please synchronize your player with the sp...

Страница 9: ...N again when you have completed your track Press 2 2 to save the calibration value 3 TIP If you want to stop the calibration during running press 1 1 to discard the calibration value Your speed and distance monitor provides unprecedented accuracy right out of the box In addition an optional calibration procedure can be performed to guarantee optimal accuracy for a specific user which will correct ...

Страница 10: ...nitor is under measuring a known distance increase the offset value Different shoe models may affect the monitor s calibration Adjust the offset value accordingly if you notice differences between shoes 3 To optimize SDM performance for different running style you can manually calibrate the SDM TIP If you run 400m and the monitor returns a reading of 380m 5 under you should adjust the offset value...

Страница 11: ...ge 4 for more information Press R RU UN N briefly to pause logging Press R RU UN N briefly again to resume logging 2 Actual display varies with use TIP Check your SDM connection status from the following icons SDM active SDM inactive blinking SDM trying to establish connection SDM not yet sychronized see page 7 To keep your workout log synchronized with summer winter timing please connect your pla...

Страница 12: ...ion in English about your running progress 2 TIP You can also get feedback automatically according to distance every km mile and time every 5 minutes Select this option from S SE ET TT TI IN NG GS S V VO OI IC CE E F FE EE ED DB BA AC CK K 0 5 SEC 1 SEC G Ge et tt tiin ng g f fe ee ed db ba ac ck k o on n y yo ou ur r r ru un nn niin ng g Voice feedback will be available 2 minutes after logging st...

Страница 13: ... Press 2 2 to automatically select the 10 strongest radio stations Press 1 1 to abort A AU UT TO O S SE EA AR RC CH H 2 Press 3 3 to scroll up or 4 4 to scroll down for your preset Press 2 2 to play the selected station 3 Radio mode no station stored Stations tuned TIP Connect your headphones before you start tuning No stations are tuned if you are using your player for the first time Some setting...

Страница 14: ... 3 3 to fine tune tune step by step Press and hold 4 4 to search for the next available station Press and hold 3 3 for the previous available station Press 1 1 to abort searching Press 2 2 to save your setting 3 Manual tuning Station stored TIP If you want to discard the newly searched station press 1 1 to exit the radio menu Radio preset menu 2 Actual display varies with use 13 ...

Страница 15: ...To list your running history select HISTORY and press 2 2 Your running logs will be listed by date 2 Actual display varies with use 14 Press 3 3 or 4 4 to select your running log Press 2 2 to view the results of the highlighted running log 3 If you want to delete the running log press 2 2 as prompted If you want to keep the running log press 1 1 4 ...

Страница 16: ...roll down for your setting Press 2 2 for next or 1 1 for previous levels of options 2 Settings mode Repeat Shuffle Strobe light Equalizer Press 2 2 to confirm your selection 3 TIP To display player information select and highlight F Fa ac ct to or ry y s se et tt tiin ng gs s press and hold 2 2 for 2 seconds Actual display varies with use 15 ...

Страница 17: ...n ng gu ua ag ge e B Ba ac ck kl liig gh ht t C Co on nt tr ra as st t F Fa ac ct to or ry y s se et tt tiin ng gs s on o of ff f Rock Funk Techno o of ff f HipHop Shuffle Shuffle Repeat o of ff f Repeat All 5 sec 1 10 0 s se ec c 30 sec Off Levels 1 to 10 L Le ev ve el l 7 7 Restore Cancel Default setting in b bo ol ld d 16 on o of ff f S Sy yn nc ch hr ro on niiz ze e V Vo oiic ce e f fe ee ed d...

Страница 18: ...nd and player holder to wear player on your arm 17 S St tr ro ob be e L Liig gh ht t Strobe light is an illumination technology setting that allows the backlit LCD display to gradually radiate bursts of light enhancing visibility of the runner in low light conditions ...

Страница 19: ...ese include running log management running log upload to support site playlist creation MP3 WMA transfer for playback on player paths and supporting link for DMM software and player firmware upgrades A Ab bo ou ut t D Diig giit ta al l M Me ed diia a M Ma an na ag ge er r D DM MM M Actual display varies with use 18 ...

Страница 20: ...o your computer s CD ROM drive 1 Follow screen instructions to begin and complete DMM installation 2 Launch DMM to customize your settings when prompted to do so 3 Select DMM s display language Specify one or more music folder Actual display varies with use 19 ...

Страница 21: ...tings New running data on your player will be automatically transferred to DMM Please wait for the process to complete Never disconnect the USB cable while transfer is in progress 2 Organize your running data music and playlists in DMM 3 Transfer your music from DMM to your player 4 TIP Please refer to your computer s manual for the exact position of your USB port Look for the USB symbol on the pr...

Страница 22: ...OU UT TS S Click on desired workout to show detailed information 2 2 1 3 4 5 6 Workout information area 3 P PL LA AY YE ER R S ST TA AT TU US S Displays player connection status 4 T Tr ra an ns sf fe er r t to o o on nl liin ne e l lo og g w we eb bs siit te e transfer all workhout history to online log website 5 Click to display workout history according to pace speed or distance 6 T Tr ra as sh ...

Страница 23: ...ick on T Tr ra an ns sf fe er r t to o o on nl liin ne e l lo og g w we eb bs siit te e 1 Login Create new user name in the pop up screen as shown above 2 Click O OK K to complete your transfer Do not disconnect your internet connection until transfer completes 3 TIP DMM will transfer a summary of your workout log to the online log website ...

Страница 24: ...s siic c f fo ol ld de er rs s For adding deleting or re arranging your Music folders in music tab only T Tr ra an ns sf fe er r o op pt tiio on ns s For selecting transfer options in music tab only D Diis st ta an nc ce e u un niit ts s For selecting distance units I In nt te er rn ne et t c co on nn ne ec ct tiio on n For selecting internet connection options P Pl la ay ye er r f fiir rm mw wa a...

Страница 25: ... IC C displays the contents of your player click on to minimize maximize 2 N Ne ew w p pl la ay yl liis st t creates a new playlist I Im mp po or rt t m mu us siic c adds music or playlist T Tr ra as sh h deletes selection E Ed diit t I ID D3 3 t ta ag g edits track information of selected track S Se ea ar rc ch h searches for music from M MY Y M MU US SI IC C and or P PL LA AY YE ER R M MU US SI ...

Страница 26: ...PL LA AY YE ER R M MU US SI IC C 2 1 2 5 6 8 9 3 4 S Sc cr ro ol ll l b ba ar r 3 P Pu ul ll l d do ow wn n m me en nu us s 4 T Te ex xt t a ar re ea a type your search criteria here 5 transfers highlighted tracks and or playlists 6 H He ea ad de er r s se ep pa ar ra at to or r resizes column width 7 P Pl la ay ye er r m me em mo or ry y iin nd diic ca at to or r shows available memory on your pl...

Страница 27: ...iew displays item contents in full 1 track playlist not on the player 2 1 2 3 4 5 Click to highlight an item Press Delete on your keyboard to delete the highlighted item 3 indicates track is playing by DMM 4 collapsed view item contains more contents to display 5 Actual display varies with use 26 ...

Страница 28: ...P PO OR RT TA AN NT T K KE EE EP P A A C CO OP PY Y O OF F Y YO OU UR R O OR RI IG GI IN NA AL L F FI IL LE ES S Please keep a copy of the original files transferred to your player Philips is not responsible for any loss of content if the player is damaged or not readable Actual display varies with use TIP Press and hold Ctrl on your keyboard and click to select more than one item To select consec...

Страница 29: ...estination 3 I IM MP PO OR RT TA AN NT T K KE EE EP P A A C CO OP PY Y O OF F Y YO OU UR R O OR RI IG GI IN NA AL L F FI IL LE ES S Please keep a copy of the original files transferred to your player Philips is not responsible for any loss of content if the player is damaged or not readable Actual display varies with use TIP Press and hold Ctrl on your keyboard and click to select more than one it...

Страница 30: ...laylist 2 Hold the mouse button and move your selection to a destination playlist 3 Your selected track is now in the playlist 4 TIP Press and hold Ctrl on your keyboard and click to select more than one item To select consecutive items click the first item press and hold Shift on your keyboard and then click the last item Actual display varies with use 29 ...

Страница 31: ... Enter to save your new playlist You can now drag more tracks to the new playlist 3 Click on to import a playlist 1 Fill in the information in the pop up window 2 Follow screen instructions to import your new playlist You can now drag more tracks to the imported playlist 3 I Im mp po or rt t P Pl la ay yl liis st ts s Actual display varies with use 30 ...

Страница 32: ...tion to to delete 2 Alternatively press Delete on your keyboard to delete your selection 3 Actual display varies with use TIP Press and hold Ctrl on your keyboard and click to select more than one item To select consecutive items click the first item press and hold Shift on your keyboard and then click the last item 31 ...

Страница 33: ...Ed diit to or r 2 Click on the text boxes of T Tr ra ac ck k n na am me e T Tr ra ac ck k n nu um mb be er r A Ar rt tiis st t A Al lb bu um m G Ge en nr re e Y Ye ea ar r C Co om mm me en nt ts s to edit relevant information 3 Click on O OK K to save the information Click C Ca an nc ce el l to discard changes made 4 Actual display varies with use 32 ...

Страница 34: ...ching 2 You will see tracks and or playlists that contain the search string 3 You can transfer delete or drag and drop these tracks as described in previous sections 4 TIP Deleting items from the searched results will delete them from your library Click on the S Se el le ec ct to or r p pa an ne el l to exit the search view 5 Actual display varies with use 33 ...

Страница 35: ... MU US SI IC C When the content panel is reduced to a certain size the content panel will only show the section icon 2 D Dr ro op p Z Zo on ne e When P PL LA AY YE ER R M MU US SI IC C is minimized you will see a D Dr ro op p Z Zo on ne e You can drag selected items and drop them here Note that the D Dr ro op p Z Zo on ne e icon turns grey when player memory is full 3 DMM provides different view o...

Страница 36: ...ck on the contents header Track Artist Album Genre to arrange music tracks according to the order you selected 1 D De et ta aiil le ed d s su um mm ma ar ry y v viie ew w Click on the next to the contents header to turn on turn off detailed display of item contents 2 detailed view summary view 35 ...

Страница 37: ... Click P Pr re ef fe er re en nc ce es s P Pl la ay ye er r F Fiir rm mw wa ar re e U Up pg gr ra ad de e F Fiir rm mw wa ar re e This will give you further information on how to download and upgrade your player firmware 1 Follow screen instructions to complete firmware upgrade 2 TIP Because you are updating the program of your player please make sure your player is connected to your computer befo...

Страница 38: ...pplications including DMM 1 From the Start menu go to Control Panel Select Add Remove Programs Select DMM from your currently installed programs to uninstall 2 For further information on uninstalling programs please refer to Windows user manual 3 37 ...

Страница 39: ...r does not respond Player busy Press and hold VOLUME and 3 3 to reset Press and hold 2 2 for 2 seconds to power on again if the power on screen does not appear automatically Automatic power off Your player automatically powers if there is no operation and no music played within 20 seconds Press and hold 2 2 to power on T Tr ro ou ub bl le es sh ho oo ot tiin ng g 1 1 If a fault occurs first check ...

Страница 40: ...s not shown in Track format not Ensure that all your music on your by packed music supported computer is in formats supported by management software your player SDM doesn t work Synchronization problem Please synchronize your player with the speed and distance monitor if you have bought a new speed and distance monitor see page 7 Workout started before Wait for the and the audible SDM connection i...

Страница 41: ...Never close DMM while file transfer is in progress Operate using one file management system only When transferring files do not attempt to transfer files via Windows Explorer whilst waiting for transfer to complete on DMM Do not delete any track via Windows Explorer when file transfer is active in DMM If you wish to delete a file please only do so from either DMM or from Windows Explorer after fil...

Страница 42: ...couraged to try to correct the interference by one or more of the following measures 0 Relocate the receiving antenna 0 Increase the separation between the equipment and receiver 0 Connect the equipment into an outlet on a circuit different from that to which the receiver is connected 0 Consult the dealer or an experienced radio TV technician for help Notice for Canada This Class B digital apparaa...

Страница 43: ...s I ID D3 3 t ta ag g s su up pp po or rt t Album title genre title track title and artist name S St to or ra ag ge e M Me ed diia a Mass storage class 256MB NAND Flash Music memory capacity up to 65 MP3 tracks 128kbps or 130 WMA tracks 64kbps Actual formatted capacity will be less T Tu un ne er r Frequency range 87 5 108 MHz Station presets 10 Tuner bands FM stereo C Co on nn ne ec ct tiiv viit t...

Страница 44: ...www nike philips com type number psa260 2004 Phillips Nike Inc All rights reserved Meet Philips Nike on the Internet http www nike philips com ...

Отзывы: