background image

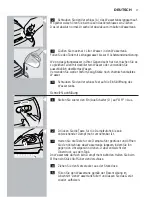
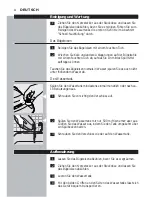
- Stellen Sie das Bügeleisen immer auf die Abstellfläche. Stellen Sie das

heiße Bügeleisen nie auf den Verbindungsschlauch oder das
Netzkabel.

- Die Abstellfläche und die Bügelsohle können sehr heiß werden und

bei Berührung zu Verbrennungen führen. Achten Sie beim Bewegen
des Wassertanks darauf, die Abstellfläche nicht zu berühren.

- Achten Sie darauf, dass das Netzkabel nicht mit der heißen

Bügelsohle in Kontakt kommt.

- Behinderte Personen sollten bei Benutzung des Geräts beaufsichtigt

werden. Achten Sie darauf, dass Kinder nicht mit dem Gerät spielen.

- Sollte während des Aufheizens aus der Einfüllöffnung Dampf

entweichen, schalten Sie das Gerät aus und setzen Sie sich mit einem
Philips Service Center in Verbindung.

- Nehmen Sie den Verschluss keinesfalls vom Wassertank, während

dieser unter Druck steht. Befolgen Sie die Anweisungen im Abschnitt
'Schnell-Nachfüllung', bevor Sie den Verschluss öffnen.

Vorbereitung zum Gebrauch

1

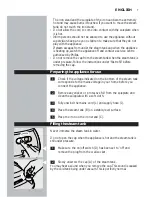
Prüfen Sie vor dem ersten Gebrauch, ob die Spannungsangabe

unter dem Wassertank mit der örtlichen Netzspannung
übereinstimmt.

2

Entfernen Sie die Schutzfolie und alle Aufkleber von der

Bügelsohle und reinigen Sie die Bügelsohle mit einem weichen
Tuch.

3

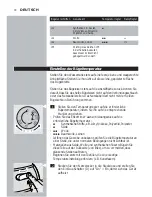
Ziehen Sie das Netzkabel (L) und den Verbindungsschlauch (J)

ganz heraus.

4

Stellen Sie den Wassertank (B) auf eine feste, ebene und

waagerechte Fläche.

5

Stellen Sie das Bügeleisen auf die Abstellfläche (C).

Den Wassertank  füllen

Tauchen Sie den Wassertank niemals in Wasser.

Öffnen Sie den Verschluss nicht, wenn das Gerät heiß ist und der
Wassertank noch unter Druck steht.

C

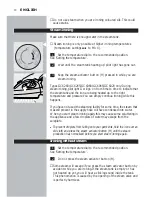
1

Achten Sie darauf, dass der Ein/Aus-Schalter (D) auf "Off" (=

Aus) steht. Ziehen Sie außerdem den Netzstecker.

DEUTSCH

16

Содержание Provapor GC6021

Страница 1: ...Provapor GC6268 GC6265 GC6263 GC6259 GC6257 GC6068 GC6065 GC6063 GC6059 GC6057 GC6029 GC6021 GC6018 ...

Страница 2: ...2 ...

Страница 3: ...3 G I H J K E L D C B A F M N O ...

Страница 4: ...4 ...

Страница 5: ...ENGLISH 6 DEUTSCH 15 FRANÇAIS 25 NEDERLANDS 34 ESPAÑOL 43 ITALIANO 52 PORTUGUÊS 61 GC6268 GC6265 GC6263 GC6259 GC6257 GC6068 GC6065 GC6063 GC6059 GC6057 GC6029 GC6021 GC6018 5 ...

Страница 6: ...is damaged in any way Regularly check if the mains cord and the supply hose are still undamaged and safe If the mains cord is damaged it must be replaced by Philips a service centre authorised by Philips or similarly qualified persons in order to avoid a hazard Do not use any other cap on the steam tank than the cap that has been supplied with the appliance as this cap also functions as a safety v...

Страница 7: ...fill before removing the cap Preparing the appliance for use 1 Check if the voltage indicated on the bottom of the steam tank corresponds to the mains voltage in your home before you connect the appliance 2 Remove any sticker or protective foil from the soleplate and clean the soleplate with a soft cloth 3 Fully unwind the mains cord L and supply hose J 4 Place the steam tank B on a stable level s...

Страница 8: ...aping from the appliance 3 Keep the steam activator button pressed in and slowly unscrew the cap of the steam tank by turning it anti clockwise This will depressurise the steam tank Make sure there is no remaining steam left in the steam tank Place a piece of rug over the cap while unscrewing 4 Remove the mains plug from the wall socket 5 Fill the steam tank as described in section Filling the ste...

Страница 9: ...nce heat up by setting the on off switch D to on 3 Cold start the steam tank and the soleplate will now be heated up The soleplate takes approximately 2 minutes to heat up and the steam tank takes approximately 8 minutes to heat up 4 Quick reheat if you refill the steam tank during the ironing process the water in the steam tank will take approximately 6 minutes to heat up 5 Types GC6268 GC6265 GC...

Страница 10: ... If you have not used the steaming facility for some time the steam that was still present in the supply hose will have condensed into water When you start steam ironing again this may cause some spluttering in the appliance and a few droplets of water may escape from the soleplate B To prevent droplets from falling onto your garments hold the iron over an old cloth and press the steam activator b...

Страница 11: ...e steam ironed by holding the iron in vertical position Never direct the steam at people Shot of steam types GC6268 GC6068 GC6029 only A powerful shot of steam helps remove stubborn creases C 1 For a shot of steam set the steam control F to R the large cloud and set the temperature dial l to position 3 or MAX C 2 Press both the steam activator button H and the shot of steam button N Variable steam...

Страница 12: ...t the steam control to position q and let the appliance cool down before you put it away Cleaning and maintenance 1 Remove the mains plug from the wall socket and let the iron cool down before you start cleaning it If you want to clean the steam tank follow the first four steps of the Fast refill section Iron 1 Clean the iron with a damp cloth 2 Wipe scale and any other deposits off the soleplate ...

Страница 13: ...Philips Web site at www philips com or contact the Philips Customer Care Centre in your country you will find its phone number in the worldwide guarantee leaflet If there is no Customer Care Centre in your country turn to your local Philips dealer or contact the Service Department of Philips Domestic Appliances and Personal Care BV Troubleshooting This chapter summarises the most common problems y...

Страница 14: ...ormal with a new iron The temperature dial I has been set to a temperature that is too low for steam ironing The steam tank has been placed on an unstable and or uneven surface When you start steam ironing the hose is cold Steam condenses in the hose causing droplets of water to escape from the soleplate The steam tank has not been switched on The steam tank heating up pilot light is still on type...

Страница 15: ...irgendeiner Hinsicht defekt oder beschädigt ist Prüfen Sie regelmäßig den Verbindungsschlauch und das Netzkabel auf Unversehrtheit und Sicherheit Wenn das Netzkabel defekt oder beschädigt ist darf es nur von einem Philips Service Center oder einer von Philips autorisierten Werkstatt ausgetauscht werden um ein Sicherheitsrisiko zu vermeiden Verwenden Sie zumVerschließen des Wassertanks ausschließli...

Страница 16: ...enVerschluss keinesfalls vom Wassertank während dieser unter Druck steht Befolgen Sie die Anweisungen im Abschnitt Schnell Nachfüllung bevor Sie denVerschluss öffnen Vorbereitung zum Gebrauch 1 Prüfen Sie vor dem ersten Gebrauch ob die Spannungsangabe unter dem Wassertank mit der örtlichen Netzspannung übereinstimmt 2 Entfernen Sie die Schutzfolie und alle Aufkleber von der Bügelsohle und reinigen...

Страница 17: ...misch entkalktes Wasser 4 Schrauben Sie denVerschluss fest auf die Einfüllöffnung des Wassertanks Schnell Nachfüllung C 1 Stellen Sie zuerst den Ein Aus Schalter D auf Off Aus C 2 Drücken Sie die Taste für die Dampfzufuhr bis kein entweichender Dampf mehr vernehmbar ist 3 Halten Sie die Taste für die Dampfzufuhr gedrückt und öffnen Sie denVerschluss des Wassertanks langsam indem Sie ihn gegen den ...

Страница 18: ...e Stoffe z B Akryl Viskose Polyamid Polyester 1 Seide 2 Wolle 3 Baumwolle Leinen Ist Ihnen das Gewebe unbekannt prüfen Sie die Bügeltemperatur an einer Stelle die unter normalen Bedingungen nicht sichtbar ist Materialien aus Seide Wolle und synthetischen Fasern Bügeln Sie dieseTeile auf der Rückseite von links um zu vermeiden dass glänzende Stellen auftreten Beginnen Sie stets mit denTextilien die...

Страница 19: ...im Dampfbügeln von Wollstoffen können sich glänzende Stellen bilden Das lässt sich durch dieVerwendung eines trockenen Bügeltuchs verhindern oder dadurch dass Sie das Gewebe von der Rückseite von links bügeln Samt und andere Gewebe die leicht glänzende Stellen bilden dürfen nur in einer Richtung mit dem Strich und unter nur leichtem Druck gebügelt werden Gefärbte Seide darf nicht mit Dampf gebügel...

Страница 20: ...Temperatur einstellen 2 Drücken Sie NICHT die Taste für die Dampfzufuhr H Drücken Sie während des Bügelns versehentlich die Taste für die Dampfzufuhr entweicht etwas Dampf Ist der Wassertank leer oder noch nicht aufgeheizt hören Sie nur ein Klicken aus dem Tank Dieses Klicken rührt vom Öffnen des Dampfventils her und ist völlig harmlos Wenn Sie nach dem Bügeln mit höherer Temperatur am Temperaturr...

Страница 21: ...ikalktrichter nur Typen GC6268 GC6068 6029 Verlängert die Lebensdauer des Geräts 1 Verwenden Sie den Antikalktrichter M beim Füllen des Wassertanks Nach dem Bügeln C 1 Schalten Sie das Gerät aus indem Sie den Ein Aus Schalter D auf Off Aus stellen 2 Lassen Sie den Druck aus dem Wassertank ab indem Sie die Taste für die Dampfzufuhr drücken bis Sie keinen Dampf mehr aus dem Gerät entweichen hören 3 ...

Страница 22: ...n Sie es auch nicht unter fließendem Wasser ab Der Wassertank Spülen Sie den Wasertank mindestens einmal monatlich oder nach ca 10 Benutzungen aus C 1 Schrauben Sie vorsichtig denVerschluss auf C 2 Spülen Sie den Wassertank mit nur 500 ml frischem Waser aus Gießen Sie das Wasser aus indem Sie den Tank umgekehrt über ein Spülbecken halten 3 Schrauben Sie denVerschluss wieder auf den Wassertank Aufb...

Страница 23: ...rem Land kein Philips Service Center setzen Sie sich mit der Kundendienstabteilung Service Department von Philips Domestic Appliances and Personal Care B V inVerbindung Fehlerbehebung In diesem Kapitel werden Probleme beschrieben die gelegentlich bei der Benutzung des Bügeleisens auftreten können Details finden Sie in den einzelnen Abschnitten Können Sie ein Problem nicht lösen setzen Sie sich mit...

Страница 24: ...ile des Bügeleisens sind in der Fabrik leicht eingefettet worden Das ist bei einem neuen Bügeleisen ganz normal DerTemperaturregler I ist auf eine zum Dampfbügeln zu niedrige Temperatur eingestellt Der Wassertank wurde auf eine instabile oder unebene Unterlage gestellt DerVerbindungsschlauch ist zu Beginn des Dampfbügelns noch kalt Dann kondensiert im Schlauch Dampf der in Tropfenform aus der Büge...

Страница 25: ...est endommagé d une façon quelconque Vérifiez toujours le cordon d alimentation vapeur et le cordon secteur pour vous assurer qu ils ne sont pas endommagés Si le cordon d alimentation est endommagé il ne doit être remplacé que par un Centre Service Agréé Philips car des outils et ou composants spéciaux sont nécessaires N utilisez pas d autre bouchon pour la chaudière que celui fourni avec l appare...

Страница 26: ...structions du chapitre Remplissage rapide Préparation à l emploi 1 Vérifiez que la tension indiquée sur le fond de la chaudière correspond bien à la tension de votre secteur avant de brancher l appareil 2 Retirez toute étiquette ou feuille de protection de la semelle et nettoyez la avec un chiffon doux 3 Déroulez complètement le cordon d alimentation L et le cordon secteur J 4 Placez la chaudière ...

Страница 27: ...ntenez le bouton vapeur appuyé et dévissez légèrement le bouchon de chaudière en tournant dans le sens inverse des aiguilles d une montre La chaudière à vapeur est ainsi dépressurisée Assurez vous que la vapeur est complètement éliminée de l appareil Mettez un chiffon au dessus du bouchon lorsque vous le dévissez 4 Débranchez la fiche de la prise de courant 5 Remplissez la chaudière comme il est d...

Страница 28: ...aches Commencez toujours le repassage des articles de fibres synthétiques nécessitant la température la plus basse C 2 Branchez la fiche dans la prise de courant et laissez l appareil chauffer en positionnant le bouton marche arrêt D sur marche 3 Début froid L eau de la chaudière et la semelle commencent à chauffer Le chauffage de la semelle dure environ 2 minutes et de l eau de la chaudière envir...

Страница 29: ...ppuyé le bouton vapeur H pendant le repassage à la vapeur Modèles GC6268 GC6265 GC6068 GC6065 GC6029 uniquement Pendant le repassage à la vapeur le témoin lumineux G s allume de temps en temps pour indiquer que le fer et l eau de la chaudière sont chauffés à la température et pression correctes Vous pouvez continuer à repasser La vapeur à l intérieur du cordon de liaison se condense si vous n util...

Страница 30: ...ouveau avant de continuer le repassage Vous éviterez ainsi de détériorer les tissus plus fragiles Autres caractéristiques Défroissage vertical C 1 Les draperies et les vêtements vestes costumes tailleurs manteaux peuvent être repassés en tenant le fer en position verticale Ne dirigez jamais le jet de vapeur vers des personnes Jet de vapeur modèles GC6268 GC6068 GC6029 uniquement Un puissant jet de...

Страница 31: ...minée 3 Débranchez la fiche de la prise de courant 4 Placez le fer sur son support C réglez le thermostat sur la position q et laissez le fer refroidir avant de le ranger Nettoyage et entretien 1 Retirez la fiche de la prise de courant et laissez le fer refroidir avant de commencer à le nettoyer Si vous voulez nettoyer la chaudière suivez les quatre premières étapes de la procédure Remplissage rap...

Страница 32: ...s d informations visitez notre Philips Web site www philips com ou veuillez contacter le Service Consommateurs Philips de votre pays vous trouverez le numéro de téléphone dans le dépliant sur la garantie internationale S il n y a aucun Service Consommateurs Philips dans votre pays contactez votre distributeur ou le Service Department of Philips Domestic Appliances and Personal Care BV Dépannage Ce...

Страница 33: ...ines parties ont été légèrement graissées C est tout à fait normal lors de la première utilisation Le thermostat I a été réglé sur une position trop basse pour le repassage à la vapeur La chaudière à vapeur a été placée sur une surface instable et ou irrégulière Lorsque vous commencez le repassage à la vapeur le cordon est froid La vapeur se condense dans le cordon laissant des gouttes d eau sorti...

Страница 34: ...nooit als het op de een of andere manier beschadigd is Controleer regelmatig of het netsnoer en de toevoerslang nog steeds onbeschadigd en veilig zijn Indien het netsnoer beschadigd is moet het vervangen worden door Philips een door Philips geautoriseerd servicecentrum of personen met vergelijkbare kwalificaties om gevaar te voorkomen Gebruik alleen de bijgeleverde dop op de stoomtank aangezien de...

Страница 35: ...der het kopje Snel bijvullen wanneer u de dop verwijdert Klaarmaken voor gebruik 1 Controleer voordat u het apparaat aansluit of de voltageaanduiding aan de onderkant van de stoomtank overeenkomt met de netspanning in uw woning 2 Verwijder stickers of beschermfolie van de zoolplaat en maak hem schoon met een zachte doek 3 Wikkel het netsnoer L en de toevoerslang J volledig af 4 Plaats de stoomtank...

Страница 36: ...et apparaat hoort ontsnappen 3 Houd de stoomtoevoerknop ingedrukt en verwijder langzaam de dop van de stoomtank door hem linksom te draaien Dit zal de overdruk laten ontsnappen Plaats een doek over de dop wanneer u deze losdraait Zorg ervoor dat u alle stoom uit de tank laat ontsnappen 4 Haal de stekker uit het stopcontact 5 Vul de stoomtank met water zoals beschreven staat in Het vullen van de st...

Страница 37: ...eerst de kledingstukken die op de laagste temperatuur gestreken moeten worden zoals kleding gemaakt van synthetische stoffen C 2 Steek de stekker in het stopcontact en laat het apparaat opwarmen door de aan uit schakelaar D op aan te zetten 3 Koude start de stoomtank en de zoolplaat worden nu opgewarmd Het opwarmen van de zoolplaat duurt ongeveer 2 minuten en het opwarmen van de stoomtank duurt on...

Страница 38: ...stoomtoevoerknop H ingedrukt tijdens het stoomstrijken Alleen types GC6268 GC6265 GC6068 GC6065 GC6029 tijdens het stoomstrijken zal het temperatuurcontrolelampje G nu en dan aanspringen om aan te geven dat de stoomtank en het strijkijzer worden opgewarmd tot de juiste temperatuur en druk U kunt dan gewoon doorgaan met strijken Als u de stoomfunctie een tijdje niet heeft gebruikt zal de stoom die ...

Страница 39: ...orkomt u beschadiging van de stof Overige functies Stomen in verticale stand C 1 Hangende gordijnen en kledingstukken colberts pakken jassen kunt u stoomstrijken door het stoomstrijkijzer verticaal te houden Richt de stoom nooit op mensen Stoomstoot alleen types GC6268 GC6068 GC6029 Deze krachtige stoomstoot helpt hardnekkige kreuken te verwijderen C 1 Zet voor een stoomstoot de stoomregelaar F op...

Страница 40: ...d q en laat het apparaat afkoelen voordat u het opbergt Schoonmaken en onderhoud 1 Haal de stekker uit het stopcontact en laat het strijkijzer afkoelen wanneer u het wilt schoonmaken Als u de stoomtank wilt schoonmaken volg dan de eerste 4 stappen onder het kopje Snel bijvullen Strijkijzer 1 Maak het strijkijzer schoon met een vochtige doek 2 Veeg schilfertjes en andere verontreinigingen van de zo...

Страница 41: ... dan onze Website www philips com of neem contact op met het Philips Customer Care Centre in uw land u vindt het telefoonnummer in het worldwide guarantee vouwblad Als er geen Customer Care Centre in uw land is ga dan naar uw Philips dealer of neem contact op met de afdeling Service van Philips Domestic Appliances and Personal Care BV Problemen oplossen Dit hoofdstuk behandelt in het kort de probl...

Страница 42: ...n de fabriek licht ingevet Dit is normaal wanneer het strijkijzer nieuw is De temperatuurregelaar I staat ingesteld op een temperatuur die te laag is voor stoomstrijken De stoomtank staat op een onstabiele en of onregelmatige ondergrond Wanneer u begint met stoomstrijken is de toevoerslang koud Stoom condenseert dan in de slang hierdoor lekken er waterdruppels uit de zoolplaat De stoomtank staat n...

Страница 43: ...icantes u otros agentes químicos en el depósito de vapor No use nunca el aparato si está deteriorado de algún modo Compruebe regularmente que el cable de red y la manguera conductora no están deteriorados y por lo tanto son seguros Si el cable de red estuviera dañado deberá ser sustituido por Philips o por un centro de servicio autorizado por Philips para evitar situaciones de peligro No use ningú...

Страница 44: ... tapón del depósito de vapor cuando el depósito de vapor esté bajo presión Siga las instrucciones de la sección Rellenado rápido antes de retirar el tapón Cómo preparar el aparato para su uso 1 Antes de enchufar el aparato compruebe si el voltaje indicado en el fondo del depósito del vapor se corresponde con el de su hogar 2 Quite cualquier etiqueta o lámina protectora de la suela de la plancha y ...

Страница 45: ...micamente descalcificada 4 Enrosque bien el tapón en la abertura de llenado del depósito de vapor Rellenado rápido C 1 Primero lleve el interruptor Encendido Apagado On Off D a la posición Apagado Off C 2 Presione el botón activador del vapor hasta que ya no oiga ningún escape de vapor del aparato 3 Mantenga apretado el botón activador del vapor y lentamente y girándolo en sentido contrario a las ...

Страница 46: ...ipo de fibra está hecha la prenda planche una parte de ésta que no se vaya a ver cuando la use Seda materiales sintéticos y lana para evitar manchas brillantes planche la prenda por el revés Empiece planchando aquellas prendas que requieran la temperatura de planchado más baja como por ejemplo las fabricadas con fibras sintéticas C 2 Enchufe el aparato a la red y con el interruptor Encendido Apaga...

Страница 47: ...arlos sólo en una dirección siguiendo el pelo y presionando muy poco No utilice vapor al planchar seda de color ya que pueden aparecer manchas Cómo planchar con vapor Asegúrese de que haya suficiente agua en el depósito de vapor C El planchado con vapor sólo es posible con las temperaturas más altas de planchado posiciones de temperatura 2 hasta MAX 1 Ajuste el dial de la temperatura a la posición...

Страница 48: ...erior del depósito Esto se debe a la apertura de la válvula del vapor y es totalmente inofensivo Si ha estado planchando a una temperatura alta y de repente ajusta el mando de la temperatura I a una posición más baja espere hasta que el piloto de la temperatura G se vuelva a iluminar antes de seguir planchando Esto evitará que los tejidos se deterioren Otras funciones Vaporizado en posición vertic...

Страница 49: ... a la posición Apagado Off 2 Despresurice el depósito de vapor presionando el botón activador de vapor hasta que ya no salga vapor del aparato 3 Desenchufe el aparato de la red 4 Coloque la plancha sobre el soporte C ponga el control de vapor en la posición q y déjela enfriar antes de guardarla Limpieza y mantenimiento 1 Desenchufe la plancha de la red y deje que se enfríe antes de empezar a limpi...

Страница 50: ...ósito de vapor 4 Para moverla fácilmente hay empuñaduras a cada lado del depósito de vapor 5 Compruebe con frecuencia que el cable de red y la manguera conductora no están deteriorados y que por lo tanto siguen siendo seguros Garantía y servicio Si necesita información o si tiene algún problema visite la página Web de Philips en www philips com o póngase en contacto con el Servicio Philips de Aten...

Страница 51: ... un espejo frío frente a las salidas de la suela Limpie la suela con un paño húmedo Limpie la suela con un paño húmedo Seleccione la temperatura de planchado recomendada Posible s causa s Esto es normal Algunas piezas de la plancha han sido ligeramente engrasadas en la fábrica Es normal que esto suceda en una plancha nueva El dial de la temperatura I ha sido ajustado a una temperatura que es demas...

Страница 52: ...e danneggiato in qualsiasi modo Controllare periodicamente le condizioni del cavo di alimentazione e del cavo collegato alla presa elettrica Nel caso il cavo di alimentazione fosse danneggiato dovrà essere sostituito da Philips presso un Centro Autorizzato Philips o personale comunque qualificato per evitare situazioni a rischio Per il serbatoio di vapore utilizzate esclusivamente il tappo fornito...

Страница 53: ...ps Non togliete il tappo quando il serbatoio del vapore è sotto pressione Prima di togliere il tappo seguite le istruzioni fornite in Riempimento rapido Come preparare l apparecchio per l uso 1 Prima di collegare l apparecchio controllate che la tensione indicata sulla parte inferiore del serbatoio di vapore corrisponda a quella della rete locale 2 Togliete eventuali fogli adesivi o protettivi dal...

Страница 54: ...to amido o acqua decalcificata chimicamente 4 Avvitate con forza il tappo sul serbatoio vapore Riempimento rapido C 1 Per prima cosa mettete l interruttore on off D in posizione off C 2 Premete il pulsante dell attivatore di vapore fino a quando non avvertite più la fuoriuscita di vapore dall apparecchio 3 Tenendo premuto il pulsante di attivatore vapore svitate lentamente il tappo del serbatoio r...

Страница 55: ...uando indossato Seta lana e materiali sintetici stirate il capo al rovescio per evitare tracce di lucido Iniziate a stirare i capi che richiedono una temperatura più bassa come ad esempio quelli in fibra sintetica C 2 Inserite la spina nella presa di corrente e lasciate riscaldare l apparecchio mettendo l interruttore on off D in posizione on 3 Partenza a freddo il serbatoio del vapore e la piastr...

Страница 56: ...hiare il tessuto Stiratura a vapore Controllate che ci sia una quantità d acqua sufficiente nel serbatoio C La stiratura a vapore è possibile solo utilizzando le temperature più alte impostazioni da 2 a MAX 1 Mettete il termostato nella posizione desiderata Vedere la sezione Come impostare la temperatura 2 Aspettate fino a quando non si spegnerà la spia riscaldamento serbatoio vapore C 3 Durante l...

Страница 57: ...alvola del vapore ed è assolutamente innocuo Se dopo aver stirato ad un alta temperatura decidete di ridurre quest ultima usando l apposito termostato I aspettate fino a quando non si sarà riaccesa la spia della temperatura G prima di continuare a stirare per evitare di rovinare i tessuti Altre caratteristiche Come stirare in posizione verticale C 1 Per stirare a vapore le tende e i capi appesi gi...

Страница 58: ...izione off 2 Depressurizzate il serbatoio del vapore tenendo premuto il pulsante dell attivatore di vapore fino a quando non avvertirete più la fuoriuscita di vapore dall apparecchio 3 Togliete la spina dalla presa di corrente 4 Appoggiate il ferro sul suo supporto C mettete il controllo vapore in posizione q e lasciate raffreddare l apparecchio prima di riporlo Pulizia e manutenzione 1 Togliete l...

Страница 59: ...asciate raffreddare il ferro 3 Svuotate il serbatoio 4 Per facilitare il trasporto il serbatoio del vapore è provvisto di maniglie su entrambi i lati 5 Controllate periodicamente le condizioni del cavo di alimentazione e del cavo collegato alla presa Garanzia e assistenza Se avete bisogno di assistenza o di ulteriori informazioni vi preghiamo di visitare il nostro sito web www philips com oppure d...

Страница 60: ...freddo davanti ai fori della piastra Pulite la piastra con un panno umido Pulite la piastra con un panno umido Selezionate la temperatura di stiratura consigliata Possibile causa E del tutto normale in quando alcune parti del ferro sono state leggermente lubrificate in fabbrica Si tratta di un fenomeno normale quando il ferro è nuovo Il termostato I è stato impostato ad una temperatura troppo bass...

Страница 61: ...o de dano ou defeito Verifique regularmente se o cabo de alimentação está em boas condições de uso e de segurança Se o fio se estragar deverá ser substituído pela Philips por um concessionário autorizado pela Philips ou por pessoal devidamente qualificado para se evitarem situações gravosas para o utilizador Não se sirva de qualquer outra tampa no reservatório do vapor além da que é fornecida com ...

Страница 62: ...elho 1 Verifique se a voltagem indicada na parte de baixo do reservatório do vapor corresponde à voltagem da sua casa antes de ligar o aparelho à corrente 2 Retire qualquer autocolante ou película protectora da base do ferro e limpe a base com um pano macio 3 Puxe todo o fio L e a mangueira J para fora 4 Coloque o reservatório do vapor B sobre uma superfície estável e plana 5 Coloque o ferro assen...

Страница 63: ...r até deixar de ouvir o vapor a escapar se do aparelho 3 Mantenha o botão activador do vapor premido e lentamente desaperte a tampa do reservatório do vapor rodando para a esquerda Desta forma procederá à despressurização do reservatório Certifique se que já não resta vapor no reservatório Coloque um pedaço de pano sobre a tampa para a desenroscar 4 Retire a ficha da tomada de corrente 5 Encha o r...

Страница 64: ...primeiro num sítio que não fique à vista quando usar a peça de roupa Seda lã e tecidos sintéticos passe pelo avesso para evitar a formação de brilho Comece por passar os artigos que requeiram uma temperatura mais baixa como é o caso dos tecidos sintéticos C 2 Ligue a ficha à tomada de corrente e deixe o aparelho aquecer rodando o botão de ligar desligar D para a posição on ligado 3 Arranque a frio...

Страница 65: ...mperaturas mais altas regulações entre 2 e MAX 1 Regule a temperatura para a posição recomendada Consulte o capítulo Selecção da temperatura 2 Aguarde até que a lâmpada indicadora de reservatório do vapor em aquecimento se apague C 3 Mantenha o botão activador do vapor H premido quando estiver a passar com vapor Apenas mod GC6268 GC6265 GC6068 GC6065 e GC6029 Enquanto estiver a passar com vapor a ...

Страница 66: ...ura elevada e passar o rotor da temperatura I para uma temperatura mais baixa aguarde até que a lâmpada piloto G volte a acender se antes de continuar a passar Evitará assim estragar os tecidos Outras características Passar com vapor na vertical C 1 Pode passar os cortinados e a roupa casacos fatos blusões pendurados colocando o ferro na vertical Nunca dirija o vapor na direcção das pessoas Jacto ...

Страница 67: ...air do aparelho 3 Retire a ficha da tomada de corrente 4 Coloque o ferro sobre o suporte C regule o controlo do vapor para a posição q e deixe o aparelho arrefecer antes de o guardar Limpeza e manutenção 1 Retire a ficha da tomada eléctrica e deixe o ferro arrefecer antes de proceder à sua limpeza Se quiser limpar o reservatório do vapor siga os primeiros quatro passos do capítulo Enchimento rápid...

Страница 68: ...ueira estão em boas condições de utilização e de segurança Garantia e assistência Se necessitar de informações ou se tiver qualquer problema por favor visite a página Philips na Internet em www philips pt ou contacte o Centro de Informação ao Consumidor Philips do seu país o número de telefone encontra se no folheto da garantia mundial Se não existir um Centro de Informação ao Consumidor no seu pa...

Страница 69: ... reservatório do vapor foi colocado sobre uma superfície instável e ou irregular Quando se começa a passar a mangueira está fria O vapor condensa se na mangueira provocando a saída de gotículas de água através da base do ferro O reservatório do vapor não está ligado A lâmpada piloto indicadora de reservatório de vapor em aquecimento ainda está acesa apenas mod GC6268 GC6265 GC6068 GC6065 GC6029 O ...

Страница 70: ...www philips com 4239 000 52874 u ...

Отзывы: