background image

4

If you wish to start transferring press ‘YES’ 

>

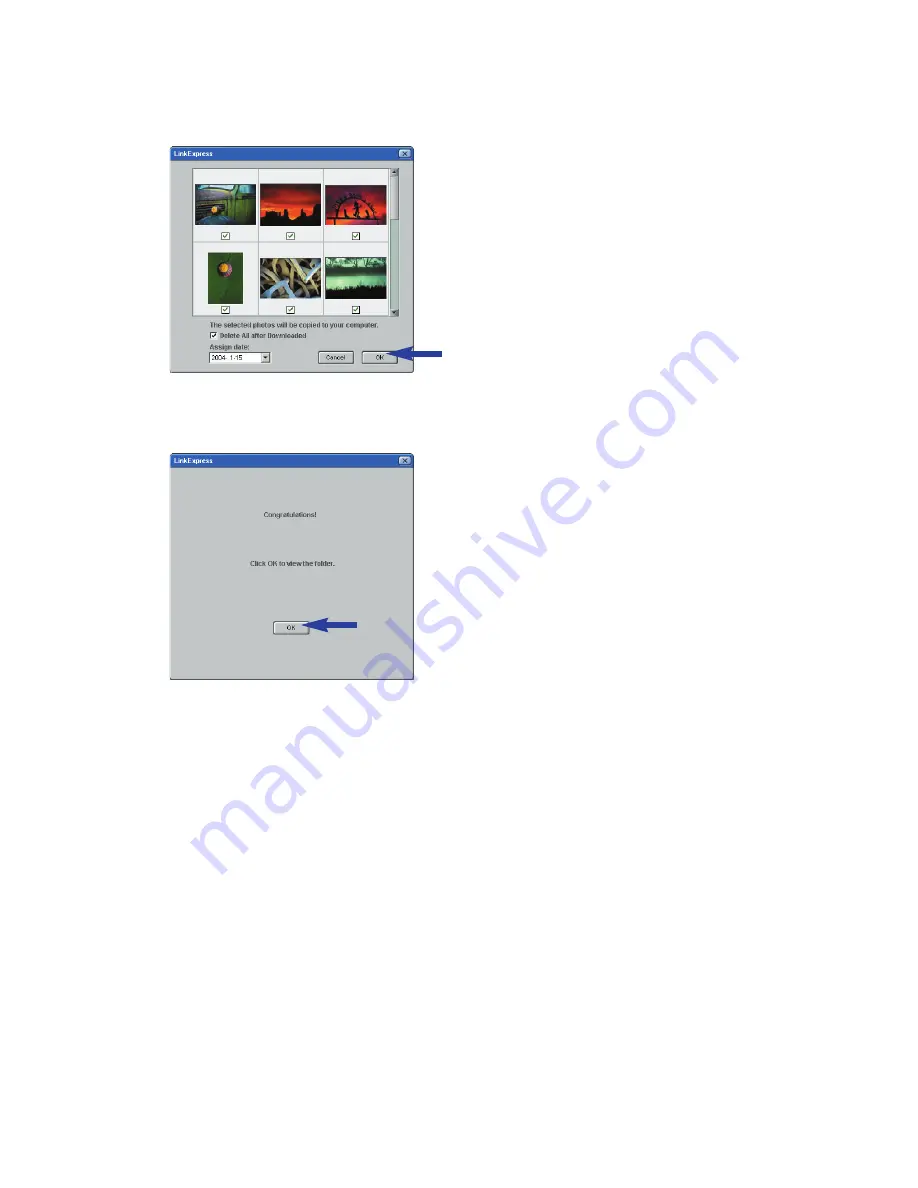
The following screen will appear.

5

Select the photos you wish to transfer and press ‘OK’ 

>

During the transfer the USB LED blinks red fast.

>

When the transfer is complete the following screen will appear.

Notes! 

If the ‘Philips PocketCam’ screen does not appear, you can start ‘Philips Photo Manager’ and click
on the 'Get Photo' icon. Select your camera (Philips PocketCam) to start the transfer.

For more information on transferring photos see ‘Transferring photos to your PC’ under 
‘5. Operating the camera’.

ENGLISH

10

Содержание PocketCam DSC2000K

Страница 1: ...Instructions for use Philips PocketCam ...

Страница 2: ...ur PC Please read the following instructions carefully They provide a step by step description of the installation process and explain how to use the Philips PocketCam Contents Introduction 2 1 Things you should know 4 5 Safety precautions 4 Copyright 4 Liquid Crystal Display 5 Pack contents 5 2 Quick start 6 10 3 Functional overview 11 12 4 Installation 13 17 Installing the camera software and dr...

Страница 3: ...g resolution 26 Tranferring photos to your PC 26 27 6 Using the applications 28 29 Philips VLounge 28 29 7 Problem solving 30 31 8 Technical specifications 31 9 Maintenance 32 Cleaning the camera 32 10 Important information 33 Disclaimer 33 End of life directives 33 Environmental information 33 System requirements 33 Disclaimer of warranty 33 Limitation of damages 33 11 Helpline 34 12 Warranty 35 ...

Страница 4: ...ens with your fingers Clean the outside of the camera with a soft cloth Do NOT use cleaning fluids based on alcohol methylated spirit ammonia etc Do NOT attempt to disassemble or repair your camera by yourself Do not open the camera In the event of technical difficulties return it to your Philips retailer Do NOT use your camera outdoors when it is raining or snowing Do NOT use your camera in the w...

Страница 5: ...ical assistance Pack contents Please check that the following items are packed in the Philips PocketCam box They are provided to help you set up and use your Philips PocketCam The Philips PocketCam Docking base with USB cable attached Wriststrap Quick Installation Guide CD ROM containing the Philips installation software application software and manual If any items are missing please contact the s...

Страница 6: ...lation 1 Unplug all your USB devices except USB keyboard and USB mouse 2 Place the installation CD ROM in your PC s CD ROM DVD drive 3 Select your language 4 Select both PocketCam driver and Philips Photo Manager ENGLISH 6 ...

Страница 7: ...installation CD ROM first before connecting the camera to the PC 3 Connect the USB cable to the USB port of the PC 4 Connect the camera USB connector to the USB connector on the docking base Push it down gently until it clicks in position You will hear a low high beep the Charge LED starts blinking blue The battery will now be charged When the battery is fully recharged the Charge LED will remain ...

Страница 8: ...move the lens cover 2 Use the display to view your subject You can also use the aiming mark in the viewfinder to centre the image you wish to capture 3 Press the Shutter button You will hear a beep when the photo is taken F 3 2 1 7 0 m m 2 0MEGA PIXELS 2 0MEGA PIXELS ENGLISH 8 ...

Страница 9: ...r to the USB connector on the docking base Push it down gently until it clicks in position You will hear a low high beep the Charge LED starts blinking blue The camera will now derive its power from the PC The USB LED slowly blinks red When USB connection has been established the USB LED remains lit The camera turns on automatically The Philips PocketCam screen appears 2 0MEGA PIXELS 2 0MEGA PIXEL...

Страница 10: ... red fast When the transfer is complete the following screen will appear Notes If the Philips PocketCam screen does not appear you can start Philips Photo Manager and click on the Get Photo icon Select your camera Philips PocketCam to start the transfer For more information on transferring photos see Transferring photos to your PC under 5 Operating the camera ENGLISH 10 ...

Страница 11: ...ens cover for turning the camera on and off and protecting the lens 7 Lens 8 Mode button for selecting the desired camera mode photo taking mode for taking photos playback mode for reviewing and deleting photos 9 Menu buttons Menu for entering menu mode and saving menu selections 3 4 Up Down for scrolling through the submenus Select for scrolling through the menu options 10 LCD button for turning ...

Страница 12: ...ged 15 Docking base for placing the camera on when re charging the battery transferring viewing photos 16 USB connector for connecting to the camera s USB port 17 USB cable for connecting to the USB port of the PC 18 Wrist strap Number of photos that can be taken Battery status Flash activated Self timer activated SD memory card inserted When photo counter shows 0 the card is full write protected ...

Страница 13: ... not connect the camera yet Run the Installation CD ROM first Have your Windows CD ROM at hand If the battery is empty follow the instructions under Re charging the battery further on in this chapter 1 Insert the installation CD ROM supplied into the PC s CD ROM DVD drive The Language Selection screen will appear automatically 2 Select your language Note If the Language Selection screen does not a...

Страница 14: ...ocketCam driver Philips Photo Manager Acrobat Reader 4 Click Start to install to start installation Note If your Operating System is Windows XP continue the installation process when the dialog box below appears on the screen In Windows 2000 the same dialog box may also appear You may then continue the installation process ENGLISH 14 ...

Страница 15: ...ve software The VLounge desktop shortcut will be installed after installation Via VLounge you have access to all camera related software Also see Using the applications 7 Double click on the VLounge icon to initiate the VLounge application The VLounge application will now be initiated and the VLounge selection screen appears ENGLISH 15 ...

Страница 16: ... It will take 4 hours to fully recharge the battery When the battery is fully recharged the Charge LED will remain lit Notes When the battery is fully charged you can take hundreds of photos with the flash and over thousand photos without the flash When the battery is almost empty appears on the display and the Power low LED starts blinking The camera contains a lithium polymer battery These batte...

Страница 17: ... a real SD card in the slot in order to protect the slot 1 Make sure the camera is turned off 2 Remove the dummy SD card from the SD card slot and insert the proper card The SD card indicator appears on the display Photos will now be stored on the memory card Approximate number of photos that can be stored on the SD card in Large and Small resolution mode see Changing resolution Large 2048 x 1536 ...

Страница 18: ...urn flash off Timer Off 10S 2S Set self timer to 2 or 10 seconds or turn off self timer Size Large Medium Small Select either high resolution images Large 2048 x 1536 pixels medium resolution images Medium 1600 x 1200 pixels or low resolution images Small 800 x 600 pixels Sound On Off Turn audio response of camera on or off Language English Français Español Select desired language Deutsch Nederlan...

Страница 19: ...Yes No Confirm deletion of all photos or not Format Yes No Confirm formatting SD memory card or internal memory or not Menu operation General explanation 1 Make sure camera and display are turned on 2 Use the Mode button to select Photo taking mode or Playback mode Use the Menu buttons to adjust the camera settings ENGLISH 19 ...

Страница 20: ...ar on the display The 4 at the bottom of the list indicates that there are more submenus available than can be shown on the display 4 Use the 3 4 Up Down buttons to cycle through the submenus Flash Auto Timer On Size High Sound On Language English ENGLISH 20 ...

Страница 21: ...p button 3 you go back to the first list 5 Use the Select button to select settings 6 Use the Menu button to confirm your selection and save the settings Zoom 1x Timeout 2 min Display High Counter Reset Flash Auto Timer On Size High Sound On Language English ENGLISH 21 ...

Страница 22: ...tons are pressed for one or two minutes you hear two beeps and the camera turns off automatically The time after which the camera turns off can be set in the Timeout menu See Menu operation Turning the display On and Off When the camera is turned on the display lights up automatically and the relevant display indications icons are shown Press the LCD button once to remove the display indications i...

Страница 23: ...play to view your subject You can also the aiming mark in the viewfinder to centre the image you wish to capture 3 Hold the camera still and press the Shutter button When the photo has been successfully taken SAVING appears on the display and the number in the photo counter decreases by one If sound was activated you will also hear a short beep See Menu operation Low light lock out When taking pic...

Страница 24: ...ory is empty the display shows No Images on camera If an SD card is installed the photos stored on the card will be displayed To view photos stored in the internal memory the SD card must be removed Deleting photos 1 Make sure camera and display are turned on 2 Use the Mode selector to set the camera to Playback mode The display shows the last taken photo ENGLISH 24 ...

Страница 25: ...om the memory Setting the self timer 1 Make sure camera and display are turned on 2 Select the required exposure time 2 seconds 10 seconds in the Timer submenu See Menu operation The Timer icon appears in the center of the display 3 Press the Shutter button to start Timer countdown The Timer LED starts blinking and you will hear a beep every second when sound is activated in the menu After the set...

Страница 26: ...s 6 Medium 1600 x 1200 pixels 6 Small 800 x 600 pixels 13 To change the resolution 1 Make sure the camera is turned on and set to Picture taking mode 2 Select the desired resulution in the menu See Menu operation Transferring photos to your PC 1 Be sure the PC is turned on and that PocketCam driver and Philips Photo Manager are installed 2 Connect the USB cable to the USB port of the PC 3 Connect ...

Страница 27: ...fer and press OK During the transfer the USB LED blinks red fast When the transfer is complete the following screen appears Note If the Philips PocketCam screen does not appear you can start Philips Photo Manager and click on the Get Photo icon Select your camera Philips PocketCam to start the transfer ENGLISH 27 ...

Страница 28: ...rt VLounge through the Windows QuickLaunch menu in your taskbar via the program group Philips PocketCam or by clicking the VLounge icon on the desktop VLounge gives you access to the following Applications if installed 1 Philips Photo Manager 2 PocketCam manual 3 Acrobat Reader Move the cursor over the buttons in the screen below to find out more about the specific functions of VLounge Click the b...

Страница 29: ...earched for After the search all folders containing photos and clips will be shown on your desktop Double click on a folder to show its content Using the tools in the toolbar you can now edit your photos create slide shows add audio create new albums and much more If you need more information on the possibilities of Philips Photo Manager select Help in the toolbar and then select Contents In the c...

Страница 30: ... improve the light conditions Camera turned off automatically no button pressed for one or two minutes Turn the camera back on See Turning the camera on and off Camera not turned on Turn on camera No memory space in internal memory or SD card Delete unwanted photos see Deleting photos or insert new SD card see Installing a Secure Digital SD memory card No reaction to Battery exhausted controls Rec...

Страница 31: ...ve subject to centre PC does not USB connection not properly made recognize camera Properly connect USB cable to both docking base and PC and be sure the camera is placed on the docking base Interference from other USB devices Disconnect other devices Camera software and drivers not installed Install camera software and drivers see Installing the camera software and drivers Camera malfunctions Ele...

Страница 32: ...he camera Use a blower brush to remove dust from the lens display or viewfinder and then wipe lightly with a soft dry cloth Leaving the lens extended for long periods can allow dust to enter the camera s viewfinder However this does not affect the image Do not scratch hard objects against the lens display or viewfinder as these surfaces are easily damaged Clean the body of the camera with a soft d...

Страница 33: ...n No unnecessary packaging material has been used We have tried to make the packaging easy to separate into three mono materials cardboard box expandable polystyrene buffer polyethylene bags protective foam Your camera consists of materials which can be recycled if disassembled by a specialized company Please observe the local regulations regarding the diposal of packing materials exhausted batter...

Страница 34: ...find the number in the list below The model number of the camera is DSC 2000K Date of purchase ______ ______ ______ day month year ENGLISH 34 België Belgien Belgique Nederland 02 275 0701 053 482 9800 Danmark Norge 35 25 8761 22 70 82 50 Deutschland Österreich 0696 698 4712 01 546 575 603 España Portugal 09 17 45 62 46 0800 831 363 France Schweiz Suisse Svizzera 03 8717 0033 02 23 10 21 16 Suomi 0...

Страница 35: ...esse og unterskrift Forhandlerens navn adresse og unterskrift Jälleenmyyjän nimi osoite ja allekirjoitus Nome morada e assinature da loja Type DSC 2000K Serial no ___________________________________________________________________ Date of purchase Date de la vente Verkaufsdatum Aankoopdatum Fecha de compra Date d acquisito Data da adquirição G Inköpsdatum Anskaffelsesdato Kjøpedato Oatopäivä 6 mon...

Отзывы: