Philips PicoPix PPX2495 Скачать руководство пользователя страница 19

Media Playback

19

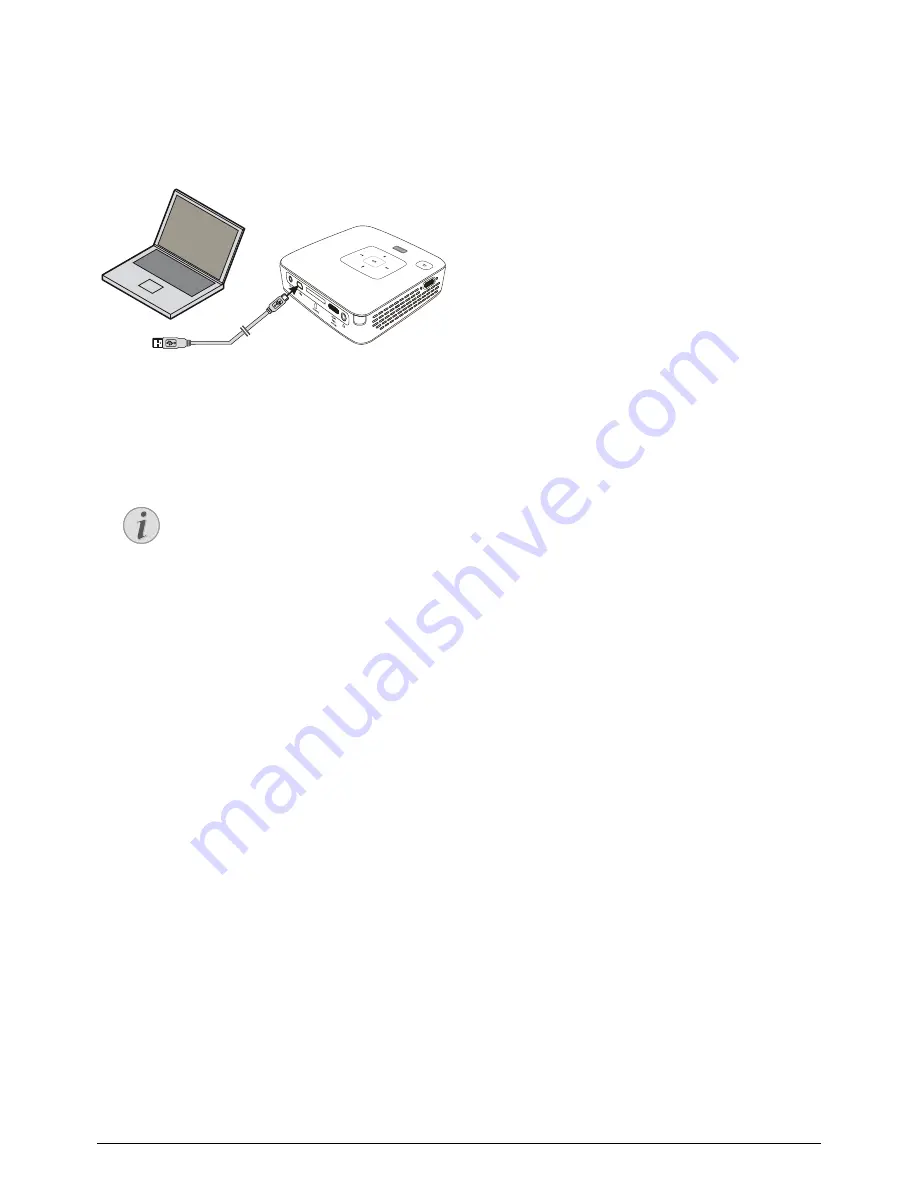
Connect to a Computer (USB)

You can use the USB cable to connect the Pocket Proj-
ect to a computer. In this way, you are able to copy files
back and forth between the internal memory, an
inserted memory card and the computer. You can also
delete the files. You can playback the files saved on the
Pocket Projector on your computer.

Connect the mini-USB cable to the Pocket Projector

and the USB output to the computer.

Switch the device on using the on/off switch on the

side.

A confirmation appears when the devices are con-

nected successfully.

If a memory card has been inserted, it will be dis-

played as another disk drive.

You can move, copy or delete data from the com-

puter, the memory card (if inserted) and the internal
memory.

Note

Successful Connection
You cannot use the projection function of 
the Pocket Projector when it is connected 
to a computer via USB.

Содержание PicoPix PPX2495

Страница 1: ...EN PPX2495 User Manual Register your product and get support at www philips com support ...

Страница 2: ...atteries of the Remote Control 10 Using the Remote Control 11 4 Connect to the Playback Device 12 Connecting to Devices with HDMI output 12 Connecting to a Computer VGA 12 Connecting Using Audio Video CVBS Adaptor Cable 13 Connecting the Headphones 13 5 Memory Card USB Storage Device 14 Inserting a Memory Card 14 Connecting USB Storage Device 14 6 Media Playback 15 Video Playback 15 Photo Playback...

Страница 3: ... safety instructions in order to ensure proper operation of your device The manufacturer accepts no liability if these instructions are not followed Symbols Used Note Troubleshooting This symbol designates tips that will help you to use your device more effectively and easily CAUTION Damage to the Device or Loss of Data This symbol gives warning of damage to the device and possible loss of data Th...

Страница 4: ...ned by trained professionals at an authorized service center To prevent the spread of fire open flames should be kept away from the device Under the following conditions a layer of moisture can appear inside the device which can lead to malfunctions if the device is moved from a cold to a warm area after a cold room is heated when this device is placed in a damp room Proceed as follows to avoid an...

Страница 5: ...ANGER Risk of Explosion with Incorrect Type of Batteries Only replace the batteries with the same or comparable batteries There is a risk of explosion if the incor rect battery type is used DANGER Danger of Damage to the Eye by High Power LED This device is equipped with an high power LED Light Emitting Diode which emits very bright light Do not stare directly into the pro jector lens to avoid eye...

Страница 6: ...ed Charging battery Green battery is fully charged 3 Remote control signal receiver 4 Ï Audio output headphone connection or con nection for external speakers 5 HDMI Connection for a playback device with an HDMI output via an adapter cable 6 SD MMC Memory card slot SD SDHC MMC ˆ ý USB connection for a computer data transfer or for a USB storage device with the enclosed adapter cable DC IN Port for...

Страница 7: ...te the menu modify settings Modify settings during music playback select previous next title À Á During music playback adjust volume level during video playback rewind fast forward ƒ Playback Keys During video playback rewind T Start stop playback During video playback fast forward Brightness Keys N ß O Decrease increase the brightness Volume Keys N Decrease the volume Mute O Increase the volume Z...

Страница 8: ... COMPONENT or VGA Pictures Selecting files for the slideshow Folder View Selecting files for Playback Copy or Delete Files Mark the files with Á and confirm using à Music Selecting music files for playback Settings Configure settings for playback and for the device Symbols in Sub Menu The chosen storage appears highlighted in white USB storage device Memory card Internal memory ª Charge level of t...

Страница 9: ...east 3 hours This will prolong the life of the battery Initial Installation 1 Switch the device on using the on off switch on the side 2 Turn the device towards a suitable projection sur face or wall Note that the distance to the projection surface must be a minimum of 1 7 feet and a maxi mum of 16 5 feet Make sure the projector is in a secure position 3 Use the focus wheel on the top to adjust th...

Страница 10: ...partment back into the remote control until the locking mechanism engages DANGER Risk of Explosion with Incorrect Type of Batteries Only use the CR 2025 type battery There is a risk of explosion if the incor rect battery type is used Note Normally the batteries will last for around one year If the remote control stops working please replace the batteries If the device is not used for a long time t...

Страница 11: ...ced between the remote control and remote sensor CAUTION The improper use of batteries can lead to overheating explosion risk of fire and injury Leaking batteries can possibly damage the remote control Never expose the remote control to direct sunlight Avoid deforming dismantling or charging the batteries Avoid exposure to open fire and water Replace empty batteries immediately Remove the battery ...

Страница 12: ...to a computer laptop or some PDAs The projector sup ports the following resolutions VGA SVGA XGA For best results set the computer s resolution to SVGA 800x600 1 Connect the VGA Audio cable to the projector s mini HDMI input 2 Connect the VGA plug to the computer s VGA out put and the audio plug to the computer s audio out put 3 Adjust the computer s resolution to the correct set ting and switch t...

Страница 13: ...of the multimedia device Please note that only the original cables from the device manufacturer may func tion Connecting the Headphones 1 Before connecting the headphones turn down the volume on the device 2 Connect the headphones to the projector s head phone slot The device speakers deactivate automat ically when the headphones are connected 3 After connecting the headphones increase the vol ume...

Страница 14: ...e device 2 Only connect the USB storage device to the adapter cable after the adapter cable has been connected to the projector DANGER Prematurely remove a Memory Card Never pull out the memory card while the device is accessing it This could cause data to be damaged or lost In order to make sure that the device does not access the memory card press the key in the main menu until the symbol for th...

Страница 15: ...ormat There are various video file formats as mov avi m4v Many of these formats function as a container that contains the various encoded audio and video files MPEG 4 H 264 MP3 and AAC are all examples of encoded audio video files In order to play these files the projector must read them and decode the audio video signals Please note that some files cannot be played as a result of different video ...

Страница 16: ...ble bass and volume Power Save This function reduces the light output in order to increase the operating time for the built in battery 3 Confirm with à 4 Modify the setting using à and 5 Confirm with à Photo Playback 1 Switch the device on using the on off switch on the side 2 After the initial screen the main menu appears 3 Use the navigation keys to select Pictures 4 Confirm with à 5 With an ins...

Страница 17: ...pears 3 Use the navigation keys to select Folder View 4 Confirm with à 5 With an inserted memory card or USB stor age device Select the internal memory the USB storage device or the memory card using the keys 6 Confirm with à 7 Use to select the file that you want to copy 8 Mark the file using Á Pressing the key again dese lects the chose file s 9 Use to select other files 10 Press à Note Switch O...

Страница 18: ...irm with à Note Files Already Exist If the files you are copying already exist in the target folder you must choose whether or not you want to overwrite them using and à If you choose not to overwrite these files copies will be created The copies can be recognised by a number added to the file names Note Error If errors occur during the copying process make sure that enough free space is avail abl...

Страница 19: ...ter 1 Connect the mini USB cable to the Pocket Projector and the USB output to the computer 2 Switch the device on using the on off switch on the side 3 A confirmation appears when the devices are con nected successfully 4 If a memory card has been inserted it will be dis played as another disk drive 5 You can move copy or delete data from the com puter the memory card if inserted and the internal...

Страница 20: ... tones on and off Video Settings View Display all videos in a list or a corresponding folder structure on the drive Repeat Set the repeat type for video files Repeat deactivated Off repeat all videos in a directory Directory repeat only the current video Movie repeat all videos All Resume play If this function is activated playback will continue at the position it was last stopped If deacti vated ...

Страница 21: ...set settings to factory defaults Firmware Update Update Firmware Information Display free space in the internal mem ory and information on the device Capacity Free space Firmware Version Device name Model Note Keep the device connected to a power outlet for the duration of the firmware update ...

Страница 22: ... a little by using the device before storing it If the device only works using the USB connection or with the power supply the battery is defective Keep the device and the battery away from sources of heat Battery Deep Discharge When the battery is in deep discharge or the device is not used for a longer period proceed as followed 1 Connect the device to the power supply see also chapter Connectin...

Страница 23: ...off automatically DANGER Switching Off the Device Switch the device on or off using the power switch before removing the power supply from the wall DANGER Instructions for Cleaning Use a soft lint free cloth Never use liquid or easily flammable cleansers sprays abrasives polishes alcohol etc Do not allow any moisture to reach the interior of the device Do not spray the device with any cleaning flu...

Страница 24: ...nitial screen appears and not the image from the connected computer Please check that the VGA output of the computer is switched on Check if the resolution of the computer is set to 800x600 Device switches to stand by mode When the device is running for a long period of time the surface becomes hot and a warning symbol appears on the projection The device switches auto matically to ECO mode when i...

Страница 25: ...P Light source RGB LED Resolution 854 x 480 Pixel 16 9 800 x 600 Pixel 4 3 Supported Resolutions VGA SVGA WVGA XGA WXGA Brightness Bright Mode up to 100 lumen Contrast ratio 1000 1 Projected image size 12 120 inch Screen distance 20 120 inch Horizontal Scan Rate 31 69 kHz Vertical Scan Rate 56 85 Hz Power Supply Model No MPA 630 Manufacturer Wanlida Group Co Ltd Built in Rechargeable Battery Batte...

Страница 26: ...n approved national organisation to improve package recovery and recycling infrastructures Please respect the sorting rules set up locally for this kind of waste Batteries If your product contains batteries they should be disposed of at an appropriate collection point Trademarks The mentioned references in this man ual are trademarks of the respective companies The lack of the trademarks É and Ë d...

Страница 27: ...s SAS under license from Koninklijke Philips Electronics N V È 2012 Sagemcom Documents SAS All rights reserved Sagemcom Documents SAS Documents Business Unit Headquarters 250 route de l Empereur 92848 Rueil Malmaison Cedex FRANCE Tel 33 0 1 57 61 10 00 Fax 33 0 1 57 61 10 01 www sagemcom com Simplified Joint Stock Company Capital 8 479 978 509 448 841 RCS Nanterre ...

Отзывы: