background image

10

Philips · PPX2240 · 2340

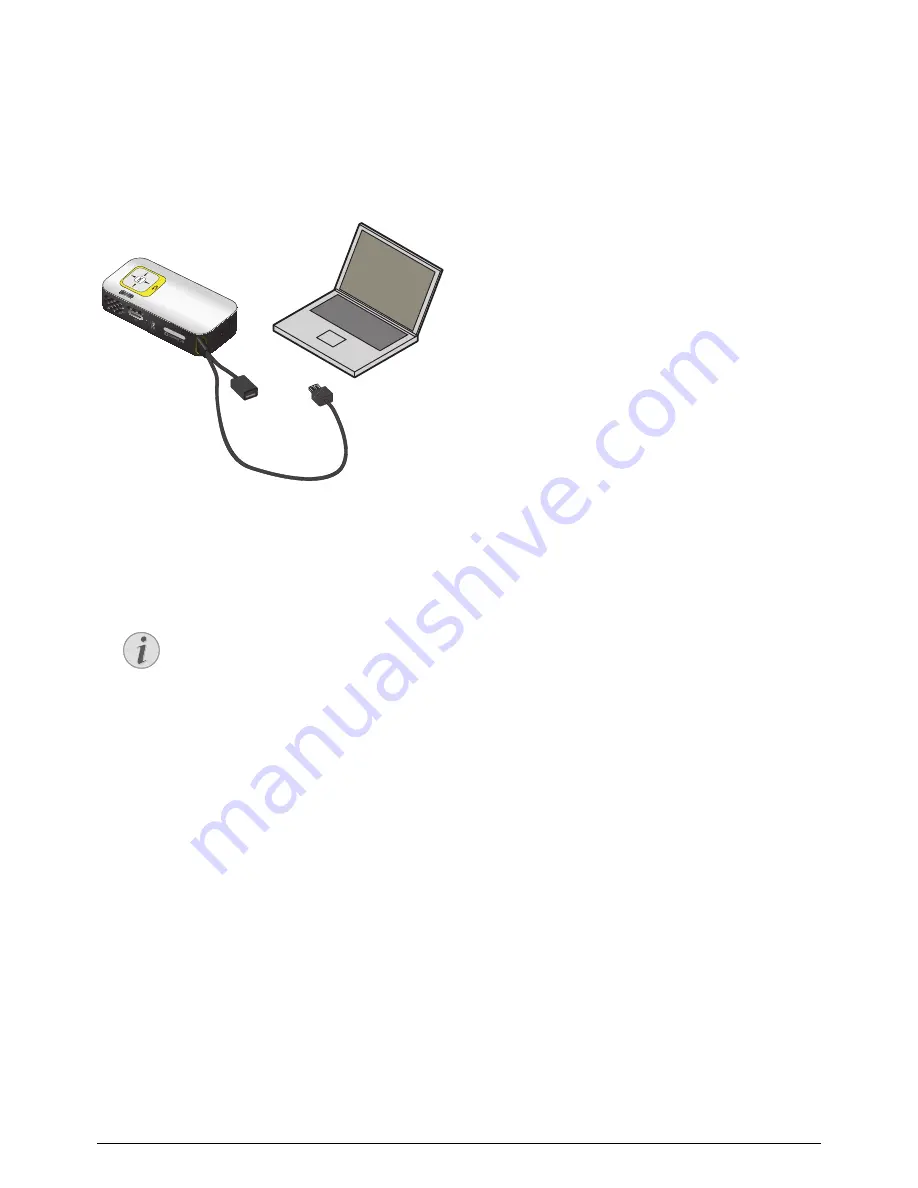
Connect to a computer 
(USB)

You can use the USB cable to connect the Pocket
Project to a computer. In this way, you are able to copy
files back and forth between the internal memory, an
inserted memory card and the computer. You can also
delete the files. You can playback the files saved on the
Pocket Projector on your computer.

1

Connect the USB plug of the Pocket Projector with
a free USB socket of your computer.

2

Switch the device on using the on/off switch on the
side.

3

A confirmation appears when the devices are con-
nected successfully.

4

If a memory card has been inserted, it will be dis-
played as another disk drive.

5

You can move, copy or delete data from the compu-
ter, the memory card (if inserted) and the internal
memory.

Note

Successful connection

You cannot use the Pocket Projector when 
it is connected to a computer via USB.

Содержание PicoPix PPX2240

Страница 1: ...UK PPX2240 PPX2340 User Manual Register your product and get support at www philips com welcome ...

Страница 2: ... 8 Initial Installation 8 4 Memory card USB storage medium 9 Inserting a Memory Card 9 Connecting USB Storage Medium 9 Connect to a computer USB 10 5 Connect to the Playback Device 11 Connecting to a computer 11 Connecting using Audio Video CVBS Adaptor Cable 11 Connecting the Headphones 12 6 Media Playback 13 Video Playback 13 Photo Playback 14 Music Playback 15 Managing files 15 7 Settings 18 8 ...

Страница 3: ... safety instructions in order to ensure proper operation of your device The manufacturer accepts no liability if these instructions are not followed Symbols Used Note Troubleshooting This symbol designates tips that will help you to use your device more effectively and easily CAUTION Damage to the Device or Loss of Data This symbol gives warning of damage to the device and possible loss of data Th...

Страница 4: ...the projec tor or the power cable If the projector gets too hot or emits smoke shut it down immediately and unplug the power cable Have your device examined by trained professionals at a tech nical service location To prevent the spread of fire open flames should be kept away from the device Under the following conditions a layer of moisture can appear inside the device which can lead to malfuncti...

Страница 5: ...f the device DANGER Risk of explosion with incorrect type of batteries Only replace the batteries with the same or comparable batteries There is a risk of explosion if the incor rect battery type is used DANGER High Power LED This device is equipped with an high power LED Light Emitting Diode which emits very bright light Do not look directly into the pro jector lens This could cause eye irritatio...

Страница 6: ...ure playback select previous next picture 5 key One menu step back one directory level back cancelling a function Side view 1 Loudspeaker 2 Battery status monitor Charge indicator with connected power supply Red Charging battery Green battery is fully charged 3 Memory card slot Micro SD Micro SDHC 4 Ï Audio output video input PPX2340 Headphone connection or connection for external speakers 5 On Of...

Страница 7: ...put Pictures Selecting files for the slideshow Folder View Selecting files for Playback Copy or Delete Files Mark the files with Á and confirm using à Music Selecting music files for playback Settings Configure settings for playback and for the device Symbols in the Main Menu You can change the storage location using the keys The chosen storage appears highlighted in white USB storage medium Memor...

Страница 8: ...ojection surface must be a minimum of 0 3 meters and a max imum of 2 1 meters Make sure the projector is in a secure position 3 Use the focus wheel on the top to adjust the image sharpness 4 Select the desired menu language using 5 Confirm with à CAUTION Mains Voltage at the Site of Installation Check whether the mains voltage of the power supply matches the mains voltage avail able at the setup l...

Страница 9: ... lightly on the memory card to remove it 5 The memory card is ejected 6 Remove the memory card 7 Close the cover of the memory card slot in order to protect the socket from dust Connecting USB Storage Medium 1 Connect the USB storage medium to the USB socket of the cable DANGER Inserting a Memory Card Never pull out the memory card while the device is accessing it This could cause data to be damag...

Страница 10: ...or on your computer 1 Connect the USB plug of the Pocket Projector with a free USB socket of your computer 2 Switch the device on using the on off switch on the side 3 A confirmation appears when the devices are con nected successfully 4 If a memory card has been inserted it will be dis played as another disk drive 5 You can move copy or delete data from the compu ter the memory card if inserted a...

Страница 11: ...rojection Connecting using Audio Video CVBS Adaptor Cable PPX2340 Use the projector s audio video cable A V cable to connect camcorders DVD players or digital cameras The jacks for these devices are yellow video red audio right and white audio left 1 Connect the optional A V cable to the Ï socket of the projector 2 Connect the video device s audio video jacks to the A V cable using a conventional ...

Страница 12: ...cally when the headphones are connected 3 After connecting the headphones increase the vol ume to a comfortable level DANGER Danger of Hearing Damage Do not use the device over a longer time at high volume especially when using head phones This could lead to the risks of hearing damage Before connecting the headphones turn down the volume on the device After connecting the headphones increase the ...

Страница 13: ... these files the projector must read them and decode the audio video signals Please note that some files cannot be played as a result of different video and audio encoders Supported File Formats Video Playback A V socket PPX2340 1 Connect the audio video output of the external device to the Pocket Projector s Ï socket Use the corresponding cable and cable adapter for this pur pose see also chapter...

Страница 14: ...elect the internal memory the USB storage medium or the memory card using the keys 6 Confirm with à 7 Miniature photos are displayed on the screen as an overview 8 Use À Á or to select the image that you want to start the slide show with 9 Press à to start the slide show 10 Press to end the slide show and return to the overview 11 When you press again you will return to the main menu Pause slidesh...

Страница 15: ...ress repeatedly À to switch off the volume mute function Managing files Copy Files You can copy files back and forth from the internal memory to the connected USB storage medium or memory card 1 Switch the device on using the on off switch on the side 2 After the initial screen the main menu appears 3 Use the navigation keys to select Folder View 4 Confirm with à 5 With an inserted memory card or ...

Страница 16: ...elect the file that you want to delete 8 Mark the file using Á Pressing deselects the chose file s Press Á long to select all files in cur rent folder 9 Use to select other files 10 Press à 11 Select with Delete 12 Confirm with à Note Mark the entire folder You can also mark an entire folder to copy all files from the folder Note that the copy process of large folders can takes some time Note File...

Страница 17: ...not write protected Note Deleting photos on the memory card When deleting photos via the computer note that the photos may not be correctly dis played when the memory card is inserted into the digital camera again Digital cameras sometimes store additional information in specific folders including previews and orien tation information For this reason only delete the photos using the digital camera...

Страница 18: ...play all videos in a list or a corresponding folder structure on the drive Repeat Set the repeat type for video files Repeat deactivated Off repeat all videos in a directory Directory repeat only the current video Movie repeat all videos All Resume play If this function is activated playback will continue at the position it was last stopped If deacti vated playback will always start at the beginni...

Страница 19: ... Reset settings to factory defaults Firmware Update Update Firmware Information Display free space in the internal mem ory and information on the device Capacity Free space Firmware Version Device name Model Mcu Version Note Connect for the duration of the firmware update the power adapter ...

Страница 20: ...ing it If the device only works using the USB connection or with the power supply the battery is defective Keep the device and the battery away from sources of heat Battery deep discharge When the battery is in deep discharge or the device is not used for a longer period proceed as followed 1 Connect the USB plug to a computer to charge the battery Alternatively you may connect the USB plug to the...

Страница 21: ...ff automatically DANGER Switching off the device Switch the device on or off using the power switch before removing the power supply from the socket DANGER Instructions for Cleaning Use a soft lint free cloth Never use liquid or easily flammable cleansers sprays abrasives polishes alcohol etc Do not allow any moisture to reach the interior of the device Do not spray the device with any cleaning fl...

Страница 22: ... the external device is switched on Check if the video output of the external device is switched on Only the initial screen appears and not the image from the connected computer Check if the software at your computer has been started Device switches to stand by mode When the device is running for a long period of time the surface becomes hot and a warning symbol appears on the projection The devic...

Страница 23: ...0 lumen Contrast ratio 1500 1 Projected image size 10 60 inch Screen distance 0 3 m up to 2 1 m Horizontal Scan Rate 31 69 kHz Vertical Scan Rate 56 85 Hz Built in rechargeable battery Battery type Li Ion Capacity 2600mAh 3 7V Charging time 3 h Operating time 1 5 h Operating time ECO mode 2 h Manufacturer Mbell Technology Group Minimum PC Requirements Processor Intel Pentium M or AMD Athlon Clock ...

Страница 24: ...rapping and Styrofoam packaging recycled or dispose of it in the non recyclable waste depending on the requirements in your country Trademarks The mentioned references in this man ual are trademarks of the respective companies The lack of the trademarks É and Ë does not justify the assumption that these dedicated terminologies are free trademarks Other product names used herein are for identificat...

Страница 25: ...s SAS under license from Koninklijke Philips Electronics N V È 2013 Sagemcom Documents SAS All rights reserved Sagemcom Documents SAS Documents Business Unit Headquarters 250 route de l Empereur 92500 Rueil Malmaison Cedex FRANCE Tel 33 0 1 57 61 10 00 Fax 33 0 1 57 61 10 01 www sagemcom com Simplified Joint Stock Company Capital 8 479 978 509 448 841 RCS Nanterre ...

Отзывы: