background image

Initial setup 9

Operation by built-in battery

The projector can be also operated on built-in 
battery for portability.

Charge the projector

Charge the projector for 1.5 hours before first 
use.
Charge the projector when the low battery icon 
appears in the projection screen.
• 

To charge the projector, connect the 
projector to an external power supply as 
described in the section of “Operation by 
external power”.

• 

When charging, the LED on the projector 
turns red regardless of the projector 
switching on or off.

• 

When powered on, the external power 
will be used first to run the projector and 
unused power will charge the battery. 

• 

For faster charging, charge while the 
projector is powered off.

Notice

The capacity of the built-in battery 
diminishes with time. If the projector 
functions only with external power 
supply, the built-in battery is defective. 
Contact an authorised service centre to 
replace the built-in battery.

Prepare the remote control

CAUTION!

The improper use of batteries can 
lead to overheating, explosion, risk of 
fire and injury. Leaking batteries can 
possibly damage the remote control.
Never expose the remote control to 
direct sunlight.
Avoid deforming, dismantling or 
charging the batteries.
Avoid exposure to open fire and water.
Replace empty batteries immediately.
Remove the batteries from the remote 
control if not in use for long periods of 
time.

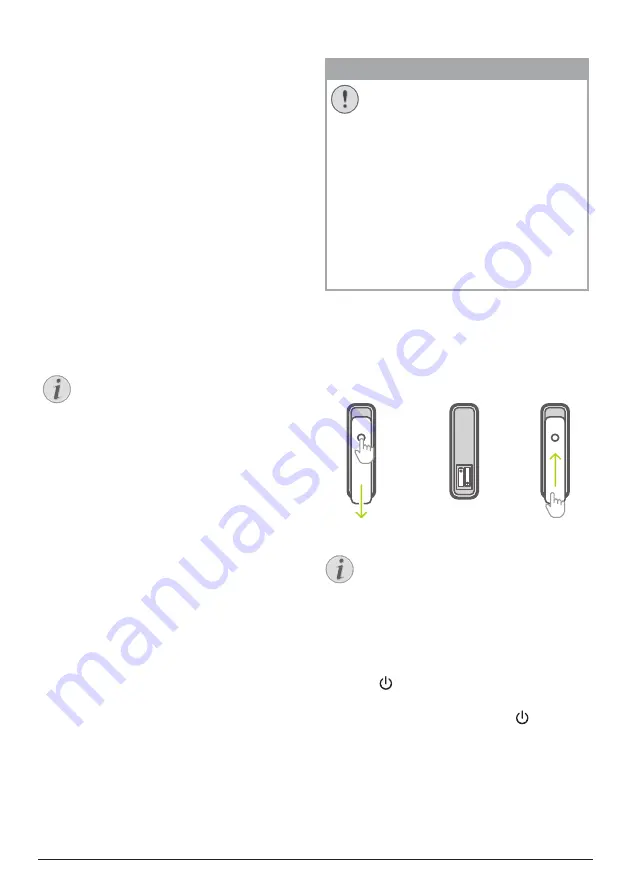
Press and hold the battery compartment 
cover, and simultaneously slide it open to 
access the battery compartment.

2  Insert the supplied batteries (type AAA) 

with correct polarity (+/- ) indicated.

3  Close the battery compartment.

Notice

When using the remote control with 
infrared signals, point the remote control 
at the IR sensor on the projector, and 
make sure there is no obstacle between 
the remote control and the IR sensor.

Power on

Press   to turn on the projector. The LED 
on the projector turns from red to white.

• 

To turn off the projector, press   and 
then press it again when the power-off 
confirmation message pops up. 
The LED on the projector turns from white 
to red.

Содержание PicoPix Max TV PPX720/INT

Страница 1: ...User Manual Register your product and get support at www philips com support PPX720 INT PicoPix MaxTV Portable projector ...

Страница 2: ...omize Channels 12 Use wired keyboard mouse 13 Use Bluetooth keyboard mouse 13 5 Bluetooth streaming 13 Stream from Bluetooth device 13 Stream to Bluetooth speaker 14 6 Chromecast streaming 15 7 Connect to playback devices 15 Connect to devices through HDMI 15 Connect to devices through USB C 16 Connect to devices through SPDIF 16 8 Other features 17 Connect to external speakers or headphones 17 Us...

Страница 3: ...Danger of personal injury This symbol gives warning of danger of personal injury Physical injury or damage can result from improper handling CAUTION Damage to the product or loss of data This symbol gives warning of damage to the product and possible loss of data Damage can result from improper handling What s in the box a Quick Start Guide b PicoPix MaxTV projector PPX720 INT c USB C to USB C cab...

Страница 4: ... the product or on the power cable If the product gets too hot or emits smoke shut it down immediately and unplug the power cable Have your product checked by an authorised service centre Keep the product away from open flames e g candles The product has built in battery Do not dissemble and modify The built in battery should be replaced by qualified service staff only Do not try to replace the bu...

Страница 5: ...ee Cleaning page 21 Use a soft lint free cloth Never use liquid gaseous or easily flammable cleaners sprays abrasives polishes alcohol Do not allow any moisture to reach the interior of the product DANGER Risk of eye irritation This product is equipped with a high power LED Light Emitting Diode which emits very bright light Do not look directly into the projector lens during operation This could c...

Страница 6: ...ut connect to external speakers or headphones f SPDIF Connect to the digital SPDIF audio input on an HiFi audio system g USB port Connect to power USB devices like Amazon Fire TV stick Roku streaming stick and for firmware upgrade h DC socket Connect to the power supply i Bluetooth button Press to turn Bluetooth on or off Remote control OK a b c d e f g h l j i k a Access voice search function Goo...

Страница 7: ...erent configurations Follow the guidelines below for different projector placement Notice For overhead mounting on ceiling purchase a projector mount recommended by an installation professional and follow the instructions that come with the mount Before mounting on the ceiling make sure the ceiling can support the weight of the projector and mounting kit For ceiling installation this product must ...

Страница 8: ...he screen a projector mount and a special rear projection screen is required 2 To adjust projection to the correct position press on the remote control to access the settings menu and navigate to Projection Direction Rear Ceiling Use a tripod optional You can use the projector with a tripod optional which allows more choices for placing the projector Locate the tripod socket on the bottom of the p...

Страница 9: ...y Prepare the remote control CAUTION The improper use of batteries can lead to overheating explosion risk of fire and injury Leaking batteries can possibly damage the remote control Never expose the remote control to direct sunlight Avoid deforming dismantling or charging the batteries Avoid exposure to open fire and water Replace empty batteries immediately Remove the batteries from the remote co...

Страница 10: ...or clearness when you reposition the projector or the projected image is detected not clear 1 When remote is in infrared mode red LED press to activate autofocus Press and hold to activate manual focus In manual focus mode use the left and right keys to fine tune the image Press when you are satisfied Boot Autofocus The projector can perform auto focus adjustment each time the projector is switche...

Страница 11: ... When prompted for pairing hold down OK and on the remote control for about 10 seconds until the interface shows successful connection Make sure the projector is turned on and as close as possible to the remote control Step 2 Select a language 1 When prompted for language selection use the Navigation buttons on the remote control to select an on screen language To change your on screen language 1 ...

Страница 12: ...from the home screen Before accessing the applications make sure the projector is connected to Internet see Step 3 Set up the Wi Fi network page 11 Use the navigation buttons and OK on the remote control to select and open an application You may add or remove an application on the home screen by installing or uninstalling an application To browse search and install applications access Google Play ...

Страница 13: ...rojector Stream music from the projector to an external Bluetooth speaker Stream from Bluetooth device Through Bluetooth you can wirelessly stream music from a Bluetooth device e g a smartphone or tablet to the projector Before you use the projector with a Bluetooth device for the first time pair it with the Bluetooth device Notice The effective operation range between the projector and the Blueto...

Страница 14: ...vice is approximately 10 meters 30 feet The music streaming may be interrupted by any obstacles between the Bluetooth device and the projector 1 Turn on your Bluetooth speaker 2 Pair the projector with your Bluetooth speaker Select the icon in the upper right corner of the home screen and press OK Then select Remotes Accessories Add accessory to search for new accessories Select your Bluetooth spe...

Страница 15: ...treamed to the projection screen Notice For better streaming performance use a 5 GHz WiFi network Google Google Play YouTube Android TV and other marks are trademarks of Google LLC Google Assistant is not available in certain languages and countries 7 Connect to playback devices Connect to devices through HDMI Connect a playback device e g a Blu ray player gaming console camcorder digital camera o...

Страница 16: ...no audio from the playback device is heard on the projector check that the audio output format is set to stereo on the playback device The port only accepts video signal To connect other USB device e g a thumb drive and keyboard use the USB A port Connect to devices through SPDIF Connect a digital device e g a home cinema system or sound bar to the projector through SPDIF connection With this conn...

Страница 17: ...the projector to headphones The speakers of the projector are deactivated automatically when the external speakers or headphones are connected to the projector HDMI DC USB SPDIF 2 When connecting to the headphones use the volume control on the remote control to adjust the volume to a comfortable level Use easy link This projector supports easy link which uses the HDMI CEC Consumer Electronics Cont...

Страница 18: ... s memory usage Set permissions for the installed apps e g location contacts camera microphone phone SMS and etc Check an app version app size and cache size Clear cache or uninstall an app Picture settings Display Go to TV settings Display to access the following settings Screen resolution Select a screen resolution to best support your video Screen position Scale the projection image within the ...

Страница 19: ...oogle assistant Select the active Google account and customize Google Assistant behaviour Chromecast built in View information about Chromecast Screen saver Select a timer to automatically turn the screen off when the projector is idle Location Check your location status and view all recent location requests Usage and diagnostics Choose if you wish for the device to automatically send diagnostic i...

Страница 20: ...ocus mode Standard mode is slower but works in all environments AI powered is faster but takes a few attempts to learn a new environment e g when you change rooms Brightness Auto mode will dynamically change the projector s brightness based on the ambient light in your room For the longest battery life select Super Eco Scheduled shutdown Go to Sleep Timer to select a time option which enables the ...

Страница 21: ... easily flammable cleansers sprays abrasives polishes alcohol etc Do not allow any moisture to reach the interior of the projector Do not spray the projector with any cleaning fluids Wipe over the surfaces gently Be careful that you do not scratch the surfaces Cleaning the lens Use a soft brush or lens cleaning paper for cleaning the lens of the projector DANGER Do not use any liquid cleaning agen...

Страница 22: ...aired with the projector Pair the remote control with the projector see First time setup page 11 The remote control is not in Android TV mode for Android TV menu navigation Press on the remote control to switch the remote control to Android TV mode if the remote control is paired with the projector When the remote control is in Android TV mode the LED on the remote control flashes blue once each t...

Страница 23: ...o flawlessly from the smartphone to the projector This can happen if one or more WiFi networks operate in the same frequency range nearby Certain IoT devices e g ZigBee enabled devices also operate in this frequency range Your smartphone is not fast enough to compress the data and send it simultaneously over WiFi The temperature of the projector s surface is warm For this projector it is normal to...

Страница 24: ...source LED RGGB 4 channels Color space 100 REC 709 Resolution 1920 1080 pixel LED lifetime over 30 000 hours Contrast ratio 1 000 1 Aspect ratio 16 9 and 4 3 Throw ratio 1 2 1 Screen size diagonal 75 cm 305 cm 30 120 Screen distance 78 cm 320 cm 31 126 Projection modes front rear front rear ceiling Focus adjustment auto Keystone correction auto vertical 4 corner correction yes Digital zoom yes Lig...

Страница 25: ...ant to Part 15 of the FCC Rules These limits are designed to provide reasonable protection against harmful interference in a residential installation This equipment generates uses and can radiate radio frequency energy and if not installed and used in accordance with the instructions may cause harmful interference to radio communications However there is no guarantee that interference will not occ...

Страница 26: ...he non recyclable waste depending on the requirements in your country Trademarks The mentioned references in this manual are trademarks of the respective companies The lack of the trademarks and does not justify the assumption that these dedicated terminologies are free trademarks Other product names used herein are for identification purposes only and may be trademarks of their respective owners ...

Страница 27: ...chenaz Philips and the Philips Shield Emblem are registered trademarks of Koninklijke Philips N V used under license Screeneo Innovation SA is the warrantor in relation to the product with which this booklet was packaged 2021 Screeneo Innovation SA All rights reserved ...

Отзывы: