background image

17

2


Select your country, then press  

OK

 to confi rm.

You are prompted to perform auto channel search.

»

3

 Select 


[Auto search]

, then press  

OK

 to confi rm.

Auto channel search starts.

»

When auto channel search is complete, the total number of TV and radio 

»

channels found is displayed.

To view the programs of the fi rst found channel, press  

»

OK

.

To change channels, press  

»

CH +/-

.

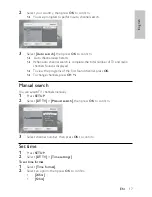
Manual search

You can search TV channels manually.

1

 Press 


SETUP

.

2

 Select 


[DTTV]

 >

[Manual search]

, then press  

OK

 to confi rm.

3


Select channel number, then press  

OK

 to confi rm.

Set time

1

 Press 


SETUP

.

2

 Select 


[DTTV]

 >

[Time settings]

.

To set time format

:

1

 Select 


[Time format]

.

2


Select an option, then press  

OK

 to confi rm.

[24hrs]

[12hrs]

DTTV

Auto search

Manual search

DTTV parental

Country

Time settings

English

EN

Содержание PET745

Страница 1: ...d get support at www philips com welcome PET745 EN User manual 3 DA Brugervejledning 23 DE Benutzerhandbuch 43 ES Manual del usuario 63 FR Mode d emploi 83 IT Manuale utente 105 NL Gebruiksaanwijzing 125 SV Användarhandbok 145 ...

Страница 2: ...he battery 13 Install remote control battery 14 Connect additional equipment 14 4 Play 15 Turn on 15 Select OSD language 15 Play discs 15 Play options 16 5 Watch TV 16 First time settings 16 Manual search 17 Set time 17 View program information 18 Use the electronic program guide 19 Rearrange the channel list 19 Manage channels 19 6 Adjust settings 20 7 Product information 21 8 Troubleshooting 21 ...

Страница 3: ...ld with the apparatus When a cart is used use caution when moving the cart apparatus combination to avoid injury from tip over l Unplug this apparatus during lightning storms or when unused for long periods of time m Refer all servicing to qualified service personnel Servicing is required when the apparatus has been damaged in any way such as power supply cord or plug is damaged liquid has been spi...

Страница 4: ... guard against this set your volume to a safe level before your hearing adapts and leave it there To establish a safe volume level Set your volume control at a low setting Slowly increase the sound until you can hear it comfortably and clearly without distortion Listen for reasonable periods of time Prolonged exposure to sound even at normally safe levels can also cause hearing loss Be sure to use...

Страница 5: ...ttached to a product it means the product is covered by the European Directive 2002 96 EC Never dispose of your product with other household waste Please inform yourself about the local rules on the separate collection of electrical and electronic products The correct disposal of your old product helps prevent potentially negative consequences on the environment and human health Your product conta...

Страница 6: ... fuktighet 2 Your portable DVD player Congratulations on your purchase and welcome to Philips To fully benefit from the support that Philips offers register your product at www philips com welcome Introduction Your portable DVD player plays digital video discs that conform to the universal DVD Video standard With it you can play movies with true cinema picture quality and stereo or multi channel so...

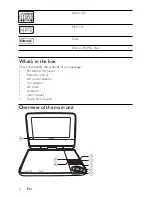
Страница 7: ...iscs with JPEG files What s in the box Check and identify the contents of your package Portable DVD player Remote control AC power adaptor Car adaptor AV cable Antenna User manual Quick Start Guide Overview of the main unit EN ...

Страница 8: ...ward at different speeds OK Confirms an entry or selection Starts pauses or resumes disc play e CHR Charging indicator Power indicator f DISC MENU For DVD accesses or exits disc menu For VCD turns on or off PBC Playback Control mode For VCD version 2 0 or SVCD with PBC turned on returns to the menu g SOURCE Switches between DVD and DTTV h IR Remote control sensor i DC IN Power supply socket j OPEN ...

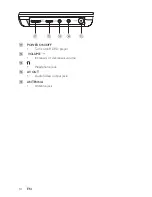
Страница 9: ...10 k POWER ON OFF Turns on off DVD player l VOLUME Increases or decreases volume m Headphone jack n AV OUT Audio video output jack o ANTENNA Antenna jack EN ...

Страница 10: ... Overview of remote control a SOURCE Switches between DVD and DTTV b TELETEXT Toggles teletext on or off c FAV LIST Accesses or exits the favorite list d Color keys Selects tasks or options E n g lis h EN ...

Страница 11: ... disc play k 0 9 Numeric keypad l GO TO Skip to a chapter track title or a play time m REPEAT Repeats a chapter track title n Adjusts screen aspect ratio o ANGLE Selects a different viewing angle of a DVD p AUDIO For DVD selects an audio language For VCD selects an audio mode q SUBTITLE Selects DVD subtitle language r CH Switches to the next or previous channel s OPTIONS Accesses options relating ...

Страница 12: ..._ Serial No ___________________________ Charge the battery Caution Risk of product damage Ensure that the power supply voltage corresponds to the voltage printed on the bottom of the player Use only the supplied AC adaptor to charge the battery Note The type plate is located on the bottom of the player You can only charge the player when it is in power off mode 1 Slide the POWER ON OFF switch to O...

Страница 13: ...ay apply See www dtsc ca gov hazardouswaste perchlorate For first time use 1 Remove the protective tab to activate the remote control battery To replace the remote control battery 1 Open the battery compartment 2 Insert 1 CR2025 battery with correct polarity as indicated 3 Close the battery compartment Connect additional equipment Connect a TV You can connect the player to a TV to enjoy DVD Match t...

Страница 14: ...The setup menu appears 2 Select General Language 3 Press to select an option 4 Press OK to confirm 5 Press SETUP to exit Play discs 1 Slide OPEN on the main unit 2 Insert the disc with label side facing up 3 Push down to close the CD compartment Play starts automatically If a menu appears select an item then press to start play To pause pres Press again to start play To stop press To select the pre...

Страница 15: ... Pan Setup 2 Follow the on screen instructions 5 Watch TV Note Before you start ensure that you have connected the antenna to the player Make sure you are in an area with sufficient DTTV signal coverage You can check the signal coverage with the TV broadcast authority of your country or visit www philips com support First time settings 1 Press SOURCE to switch to DTTV mode You are prompted to selec...

Страница 16: ...view the programs of the first found channel press OK To change channels press CH Manual search You can searchTV channels manually 1 Press SETUP 2 Select DTTV Manual search then press OK to confirm 3 Select channel number then press OK to confirm Set time 1 Press SETUP 2 Select DTTV Time settings To set time format 1 Select Time format 2 Select an option then press OK to confirm 24hrs 12hrs DTTV Auto ...

Страница 17: ... 1 Select Setting mode Manual time setting then press OK to confirm 2 Select Summer time DST If it is not summer time at the moment select Off View program information To view brief information of the current program press INFO a TV program Radio program b Next program s information c Program number d Program name e Local time f Signal length indicator g Program information icons Program containing...

Страница 18: ...gitalTV programs You can navigate select and view programs by time or title 1 Select a channel 2 Press EPG The Electronic Program Guide appears 3 Press to select a program 4 Press OK The brieft informatin of this program is displayed 5 To exit the EPG menu press EPG Rearrange the channel list 1 Press OPTIONS 2 Select Channel Edit The channel list is displayed 3 Select a channel 4 Follow the on scr...

Страница 19: ...ol function on off Power save Set power saving mode on off DivX VOD Get DivX registration code DivX Subtitle Select DivX subtitle language Parental DVD Select parental options Set password Change existing password 1369 by default Factory settings Restore factory settings Video TV display Set screen display aspect ratio TV standard Set video output format to TV system Audio Dolby Set Dolby output D...

Страница 20: ...hout prior notice Dimensions 200 x 160 x 43 5 mm Weight 0 84 kg Power supply Input 100 240V 50 60Hz Output DC 9 12V 1 0A Operating temperature range 0 50 C Laser wavelength 650 nm Video system NTSC PAL 8 Troubleshooting Warning Risk of electric shock Never remove the casing of the player To keep the warranty valid never try to repair the system yourself If you encounter problems when using the pla...

Страница 21: ...d or bright points red blue green that continuously appear on the LCD This is a normal result of the manufacturing process and does not indicate a malfunction Cannot play disc Ensure the disc label is upwards Clean the disc With a clean soft lint free cloth wipe the disc outwards from the center Check if the disc is defective by trying another disc No response to operating commands The operation i...

Страница 22: ... 2009 Koninklijke Philips Electronics N V All rights reserved ...

Отзывы: