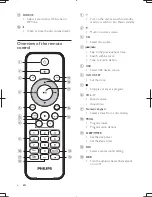
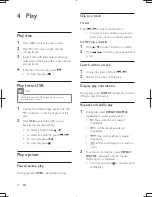
background image

11

English

EN

Tip


&

=? ;!#@ 
are played.

Program tracks

You can program a maximum of 20 tracks.

In CD/USB mode, in the stop position, 
press 

9^3-

 to activate the program 

mode.


»

Œ9^3-

(program) and track number 

begin to blink.

For MP3 tracks, press   /   to select an 
album.

$

Press 

X

 to select a track number, 

then press 

9^3-

 <

Repeat steps 2 to 3 to program more 
tracks.

%

Press 

 to play the programmed tracks.


»

During play, 

Œ9^3-

 (program) is 

displayed.

& To erase the program, in the stop 

position, press  .

% 0./

Tune to a radio station

Press 

FM

.

Press and hold 

X

 over two seconds.


»

Œ<‚q^f€

 (search) is displayed.


»

The radio tunes to a station with 
strong reception automatically. 

$

Repeat step 2 to tune to more stations.

& To tune to a weak station, press 

X

 ? ? 

reception.

& ;$ ?%

 on 

remote control repeatedly to select 
stereo or mono sound.

Tip


&

Position the antenna as far as possible from TV, VCR, or 
other radiation source.


&

For optimal reception, fully extend and adjust the 
position of the antenna.

Program radio stations 
automatically

You can program a maximum of 20 preset 
radio stations (FM).

In FM mode, press and hold 

9^3-

 over two 

seconds to activate automatic program mode.


»

Œqz{3

(auto) is displayed.


»

All available stations are programmed.


»

 @ 
broadcast automatically.

MCM1055_51_UM_V1.1.indb   11

2012-2-3   16:43:41

Содержание MCM1055

Страница 1: ...Register your product and get support at www philips com welcome User manual 1 MCM1055 MCM1055B ...

Страница 2: ...monstrate features 9 Turn on 9 4 Play 10 Play disc 10 Play from USB 10 Play options 10 0 11 Tune to a radio station 11 Program radio stations automatically 11 Program radio stations manually 12 Select a preset radio station 12 6 Adjust sound 12 Adjust volume 12 Select a preset sound effect 12 Enhance bass 12 Mute sound 12 3 5 7 13 Set the timer 13 Set the sleep timer 13 Play from an external devic...

Страница 3: ...w all instructions e Do not use this apparatus near water f Clean only with dry cloth g Do not block any ventilation openings Install in accordance with the 7 B h Do not install near any heat sources such as radiators heat registers stoves or 5 J L L O Q 5 produce heat i 9 5 V 7 walked on or pinched particularly at plugs convenience receptacles and the V5 5 W 7 5 B j 3 L 5 X O 5 7 B k Use only wit...

Страница 4: ...ibel ranges that may cause hearing loss for a normal person even for exposure less than a minute The higher decibel ranges are offered for those that may have already experienced some hearing loss Sound can be deceiving Over time your hearing comfort level adapts to higher volumes of sound So after prolonged listening what sounds normal can actually be loud and harmful to your hearing To guard aga...

Страница 5: ...household waste Please inform yourself about the local rules on separate collection of batteries because correct disposal helps to prevent and human health L 7 All unnecessary packaging has been omitted We have tried to make the packaging easy to separate into three materials cardboard box polystyrene foam buffer and polyethylene bags protective foam sheet Your system consists of materials which c...

Страница 6: ...ats 5 5 W Check and identify the contents of your package Main unit 2 x Speakers Power cord Remote control with 2 AAA batteries User manual Quick start guide 3 V 7 5 a Display panel Show current status b Turn on the unit or switch to standby mode or switch to Eco Power standby c Remote sensor d Connector for a USB device e 9 0 Connector 3 5mm for an external audio device f Stop play or erase a pro...

Страница 7: ...ode or switch to Eco Power standby b Mute or restore volume c CD Select disc source d X Skip to the previous next track Search within a track Tune to a radio station e USB Select USB device source f f03f Set the clock g Stop play or erase a program h 30 X Adjust volume Adjust time i Numeric keypad Select a track from a disc directly j 9 3 Program tracks Program radio stations k 0 9X Set the sleep ...

Страница 8: ...n herein may result in hazardous radiation exposure or other unsafe operation Always follow the instructions in this chapter in If you contact Philips you will be asked for the model and serial number of this apparatus The model number and serial number are on the rear of the apparatus Write the numbers here Model No __________________________ Serial No ___________________________ Prepare the remo...

Страница 9: ...the rear of the main unit Before connecting the AC cord make sure that you have completed all other connections Note The type plate is located on the rear of the main unit R L 1 Connect the power cord to the AC jack on the main unit 2 Connect the power plug to the wall outlet Auto install radio stations When you connect power and no radio stations are stored the unit automatically begins to store ...

Страница 10: ... exits clock setting mode automatically 7 In the standby mode press 0f3 3 9 0 9 welcome to Philips scrolls on the display 3 3 demo on scrolls on the display The feature names are displayed one by one To exit the feature demonstration press again 3 3 demo off scrolls on the display Turn on Press The unit switches to the last selected source Switch to standby When the unit is turned on press to swit...

Страница 11: ...y options 9 X L During play press to pause resume play Skip to a track For CD Press X to select another track To select a track directly you can also press a key on the numerical keypad 9 z 1 Press to select an album or folder 2 Press X to select previous next track Search within a track 1 During play press and hold 2 Release to resume normal play L L 7 During play press 90q repeatedly to select d...

Страница 12: ...Press FM 2 Press and hold X over two seconds q f search is displayed The radio tunes to a station with strong reception automatically Repeat step 2 to tune to more stations To tune to a weak station press X reception on remote control repeatedly to select stereo or mono sound Tip Position the antenna as far as possible fromTV VCR or other radiation source For optimal reception fully extend and adj...

Страница 13: ...To overwrite a programmed station store another station in its place Select a preset radio station In FM mode press to select a preset number 6 Adjust sound Adjust volume During play press 30 X to decrease increase the volume L 77 During play press DSC repeatedly to select 939 pop q jazz 3f rock f0q f classic Tip To exit press DSC repeatedly to select 0q Enhance bass During play press DBB to turn ...

Страница 14: ... 6 Press or 30 X to adjust volume then press 0 9X The timer is set and activated and is displayed L 1 Press to switch to standby mode 2 Press 0 9X repeatedly to activate or deactivate timer If timer is activated is displayed If timer is deactivated is disappeared Note In MP3 link mode the timer cannot be set If disc USB source is selected and the audio cannot be played tuner is activated automatic...

Страница 15: ...to the connector on the unit to listen through the headphones 8 Product 7 Note Product information is subject to change without prior notice O L 7 AC power AC 220 230V 50 Hz Operation Power Consumption 20 W Eco Standby Power Consumption 0 5 W USB Direct Version 2 0 1 1 Dimensions Main Unit W x H x D 140 x 143 x 210 mm Speaker box W x H x D 140 x 143 x 198 mm Weight Main Unit 0 91 kg Speaker box 0 ...

Страница 16: ... File name in Unicode UTF8 maximum length 128 bytes z 7 Empty albums an empty album is an Q and is not shown in the display For example Word documents doc Q ignored and not played Q Maintenance Clean the cabinet Use a soft cloth slightly moistened with a mild detergent solution Do not use a solution containing alcohol spirits ammonia or abrasives Clean discs When a disc becomes dirty clean it with...

Страница 17: ...e control does not work select the correct source with the remote control instead of the main unit Reduce the distance between the remote control and the unit Insert the battery with its polarities signs aligned as indicated Replace the batteries Aim the remote control directly at the sensor on the front of the unit No disc detected Insert a disc Check if the disc is inserted with the print side f...

Страница 18: ... 7 5 V 5 2012 Koninklijke Philips Electronics N V All rights reserved f f Ï Ïz Ï B ...

Отзывы: