background image

MCD299

DVD Micro Theatre

Register your product and get support at

www.philips.com/welcome

pg001-pg020_MCD299-98-Eng-A

2007.9.27, 13:04

1

Содержание MCD299

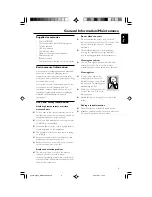
Страница 1: ...MCD299 DVD MicroTheatre Register your product and get support at www philips com welcome pg001 pg020_MCD299 98 Eng A 2007 9 27 13 04 1 ...

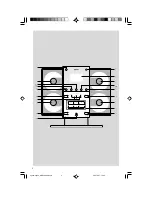
Страница 2: ...2 1 7 3 9 6 7 9 7 2 5 7 9 4 0 8 9 pg001 pg020_MCD299 98 Eng A 2007 9 27 13 04 2 ...

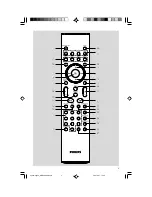
Страница 3: ...3 1 5 0 2 3 7 9 4 8 8 6 7 pg001 pg020_MCD299 98 Eng A 2007 9 27 13 04 3 ...

Страница 4: ...ING DTS AND DTS DIGITAL SURROUND ARE RESISTEREDTRADEMARKS OF DIGITAL THEATER SYSTEMS INC COPYRIGHT 1996 2003 DIGITAL THE ATER SYSTEMS INC ALL RIGHTS RESERVED This product incorporates copyright protection technology that is protected by method claims of certain U S patents and other intellectual property rights owned by Macrovision Corporation and other rights owners Use of this copyright protecti...

Страница 5: ...x English 6 45 CAUTION Use of controls or adjustments or performance of procedures other than herein may result in hazardous radiation exposure or other unsafe operation pg001 pg020_MCD299 98 Eng A 2007 9 27 13 04 5 ...

Страница 6: ...rogressive Scan feature for Progressive Scan TV only Step 4 Setting language preference 19 20 Basic Functions Plug and Play 21 Switching the system on off 21 Power saving automatic standby 21 Sound control 21 DBB DSC Volume control 22 Dimming the display screen 22 Demonstration mode 22 Disc Operations Playing discs 23 Using the disc menu 23 Basic playback controls 23 25 Pausing playback Selecting ...

Страница 7: ...mming radio stations 32 33 Automatic programming Manual programming Tuning to preset radio stations 33 Changing tuning grid 33 External Sources Using a non USB device 34 Using a USB mass storage device 34 35 Timer Timer setting 36 Sleep timer setting 37 Specifications 38 Troubleshooting 39 41 Glossary 42 Appendix 43 44 How to mount your system onto wall 43 44 What s in the supplied mounting kit Wh...

Страница 8: ...r film based sources When a picture refreshes its vertical resolution can double to 525 lines Note To fully enjoy the progressive scan feature you need a progressive scan TV Discs for playback Your DVD System will play DigitalVideo Discs DVDs Video CDs VCDs SuperVideo CDs SVCDs DigitalVideo Discs Rewritable DVD RW Compact Discs CDs Picture Kodak JPEG files on CDR W Windows Media Audio WMA Supporte...

Страница 9: ...struction booklet and a quick start guide Environmental information All unnecessary packaging has been omitted We have tried to make the packaging easy to separate into three materials cardboard box polystyrene foam buffer and polyethylene bags protective foam sheet Your system consists of materials which can be recycled and reused if disassembled by a specialised company Please observe the local ...

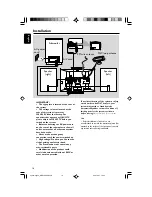
Страница 10: ...odification of the product could result in hazardous radiation of EMC or other unsafe operation AC CORD CONNECT TO SUB WOOFER R L SPEAKERS 6 Ω Y Pb Pr OUT A V OUT AUDIO IN S VIDEO IN VIDEO IN TV IN AUDIO IN S VIDEO IN VIDEO IN TV IN AC power cord Speaker right Speaker left FM wire antenna MW loop antenna To avoid overheating of the system a safety circuit has been built in Therefore your system ma...

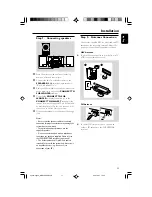
Страница 11: ...ver at the left bottom of the main set to expose the CONNECTTO SUB WOOFER terminal 4 Connect the CONNECTTO SUB WOOFER terminal of the main set to the CONNECTTO MAIN SET terminal of the subwoofer with the supplied 15 pin D Sub cable by matching the pins Fix the two screws on the connectors to ensure firm connection 5 Mount the detachable cover back until hearing a click Notes Ensure that the speake...

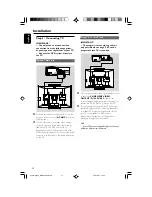
Страница 12: ...onnect the audio connectors white red to the audio input jacks on theTV UsingY Pb Pr OUT jack IMPORTANT The progressive scan video quality is only possible when usingY Pb Pr and a progressive scanTV is required R CONNECT TO SUB WOOFER R L SPEAKERS 6 Ω Y Pb Pr OUT A V OUT 1 Use component video cables red blue green to connect the COMPOENTVIDEO OUTPUT Pr Cr Pb CbY jack to the corresponding Component...

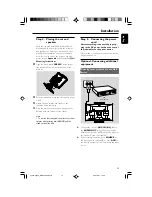
Страница 13: ...stands Note To remove the stand from the main set or either speaker while pressing down PRESS4 pull the stand out from the slots Step 5 Connecting the power cord After everything is connected properly plug in the AC power cord on the rear of the subwoofer to the power outlet Never make or change any connection with the power switched on Optional Connecting additional equipment Listening to the pla...

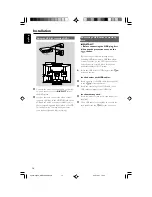
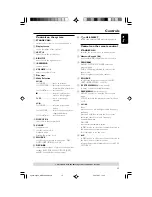
Страница 14: ...NT Before connecting the USB plug first slide open the protective cover on the socket By connecting a USB mass storage device including USB flash memory USB flash players or memory cards to the Hi Fi system you can enjoy the device s stored music through the powerful speakers of Hi Fi system Insert the USB device s USB plug into the socket on the set for the devices with USB cables 1 Insert one pl...

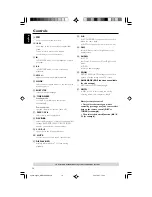
Страница 15: ...t USB DIRECT jack for the external USB mass storage device Controls on the remote control 1 STANDBY ON y switches the system on or to standby mode 2 Numeric Keypad 0 9 inputs a track title chapter number of the disc 3 PROGRAM DVD VCD CD MP3 CD USB enters the program menu Picture CD during playback to select a slide show mode Tuner programs preset radio stations 4 SOURCE to select the respective so...

Страница 16: ... left right disc door MUTE to interrupt or resume sound reproduction DISPLAY OSD displays information onTV screen during playback A B forVCD CD USB to repeat a specific section within the same track for DVD to repeat a specific section in a disc DIM selects different levels of brightness for the display screen AUDIO forVCD sets Stereo Mono Left or Mono Right sound mode for DVD selects an audio lan...

Страница 17: ...ove batteries if they are exhausted or if the Remote Control is not being used for a long time Do not use old and new or different types of batteries in combination Batteries contain chemical substances so they should be disposed of properly Step 2 Setting the clock The clock can be set in either 12 hour or 24 hour mode 1 In standby mode press and hold CLOCK on the front panel 2 Press à á to set t...

Страница 18: ...lect this mode It will change the video signal of a NTSC disc and output in PAL format Multi If the connectedTV is multi system select this mode The output format will be in accordance with the video signal of the disc NTSC If the connectedTV is NTSC system select this mode It will change the video signal of a PAL disc and output in NTSC format SettingTV Display Select the aspect ratio of theTV to...

Страница 19: ...ideo Input channel The DVD background screen appears on the TV 5 Press SYSTEM MENU 6 Press à á repeatedly to select Video Setup page 7 Move to Progress and press á 8 Move to On and press OK to confirm The setup is complete now and you can start to enjoy the high quality picture Step 4 Setting language preference You can select your preferred language settings so that this DVD Micro System will aut...

Страница 20: ...isplayed list Disc Menu DVD only Select the language for the DVD menu When the selected language is not recorded in the DVD one of the recorded languages will be selected automatically except for OSD You can reset all the DVD settings except for Rating If the language selected is not available on the disc the original language designated by each disc will be selected 3 Press 5 4 to select a langua...

Страница 21: ...f no stereo frequency is detected during Plug and Play CHECK ANTENNA will be displayed During Plug and Play if no button is pressed within 15 seconds the system will exit Plug and Play mode Switching the system on off Press STANDBY ON B Press DISC USB TUNER or AUX on the remote The system will switch to the selected source Press LEFT ç or RIGHT ç on the front panel L ç or R çon the remote The syst...

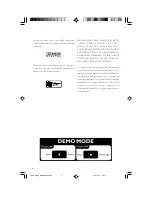
Страница 22: ...ing the display screen Press DIM repeatedly to select different levels of brightness for the display screen Demonstration mode The system has a demonstration mode that shows the various features offered by the system To activate the demonstration In standby mode press 9 on the system to activate the demo mode Demonstration will begin To deactivate the demonstration Press 9 on the system again DEMO...

Страница 23: ...printed side facing you Press LEFT ç or RIGHT ç on the front panel L ç or R çon the remote control again to close the disc door Disc Operations CLOSE is displayed briefly Then the DVD player will play all the discs in the four disc trays one by one starting from DISC 1 If no disc is found in a disc tray the DVD player will automatically turn to the next one In this case CHANGING will be displayed ...

Страница 24: ...REPEAT ALL SHUFFLE NORMAL PLAYBACK For MP3 WMA repeat track album disc in Folder mode Press MODE repeatedly to select the following REPEAT ONE REPEAT ALL SHUFFLE NORMAL PLAYBACK in File list Playlist mode Press MODE repeatedly to select the following REPEAT ONE REPEAT ALL SHUFFLE NORMAL PLAYBACK In shuffle playback mode Press P button to select another track in a shuffle order Press 9 to stop shuf...

Страница 25: ...ion Display off For CD Elapsed playback time of the current track Remaining playback time of the current track Elapsed playback time of the whole disc Remaining playback time of the whole disc Display off For MP3 CD WMA Elapsed playback time of the current track Remaining playback time of the current track Display off Special disc features Playing aTitle DVD 1 Press DISC MENU The disc title menu a...

Страница 26: ... compiled onto the disc Playback selection During playback you can Press í ë to select another track in the current album Press 2 repeatedly to pause resume playback Playing JPEG Picture CD General operation 1 Load a JPEG Picture CD A data disc menu appears on theTV screen and playback starts automatically from the first file 2 Press à to move to the folder column on the left of theTV screen then ...

Страница 27: ... L Mode 4 WIPE R Mode 5 DIAGONAL L TOP Mode 6 DIAGONAL RTOP Mode 7 DIAGONAL L BOTTOM Mode 8 DIAGONAL R BOTTOM Mode 9 EXTEND CENTER H Mode 10 EXTEND CENTER V Mode 11 COMPRESS CENTER H Mode 12 COMPRESS CENTER V Mode 13 WINDOW H Mode 14 WINDOWV Mode 15 EDGETO CENTER Mode 16 MOVE IN FROMTOP Playback with multi angles JPEG During playback press à á 5 4 to rotate the picture on theTV screen 5 flip the p...

Страница 28: ...SD Lang See Preparations Step 4 Setting language preference for details Screen Saver This function is used to turn the screen saver on or off Audio Setup Page The options included in Audio Setup Page are Night Mode Digital Output and Dolby Digital Setup Audio Setup Page NIGHT MODE DIGITAL Output Dolby Digital Setup Night Mode On Select this to level out the volume High volume outputs will be softe...

Страница 29: ...this DVD player Video Setup Page The options included inVideo Setup Page are TV Display Progress and TVType Video Setup Page TV Display PROGRESS TV Type TV Display See Preparations Step 3 Setting video preference for details Progress See Preparations Step 3 Setting video preference for details TV Type See Preparations Step 3 Setting video preference for details Preference Page The options included...

Страница 30: ...e disc inserted DVDs that are rated above the level you selected will not play unless you enter your four digit password and choose a higher level rating Note Some DVDs are not encoded with a rating though the movie rating may be printed on the Disc cover The rating level feature does not work for such Discs Rating explanations 1 KID SAFE Suitable for children 2 G General Audience recommended as a...

Страница 31: ...m and the new password takes effect Note The default password 1234 is always active even if the password has been changed Default Setting the Default function will reset all options and your personal settings to the factory defaults and all your personal settings will be erased Preference Page Audio Subtitle Disc Menu Parental Password Default Reset 1 Press 5 4 to highlight Default 2 Highlight Res...

Страница 32: ...til you have found optimal reception Programming radio stations You can store up to a total of 40 radio stations in the memory for each band Automatic programming Automatic programming will start with a chosen preset number From this preset number upwards former programmed radio stations will be overridden 1 Press í ë to select the preset number where programming should start Note If no preset num...

Страница 33: ...place Tuning to preset radio stations Press í ë until the desired preset station is displayed Changing tuning grid not available for all versions In North and South America the frequency step between adjacent channels in the MW band is 10 kHz 9 kHz in some areas The preset frequency step in the factory is 10 kHz Changing the tuning grid will erase all previously stored preset radio stations Press ...

Страница 34: ...quired a battery power source Please make sure you have a fresh battery in it or charge the USB device first and then plug it into the product again Supported Music type a This device only supports unprotected music with the following file extension mp3 wma b Music bought from on line music stores are not supported because they are secured by Digital Rights Management protection DRM c File name ex...

Страница 35: ... end with mp3 and the file names ofWMA files end with wma For DRM protectedWMA files useWindows Media Player 10 or later for conversion Visit www microsoft com for details aboutWindows Media Player andWM DRM Windows Media Digital Rights Management 1 Check the USB device has been properly connected See Installation Connecting an additional appliance 2 Press SOURCE once or more to select USB or USB ...

Страница 36: ...program refer to Disc Operations Program USB Correctly insert a USB mass storage device TUNER tune to the desired radio station 3 Press à á repeatedly to set the hour for the timer to start 4 Press í ë repeatedly to set the minute for the timer to start 5 Press TIMER SLEEP on the remote control to store the start time At the preset time the selected source will play To exit without storing the set...

Страница 37: ...hown except for OFF mode The sleep timer is now set To check the remaining length of time after sleep timer is activated Press TIMER SLEEP once To change the preset sleep timer Press TIMER SLEEP again while the remaining sleep timer is shown The display will show the next sleep timer options To deactivate the sleep timer Press TIMER SLEEP repeatedly until OFF is displayed or press STANDBY ON B Not...

Страница 38: ...ort MP3 and WMA files Number of albums folders maximum 99 Number of tracks titles maximum 999 TUNER FM wave range 87 5 108 MHz Sensitivity at 75 Ω mono 26 dB signal to noise ratio 2 8 µV stereo 46 dB signal to noise ratio 61 4 µV Tuning grid 9 10 kHz Selectivity 15 dB Total harmonic distortion 5 Frequency response 40 5000 Hz 6 dB Signal to noise ratio 58 dBA SPEAKERS Front Speakers Impedance 6 Ω S...

Страница 39: ... the connectedTV does not support progressive signals or the cables are not connected accordingly see Preparations Setting up Progressive Scan feature for proper progressive scan setup Sometimes a slight picture distortion may appear This is not a malfunction Clean the disc The aspect ratio is fixed on the DVD disc The aspect ratio may not be changed for some TV systems WARNING Under no circumstan...

Страница 40: ... plug from the jack and insert again Multi language sound or subtitle is not recorded on the DVD Changing the language for the sound or subtitle is prohibited on the DVD Make sure the component is connected correctly Press the correct function button for the input source Adjust the volume Check that the speakers are connected correctly Check if the stripped speaker wire is clamped If the system is...

Страница 41: ...t the remote control at the remote control sensor of the unit Reduce the distance to the player Remove any possible obstacles Replace the batteries with new ones Check that the batteries are loaded correctly Set the clock correctly Power has been interrupted or the power cord has been disconnected Reset the clock timer Check if the number of folders exceeds 99 or the number of titles exceeds 999 T...

Страница 42: ...out 10 times as much data volume as a regular CD can Multichannel DVD is specified to have all sound tracks constitute one sound field Multichannel refers to a structure of sound tracks having three or more channels Parental control A function of the DVD to limit playback of the disc by the age of the users according to the limitation level in each country The limitation varies from disc to disc w...

Страница 43: ...ing person only Ask a qualified person to help you with the wall mounting which includes drilling holes on the wall and mounting the set onto wall What s in the supplied mounting kit 1 x template 6 x screws and dowels 2 x speaker brackets What else you ll need Drilling tools e g an electric drill Preparation 1 Find a suitable location for mounting and complete necessary rear connections see Prepar...

Страница 44: ...ere you want to hang the speakers one by one Drill 2 holes slightly undersized for each bracket to ensure a firm fit 2 Secure each bracket on the wall using 2 dowels and 2 screws supplied 3 Detach the speaker stands in the same way as you do the main unit stand 4 Hang the speakers on the brackets securely Appendix pg021 pg044_MCD299 98 Eng B 2007 9 27 13 05 44 ...

Страница 45: ...English Printed in China CLASS 1 LASER PRODUCT MCD299 PDCC JS JW 0740 Meet Philips at the Internet http www philips com PageBack_MCD299_98 2007 9 27 13 03 94 ...

Отзывы: