background image

26

English

System Menu Options

Basic operations

1

Press 

SYSTEM

 to enter the Setup Menu.

2

Press 

1 2 

to select a page to be set.

3

Press 

3 4 

to highlight an option.

4

Enter its submenu by pressing 

or 

OK

.

5

Move the cursor by pressing 

3 4 

to highlight

the selected item.

In cases of value setting

, press 

1 2 

to adjust

values.

6

Press 

OK

 to confirm.

To return to the upper-level menu

Press 

or 

OK

 (in cases of value adjustment).

To exit from the menu

Press 

SYSTEM 

again.

The settings will be stored in the player’s

memory even if the player is switched off.

Note:
– Some of the features in the System Menu
Options are described in “Getting Started”.

General Setup Page

The options included in General Setup page are:
“TV Display”, “OSD Language”, “Closed
Captions” and  “Screen Saver”.

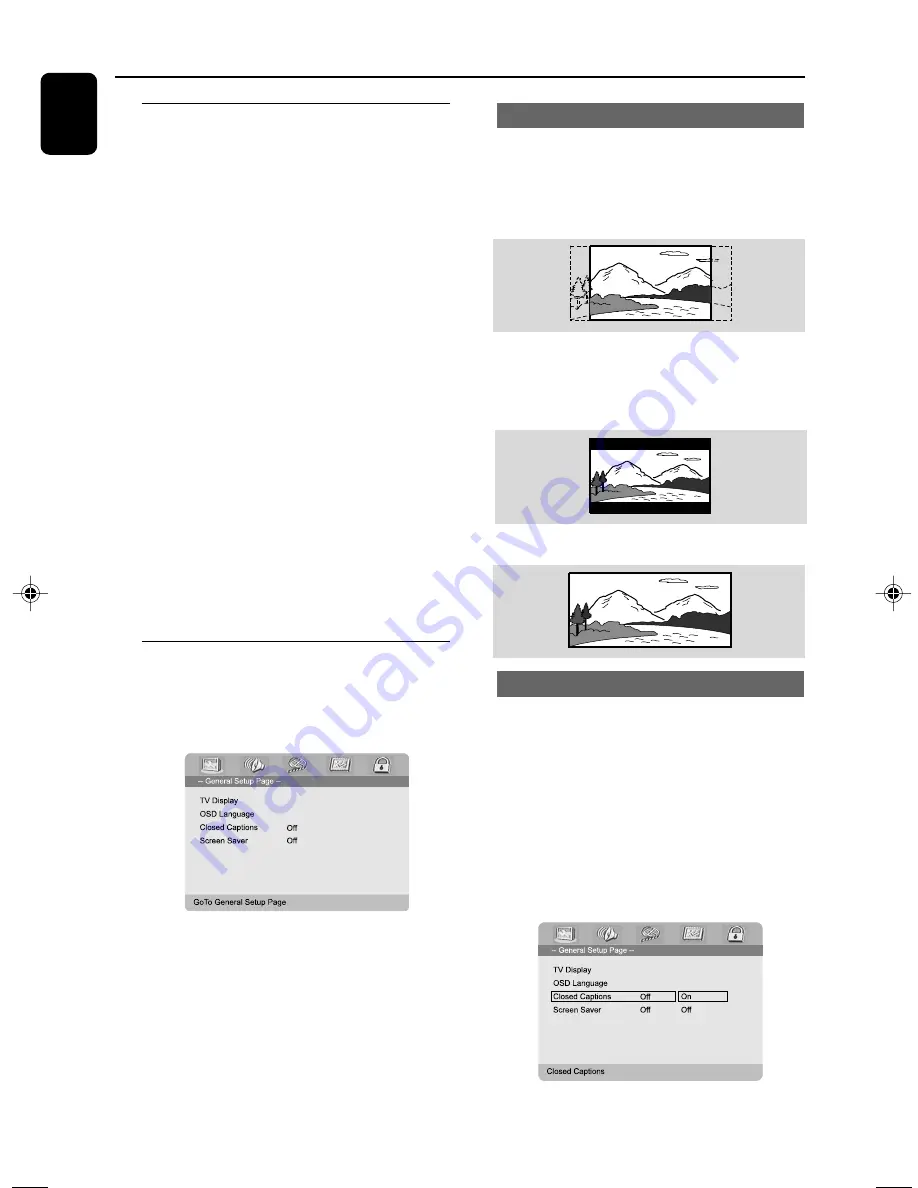
TV Display

Set the aspect ratio of the DVD Player according
to the TV you have connected.

Normal/PS 

(panscan): If you have a normal

TV and want both sides of the picture to be
trimmed or formatted to fit your TV screen.

Normal/LB 

(letterbox): If you have a

normal TV. In this case, a wide picture with black
bands on the upper and lower portions of the
TV screen will be displayed.

Wide

: If you have a wide-screen TV.

Closed Captions

Closed captions are data that are hidden in the
video signal of some discs. Captions are different
from subtitles because captions hearing are
impaired by showing the sound effects (e.g.,
"phone ringing" and "footsteps"), while subtitles
do not.
Before you select this function, please ensure
that the disc contains closed captions
information and your TV set also has this
function.

1

Press 

3 4 

to highlight 'Closed Captions'.

pg001-038_MCD700_37_Eng

2005.10.28, 13:31

26

Содержание MCD 700

Страница 1: ...DVD Micro Theatre 702 ...

Страница 2: ...tes dans le Règlement sur le Brouillage Radioélectrique édicté par le Ministère des Communications du Canada CAUTION Use of controls or adjustments or performance of procedures other than herein may result in hazardous radiation exposure or other unsafe operation ATTENTION L utilisation des commandes ou réglages ou le non respect des procédures ci incluses peuvent se traduire par une exposition da...

Страница 3: ...ncluding special money sav ing offers Know these safetysymbols This bolt of lightning indicates uninsulated material within your unit may cause an electrical shock For the safety of everyone in your household please do not remove product covering The exclamation point calls attention to features for which you should read the enclosed literature closely to prevent operating and maintenance problems...

Страница 4: ...re entitled to protection by one of the most comprehensive warranties and outstanding serv ice networks in the industry What s more your purchase guaran tees you ll receive all the information and special offers for which you qualify plus easy access to accessories from our convenient home shopping network Most importantly you can count on our uncompromising commit ment to your total satisfaction ...

Страница 5: ...5 IMPORTANT SAFETY INSTRUCTIONS Class II equipment symbol This symbol indicates that the unit has a double insulation system Clean only with dry cloth materials ...

Страница 6: ...HEATER SYSTEMS INC COPYRIGHT 1996 2000 DIGITAL THEATER SYSTEMS INC ALL RIGHTS RESERVED This product incorporates copyright protection technology that is protected by method claims of certain U S patents and other intellectual property rights owned by Macrovision Corporation and other rights owners Use of this copyright protection technology must be authorized by Macrovision Corporation and is inte...

Страница 7: ...English Français Español 7 Index English 4 Français 42 Español 78 ...

Страница 8: ...g the display screen 20 Disc Operations Playable Discs 21 Playing discs 21 Using the Disc Menu 21 22 Basic playback controls 22 23 Pausing playback DVD VCD CD MP3 WMA Selecting a track chapter title DVD VCD CD MP3 WMA Resuming playback from the last stopped point DVD VCD CD MP3 WMA Zoom DVD VCD JPEG Repeat DVD VCD CD MP3 WMA Repeat A B DVD VCD CD MP3 WMA Slow Motion DVD VCD Program not for Picture...

Страница 9: ... C Video Setup Page 28 29 Component TV Mode Quality Preference Page 29 30 Parental Default Password Setup Page 30 Password mode Password Other Functions Radio reception 31 Tuning to radio stations Presetting radio stations Listening to preset radio stations Setting the clock 31 Setting sleep wake up timer 32 Sleep timer setting Wake up timer setting Specifications 33 Troubleshooting 34 36 Glossary...

Страница 10: ...arding the disposal of packaging materials exhausted batteries and old equipment Installation Place the player on a flat hard and stable surface In a cabinet allow about 10cm 4 inches of free space all around the player for adequate ventilation Do not expose your player to extreme temperatures or humidity The apparatus shall not be exposed to dripping or splashing and that no objects filled with l...

Страница 11: ...wire to and silver wire to Fully insert the stripped portion of the speaker wire into the terminal as shown Connections 1 2 Notes Ensure that the speaker cables are correctly connected Improper connections may damage the system due to short circuit For optimal sound performance use the supplied speakers Do not connect more than one speaker to any one pair of speaker jacks Do not connect speakers w...

Страница 12: ... make one of the best connections depending on the capabilities of yourTV system If COMPOMENT video output jacks or S Video jack is used for video connection the system s Component setting will need to be set accordingly Details are shown under Video Setup Page Connect the VIDEO OUTPUT jack to the video input jack on theTV using a video cable yellow OR Option 1 Connect the S VIDEO output jack to t...

Страница 13: ...yback of other equipment Connect the system s AUX IN R L jacks to the AUDIO OUT jacks on the other audio visual device such as aTV VCR Laser Disc player or cassette deck Before starting operation press AUX on the remote repeatedly in order to activate the input source AUX1 or AUX2 Connecting an active subwoofer Connect the DVD micro system s WOOFER OUT jack to the AUDIO INPUT jack on an active woo...

Страница 14: ...ss the control knob upward to enter the program menu MP3 WMA CD press the control knob upward to add delete a programmed track to from the program list Picture CD during playback press the control knob upward to select a slide show mode Tuner press the control knob upward to program preset radio stations REPEAT STEREO Disc press the control knob downward to repeat a track or disc FM press the cont...

Страница 15: ... menu MP3 WMA CD adds deletes a programmed track to from the program list Picture CD during playback to select a slide show mode Tuner programs preset radio stations 5 GOTO ST Disc fast searches in a disc by entering a time title chapter or track FM sets stereo or mono sound mode 6 SYSTEM disc mode only enters or exits the system menu 7 DISC MENU disc mode only DVD VCD enters or exits the disc con...

Страница 16: ...er function auto off CLOCK Standby mode sets the system clock Playback mode displays the system clock DIM selects different levels of brightness for the display screen in standby mode SUBTITLE selects a subtitle language ANGLE selects a DVD camera angle DISPLAY displays information onTV screen during playback AUDIO forVCD sets Stereo Mono Left or Mono Right sound mode for DVD selects an audio lang...

Страница 17: ...lue Philips DVD background screen on theTV Usually these channels are between the lowest and highest channels and may be called FRONT A V IN orVIDEO See yourTV manual for more details Or you may go to channel 1 on yourTV then press the Channel down button repeatedly until you see theVideo In channel Or theTV Remote Control may have a button or switch that chooses different video modes Or set theTV...

Страница 18: ...ars on theTV CONFIRM TO USE P SCAN IF PICTURE IS GOOD PRESS OK BUTTON ON REMOTE TIME LAST 01 SECOND 0 Press 1 2 to highlight OK in the menu and press OK to confirm The setup is complete now and you can start enjoy the high quality picture To deactivate Progressive manually When the distorted sign still appears on theTV it may be due to the connectedTV does not accept progressive signals and progre...

Страница 19: ... Language and press 2 4 Select a language and press OK To exit from the menu Press SYSTEM again Setting the Audio Subtitle and Disc Menu language 1 Press SYSTEM in stop mode 2 Press 1 2 to select Preference Page 3 Press 3 4 to highlight the following in the Preference Page Audio disc s soundtrack Subtitle disc s subtitles Disc Menu disc s menu 4 Enter its submenu by pressing 2 5 Select a language ...

Страница 20: ... and MUTING flashes To activate sound reproduction you can press MUTE again adjust the volume controls change source Sound Control DBB DSC and LOUDNESS sound features cannot be activated at the same time DBB Dynamic Bass Boost DBB enhances the bass response Press DBB on the remote to enable disable DBB feature Some discs might be recorded in high modulation which causes a distortion at high volume...

Страница 21: ...this DVD Player Playing discs 1 Connect the power cords of the system andTV or any optional stereo or AV receiver to a power outlet 2 Turn on theTV power and set to the correct Video In channel See Setting up theTV 3 Press STANDBY ONB on the DVD Player front panel or B on the remote You should see the blue Philips DVD background screen on theTV 4 Press OPEN CLOSE to open the disc tray and load in ...

Страница 22: ...to enlarge or reduce the playback video image 2 Press 1 2 3 4 to pan across theTV screen Disc Operations Repeat DVD VCD CD MP3 WMA For DVD VCD CD Press the control knob downward corresponding to REPEAT STEREO or press MODE repeatedly to choose a repeat mode during playback CHAPTER DVD to repeat playback of the current chapter TRACK CD VCD TITLE DVD to repeat playback of the current track CD SVCD V...

Страница 23: ...back to select the required speed 2X 4X 8X 16X or 32X backward or forward Sound will be muted 2 To return to normal speed press PRESET É Å or É Å on the remote Time search search by chapter track number DVD VCD CD MP3 WMA 1 Press GOTO ST until the time or chapter track edit box appears 2 Enter hours minutes and seconds from left to right in the time edit box using remote control numerical keypad O...

Страница 24: ...Load an MP3 WMA disc The data disc menu appears on theTV screen 2 Use 3 4 to select an album and press OK to open the album 3 Press 3 4 or use the Numeric Keypad 0 9 to highlight a track 4 Press OK to confirm The playback will start from the selected track to the end of the album Note The disc reading time may exceed 10 seconds due to large number of songs compiled onto the disc Playback selection...

Страница 25: ... to the left right corresponding to S T or press CH on the remote Use 1 2 3 4 to highlight Prev or Next and press OK Zoom picture JPEG During playback press ZOOM repeatedly to display the picture with different scales Use 1 2 3 4 to view the zoomed picture Slide show playback modes JPEG During playback press the control knob upward corresponding to PROGRAM or press PROG on the remote repeatedly to...

Страница 26: ...ge are TV Display OSD Language Closed Captions and Screen Saver TV Display Set the aspect ratio of the DVD Player according to theTV you have connected Normal PS panscan If you have a normal TV and want both sides of the picture to be trimmed or formatted to fit yourTV screen Normal LB letterbox If you have a normalTV In this case a wide picture with black bands on the upper and lower portions of ...

Страница 27: ...u have connected your DIGITAL OUT COAXIAL or OPTICAL to a multi channel decoder receiver SPDIF PCM Only if your receiver is not capable of decoding multi channel audio Dolby Digital Setup The options included in Digital Audio Setup are Dual Mono and Dynamic Dual Mono Select the setting that matches the number of speakers you have connected Stereo Left mono sound will send output signals to Left sp...

Страница 28: ...deo output according to your video connection This setting is not required if you are using the VIDEO OUTPUT jack yellow to connect the DVD micro system to yourTV Ypbpr Select this if you have connected the DVD micro system to yourTV using Component video jacks S Video Select this if you have connected the DVD micro system to yourTV using S Video jack TV Mode Selects interlace or P SCAN video outp...

Страница 29: ...s you set a playback limitation level The rating levels are from 1 to 8 and are country dependent You can prohibit the playing of certain discs that are not suitable for your children or have certain discs played with alternative scenes VCD SVCD and CD have no level indication so parental control function has no effect on those kinds of discs This applies to most illegal DVD discs 1 Press 3 4 to h...

Страница 30: ...is function is activated all settings will be reset to factory defaults Password Setup Page The options included in Password Setup page are Password Mode and Password Password Mode This feature is used to enable disable password by selecting ON OFF Password Enter your four digit password when a hint is displayed on the screen The default password is 1234 1 Press 3 4 to highlight Password 2 Enter i...

Страница 31: ...ward corresponding to PROGRAM or press PROG on the remote again to store the radio station Repeat steps 1 4 to store other radio stations Other Functions Listening to preset radio stations In tuner mode press PRESET É Å or CH on the remote or use the Numeric Keypad 0 9 to select the desired preset number The preset number radio frequency and waveband are displayed Setting the clock 1 In Standby mo...

Страница 32: ...the display TIME SET is displayed briefly Then the hour digits flash on the display screen 2 Turn VOLUME clockwise or anticlockwise or press VOLUME on the remote to set the hours 3 Press SLEEP TIMER to confirm The minute digits flash on the display screen 4 Turn VOLUME clockwise or anticlockwise or press VOLUME on the remote to set the minutes 5 Press SLEEP TIMER to confirm the time setting OFF fl...

Страница 33: ...y response 100Hz 20kHz 1dB S N Ratio 60dB Loaded impedance 8 Ω Dimensions 208 W x 56 9 H x 244 D mm 8 2 x 2 2 x 9 6 inch Weight 2 4 kg 5 3 pounds TUNER FM Frequency range 87 5 108 MHz FM Noise limit sensitivity 20µ V M FM S N 46dB AM wave range 520 1710 kHz AM Noise limit sensitivity 3 0µ V m AM S N 40dB Specifications SPEAKER Impedance 8 Ω Input power 35W Sensitivity 80 4dB Frequency response 80H...

Страница 34: ... on the remote Set yourTV to the correctVideo In channel This channel is usually near channel 00 Or you may have a button on theTV remote control that selects Auxiliary or A V IN channel See yourTV owner s manual for details Or change channels at the TV until you see DVD screen on theTV If the progressive scan feature is activated but the connectedTV does not support progressive signals or the cab...

Страница 35: ...sc with the playback side facing down Check the disc type colour system and regional code Check for any scratches or smudges on the disc Press SYSTEM MENU to turn off the setup menu screen Cancel the parental control rating function or change the rating level Moisture has condensed inside the system Remove the disc and leave the system turned on for about an hour Disconnect the power plug from the...

Страница 36: ...Point the remote control at the remote sensor of the unit Reduce the distance to the player Remove any possible obstacles Replace the batteries with new ones Check that the batteries are loaded correctly Press DIM again Place the DVD micro system as far away as possible from electrical devices that may be causing interference Check all speakers for correct polarity Check that the output of the vid...

Страница 37: ...or CD RW can contain about 10 times as much data volume as a regular CD can Multichannel DVD is specified to have all sound tracks constitute one sound field Multichannel refers to a structure of sound tracks having three or more channels Parental control A function of the DVD to limit playback of the disc by the age of the users according to the limitation level in each country The limitation var...

Страница 38: ...ged or cost associated with packaging Product lost in shipment and no signature verification of receipt can be provided A product used for commercial or institutional purposes including but not limited to rental purposes Products sold AS IS or RENEWED CARRY IN SHIP IN WARRANTY For Carry In warranty repair take the product to a Philips authorized service center for repair When the product has been ...

Отзывы: