Philips MC-57 Скачать руководство пользователя страница 3

3

3

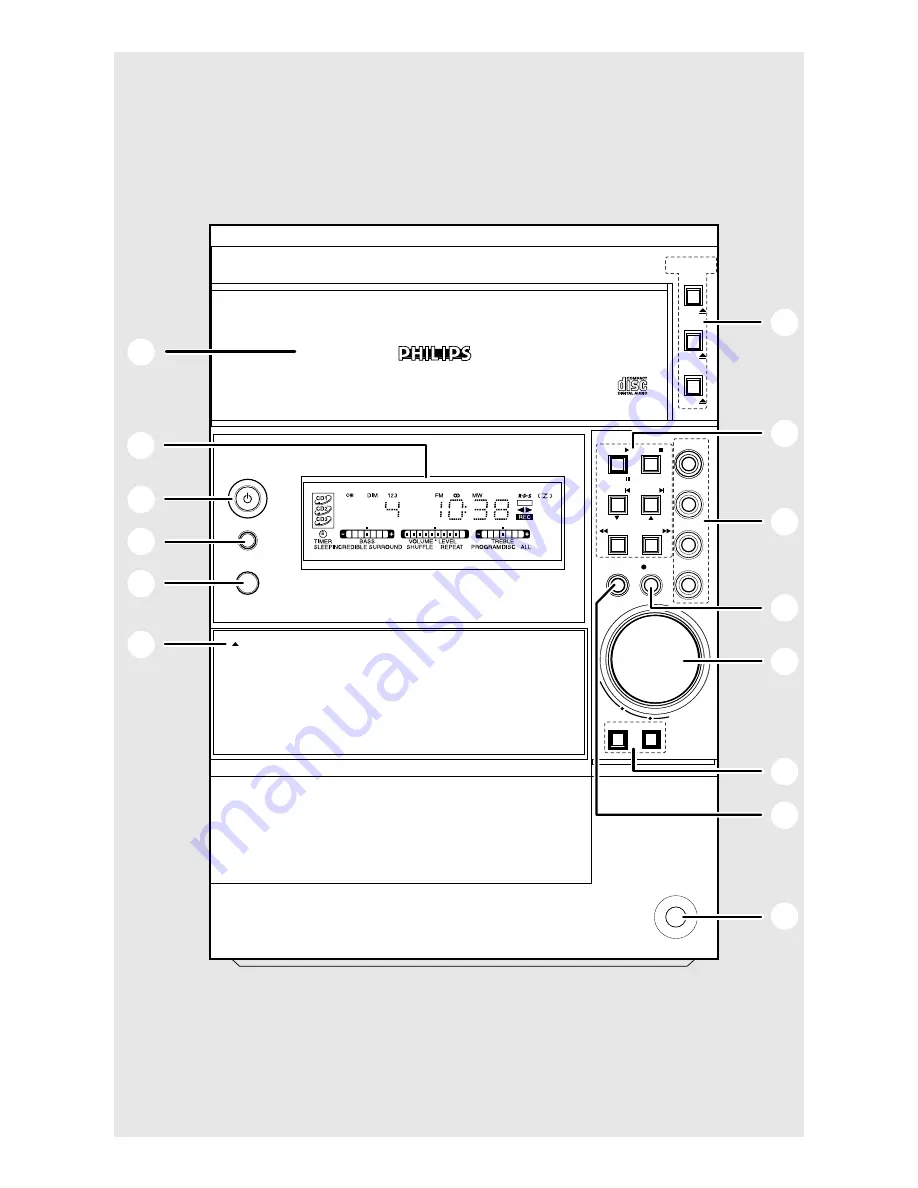
CD / CD-R / CD-RW COMPATIBLE

OPEN

STANDBY- ON

ECO
POWER

iR

VOL

AUX/CDR

PROG

PRESET

TAPE

SEARCH/ TUNE

TUNER

DEMO STOP

PAUSE

PREV

NEXT

REC

STOP

PLAY

BASS

TREBLE

PHONES

1
2
3

4

5

6

7

8

9

0

!

@

$

%

NEWS

D

C

3

C H A N G E R

CD 1•2•3

CD

OPEN•CLOSE

CD 1

CD 2

CD 3

  M I C R O   S Y S T E M

DIGITAL
SOUND
CONTROL

Содержание MC-57

Страница 1: ...1 Micro Hi Fi System MC 57 MC 57 ...

Страница 2: ...d N or coloured black Connect the brown wire to the terminal marked L or coloured red Do not connect either wire to the earth terminal in the plug marked E or e or coloured green or green and yellow Before replacing the plug cover make certain that the cord grip is clamped over the sheath of the lead not simply over the two wires Copyright in the U K Recording and playback of material may require ...

Страница 3: ... ECO POWER iR VOL AUX CDR PROG PRESET TAPE SEARCH TUNE TUNER DEMO STOP PAUSE PREV NEXT REC STOP PLAY BASS TREBLE PHONES 1 2 3 4 5 6 7 8 9 0 NEWS D C 3C H A N G E R CD 1 2 3 CD OPEN CLOSE CD 1 CD 2 CD 3 M I C R O S Y S T E M DIGITAL SOUND CONTROL ...

Страница 4: ...ider gränsen för laserklass 1 Observera Stömbrytaren är sekundärt kopplad och bryter inte strömmen från nätet Den inbyggda nätdelen är därför ansluten till elnätet så länge stickproppen sitter i vägguttaget SF Luokan 1 laserlaite Varoitus Laitteen käyttäminen muulla kuin tässä käyttöohjeessa mainitulla tavalla saattaa altistaa käyttäjän turvallisuusluokan 1 ylittävälle näkymättömälle lasersäteilyl...

Страница 5: ...rtuguês Español Deutsch Nederlands Italiano Svenska Dansk Suomi ÏÏËÓÈÎ Polski Index English 6 Français 30 Español 55 Deutsch 80 Nederlands 105 Italiano 130 Svenska 155 Dansk 180 Suomi 205 Português 230 ÏÏËÓÈÎ 255 Polski 280 ...

Страница 6: ...im mode 14 Volume Control 14 Interactive Sound Control 15 CD Operation Discs for Playback 16 Loading Disc 16 Disc Playback 17 Programming the disc tracks 17 18 Repeat 18 Shuffle 18 Radio Reception Storing Preset Radio Stations 19 20 Tuning to Preset Radio Stations 20 Erasing a Preset Radio Station 20 RDS 20 21 NEWS 21 Tape Operation Recording Tape Playback 22 General Information on Recording 23 Pr...

Страница 7: ...ltage indication beside the voltage selector of your system is identical with the voltage of your local power supply If not please consult your dealer Place the system on a flat hard and stable surface Place the system in a location with adequate ventilation to prevent internal heat build up in your system Allow at least 10 cm 4 inches clearance from the rear and the top of the unit and 5 cm 2 inc...

Страница 8: ...t has been built in Therefore your system may switch to Standby mode automatically under extreme conditions If this happens let the system cool down before reusing it not available for all versions B Antennas Connection Connect the supplied AM loop antenna and FM antenna to the respective terminals Adjust the position of the antenna for optimal reception AM Antenna Fix the claw to the slot Positio...

Страница 9: ...the rumble of spaceships for example Connecting other equipment to your system Connect the audio left and right OUT terminals of a TV VCR Laser Disc player DVD player or CD Recorder to the AUX CDR IN terminals Note If you are connecting equipment with a monaural output a single audio out terminal connect it to the AUX CDR IN left terminal Alternatively you can use a single to double cinch cable st...

Страница 10: ...DR to select a connected external source CDR or AUX auxiliary mode Mode Selection PLAY PAUSE É Å for CD to start or interrupt playback forTAPE to start playback for PLUG PLAY on the system only to initiate and start plug play mode STOP DEMO STOP Ç for CD to stop playback or to clear a programme forTUNER to stop programming on the system only to delete the preset radio station forTAPE to stop playb...

Страница 11: ...lable discs and their tracks programme in random order TIMER ON OFF to activate or deactivate the timer function NEWS to hear News automatically SLEEP to activate deactivate or set the sleep timer function RDS to select RDS information CLOCK to display clock or set the clock B to switch the system to Standby mode or Eco Power Standby mode Notes for remote control First select the source you wish t...

Страница 12: ...tation will play when Plug and Play is completed 3 The system will proceed to set the RDS time automatically with the stored RDS preset station If no RDS station is found in the first preset station The programme will exit automatically If RDS radio station is found INSTALL will be displayed and followed by TIME When searching RDS time SEARCH RDS TIME will be displayed When RDS time is read RDS TI...

Страница 13: ... again Switching the system on In Standby Demonstration mode Press STANDBY ON The system will switch to the last selected source Press CD 1 2 3 CD 123 TUNER TAPE AUX CDR The system will switch to the selected source Press any one of the disc CD OPEN CLOSE CD10 CD20 CD 30 button The system will switch to CD mode In Eco Power Standby mode Press ECO POWER The system will switch to last selected sourc...

Страница 14: ...bar inactive DIM 2 All lightings turn off display screen will have full brightness music level bar inactive DIM 3 All lightings turn off display screen will be at half brightness music level bar inactive music level bar Volume Control Adjust VOL to increase turn knob clockwise or pressVOLUME or decrease turn knob anti clockwise or pressVOLUME the sound level XX dB will be displayed XX denotes the ...

Страница 15: ...ed XX denotes the level as follows MIN 2 0 1 2 MAX Note The volume knob can be used to adjust Bass Treble level immediately after you have selected the respective Bass Treble sound feature If the volume knob is not used within 5 seconds it will become normal volume control function IS Incredible Surround The Incredible Surround magnifies the virtual distance between the front speakers for an incre...

Страница 16: ... slides out 3 Load a disc with the label side facing up 4 Press again the corresponding button to close the disc tray READING will be displayed The selected disc tray total number of tracks and the playing time will appear on the display To select a desired disc tray Press CD 1 2 3 or CD 123 on the remote control repeatedly Notes To ensure good system performance wait until the disc trays complete...

Страница 17: ...l cause the player to skip only to the beginning of the current track To skip to the beginning of the current track during playback Press í once To replace disc during playback You are able to replace or load in disc into the other two disc trays without interrupting current playback While playback press the CD OPEN CLOSE button of the inactive disc tray refer to Loading Disc If you press CD OPEN ...

Страница 18: ...will appear on the display DISC to repeat the entire disc REPEAT and DISC will appear on the display ALL DISC to repeat all available discs REPEAT DISC and ALL will appear on the display CD Operation In programme playback TRACK to repeat the current programmed track REPEAT and PROGRAM will appear on the display PROGRAM to repeat all programmed tracks REPEAT PROGRAM DISC and ALL will appear on the ...

Страница 19: ...s on the display PROGRAM will start flashing The system will search for all RDS stations and then continue with radio stations on FM MW and LW band respectively All available radio stations with sufficient signal strength will be stored automatically The system will stop searching when all the available radio stations are stored or when the memory for 40 preset radio stations is used The last pres...

Страница 20: ...and will appear on the display Radio Reception Erasing a Preset Radio Station 1 Press í or ë to select the preset radio station to be erased 2 Press and hold Çon the system until PRESET DELETED appears on the display The radio frequency remains on the display The preset numbers of all other preset radio stations in the band with higher numbers are also decreased by one Repeat steps 1 2 to erase ot...

Страница 21: ... and Eco Power Standby mode To start NEWS function 1 Press NEWS on the remote control NEWS and NEWS logo NEWS will appear on the display It will scan the radio stations stored in the first 5 preset and wait for the News Programme Type data to be available in any of these RDS radio stations If no RDS station is detected in the first 5 presets the system will exit NEWS function NO RDS NEWS will be d...

Страница 22: ...tion indicator will appear on the display To stop playback Press Ç To change the playback side Press í or ë The A BACK or B FRONT appear on the display depending on the tape side selected To change the playback mode Press AUTO REV on the remote control repeatedly to select the different playback modes å playback on one side of the tape only both sides are played once both sides are played repeated...

Страница 23: ...tape mode 2 Load a recordable tape into the tape deck 3 Press í or ë to select the recording tape side A appears on the display for the reverse side B appears on the display for the forward side 4 Press AUTO REV on the remote control repeatedly to select a recording mode å for recording on one side only for recording on both sides 5 Prepare the source to be recorded CD 1 2 3 load the disc s TUNER ...

Страница 24: ... of your system 2 Press AUX CDR repeatedly to select CDR mode or normal AUX mode CDR or AUX will be displayed If the sound from the external source is distorted select CDR mode for listening External Sources Notes You are advised not to listen to and record from the same source simultaneously All the interactive sound control features IS or BASS TREBLE for example are available for selection Refer...

Страница 25: ...if a power failure occurs During clock setting if no key is pressed within 90 seconds the system will exit clock setting mode automatically To set the clock automatically through the time information in the RDS signal refer to Radio Reception RDSTime Display Clock The system allows you to select clock display or normal display in any source mode except Eco Power Standby mode When in Standby mode t...

Страница 26: ... If CD is the selected source and it is not available when the preset time is reached Tuner will be selected automatically During timer setting if no key is pressed within 90 seconds the system will exit timer setting mode automatically To check theTIMER Press TIMER on the remote control If the timer has been activated the set timer information will be displayed If the timer has been deactivated O...

Страница 27: ... MHz MW wave range 531 1602 kHz LW wave range 153 279 kHz Number of presets 40 Antenna FM 75 Ω wire AM Loop antenna TAPE PLAYER Frequency response Normal tape type I 60 15000 Hz 5 dB Signal to noise ratio Normal tape type I 47 dBA Wow and flutter 0 4 DIN SPEAKERS Front left right System 2 way Bass reflex Impedance 6 Ω Woofer 1 x 5 25 metal cones Tweeter 1 x 1 Ferrofluid Dimensions w x h x d 180 x ...

Страница 28: ...back quality clean the heads A the capstan s B and pressure roller s C after every 50 hours of tape operation Use a cotton swab slightly moistened with cleaning fluid or alcohol You also can clean the heads by playing a cleaning tape once C C B B A Demagnetising the heads Use a demagnetising tape available at your dealer Troubleshooting WARNING Under no circumstances should you try to repair the s...

Страница 29: ...Check if the stripped speaker wire is clamped The left and right sound outputs are Check the speaker connections and location reversed The remote control does not function Select the source CD orTUNER for example properly before pressing the function button É í ë Reduce the distance between the remote control and the system Insert the batteries with their polarities signs aligned as indicated Repl...

Страница 30: ...nglish Français Português Español Deutsch Nederlands Italiano Svenska Dansk Suomi ÏÏËÓÈÎ Polski CLASS 1 LASER PRODUCT MC 57 3140 115 30501 JP 0247 22 12 Meet Philips at the Internet http www philips com ...

Отзывы: