background image

26

AUDIO SYSTEM

One Year Free Labor

One Year Free Service on Parts

This product must be carried in for repair.

LIMITED WARRANTY

WHO IS COVERED?

You must have proof of purchase to receive warranty ser-
vice. A sales receipt or other document showing that you
purchased the product is considered proof of purchase.

WHAT IS COVERED?

Warranty coverage begins the day you buy your product.
For one year thereafter, all parts will be repaired or
replaced, and labor is free. After one year from the day of
purchase, you pay for the replacement or repair of all
parts, and for all labor charges.
All parts, including repaired and replaced parts, are covered
only for the original warranty period.When the warranty
on the product expires, the warranty on all replaced and
repaired parts also expires.

WHAT IS EXCLUDED?

Your warranty does not cover:
• labor charges for installation or setup of the product,

adjustment of customer controls on the product, and
installation or repair of antenna systems outside of the
product.

• product repair and/or part replacement because of misuse,

accident, unauthorized repair or other cause not within the
control of Philips.

• reception problems caused by signal conditions or cable

or antenna systems outside the unit.

• a product that requires modification or adaptation to

enable it to operate in any country other than the coun-
try for which it was designed, manufactured, approved
and/or authorized, or repair of products damaged by
these modifications.

• incidental or consequential damages resulting from the

product. (Some states do not allow the exclusion of inci-
dental or consequential damages, so the above exclusion
may not apply to you.This includes, but is not limited to,
prerecorded material, whether copyrighted or not copy-
righted.)

• a product that is used for commercial or institutional

purposes.

WHERE IS SERVICE AVAILABLE?

Warranty service is available in all countries where the
product is officially distributed by Philips. In countries
where Philips does not distribute the product, the local
Philips service organization will attempt to provide service
(although there may be a delay if the appropriate spare
parts and technical manual(s) are not readily available).

MAKE SURE YOU KEEP...

Please keep your sales receipt or other document showing
proof of purchase. Attach it to this owner’s manual and
keep both nearby. Also keep the original box and packing
material in case you need to return your product.

BEFORE REQUESTING SERVICE...

Please check your owner's manual for assistance. If you
have additional questions, call us at 1-800-531-0039.

TO GET WARRANTY SERVICE IN U.S.A.,
PUERTO RICO, OR U.S. VIRGIN ISLANDS...

Take the product to a Philips factory service center (see
enclosed list) or authorized service center for repair.When
the product has been repaired, you must pick up the unit at
the center. Centers may keep defective parts.
(In U.S.A., Puerto Rico, and U.S.Virgin Islands, all implied
warranties, including implied warranties of merchantability
and fitness for a particular purpose, are limited in duration
to the duration of this express warranty. But, because some
states do not allow limitations on how long an implied
warranty may last, this limitation may not apply to you.)

TO GET WARRANTY SERVICE IN CANADA...

Please contact Philips at:

1-800-661-6162 (French Speaking)

1-800-531-0039 (English or Spanish Speaking)

(In Canada, this warranty is given in lieu of all other war-
ranties. No other warranties are expressed or implied,
including any implied warranties of merchantability or fit-
ness for a particular purpose. Philips is not liable under any
circumstances for any direct, indirect, special, incidental or
consequential damages, howsoever incurred, even if notified
of the possibility of such damages.)

REMEMBER...

Please record below the model and serial numbers found
on the product. Also, please fill out and mail your warranty
registration card promptly. It will be easier for us to notify
you if necessary.

MODEL #

__________________________________

SERIAL #

__________________________________

EL4965E007 / 8-02

This warranty gives you specific legal rights.You may have other rights which vary from state/province to state/province.

Philips, P.O. Box 520890, Miami, FL 33152, USA, (402) 536-4171

Содержание MC-500

Страница 1: ...Features We want you to start enjoying your new product right away CALL US BEFORE YOU CONSIDER RETURNING THE PRODUCT 1 800 531 0039 or Visit us on the web at www philips com S EE WHY INSID E I M PORTAN T Return yourWarranty Registration Card within 10 days MC500 MC500 visit our website www audio philips com to download latest UPDATES of USB PC Link Driver MusicMatch Jukebox softwares and FAQs ...

Страница 2: ...open AVOID DIRECT EXPOSURE TO BEAM or This warning label is located on the rearside and inside this laser product Canada English This digital apparatus does not exceed the Class B limits for radio noise emissions from digital apparatus as set out in the Radio Interference Regulations of the Canadian Department of Communications Français Cet appareil numérique n emet pas de bruits radioélectriques ...

Страница 3: ... 3 DISC 4 1 2 3 5 4 DISC 2 DISC 3 DISC 4 DISC 5 CD CD R CD RW COMPATIBLE 5 DISC DIRECT PLAY PRESET M C M 5 0 0 M I C R O S Y S T E M STANDBY ON OPEN CLOSE USB PC LINK CD AUX TUNER MAX SOUND T M C HI SPEED E ED RTI I F VIRTUAL ENVIRONMENT CONTROL DIGITAL SOUND CONTROL MAX SOUND 1 2 3 4 5 P2 P1 P4 DISC 1 DISC 5 DISC 1 DISC 2 DISC 3 DISC 4 1 2 3 5 4 DISC 2 DISC 3 DISC 4 DISC 5 CD CD R CD RW COMPATIBL...

Страница 4: ... qualify for as the owner of your model t This bolt of lightning indi cates uninsulated material within your unit may cause an electrical shock For the safety of everyone in your household please do not remove product covering s The exclamation point calls attention to features for which you should read the enclosed literature closely to prevent operating and maintenance problems WARNING TO PREVEN...

Страница 5: ...e guarantees you ll receive all the information and special offers for which you qualify plus easy access to accessories from our convenient home shopping network And most importantly you can count on our uncompromising commitment to your total satisfaction All of this is our way of saying welcome and thanks for investing in a Philips product Sincerely Lawrence J Blanford President and Chief Execu...

Страница 6: ...ttachments accessories specified by the manufacturer 12 Use only with the cart stand tripod bracket or table specified by the manufacturer or sold with the apparatus When a cart is used use caution when moving the cart apparatus combination to avoid injury from tip over 13 Unplug this apparatus during lightning storms or when unused for long periods of time 14 Refer all servicing to qualified service...

Страница 7: ...7 E n g l i s h Français E s p añ o l Index English 8 Français 30 Español 53 ...

Страница 8: ...e 16 Setting the clock 16 Selecting different display mode 17 Dim mode 17 Clock display mode 17 Volume control 17 Sound control 17 MAX sound 17 Digital Sound Control 17 Virtual Environment Control 17 Disc Operations Playable discs 18 Loading discs 18 Basic playback controls 18 19 Repeat and Shuffle 19 Repeat play 19 Random play 19 Programming the disc tracks 19 Checking the program 20 Playing a di...

Страница 9: ...by heating equipment or direct sunlight Always keep the disc tray closed to avoid dust on the lens Avoid condensation problem The lens may cloud over when the system is suddenly moved from cold to warm surroundings making it impossible to play a disc Leave the system in the warm environment until the moisture evaporates Do not block the vents In a cabinet allows about 10cm 4 inches of free space a...

Страница 10: ... the minutes USB PC LINK selects a track from the playlist 5 à SEARCH TUNING á CD searches backward forward TUNER tunes the radio frequency up down CLOCK sets the hours USB PC LINK searches backward forward 6 PROG PROGRAM CD starts or confirms tracks programming TUNER starts automatic manual preset programming CLOCK selects 12 or 24 hour clock display 7 DIM Selects different levels of brightness f...

Страница 11: ... TUNER AUX USB PC LINK Selects the relevant active mode CD toggles between DISC 1 5 TUNER toggles between FM and AM band AUX toggles between AUX and CDR mode Connect the USB cable between the system and PC s USB port n Plug in the headphones jack The speakers output will be cancelled Control buttons available on the remote only REPEAT Repeats a track disc all discs all programmed tracks SLEEP Sets...

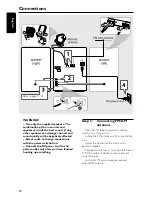
Страница 12: ...wer switched on Connect the AC power cord to the power outlet only after you have finished hooking up everything Step 1 Connecting FM AM antennas Place the AM loop antenna on a shelf or attach it to a stand or wall Extend the FM antenna and fix its ends to the wall Adjust the position of the antennas for optimal reception Position the antennas as far as possible from a TV VCR or other radiation so...

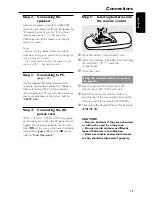
Страница 13: ...ord AUTO INSTALL PRESS PLAY may appear on the display panel when the AC power cord is plugged into the power outlet for the first time Press É Å on the main unit to store all available radio stations page 3 P3 or press Ç to exit refer to Tuner Operations Step 5 Inserting batteries into the remote control 3 1 2 1 Open the battery compartment cover 2 Insert two batteries type R06 or AA following the...

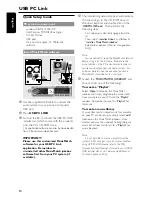
Страница 14: ...r and follow by installer MusicMatch jukebox Select other options Tutorial Free goodies FAQ Note You are advised to read the MusicMatch tutorial before using it for the first time Make sure the mute function on the PC is deactivated in order to ensure sound output from the Audio System For optimum performance the equalizer function in MusicMatch should be set to a low level 5 Launch the MUSICMATCH...

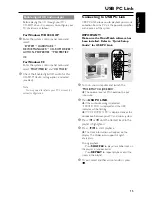
Страница 15: ...he powerful amplifier and speakers of this system IMPORTANT Make sure the MusicMatch software has been installed Refer to Quick Setup Guide for USB PC Link 2 3 4 5 1 1 Turn on your computer and launch the MUSICMATCH JUKEBOX The volume level of PC should not be put into mute 2 Press USB PC LINK If the audio streaming is detected CONNECTING is displayed and the USB indicator will be flashing If NO C...

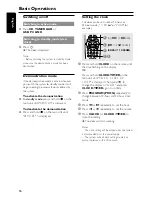
Страница 16: ...is displayed Setting the clock The clock can be set in either 12 hour or 24 hour mode 11 59 PM or 23 59 for example 00 00 î 12 00AM 00 00 12 00AM 00 00 12 00AM 4 3 2 1 5 1 Press and hold CLOCK on the remote until the time flashing on the display OR Press and hold CLOCK TIMER on the main unit until SELECT CLOCK OR TIMER is displayed Then press ë to change the display to CLOCK and press CLOCK TIMER ...

Страница 17: ...ol Adjust MASTERVOLUME or press VOL on remote to increase or decrease the sound level VOL MUTE is the minimum volume level and 0 dB is the maximum volume level To switch off the volume temporarily Press MUTE on the remote Playback will continue without sound and MUTE is displayed To restore the volume press MUTE again or increase the volume level Sound control You are only able to select one of th...

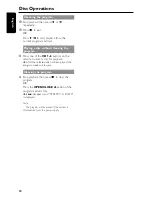
Страница 18: ... the second tray opens Basic playback controls Load discs page 3 P4 To play all discs on the disc trays Press É Å OR In stop mode press CD to select a disc tray to begin then press É Å All the available discs will play once then stop To play the selected disc only Press one of the 5 DISC DIRECT PLAY DISC 1 5 buttons or CD 1 5 on remote The selected disc will play once then stop To select a desired...

Страница 19: ...eat and shuffling modes Programming the disc tracks Programming tracks is possible when playback is stopped Up to 40 tracks can be stored in the memory in any order DISC 1 DISC 5 DISC 1 DISC 2 DISC 3 DISC 4 1 2 3 5 4 DISC 2 DISC 3 DISC 4 DISC 5 CD CD R CD RW COMPATIBLE 5 DISC DIRECT PLAY OPEN CLOSE DISC 5 DISC 2 DISC 3 DISC 4 3 POWER ON OFF DISC 1 3 4 6 7 2 5 1 1 Load the desired discs on the disc...

Страница 20: ...one of the CD 1 5 buttons on the remote to select a disc for playback After the selected disc has been played the program mode will resume Clearing the program Stop playback then press Ç to clear the program OR Press the OPEN CLOSE 0 button of the programmed disc tray PROG disappears and PROGRAM CLEARED is displayed Note The program will be erased if the system is disconnected from the power suppl...

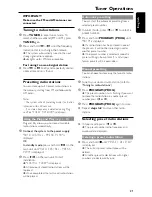
Страница 21: ...Å on the main unit to start installation INSTALL TUNER is displayed All previously stored radio stations will be replaced Once completed the last tuned radio station will be played Automatic presetting You can start the automatic presetting from a selected preset number 1 In tuner mode press í or ë to select a preset number 2 Press and hold PROGRAM PROG until AUTO is displayed If a radio station h...

Страница 22: ...e preset time the selected sound source will be played for 30 minutes before it switches to standby mode if no button is being pressed within the time frame CD playing the first track of the last selected disc or programmed track if program mode is active If the last selected disc tray is empty it will switch to the next available disc If all the disc trays are not available it will switch toTuner...

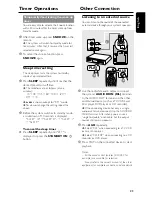
Страница 23: ... Notes All the sound control features DSC VEC for example are available for selection Always refer to the owner s manual of the other equipment for complete connection and use details Temporarily deactivating the wake up timer You are only able to activate the Snooze function within 30 minutes after the timer wake up from Standby mode 1 After timer wake up press SNOOZE on the remote The system wil...

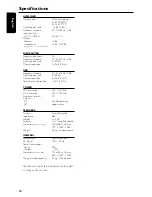
Страница 24: ...nnel separation 40 dB 1 kHz Total harmonic distortion 0 3 1 kHz TUNER FM wave range 87 5 108 MHz AM wave range 530 1700 kHz Number of presets 40 Antenna FM 300 Ω dipole wire AM Loop antenna SPEAKERS System 2 way Bass reflex Impedance 6 Ω Woofer 1 x 5 25 Tweeter 1 x 2 Ferrofluid cooled Dimensions w x h x d 180 x 268 x 225 mm 7 09 x 10 55 x 8 86 Weight 2 5 kg 5 5 pounds each GENERAL Material finish ...

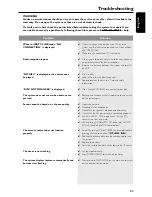
Страница 25: ... sure the connected PC is turned on If the signal is too weak adjust the antenna or connect an external antenna for better reception Increase the distance between the system and yourTV or VCR Insert a disc Load in the disc with label facing right Replace or clean the disc see Care and safety information Use a finalized CD R W or a correct format disc Remove and reconnect the AC power cord and swit...

Страница 26: ...product the local Philips service organization will attempt to provide service although there may be a delay if the appropriate spare parts and technical manual s are not readily available MAKE SUREYOU KEEP Please keep your sales receipt or other document showing proof of purchase Attach it to this owner s manual and keep both nearby Also keep the original box and packing material in case you need...

Страница 27: ...English Français Español CLASS 1 LASER PRODUCT SgpJP 0251 37 3 PHILIPS CONSUMER ELECTRONICS NORTH AMERICA Knoxville Tennessee 37914 1810 USA Printed In China MC 500 3139 115 22113 IB8399T001 ...

Отзывы: