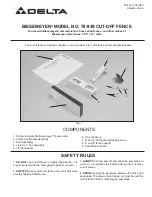
manualshive.com logo in svg
background image

Figure 2

4

1. 

Measure the window prior to proceeding with the installation to 

ensure that it matches the rough opening.

2. 

These windows are fabricated with fusion welded joined corners.  

Care should be exercised in the handling of the products as it is 

possible to crack the welded outer frame.  Inspect the outer frame

for damage.  If frame is cracked, fractured, or damaged due to 

handling, contact Philips Products, Inc. for instructions.

3. 

Inspect the mounting flanges to ensure they have not been 

damaged or distorted during shipping or handling to the extent 

that they will not seat flat against the exterior perimeter of the 

R.O.  If damaged or distorted, straighten the mounting flange so 

that it will make contact with the exterior face of the wall or 

contact Philips Products, Inc. for instructions. 

4. 

Windows must always be closed and locked during installation.  

Make sure there are no gaps or voids between the window 

mounting flange and the exterior perimeter of the R.O.  Gaps or 

voids in this area may provide a path for water and air to enter.  

5. 

It is possible to install the window "upside down" and/or "inside 

out" which will cause the unit to operate incorrectly, thereby 

voiding the warranty.  
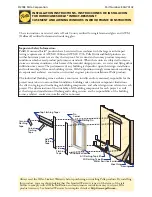
Note:

The weep holes are always at the 

bottom of the window at the exterior face (see figure 2).  

Never 

fill, modify, or block weep holes.

Figure 3

5

Содержание Manufactured Housing Vinyl Window

Страница 1: ...MANUFACTURED HOUSING VINYL WINDOW INSTALLATION INSTRUCTIONS EXCLUDES STORM WINDOWS PHILIPS PRODUCTS PHONE NUMBER 574 296 0000 LIT 1610 3 05 REV 2 PRODUCTS PHILIPS ...

Страница 2: ...ducts and methods used in construction and installation conform to all applicable building codes and regulations 4 For casement style windows see page 9 for additional instructions 5 Do not leave windows in direct sunlight when wrapped ROUGH OPENING PREPARATION 1 Make certain the rough opening referred to as R O in the remainder of document is correctly sized and constructed The R O must be greate...

Страница 3: ...will not seat flat against the exterior perimeter of the R O If damaged or distorted straighten the mounting flange so that it will make contact with the exterior face of the wall or contact Philips Products Inc for instructions 4 Windows must always be closed and locked during installation Make sure there are no gaps or voids between the window mounting flange and the exterior perimeter of the R ...

Страница 4: ...nimum of 1 penetration into the framing members 3 While holding the window flat against the exterior of the wall start a fastener in the approximate center of one of the frame jamb mounting flanges Continue installing fasteners in the following order center of opposite frame jamb center of head and center of sill Note If scaffolding interferes with the top of the window it is acceptable to install...

Страница 5: ...rner of the window so as to check whether they damage the finish Weather stripping hardware components tracks or vinyl components should not be painted or stained Flashing Philips recommends the use of flashing for proper drainage Reference Section 16 New Construction Installations of AAMA Installer Certification Manual It is also acceptable to use a house wrap system that is sealed and allows no ...

Страница 6: ...ch Truth part number 31887 onto the base of the stud found between the support arm and the track of the lower hinge Swinging the wrench away from the lock side window will decrease the amount of sash drag The maximum sash drag adjustment is reached when the stud flats are parallel to the track Note turning the stud flats beyond parallel will not increase sash drag correction 3 For severe sash drag...

Отзывы: