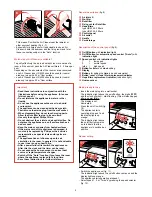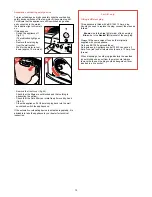
- At the set switch-on time, the Air Cleaner will switch the
appliance on automatically at the programmed speed (or in
function “Auto”).
The display lighting and the “ON” symbol come on (fig. 31).
- At the set switch-off time, the Air Cleaner will switch off
automatically.
The display lighting goes out and the “ON” symbol
disappears (fig. 32).
• The appliance will keep on switching on and off at the
programmed moments and using the programmed speed (or
“Auto” function), until you switch off the timer. (See section
“How to switch off the timer”.)
• After switching off the timer the program remains stored in
the memory.
You can re-activate the program using the M button. (See
section “Fast timer setting”.)
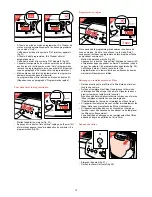
How to switch off the timer
- Switch the appliance on (fig. 33).
- Press and hold the “time setting” button (M) until the timer
symbol
Ò
disappears (fig. 34).
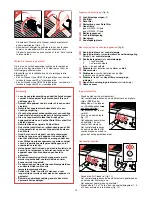
Fast timer setting
If you had previously programmed a switch-on time, a switch-
off time and a speed (or the “Auto” function), you can use this
program again quickly and simply:
- Switch the appliance on (fig. 35).
- Press and hold the “time setting” button (M) (at least for
3 seconds) until the timer symbol
Ò
comes on (fig. 36).
The display lighting goes out. The time, the timer symbol
Ò
and the indication light above the on/off button remain
visible.
How to clean or replace filters
• Remove and clean the pre-filter and the Rota filter at least
every two months.
• Remove and replace the Hepa filters when the Hepa filter
replacement indicator (Q) starts flashing (firstly) or is on
continuously (later).
Do not forget to reset the indicator when ready. (See
“Resetting the Hepa filter replacement indicator”.)
• Check the filters right away if the appliance becomes noisier.
Clean and/or replace the filters if necessary.
• Especially if the appliance is used in a smoky environment, it
may be necessary to clean or replace the filters more
frequently.
This depends on the condition of the air to be filtered.
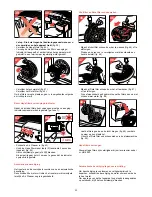
Removing the filters
- Switch the appliance off (fig. 37).
- Remove the front cover (fig. 38).
8
35
36
3 sec.
37
38
33
34
31
32
Содержание HR 4325
Страница 1: ...HR 4325 35 ...
Страница 3: ...3 9 J K M L N O P Q R HR 4325 8 G D A C H B I A A F HR 4335 E ...
Страница 81: ... 4222 000 92622 ...

