background image

C

4

Leave the shaving unit open to let the
appliance dry completely.

You can also clean the hair chamber without
water by using the brush supplied.

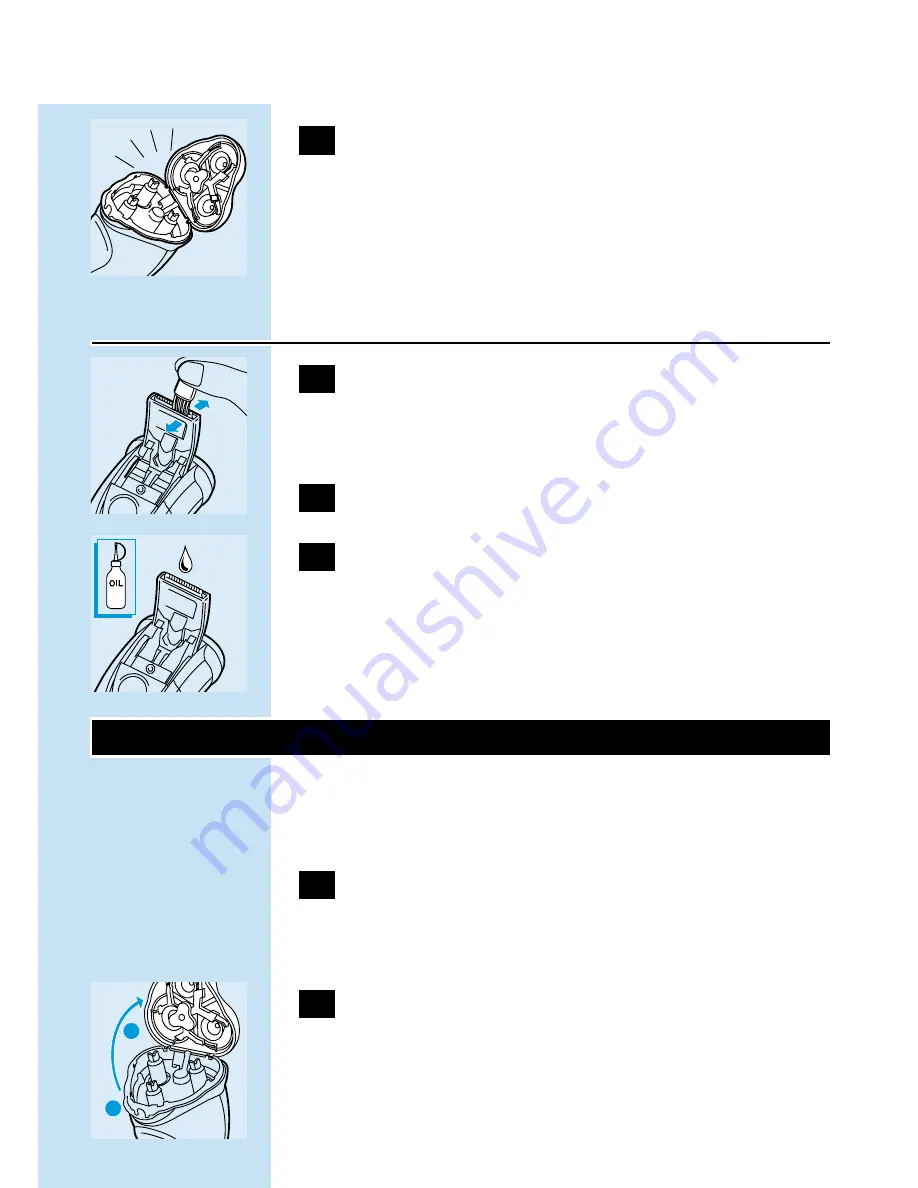
Every six months: trimmer

1

Switch the shaver off, remove the
powerplug from the wall socket and pull
the appliance plug out of the shaver.

C

2

Clean the trimmer with the brush.

C

3

Lubricate the trimmer teeth with a drop
of sewing machine oil every six months.

Replacing the shaving heads

Replace the shaving heads every two years for
optimal shaving results.

1

Switch the shaver off, remove the
powerplug from the socket and pull the
appliance plug out of the shaver.

C

2

Press the release button to open the
shaving unit.

ENGLISH

8

1

2

Содержание HQ6865

Страница 1: ...HQ6867 6865 3 ENGLISH 4 FRANÇAIS 13 ESPAÑOL 22 PORTUGUÊS 31 48 57 á Hô dG ...

Страница 2: ...art charging the empty shaver the red light lights up When there is sufficient power for 1 shave the green light starts blinking As charging continues more and more lights will become green to indicate to what level the batteries have been charged C Batteries fully charged When the batteries have been fully charged all lights will become green C Remaining capacity The number of lights indicate how...

Страница 3: ...time of the batteries remove the powerplug from the wall socket and pull the appliance plug out of the shaver when the batteries have been fully charged C 1 Insert the appliance plug into the shaver as far as the line on the plug 2 Put the powerplug in the wall socket Do not recharge the shaver in a closed pouch 3 When charging for the first time or after a long period of disuse leave the shaver t...

Страница 4: ...straight and circular movements Shaving on a dry face gives the best results Your skin may need 2 or 3 weeks to get accustomed to the Philishave system 3 Switch the shaver off C 4 Put the protection cap on the shaver to prevent damage Replace the shaving heads type HQ6 Quadra Action every 2 years for optimal shaving results Trimming For grooming sideburns and moustache C 1 Open the trimmer by push...

Страница 5: ...up the cutters and guards since grinding of the cutters in the guards only guarantees optimal performance for each matching set If you accidentally mix up the sets it could take several weeks before optimal shaving performance is restored Every week shaving unit 1 Switch the shaver off remove the powerplug from the wall socket and pull the appliance plug out of the shaver C 2 Press the release but...

Страница 6: ...and pull the appliance plug out of the shaver C 2 Clean the trimmer with the brush C 3 Lubricate the trimmer teeth with a drop of sewing machine oil every six months Replacing the shaving heads Replace the shaving heads every two years for optimal shaving results 1 Switch the shaver off remove the powerplug from the socket and pull the appliance plug out of the shaver C 2 Press the release button ...

Страница 7: ...nto the recesses C 5 Reassemble the shaving unit by replacing the retaining frame Press the wheel and turn it clockwise If the shaving heads have been properly inserted a shiny circle is visible on top of the shaving unit Replace damaged or worn shaving heads with Philishave HQ6 Quadra Action shaving heads only Storage C Put the protective cap on the shaver to prevent damage Store the appliance in...

Страница 8: ...ket and pull the appliance plug out of the shaver C 2 Let the shaver run until it stops undo the screws and open the shaver 3 Remove the batteries Do not connect the shaver to the mains again after the batteries have been removed Troubleshooting 1 Reduced shaving performance B Cause 1 the shaving heads are dirty B The shaver has not been rinsed long enough or the water used was not hot enough Clea...

Страница 9: ...t the retaining plate back onto the shaving unit B Cause 3 shaving heads are damaged or worn Remove the retaining frame Remove the old shaving heads from the shaving unit and replace them with new ones Damaged or worn shaving heads cutters and guards must only be replaced with the original Philishave HQ6 Quadra Action shaving heads Put the retaining plate back onto the shaving unit 2 The shaver do...

Страница 10: ...ps com or contact the Philips Customer Care Centre in your country you will find its phone number in the worldwide guarantee leaflet If there is no Customer Care Centre in your country turn to your local Philips dealer or contact the Service Department of Philips Domestic Appliances and Personal Care BV ENGLISH 12 ...

Страница 11: ...ue vous commencez à charger le rasoir déchargé la lampe rouge s allume Lorsque la charge suffit pour un rasage la lampe verte se met à clignoter Lorsque la charge se poursuit de plus en plus de lampes deviennent vertes pour indiquer le niveau de charge atteint par les accus C Accumulateurs entièrement chargés Lorsque les accus sont complètement chargés toutes les lampes deviennent vertes C Capacit...

Страница 12: ... préalablement l appareil en raccordant directement l appareil à la tension du réseau Pour prolonger la durabilité des accumulateurs enlevez le chargeur de la prise de courant et tirez la fiche hors du rasoir C 1 Enfoncez la petite fiche jusqu à la ligne dans l appareil 2 Mettez le chargeur dans la prise de courant Ne chargez jamais l appareil dans un étui fermé 3 Lorsque vous chargez l appareil p...

Страница 13: ...sant glisser le bouton marche arrêt vers le haut C 2 Déplacez rapidement les têtes de rasage sur la peau en effectuant des mouvements rectilignes et circulaires Les meilleurs résultats de rasage sont obtenus sur peau sèche Votre peau peut avoir besoin de 2 3 semaines pour s habituer au système de coupe Philishave 3 Arrêtez le rasoir C 4 Remettez le capot protecteur sur le rasoir pour éviter tout d...

Страница 14: ...s chaude possible 60c 80cC Quand vous nettoyez l appareil il n est pas nécessaire de démonter les têtes de rasage couteaux et grilles Si vous désirez cependant le faire n intervertissez pas les couteaux et les grilles car elles sont affutées par paires Si vous les intervertissez plusieurs semaines peuvent être nécessaires avant de retrouver une qualité de rasage optimale Toutes les semaines unité ...

Страница 15: ...ondeuse 1 Arrêtez l appareil enlevez le chargeur de la prise de courant et tirez la fiche hors du rasoir C 2 Nettoyez la tondeuse avec la brosse C 3 Tous les six mois lubrifiez la tondeuse à l aide d une gouttelette d huile pour machine à coudre Remplacement des têtes de rasage Pour un résultat de rasage optimal remplacez les têtes de rasage tous les deux ans 1 Arrêtez l appareil enlevez le charge...

Страница 16: ...s soient orientées vers le milieu Veillez à ce que les petites ailettes qui dépassent des têtes de rasage tombent exactement dans les renfoncements C 5 Assemblez à nouveau l unité de coupe en pressant la molette et en la tournant dans le sens des aiguilles d une montre Si les têtes de coupe sont correctement placées un cercle brillant doit apparaître sur le dessus de l unité de coupe Remplacez les...

Страница 17: ...ous pouvez également les déposer dans un Centre Service Agéé Philips Ils y seront traités dans le respect de l environnement Eliminez les accumulateurs uniquement lorsque ceux ci sont entièrement vides 1 Enlevez le cordon d alimentation de la prise de courant et tirez la petite fiche hors de l appareil C 2 Laissez l appareil fonctionner jusqu au moment où il s arrête défaites les vis et ouvrez l a...

Страница 18: ...ettoyez pas plus d un couteau et une grille à la fois parce que ceux ci sont affûtés par paires Si vous intervertissez par mégarde les couteaux et les grilles plusieurs semaines peuvent être nécessaires avant que l appareil rase à nouveau de manière optimale Replacez la plaque de fermeture sur les têtes de rasage B Cause 3 les têtes de rasage sont abîmées ou usées Enlevez la plaque de fermeture En...

Страница 19: ...chargez le rasoir Garantie et service Pour toute réparation information ou en cas de problème visitez notre website www philips com Ou veuillez contacter le Service Consommateurs Philips de votre pays vous trouverez le numéro de téléphone dans le dépliant sur la garantie internationale S il n y a aucun Service Consommateurs Philips dans votre pays contactez votre distributeur ou le Service Departm...

Страница 20: ...itadora Tan pronto como empiece a cargar la afeitadora descargada la lámpara piloto roja se encenderá Cuando haya suficiente carga para un afeitado la lámpara piloto verde empezará a parpadear Conforme continúe la carga se irán poniendo verdes más lámparas piloto para indicar hasta qué nivel se han cargado las baterías C Baterías completamente cargadas Cuando las baterías estén completamente carga...

Страница 21: ...adaptadora es apropiada para voltajes de red entre 110 y 240V También puede afeitarse sin recargar la afeitadora enchufándola a la red eléctrica Para alargar la vida útil de las baterías desenchufe la clavija adaptadora de la red y quite la clavija de la afeitadora una vez que las baterías se hayan cargado completamente C 1 Enchufe la clavija correspondiente a la afeitadora introduciéndola hasta l...

Страница 22: ... su distribuidor Philishave Afeitado 1 Ponga en marcha el aparato presionando una vez el botón de encendido apagado C 2 Desplace los conjuntos cortantes rápidamente sobre la piel con movimientos tanto rectos como circulares Los mejores resultados se obtienen afeitando sobre la piel seca Puede que su piel necesite de 2 a 3 semanas para acostumbrarse al sistema de afeitado Philishave 3 Apague la afe...

Страница 23: ...s necesario sacar los conjuntos cortantes cuchillas y protectores Si quiere sacarlos asegúrese de no mezclar protectores y cuchillas entre sí ya que el afilado de cada cuchilla en su protector garantiza el funcionamiento óptimo sólo para cada conjunto emparejado Si accidentalmente mezcla los conjuntos pueden ser necesarias varias semanas para que se restablezcan los optimos resultados en el afeita...

Страница 24: ...Cada seis meses cortapatillas 1 Apague la afeitadora desenchufe la clavija adaptadora de la red y saque la clavija de la afeitadora C 2 Limpie el cortapatillas con el cepillo C 3 Cada seis meses lubrifique los dientes del cortapatillas con una gota de aceite de máquina de coser Sustitución de los conjuntos cortantes Para unos resultados óptimos en el afeitado sustituya los conjuntos cortantes cada...

Страница 25: ...gúrese de que los salientes de los conjuntos cortantes encajen exactamente en las ranuras C 5 Colocando de nuevo el bastidor de retención vuelva a montar la unidad afeitadora Presione la ruedecita y hágala girar en el sentido de las agujas del reloj Si los conjuntos cortantes han sido insertados adecuadamente un círculo brillante será visible en la parte superior de la unidad afeitadora Sustituya ...

Страница 26: ...én puede llevar la afeitadora a un Servicio de AsistenciaTécnica de Philips donde se desharán de las baterías de un modo seguro para el medio ambiente Quite las baterías sólo si están completamente descargadas 1 Desenchufe la clavija adaptadora de la toma de corriente y saque la clavija de la afeitadora C 2 Deje que la afeitadora funcione hasta que se pare quite los tornillos y abra la afeitadora ...

Страница 27: ...uite el marco de sujeción Quite los pelos con el cepillo que se suministra C Limpie las cuchillas y los protectores No limpie más de una cuchilla y un protector al mismo tiempo ya que forman conjuntos entre sí Si accidentalmente se intercambian las cuchillas y los protectores pueden ser necesarias varias semanas para que se restablezcan los óptimos resultados en el afeitado Vuelva a poner la placa...

Страница 28: ...ionar el botón de encendido apagado B Causa las baterías están descargadas Recargue las baterías Garantía y Servicio Si necesita información o tiene algún problema visite la página Web de Philips en www philips com o contacte con el Servicio Philips de Atención al Cliente de su país hallará su número de teléfono en el folleto de la Garantía Mundial Si en su país no hay Servicio Philips de Atención...

Страница 29: ...mperatura superior a 80cC Indicações de carga C Carga Assim que começar a carregar a máquina de barbear descarregada a luz vermelha acender se á Quando existir energia suficiente que permita utilizar a máquina uma vez a luz verde começará a piscar À medida que continua o carregamento um número cada vez maior de luzes começa a ficar verde para indicar até que nível é que as baterias se encontram ca...

Страница 30: ...arga Carregue e guarde a máquina numa temperatura entre 5cC e 35cC A ficha de ligação é adequada para voltagens entre 110 e 240V Poderá igualmente barbear se sem carregar a máquina bastando que a ligue à corrente Para prolongar a vida das baterias retire a ficha da corrente e puxe a ficha de ligação para fora da máquina quando as baterias estiverem com carga total C 1 Introduza a ficha na máquina ...

Страница 31: ...ode também proceder à carga da máquina de barbear a partir de uma alimentação de 12 volts dentro de um automóvel por exemplo Estes cabos são acessórios disponíveis em qualquer distribuidor Philips Utilização da máquina de barbear 1 Ligue a máquina pressionando uma vez o botão On Off ligar desligar C 2 Passe as cabeças de corte rapidamente sobre a pele efectuando movimentos longitudinais e circular...

Страница 32: ...de melhores resultados A forma mais fácil e higiénica de limpar a máquina de barbear é lavando a todas as semanas com água quente 60c 80cC Quando proceder à limpeza da máquina não é necessário retirar as cabeças de corte lâminas e guardas Se as quiser tirar certifique se que não mistura as lâminas e as guardas umas com as outras porque formam conjuntos e só funcionam bem e dão bons resultados se e...

Страница 33: ...nte algum tempo C 4 Deixe o compartimento das cabeças aberto até secar completamente O compartimento de recolha dos pêlos também pode ser limpo a seco utilizando para o efeito a escova fornecida De seis em seis meses aparador 1 Desligue a máquina retire a ficha da tomada eléctrica e puxe a ficha de ligação para fora da máquina C 2 Limpe o aparador com a escova C 3 A cada seis meses lubrifique os d...

Страница 34: ...ças de corte e coloque as novas na máquina de maneira que os lados que têm os pequenos furos fiquem virados para o centro da unidade de corte Certifique se que as saliências existentes nas cabeças encaixam perfeitamente nos seus alojamentos C 5 Volte a montar a máquina de barbear premindo o anel e rodando o para a direita Se as novas cabeças estiverem bem colocadas torna se visível um círculo bril...

Страница 35: ...cial ou num Centro de AssistênciaTécnica da Philips que tratará de eliminar as baterias de uma forma segura para o ambiente Apenas retire as baterias caso estas se encontrem completamente vazias 1 Desligue a máquina retirando a ficha da tomada de corrente e puxando a ficha de ligação para fora C 2 Deixe a máquina funcionar até parar desaperte os parafusos e abra a 3 Retire as baterias A máquina de...

Страница 36: ...om a escova fornecida C Limpe as lâminas e as guardas Não limpe mais do que um conjunto lâmina guarda de cada vez já que constituem pares Se por acaso alterar os conjuntos lâmina guarda a eficácia da máquina diminuirá e só passadas algumas semanas voltará ao normal Volte a colocar a armação na máquina B Causa 3 cabeças de corte danificadas ou desgastadas Retire a armação Retire as cabeças velhas d...

Страница 37: ...e tiver qualquer problema por favor visite o site da Philips www philips com ou contacte o Centro de Informação ao Consumidor Philips do seu país o número de telefone está indicado no folheto da garantia mundial Se não existir um Centro de Informação ao Consumidor Philips no seu país dirija se ao agente Philips local ou contacte o Departamento de Service da Philips Domestic Appliances and Personal...

Страница 38: ...PG GƒæY â âfÎf G Y ùÑ a áëØ U com philips www hCG ƒ ü G æµÁ ó H øFÉHõdG áeóÿ ùÑ a õcôÃ É üJ G Éæg øµj GPG ŸÉ dG ɪ dG ë e øe JÉ dG ºbQ Y äÉéàæe π cƒH π üJEG a ø J òdG ó ÑdG øFÉHõdG áeóN õcôe ájÉæ dGh á dõæŸG äGhOCÓd ùÑ a áeóN õcôà π üJEG hCG ùÑ a á üî ûdG áeóÿGh ɪ dG ...

Страница 39: ...dP çóM GPG á dÉãe ábÓM ábÓ G IóMh fɵe âÑãŸG QÉW G V ɪ à SÓd á É U ÒZ hG âØ J ábÓ G ShDhQ 3 ÖÑ ùdG âÑãŸG QÉW G õfG º dóÑà SGh ábÓ G IóMh øe áÁó dG ábÓ G ShDhQ õfG IójóL ShDhôH É dGóÑà SG Öéj äGQÉW Gh äGôØ ûdG áØdÉàdG ábÓ G ShDhQ û a á UG ábÓM ShDhôH HQ6 ø ûcCG GQOGƒc ábÓ G IóMh fɵe âÑãŸG QÉW G V É jE G π ûàdG ìÉàØe Y dG óæY ádB G πª J á dÉN äÉjQÉ ÑdG 1 ÖÑ ùdG äÉjQÉ ÑdG øë ûH ºb 2 1 2 ...

Страница 40: ...á ªµJ πÑb kGó L ád G π ùZG æàdG Iô a G ô fG ábÓ G ShDhQ OGó S ÖÑ S πjƒ dG ô ûdG 2 ÖÑ ùdG ájOÉ dG äÉjÉØædG äÉjQÉ ÑdG eôJ øjòdG ùÑ a áeóN õcôŸ É ª ùJ æµÁ áæeBGh á Ä H á jô H É æe ƒ ü îàj kÉeÉ É ZGôa ádÉM äÉjQÉ ÑdG õfG a øeh FÉ G øe FÉHô µdG ùÑ ŸG õfG ádB G ZGÈdG ØH ºb ºK É ØbƒJ ájÉ d πª J ád G O ád G íàaGh äÉjQÉ ÑdG õfG äÉjQÉ ÑdG õf ó H øë ûdG IóYÉb ád G J 1 2 3 1 ...

Страница 41: ... Iô TDƒe IÒ üdG ܃ ãdG äGP dG ƒµJ ábÓ G IóMh dG ÓN øe ójóL øe ábÓ G IóMh ÖcQ ÖcQ áYÉ ùdG ÜQÉ Y ÉŒÉH µjô h Ü hódG Y âÑãŸG QÉW G û a ShDhôH áØdÉàdG ábÓ G ShDhQ óÑà SG HQ6 a ø ûcCG GQOGƒc àdG Öæéàd ádB G Y eÉ G AÉ dG V á aÉ G É àÑ M ádB G øjõîàH ºb ádB G øe ü îàdG óæY äÉjQÉ ÑdG õfG øjõîàdG äÉjQÉ ÑdG øe ü îàdG 1 2 1 2 5 3 4 ...

Страница 42: ... FÉ G øe ùÑ ŸG õfGh ádB G π ûJ bhCG IÉ TôØdG á SGƒH Üò ûŸG f áWÉ ÿG äÉæ cÉe âjR Iô H Üò ûŸG Éæ SCG º ë ûàH ºb ô TCG áà S πc ábÓM èFÉàf Y ƒ üë d Úàæ S πc ábÓ G ShDhQ óÑà SG ádÉ a øeh FÉ G øe ùÑ ŸG õfGh π ûàdG øY ádB G bhCG ábÓ G IóMh íàØd π üØdG ìÉàØe Y VG ádB G QÉW G õfGh áYÉ ùdG ÜQÉ Y ÉŒG ùµ H Ü hódG QOCG âÑãŸG ábÓ G ShDhQ GóÑà SG 4 1 2 3 1 2 1 2 ...

Страница 43: ...ƒÑ SCG πc øNÉ ùdG AÉŸÉH ShDhQ õ æd Qhô V ù d ádB G æJ óæY G º YÉLQG øe ócCÉJ dP äOQCG GPG ábÓ G ábÓM Y ƒ üë d í ë üdG º fɵe ádÉ a ábÓ G IóMh ƒÑ SCG πc ádB G øeh FÉ G øe ùÑ ŸG õfG ádB G π ûJ bhCG ábÓ G IóMh íàaGh π üØdG ìÉàØe Y VG AÉŸG â º Ø ûH ô ûdG õflh ábÓ G IóMh f âbƒdG Ñd øNÉ ùdG æàdG 1 2 3 1 2 ...

Страница 44: ...Üò ûŸG π ûJ øµÁ É j G π ûàdG ìÉàØe Y dG á SGƒH ádB G π T IóMGh Iôe äÉcôëH Jô ûH ƒa áYô ùH ábÓ G ShDhQ ôM ájôFGOh ájRGƒàe IóŸ êÉà Jô ûH áëLÉf èFÉàf J ÉL Lh Y ábÓ G û a ΩÉ f e º bCÉààd áKÓK hCG ÚYƒÑ SCG É j G π ûàdG ìÉàØe Y dG á SGƒH ádB G π T IóMGh Iôe àdG Öæéàd ádB G Y eÉ G AÉ dG V ø ûcCG GQOGƒc RGôW ábÓ G ShDhQ óÑà SG HQ6 Úàæ S πc ádÉ a ábÓM èFÉàf Y ƒ üë d ábÓ G á ªY Öjò ûàdG á ªY 1 2 3 4 1 ...

Страница 45: ...dƒa ùdG π UƒJ á SGƒHh ádB G øë T hO ábÓ G kÉ jCG æµÁ QÉ àdG e kIô TÉÑe FÉHô µdG øeh FÉ G øe FÉHô µdG ùÑ ŸG õfG äÉjQÉ ÑdG ôªY ádÉWC πeɵdÉH äÉjQÉ ÑdG øë T ΩÉ G óæY ádB G ádB ÉH ùÑ ŸG π UhCG FÉ ÉH ùÑ ŸG π UhCG á aÉ G É àÑ M πNGO gh ádB G øë ûJ ΩóY øe á jƒW Ióe ó H hCG Iôe hC øë ûdG óæY äÉYÉ S 4 IóŸ øë ûJ ádB G O ɪ à S G IóMGh áYÉ S kIOÉY ô à ùJ øë ûdG á ªY øë T á ªY ΩÉ G óæY ádB G øeh FÉ G øe ùÑ ŸG...

Страница 46: ...GôM áLQO øë ûdG ôªMC G ô TDƒŸG Aƒ dG eƒj ádBÓd FÉHô µdG øë ûdÉH CGóÑJ ÉŸÉM Aƒ dG CGóÑj IóMGh ábÓM á ª d á aÉc ájQÉ ÑdG ƒµJ ÉeóæY íÑ üJ á UGƒàŸG øë ûdG á ªY ÓNh Qƒ dÉH ô NC G ô TDƒŸG iƒà ùŸG G kIÒ ûe ô NC G ƒ dG G Ò ûJ AGƒ VC G øe ójõŸG æë T òdG ájQÉ ÑdG πeɵdÉH áfƒë ûe äÉjQÉ H AGƒ VC G ªL íÑ üJ πeɵdÉH áfƒë ûe äÉjQÉ ÑdG íÑ üJ ÉeóæY AGô N ÑàŸG øë ûdG äÉjQÉ ÑdG kÉÑjô J á ÑàŸG ábÉ dG á ªc G Ò ûj AGƒ ...

Страница 47: ...49 ...

Страница 48: ...50 C B B ...

Страница 49: ...51 1 2 C B B B C ...

Страница 50: ...52 C C C C 1 2 1 2 ...

Страница 51: ...53 C C C C 1 2 ...

Страница 52: ...54 C C 1 2 ...

Страница 53: ...55 C C C ...

Страница 54: ...56 C ...

Страница 55: ...57 C C C C C HQ8000 6000 HQ8000 6000 ...

Страница 56: ...4222 001 87613 ...

Отзывы: