background image

EN-13

Getting started

Philips Digital PhotoFrame

• Do not remove the memory card/USB flash drive before the copy process is 
  completed. 

• 

If the files you wish to copy from the memory card/USB flash drive already 

   exists in the internal memory of the PhotoFrame, the files will be overwritten
   when you select       to proceed. 

Step 6: Connecting the PhotoFrame 

to a computer

You can connect the PhotoFrame to a computer using a mini USB
cable (to be purchased separately) to easily manage the files in 
the internal memory of the PhotoFrame. 
1. Start the computer and turn on the PhotoFrame. 
2. Connect the smaller end of the USB cable to the mini USB port
    of the PhotoFrame. 
3. Connect the other end of the USB cable to a USB port on the 
    computer, making sure the connectors are fully inserted. 
4. Once connected, the PhotoFrame will enter PC transfer mode 
    automatically. 
5. When the computer has detected the PhotoFrame, the
    PhotoFrame will appear in “My Computer” as “removable disk”. 
6. Now you can freely transfer the files in the PhotoFrame as you 
    would on other disk drive. 

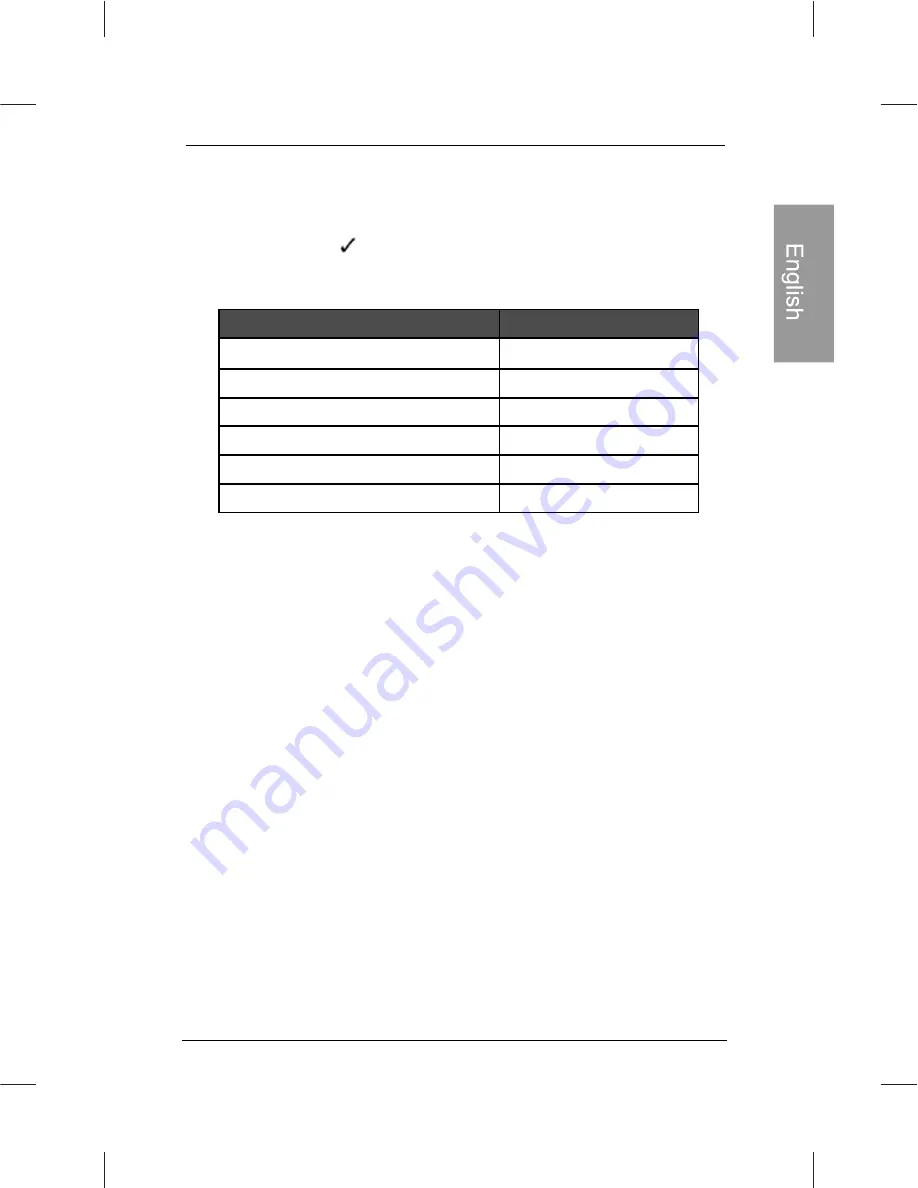
Compatible memory card formats : 

1

Maximum capacity

SD/SDHC
MultiMediaCard(MMC)
Memory Stick(MS)
Mcmory Stick PRO(MS PRO)
Memory Stick Duo(MS Duo)
USB flash drive

32GB
1GB
4GB
2GB
2GB
16GB

Memory card format

• Maximum capacity specification listed above are subject to change without 
  prior notice

Содержание Home Essentials SPF3470T/G7

Страница 1: ......

Страница 2: ......

Страница 3: ... from time to time in the contents hereof without obligation to notify any person of such revision or changes Safety Instructions Before operating the PhotoFrame carefully read and follow the instructions below Retain this User Manual for future reference Read the safety and operating instructions carefully before using the product All warnings on the product and in the operating instructions shou...

Страница 4: ...ut bend modify place heavy objects or step on the power adapter cord Otherwise the external insulation may be damaged and result in short circuit or fire If there are strange odors or heat emitting from this product or any signs of malfunction disconnect the PhotoFrame from the power immediately and contact your dealer for inspection or service Use a smooth soft cloth to clean the surface of the s...

Страница 5: ...ting a language Setting the date and time Step 5 Copying photos to internal memory Step 6 Connecting the PhotoFrame to a computer Step 7 Replacing the paper mat Using the main menu Managing photos Manually copying photos to the internal memory Tagging photos to an album Removing photos from an album Managing photos by using the TIMELINE album Creating a new album Modifying an album Deleting an alb...

Страница 6: ...r Using CLOCK EZ Access button Selecting a clock skin Switching between Clock view and Slideshow view Using SCRAPBOOK Using SETTINGS Date and Time page General Settings page Information page Frequently asked questions Regulation and compliance Recycling Appendix Specifications For SPF3470 G7 SPF3480 G7 SPF3400 G7 series 25 25 25 27 28 29 29 30 30 31 32 33 34 34 35 37 36 37 38 ...

Страница 7: ...se Key features Key features This PhotoFrame is equipped with the following features lear and bright display Enables you to display photos that are stored in the internal memory a memory card or a USB flash drive Allows you to select a preferred power saving option for the PhotoFrame using the Smart Energy Saver feature Allows you to use albums to manage and sort your photos easily Allows you to d...

Страница 8: ...rd x 1 7 Warranty Card x 1 8 Hook and loop tape for remote control x 1 Actual product appearance may vary from the illustrations shown in this User Manual Available accessories may vary depending on the area where you purchased the PhotoFrame The remote control is not included in the SPF3470 G7 SPF3470X G7 SPF3071 G7and SPF3470T G7 models Philips Digital PhotoFrame What s in the box What s in the ...

Страница 9: ...y of the PhotoFrame Memory card slot Allows for an SD SDHC MultiMediaCard MMC Memory Stick MS Memory Stick PRO MS PRO Memory Stick Duo MS Duo memory card Play back photos stored in the inserted card Copy photos from the inserted card to the PhotoFrame 1 2 3 4 5 6 7 Power jack Connect one end of the AC power adapter into the power jack and the other end into a power outlet Recommended Remote contro...

Страница 10: ...ons on page 6 for details ESC button ESCAPE button See Using the control buttons on page 6 for details Scroll wheel OK button See Using the control buttons on page 6 for details Kensington security slot You can attach an anti theft Kensington lock and cable to this slot to help prevent possible theft Philips Digital PhotoFrame Rear View Rear View EN 4 ...

Страница 11: ...otoFrame Philips Digital PhotoFrame You can use the control buttons on the back or the supplied remote control to operate the photo frame In this user manual instructions or examples provided are based upon operation with the remote control To know how to use the control buttons refer to Using the control buttons on page 6 for details The remote control is supplied with the SPF3480 G7 SPF3480X G7 ...

Страница 12: ...rrent operation and or returns to the previous page Scroll wheel OK button Press this button to enter or confirm your operation selection Scroll this button to the left to select the previous item Scroll this button to the right to select the next item MENU button Displays the pop up menu EZ Access button Switches between Clock view and Slideshow view OK ...

Страница 13: ... Digital PhotoFrame Using the remote control These models only SPF3480 G7 SPF 3480X G7 SPF3480T G7 SPF 3400 G7and SPF3400X G7 Place the hook and loop tape on back of the PhotoFrame for remote storage hook and loop tape1 hook and loop tape2 ...

Страница 14: ......

Страница 15: ...e Getting started Step 1 Using the adjustable back stand 1 Gently pop out the back stand as shown below 2 To place the PhotoFrame horizontally or vertically you can rotate the back stand by aligning the triangle mark with the rounded points 1 or 2 ...

Страница 16: ... the wall mount holes you can hang the PhotoFrame horizontally or vertically on the wall Step 2 Connecting to power 1 Place the PhotoFrame on a flat surface 2 Connect the power adapter as below 1 and press the Power button to turn on the PhotoFrame 2 Power systems and plug types may vary depending on yourcountry region To turn off the PhotoFrame press the Power button Getting started Philips Digit...

Страница 17: ...ter the first use You can turn on the tutorial by going into SETTINGS Step 4 Basic setup Select a language and set the date and time during the first use of the PhotoFrame Selecting a language Getting started Philips Digital PhotoFrame 1 In the main menu press or to select SETTINGS and then press OK 2 Press The General Settings page appears 3 Press OK press to go to Language and then press again 4...

Страница 18: ...mory If Smart Copy is set to Resize under General Settings photos will be resized to the screen resolution when copied to the internal memory to optimize the storage capacity Please keep a copy of the original photos on your memory card or USB flash drive 2 Press OK to highlight the Year field press or to select a year and then press OK to confirm the setting 3 Press to move to move to the Month f...

Страница 19: ...Frame 2 Connect the smaller end of the USB cable to the mini USB port of the PhotoFrame 3 Connect the other end of the USB cable to a USB port on the computer making sure the connectors are fully inserted 4 Once connected the PhotoFrame will enter PC transfer mode automatically 5 When the computer has detected the PhotoFrame the PhotoFrame will appear in My Computer as removable disk 6 Now you can...

Страница 20: ... may come with one or more bonus paper mats depending on your purchased model You can replace the existing paper mat with the one supplied if available Follow the instructions below to replace the supplied paper mat 1 On a flat table place the PhotoFrame facing down on top of a soft towel Be careful not to scratch the unit 2 Twist the EZ Lock Screws on the back of the PhotoFrame to the UNLOCK posi...

Страница 21: ... Philips Digital PhotoFrame 3 Remove the existing paper mat 4 Install the supplied bonus paper mat 5 Install the PhotoFrame to the wooden frame and secure the PhotoFrame by tightening the EZ Lock Screws to the LOCK position ...

Страница 22: ...gital PhotoFrame EN 16 Smart Energy Saver Allows you to select a power saving option for the PhotoFrame See Using Smart Energy Saver on page 28 for details Clock Calendar Allows you to set your favorite clock skins See Using CLOCK EZ Access button on page 29 for details SCRAPBOOK Allows you to display photos in slideshow with various preloaded templates See Using SCRAPBOOK on page 30 for details ...

Страница 23: ...OTO ALBUMS menu to manage photos in the internal memory memory card or USB flash drive Manually copying photos to the internal memory In addition to the automatic Smart Copy feature you can manually copy photos from external storage devices to the internal memory and tag photos to an album The example below demonstrates how to copy photos from a memory card to the internal memory and tag photos in...

Страница 24: ...mark 6 Press or to move to the photo you wish to select and then press OK to confirm the selection The selected photo will have a selection mark If you wish to select all the photos shown on the current page select Select All in the pop up menu and press OK Then continue with Step 7 Repeat Step 6 to select more photos as desired 7 Press Menu 8 From the pop up menu press or to select Tag It and the...

Страница 25: ...ash drive and a memory card have been inserted to the PhotoFrame For details about the TIMELINE album see Managing photos by using the TIMELINE album on page 22 2 Press or to select the source Press or to select the source of your photos such as the Internal Memory album and then press OK You can also select USB or Memory Card if available The file source including USB Memory Card and Internal Mem...

Страница 26: ...tep 4 Press OK to enable the selection mark 5 Press or to move to the photo you wish to select and then press OK to confirm the selection The selected photo will have a selection mark Repeat Step 6 to select more photos as desired 6 Press MENU If you wish to select all the photos shown on the current page select Select All in the pop up menu and press OK Then proceed to Step 7 7 From the pop up me...

Страница 27: ...ction mark 3 Press or to move to the photo you wish to select and then press OK to confirm the selection The selected photo will have a selection mark Repeat Step 3 to select more photos as desired 4 Press MENU If you wish to select all the photos shown on the current page select Select All in the pop up menu and press OK Then proceed to Step 5 5 From the pop up menu press or to select Uncategoriz...

Страница 28: ...specified 1 In the PHOTO ALBUMS menu press or to select TIMELINE and then press OK 2 Press OK When the marks appear press or to adjust the settings in the Year field and then press again In this step you can also search for photos taken in a specific period of time under the TIMELINE album by pressing MENU and selecting the time frame 3 Press to move to the Month field and repeat Step 2 to adjust ...

Страница 29: ...O ALBUMS menu press OK to select and then press OK to Create Album Press or to select a letter and then press OK to enter the letter Press MENU to toggle between letters and numbers To add a space press or to move to Space and then press OK 2 In the Album Name field that appears use the on screen keyboard to enter a desired name 3 Now the new album is created The PhotoFrame allows you to create up...

Страница 30: ...other options in the PHOTO ALBUMS menu 1 In the PHOTO ALBUMS menu press or to select an album and then press OK 2 Press OK to enable the selection mark Deleting photos 1 In the PHOTO ALBUMS menu press or to select an album that you wish to delete then press MENU 2 Select Delete Album and then press OK Default albums including TIMELINE Pre installed Library Uncategorized Family Friends and Vacation...

Страница 31: ...ll be rotated 90 degrees clockwise Repeat Step above if you wish to rotate the photo into other angles Applying photo effects From the pop up menu press or to select Photo Effects and then press OK Press or to select the effect you wish to apply to the selected photo including SEPIA ORIGINAL and BLACK WHITE and then press OK Viewing photos Viewing photos 1 In the main menu press or to select SLIDE...

Страница 32: ...n slideshow and then press OK If you wish to pause the slideshow press OK 3 To configure slideshow settings press MENU to display the pop up menu You can adjust the settings below Transition Effect selects the transition effect you wish to apply to the slideshow Slideshow Interval selects the slideshow interval between photos ...

Страница 33: ...g the TIMELINE album 1 In the SLIDESHOW menu press or to select TIMELINE and then press OK 2 In the pop up screen specify a time span to include the photos you wish to display in slideshow In this step you can also search for photos taken in a specific period of time under the TIMELINE album by pressing MENU and selecting the time frame Philips Digital PhotoFrame EN 27 Viewing photos Play mode sel...

Страница 34: ...The Smart Energy Saver menu provides various pre defined power saving options 1 In the main menu press or to select Smart Energy Saver and then press OK 2 Press or to select a desired option and confirm with OK For details about the power saving options refer to the table below Saves 50 on backlight power consumption during nighttime and automatically resumes normal power consumption during daytim...

Страница 35: ...preference Auto 100 Save 20 Save 50 Customized Nighttime is defined as hours from p m to a m Daytime is defined as hours from a m to p m Using Smart Energy Saver does not affect the photo Tuality Using CLOCK EZ Access button Using CLOCK EZ Access button Selecting a clock skin The PhotoFrame provides various preloaded clock and calendar skins To set a default clock skin to be displayed in Clock vie...

Страница 36: ...switching from Clock view to Slideshow view the Photo Frame starts the slideshow that was running previously If the last slideshow was playing from memory card or USB and is no longer available the PhotoFrame will start a slideshow from the Internal Memory Using SCRAPBOOK Philips SCRAPBOOK feature provides a brand new user experience in enjoying photo slideshows 1 In the main menu press or to sele...

Страница 37: ...l start to display the photos in slideshow using the selected template Using SETTINGS Using SETTINGS The SETTINGS menu allows you to configure the settings of the PhotoFrame 1 In the main menu press or to select SETTINGS and then press The Date and Time page appears 2 Press or to toggle among Date and Time General Settings and Information pages ...

Страница 38: ... settings 5 Press OK to exit Date and Time page Date Time Mode On Screen Clock Current Time Zone Second Time Zone Description Item Option On Off Allows you to set the date Allows you to set the time Allows you to select a time format 12 hour clock or 24 hour clock On screen display of the digit clock during slideshow mode Allows you to select the time zone that matches your current geographic loca...

Страница 39: ...vices to the internal memory when using the Smart Copy feature Resizes the photos to save memory space Keeps the original file size Resize Original Smart Cropping Selects to display photos in original size or full screen Full screen English Spanish French Yes Returns all the settings back to No system default Yes Upgrades the firmware of the No PhotoFrame Sets up the On Screen Display OSD language...

Страница 40: ...hotoFrame is placed upside down Please rotate the frame What types of image files can I view on my PhotoFrame The PhotoFrame supports playback of JPEG BMP images Can I connect my PhotoFrame directly to my computer You can connect the PhotoFrame directly to your computer via a mini USB cable Will the tagged photos be reset if I pull out the SD card No The Digital PhotoFrame DPF will write informati...

Страница 41: ...information onto the files in order to tag to Album Regulation and compliance This equipment has been tested and found to comply with the limits for a Class B digital device pursuant to Part 15 of the FCC Rules These limits are designed to provide reasonable protection against harmful inter ference in a residential installation This equipment generates uses and can radiate radio frequency energy a...

Страница 42: ... uses materials that can be recycled To minimize the amount of waste in the environment check your area for companies that will recover used televisions for dismantling and collection of reusable materials or contact your dealer for recycling tips Please dispose of the carton and packing material through the proper waste disposal management in your area Recycling Visit www recycle philips com for ...

Страница 43: ... format JPEG BMP JPEG BMP JPEG BMP USB port Mini USB USB host Mini USB USB host Mini USB USB host USB 1 1 2 0 compliant Yes Yes Yes Memory card slots 5 in 1 card slot 5 in 1 card slot 5 in 1 card slot Input power AC100 240V AC100 240V AC100 240V Output power DC 5V 1A DC 5V 1A DC 5V 2A Automatic photo rotation with built in sensor Yes Yes Yes Yes Yes Yes Clock Back stand Foldable Foldable Foldable ...

Страница 44: ...Philips Digital PhotoFrame EN 38 Memo Appendix ...

Страница 45: ...nto Se deberán tener en cuenta todas las instrucciones que aparecen en el producto y en las instrucciones de funcionamiento 1o coloque este producto baMo la luz solar directa o cerca de fuentes de calor por eMemplo en un automóvil cerrado ubicado al sol o en una ubicación cercana a una estufa La cubierta exterior del producto podría deformarse y los sofisticados sensores internos podrían sufrir da...

Страница 46: ... dañarse el aislamiento externo y ello derivar en un cortocircuito o incendio Si existieran olores extraños o calor provenientes de este producto u otro signo de funcionamiento defectuoso desconecte de inmediato el PhotoFrame de la alimentación y póngase en contacto con el distribuidor para su inspección o servicio técnico Utilice un paño suave para limpiar la superficie de la pantalla No utilice ...

Страница 47: ...o 4 Configuración básica Selección de un idioma Configuración de la fecha y hora Paso 5 Copiado de fotografías a la memoria interna Paso 6 Conexión del PhotoFrame a una computadora Paso 7 Reemplazo de la esterilla de papel Utilización del menú principal Gestión de las fotografías Copiado manual de fotografías a la memoria interna Rotulación de fotografías en un álbum Remoción de fotografías de un ...

Страница 48: ...igente de energía Utilización de RELOJ botón de acceso a EZ Selección de un tema del reloj Conmutación entre Vista de reloj y Vista de presentación Utilización del ÁLBUM DE RECORTES Utilización de CONFIGURACIÓN Página de Fecha y hora Página Configuración general Página de información Preguntas frecuentes Regulación y cumplimiento Reciclaje Apéndice Especificaciones Sólo para los modelos SPF3470 G7...

Страница 49: ...rame digital posee las siguientes características Pantalla nítida y brillante Le permite exhibir fotografías que estén almacenadas en la memoria interna una tarjeta de memoria o una unidad flash USB Le permite seleccionar una opción de ahorro de energía preferida para el PhotoFrame utilizando la función Economizador inteligente de energía Le permite utilizar álbumes para administrar y ordenar sus ...

Страница 50: ...Tarjeta de garantía x 1 8 Control remote hook and loop tape x 1 La apariencia real del producto puede variar de aquella que aparece en las ilustraciones de este manual del usuario Los accesorios disponiEles podrtan variar en Iunciyn de la reJiyn en la que se adquiera el 3Koto rame El control remoto no esti incluido en los modelos 63 63 J 63 63 7 Español PhotoFrame digital Philips Elementos incluid...

Страница 51: ...putadora para administrar los archivos presentes en la memoria interna del mismo Recomenda el control remoto de almacenaje Utilice el hook and loop tape que incluiye para guardar el mando a distancia Ranura para tarjetas de memoria Permite tarjetas de memoria SD SDHC MultiMediaCard MMC Memory Stick MS Memory Stick PRO MS PRO Memory Stick Duo MS Duo Reproducir las fotografías almacenadas en la tarj...

Страница 52: ...ntrol en página 6 Botón ESC botón ESCAPE Para obtener más información consulte Utilización de los botones de control en página 6 Botón Rueda de desplazamiento OK Para obtener más información consulte Utilización de los botones de control en página 6 Ranura de seguridad Kensington Puede colocar en esta ranura un cable con un candado antirrobo Kensington para evitar posibles robos Vista posterior Vi...

Страница 53: ... Funcionamiento del PhotoFrame Para operar el PhotoFrame se puede utilizar los botones de control ubicados en la parte posterior o en el control remoto suministrado En este manual del usuario las instrucciones o ejemplos proporcionados se basan en la utilización del control remoto Para obtener más información sobre cómo utilizar los botones de control consulte Utilización de los botones de control...

Страница 54: ...la página anterior Botón Rueda de desplazamiento OK Presione este botón para ingresar o confirmar su operación selección Desplace este botón hacia la izquierda para seleccionar el elemento anterior Desplace este botón hacia la derecha para seleccionar el elemento siguiente pour sélectionner l élément suivant Botón MENÚ Exhibe el menú emergente Botón de acceso a EZ Conmuta entre Vista de reloj y Vi...

Страница 55: ...remoto Sólo estos modelos SPF3480 G7 SPF3480X G7 SPF3480T G7 SPF3400 G7 y SPF3400X G7 Coloque el hook and loop tape en la parte posterior del PhotoFrame del control remoto de almacenaje por favor hook and loop tape1 hook and loop tape2 Utilización del control remoto ...

Страница 56: ......

Страница 57: ...able 1 Retire suavemente el pedestal trasero tal como se muestra a continuación 2 Para colocar el PhotoFrame horizontal o verticalmente se puede girar el pedestal trasero alineando la marca triangular con los puntos redondeados 1 o 2 PhotoFrame digital Philips Comienzo ...

Страница 58: ...zontal o verticalmente en la pared Paso 2 Conexión de la alimentación Eléctrica 1 Coloque el PhotoFrame sobre una superficie plana 2 Conecte el adaptador de alimentación eléctrica tal como se ndica a continuación 1 y presione el Botón de encendido para activar el PhotoFrame 2 Los sistemas de alimentación eléctrica y los tipos de enchufe pueden variar de acuerdo con su país región Para apagar el Ph...

Страница 59: ...do luego del primer uso Usted puede activar el tutorial yendo a CONFIGURACIÓN Paso 4 Configuración básica Seleccione un idioma y configure la fecha y la hora durante el primer uso del PhotoFrame e Selección de un idioma Español Configuración de la fecha y hora 1 En el menú principal presione o para seleccionar CONFIGURACIÓN y luego presione OK 2 Presione Aparecerá la página Configuración general 3...

Страница 60: ...a seleccionar un año y luego presione OK para confirmar la configuración Appuyez sur OK pour mettre en surbrillance le champ 3 Presione para pasar al campo Mes Presione OK para resaltarlo Presione o para seleccionar un mes y luego presione OK para confirmar la configuración 4 Repita el Paso 3 para los campos restantes entre ellos Fecha Hora Minuto Modo El reloj de la pantalla Zona horaria actual y...

Страница 61: ...cable USB al puerto mini USB del PhotoFrame 3 Conecte el otro extremo del cable USB a un puerto USB de la computadora asegurándose de que los conectores estén debidamente insertados 4 Una vez conectado el PhotoFrame ingresará automáticamente al modo de transferencia a la PC 5 Cuando la computadora haya detectado el PhotoFrame éste aparecerá en Mi PC como Disco extraíble PhotoFrame digital Philips ...

Страница 62: ... existente con otra suministrada si estuviera disponible Para reemplazar la esterilla de papel suministrada siga las instrucciones listadas a continuación 1 En una mesa plana coloque el PhotoFrame apuntando hacia abajo sobre un paño suave Tenga cuidado de no rayar el equipo 2 Gire los tornillos del candado EZ ubicados en la parte trasera del PhotoFrame hacia la posición DESBLOQUEAR y luego levante...

Страница 63: ...lla de papel existente 4 Instale la esterilla de papel de regalo suministrada 5 Instale el PhotoFrame en el marco de madera y fíjelo apretando los tornillos del candado EZ hacia la posición BLOQUEO PhotoFrame digital Philips Comienzo ...

Страница 64: ...ner une option d économie d énergie pour le PhotoFrame Voir Utilisation de la fonction Smart Energy Saver à la page 28pour plus de détails RELOJ Y CALENDARIO Le permite configurar sus temas del reloj favoritos Para obtener más información consulte Utilización de RELOJ botón de acceso a EZ en página 29 ÁLBUM DE RECORTES Le permite exhibir fotografías en el modo Presentación de diapositivas con vari...

Страница 65: ...tografías Gestión de las fotografías Se puede utilizar el menú ÁLBUMES DE FOTOS para administrar fotografías ubicadas en la memoria interna la t arjeta de memoria o la unidad flash USB Copiado manual de fotografías a la memoria interna Además de la función automática Copiado inteligente se puede copiar fotografías manualmente desde dispositivos externos de almacenamiento a la memoria interna y rot...

Страница 66: ... selección La fotografía seleccionada tendrá una marca de selección azul Repita el paso 6 para seleccionar más fotografías tal como se desee Si desea seleccionar todas las fotografías mostradas en la página actual seleccione Seleccionar todas en el menú emergente y presione OK y luego continúe con el Paso 7 7 Presione Menu 8 En el menú emergente Presione o para seleccionar Rotularla y luegoPresion...

Страница 67: ... memoria Para obtener detalles sobre el álbum CRONOGRAMA consulte Gestión de las fotografías utilizando el álbum CRONOGRAMA en página 30 2 Presione o para seleccionar la fuente de sus fotografías tal como el álbum Memoria interna y luego presione OK Usted también puede seleccionar USB o Tarjeta de memoria si estuvieran disponibles los archivos fuente que incluyen los de la tarjeta USB la Tarjeta d...

Страница 68: ...ione o para pasar a la fotografía que desea seleccionar y luego presione OK para confirmar la selección La fotografía seleccionada tendrá una marca de selección azul Repita el paso 5 para seleccionar más fotografías tal como se desee 6 Presione MENU Si desea seleccionar todas las fotografías mostradas en la página actual seleccione Seleccionar todas en el menú emergente y presione OK Luego continú...

Страница 69: ...a la fotografía que desea seleccionar y luego presione OK para confirmar la selección Repita el paso 3 para seleccionar más fotografías tal como se desee 4 Presione MENU Si desea seleccionar todas las fotografías mostradas en la página actual seleccione Seleccionar todas en el menú emergente y presione OK Luego continúe al paso 5 5 En el menú emergente presione o para seleccionar No categorizado y...

Страница 70: ...ilizar el álbum CRONOGRAMA para buscar fotografías en la memoria interna de acuerdo con el intervalo de tiempo especificado 1 En el menú ÁLBUMES DE FOTOS presione o para seleccionar CRONOGRAMA y luego presione OK 2 Presione OK Cuando aparezcan las marcas presione or para ajustar los parámetros del campo Año y luego oprima OK de nuevo 3 Presione para pasar al campo Mes y repita el Paso 2 para ajust...

Страница 71: ...la para ingresar el nombre deseado 3 Ahora el nuevo álbum está creado El PhotoFrame le permite crear hasta 12 álbumes personalizados 1 En el menú FOTOS ÁLBUMES pulse o selecciona y luego presione OK para crear el álbum Presione o para seleccionar una letra y luego presione OK para ingresar la letra Para alternar entre letras y números presione MENU Para añadir un espacio presione o para pasar a Es...

Страница 72: ...su nombre y luego presione MENU 2 Seleccione Editar nombre y luego presione OK 3 En el campo Nombre del álbum que aparece utilice el teclado en pantalla para ingresar el nombre deseado 4 Una vez que haya terminado de editar el nombre del álbum Presione ESC para salir Suppression de photos 1 En el menú de los álbumes de fotos presione o seleccione un álbum y luego presione OK 2 Presione OK para act...

Страница 73: ...oto en otros ángulos Se aplica los efectos a las fotos Desde el menú pop up presione o para selecciona los efectos a las fotos A continuar presione OK Presione o para seleccionar el efecto que quiere aplicar a la foto seleccionada Incluye SEPIA ORIGINAL EN BLANCO Y NEGRO A continuar presione OK Visualización de fotografías 1 En el menú principal presione o t para seleccionar PRESENTACIÓN DE DIAPOS...

Страница 74: ...rar los parámetros de la presentación de diapositivas presione MENU para exhibir el menú emergente Usted puede ajustar los siguientes parámetros Efecto de transición selecciona el efecto de la transición que se desea aplicar a la presentación de diapositivas Intervalo de la presentación de diapositivas selecciona el intervalo de tiempo que transcurre entre cada fotografía PhotoFrame digital Philip...

Страница 75: ...o usted puede también buscar fotografías tomadas en un período específico de tiempo en el álbum CRONOGRAMA presionando MENU y seleccionando el intervalo Español ES 27 Modo de reproducción selecciona el subsiguiente o al azar de la reproducción 1 En el menú PRESENTACIÓN DE DIAPOSITIVAS Presione or para seleccionar CRONOGRAMA y luego presione OK 2 En la pantalla emergente especifique un intervalo de...

Страница 76: ... característica de TIMELINE solamente se aplica a las fotos internas Copie cualquier foto en la unidad USB o tarjeta de memoria por favor si quiere acceder a esta función Español Descripción Opción Désactive la fonction Smart Energy Saver Apagado Automático 50 El menú del del Economizador inteligente de energía suministra varias opciones predefinidas de ahorro de energía 1 En el menú principal pre...

Страница 77: ...io diurno se define como el intervalo comprendido entre las a m y las p m La utilización del Planificador automático del economizador inteligente de energía no afecta la calidad de las fotografías Utilización de RELOJ botón de acceso a EZ Utilización de RELOJ botón de acceso a EZ Selección de un tema del reloj El PhotoFrame suministra varias opciones de temas del reloj y calendario precargadas Par...

Страница 78: ...onar ÁLBUM DE RECORTES y luego presione OK 2 Presione o para alternar entre las páginas Fecha y hora Configuración general e Información Conmutación entre Vista de reloj y Vista de presentación Se puede presionar para alternar entre la vista Reloj y la vista Presentación de diapositivas Cuando se pasa de Vista reloj a Vista de presentación el PhotoFrame inicia la presentación de diapositivas que f...

Страница 79: ...ción de diapositivas utilizando la plantilla seleccionada Utilización de CONFIGURACIÓN Utilización de CONFIGURACIÓN El menú CONFIGURACIÓN le permite configurar los parámetros del PhotoFrame 1 In the main menu Presione or to select SETTINGS and then Presione The Date and Time page appears 2 Presione o para alternar entre las páginas Fecha y hora Configuración general e Información PhotoFrame digita...

Страница 80: ...ria actual Segunda zona horaria Descripción Elemento Opción Activé Désactivé Le permite configurar la fecha Le permite configurar la hora Le permite seleccionar un formato de hora reloj de 12 horas o de 24 horas En la pantalla visualize el reloj del dígito durante utiliza el modo de presentación Le permite seleccionar la zona horaria que coincida con la de su ubicación geográfica actual Le permite...

Страница 81: ...se utiliza la función Copiado inteligente Permite seleccionar si las fotografías se exhibirán en su tamaño original o en pantalla completa Redimensiona las fotografíaspara ahorrar espacio de memoria Mantiene el tamaño de archivo original Pantalla completa Redimensionar Normal Original Permite configurar el idioma del menú de información enpantalla OSD Langue Mise à niveau FW Introduction au produi...

Страница 82: ...otografías aparecen al revés El PhotoFrame está colocado al revés Gire el armazón Qué tipos de archivo de imagen puedo visualizar en miPhotoFrame El PhotoFrame admite la reproducción de imágenes JPEG BMP Puedo conectar mi PhotoFrame directamente a micomputadora Usted puede conectar el PhotoFrame directamente a su computadora a través de un cable mini USB Serán reinicializadas las fotografías rotul...

Страница 83: ...alizando una o varias de las siguientes acciones Preguntas frecuentes El cuadro se congeló y no responde qué puedo hacer Si el cuadro se congelara es sencillo reiniciar el portarretratos desenchufándolo del tomacorriente y luego presionando de nuevo el botón de encendido le débranchant de l alimentation électrique puis en appuyant à nouveau sur le bouton d alimentation Por qué razón no está accesi...

Страница 84: ...ceptar cualquier interferencia recibida incluyendo interferencias que puedan causar un funcionamiento no deseado GiiNii International 7060 Koll Center Parkway Suite 340 Pleasanton CA 94566 1 877 784 0999 PhotoFrame digital Philips Para minimizar los daños al medio ambiente las pilas suministradas con este PhotoFrame no contienen mercurio ni níquel cadmio De ser posible al desechar las pilas utilic...

Страница 85: ...o previo SPF3470 G7 SPF3480 G7 SPF3400 G7 7 8 10 LED LED LED 16 9 4 3 4 3 Digital Digital Digital 800x480 800x600 800x600 128MB 128MB 128MB SD SDHC MMC MS MS PRO MS Duo SD SDHC MMC MS MS PRO MS Duo SD SDHC MMC MS MS PRO MS Duo JPEG BMP JPEG BMP JPEG BMP Mini USB Servid or USB Mini USB Servid or USB Mini USB Servid or USB sí sí sí Ranura para tarjetas de memoria 5 en 1 Ranura para tarjetas de memor...

Страница 86: ... mode d emploi doivent être respectés Ne placez pas cet appareil sous les rayons directs du soleil ou près de sources de chaleur comme dans une voiture fermée sous les rayons du soleil ou encore près d un poêle e bovtier externe de cet appareil pourrait se déformer et les capteurs sensibles se trouvant à l intérieur pourraient s endommager lorsque exposés à une chaleur excessive N utilisez pas ce ...

Страница 87: ...ordon de l adaptateur de courant isolation externe pourrait être endommagée ce qui risquerait d entravner un court circuit ou un incendie 6i vous sentez que l appareil émet une odeur étrange de la chaleur ou que celui ci présente des signes de mauvais fonctionnement débranchez immédiatement le PhotoFrame de son alimentation électrique et communiquez avec votre revendeur pour une inspection ou de l...

Страница 88: ... Sélection de la langue d affichage Réglage de la date et de l heure Étape 5 Copier des photos vers la mémoire interne Étape 6 Connexion du PhotoFrame à un ordinateur Étape 7 Remplacement du passe partout en papier Assignation de photos à un album Gestion des photos Copier des photos vers la mémoire interne Assignation de photos à un album Retirer des photos d un album Gestion de vos photos à l ai...

Страница 89: ...ORLOGE bouton EZ Access Sélection d une apparence d affichage de l horloge Basculement entre les modes horloge et diaporama Utilisation de l ALBUM PERSONNALISÉ Utilisation du menu RÉGLAGES Menu Date et heure Menu Réglages généraux Menu Information Foire aux questions Réglementation et conformité Recyclage Annexe Spécifications techniques Uniquement pour les modèles SPF3470 G7 SPF3480 G7 SPF3400 G7...

Страница 90: ...tiques principales Caractéristiques principales Ce cadre photo numérique PhotoFrame présente les caractéristiques suivantes Affichage clair et brillant Vous permet d afficher des photos stockées dans une mémoire interne sur une carte mémoire ou une clé USB Vous offre un choix d options d économie d énergie grâce à la fonction Smart Energy Saver gestion d énergie intelligente Vous permet de gérer e...

Страница 91: ... d enregistrement x 1 7 Carte de garantie x 1 8 Hook and loop tape pour la télécommande x 1 L apparence réelle de l appareil peut différer des illustrations trouvées dans le présent mode d emploi Les accessoires disponibles peuvent varier selon la région où vous avez acheté le cadre photo La télécommande n est pas fournie avec les modqles SPF3470 G7 SPF3470X G7 SPF3071 G7 et SPF3470T G7 Cadre phot...

Страница 92: ... télécommande recommandé Vous permet de connecter le PhotoFrame à un ordinateur pour gérer les fichiers dans la mémoire interne du PhotoFrame Logements pour cartes mémoire Le PhotoFrame prend en charge les cartes de stockage suivantes SD SDHC MultiMediaCard MMC Memory Stick MS Memory Stick PRO MS PRO Memory Stick Duo MS Duo et xD Picture Card xD Affichez les photos enregistrées sur la carte mémoir...

Страница 93: ...SC Bouton ÉSCHAP Voir Utilisation des boutons de commande à la page 6 pour plus de détails Roulette de défilement bouton OK Voir Utilisation des boutons de commande à la page 6 pour plus de détails Emplacement pour verrou antivol Kensington Vous pouvez fixez un verrou et un câble antivols Kensington à cet ancrage afin d aider à protéger votre PhotoFrame contre le vol Cadre photo numérique PhotoFra...

Страница 94: ...uvez contrôler le PhotoFrame à l aide des boutons de commande se trouvant à l arrière du cadre ou encore en vous servant de la télécommande fournie avec l appareil Dans le présent mode d emploi les consignes ou les exemples fournis sont basés sur l utilisation de latélécommande Pour savoir comment utiliser les boutons de commande reportez vous à la section Utilisation des boutons de commande à la ...

Страница 95: ...à l écran précédent Roulette de défilement bouton OK Appuyez sur ce bouton pour entrer ou confirmer une opération sélection Faites tourner la roulette vers la gauche pour sélectionner l élément précédent Faites tourner la roulette vers la droite pour sélectionner l élément suivant Bouton MENU Fait apparaître le menu contextuel Bouton EZ Access Permet de basculer entre les modes horloge et diaporam...

Страница 96: ...toFrame Utilisation de la télécommande uniquement avec les modèles suivants SPF3480 G7 SPF3480X G7 SPF3480T G7 SPF3400 G7 and SPF3400X G7 Placez le Hook and loop tape en arrière du PhotoFrame pour le stockage à distance Hook and loop tape 1 Hook and loop tape 2 ...

Страница 97: ......

Страница 98: ...Utilisation du pied arrière réglable 1 Éjectez doucement le pied arrière tel qu illustré ci dessous 2 Pour placer le PhotoFrame à l horizontale ou à la verticale vous pouvez faire pivoter le pied arrière en alignant la flèche sur les points 1 ou 2 Démarrage du PhotoFrame ...

Страница 99: ...ent à un mur en vous servant des trous de suspension Étape 2 Branchement de l alimentation 1 Placez le PhotoFrame sur une surface plane 2 Branchez l adaptateur de courant tel qu illustré ci dessous 1 puis appuyez sur le bouton d alimentation pour allumer le PhotoFrame 2 Les systèmes d alimentation et les types de fiche peuvent varier selon votre pays ou région Pour éteindre le PhotoFrame appuyez à...

Страница 100: ...ichage du tutoriel en accédant au menu RÉGLAGES Étape 4 Configuration de base Sélectionnez la langue d affichage et réglez la date et l heure lors de votre première utilisation du PhotoFrame Sélection de la langue d affichage Cadre photo numérique PhotoFrame Réglage de la date et de l heure 1 Dans le menu principal appuyez sur ou sur pour sélectionner RÉGLAGES puis appuyez sur OK 2 Appuyez sur Le ...

Страница 101: ...r Redimensionner les photos seront automatiquement redimensionnées en fonction de la résolution d écran lorsque copiées vers la mémoire interne et ce afin d optimiser la capacité de stockage de cette dernière Veuillez vous assurer de conserver des copies des photos originales sur votre carte mémoire ou votre clé USB 2 Appuyez sur OK pour mettre en surbrillance le champ Année appuyez sur ou pour sé...

Страница 102: ...ment en mode transfert PC 5 Lorsque l ordinateur détectera le PhotoFrame ce dernier apparaîtra dans le Poste de travail My Computer comme un disque amovible Démarrage du PhotoFrame Ne retirez pas la carte mémoire ou la clé USB avant que le processus de copie ne soit terminé If the files you wish to copy from the memory card USB flash drive already exists in the internal memory of the PhotoFrame th...

Страница 103: ...ce par l un de ceux fournis avec le cadre photo si disponible Suivez les instructions ci dessous pour remplacer le passe partout en papier 1 Sur la surface plane d une table posez le PhotoFrame sur une serviette propre avec le côté face vers le bas Prenez bien soin de ne pas égratigner l appareil 2 Tournez les vis de blocage EZ à l arrière du PhotoFrame en position DÉVERROUILLÉES puis retirez douc...

Страница 104: ...rez le passe partout qui était en place 4 Placez le passe partout de remplacement dans le cadre 5 Replacez le PhotoFrame dans le cadre en bois et fixez le en place en tournant les vis de blocage EZ en position VERROUILLÉES Démarrage du PhotoFrame ...

Страница 105: ...art Energy Saver Vous permet de sélectionner une option d économie d énergie pour le PhotoFrame Voir Utilisation de la fonction Smart Energy Saver à la page 28pour plus de détails HORLOGE Vous permet de choisir votre apparence d affichage de l horloge préférée Voir Utilisation du menu HORLOGE bouton EZ Access à la page 29 pour plus de détails ALBUM PERSONNALISÉ Vous permet d afficher des photos en...

Страница 106: ...u ALBUMS PHOTO pour gérer les photos enregistrées dans la mémoire interne sur une carte mémoire ou une clé USB Copier des photos vers la mémoire interne En plus de la fonction automatique de Copie intelligente voir page 18 vous pouvez copier manuellement des photos depuis un périphérique de stockage externe vers la mémoire interne et étiqueter des photos pour les assigner à un album L exemple ci d...

Страница 107: ...ection affiché en orangé 6 Appuyez sur ou pour déplacer le champ de sélection jusqu à la photo que vous voulez sélectionner puis appuyez sur OK pour confirmer La photo sélectionnée sera marquée d un cadre bleu Répétez l étape 6 pour sélectionner les autres photos que vous souhaitez sélectionner Si vous voulez sélectionner toutes les photos affichées sur la page actuelle sélectionnez Tout sélection...

Страница 108: ...et une carte mémoire ont été insérées dans le PhotoFrame Pour plus de détails concernant l album CHRONOLOGIE voir la section Gestion de vos photos à l aide de l album CHRONOLOGIE à la page 30 2 Appuyez sur ou pour sélectionner la source de vos photos telle que l album Mémoire interne puis appuyez sur OK le cas échéant vous pouvez également sélectionner USB ou Carte mémoire la source du fichier inc...

Страница 109: ...ection affiché en orangé 5 Appuyez sur ou pour déplacer le champ de sélection jusqu à la photo que vous voulez sélectionner puis appuyez sur OK pour confirmer La photo sélectionnée sera marquée d un cadre bleu 6 Appuyez sur MENU Si vous voulez sélectionner toutes les photos affichées sur la page actuelle sélectionnez Tout sélectionner dans le menu contextuel puis appuyez sur OK Passez ensuite à l ...

Страница 110: ... à la photo que vous voulez sélectionner puis appuyez sur OK pour confirmer La photo sélectionnée sera marquée d un cadre bleu Répétez l étape 3 pour sélectionner les autres photos que vous souhaitez sélectionner 4 Appuyez sur MENU Si vous voulez sélectionner toutes les photos affichées sur la page actuelle sélectionnez Tout sélectionner dans le menu contextuel puis appuyez sur OK Passez ensuite à...

Страница 111: ...tion CHRONOLOGIE puis appuyez sur OK 2 Appuyez sur OK Lorsque les symboles apparaissent appuyez sur ou pour régler les paramètres du champ Année puis appuyez à nouveau sur OK Dans ce menu vous pouvez également rechercher des photos prises pendant une période de temps spécifique avec l album CHRONOLOGIE en appuyant sur MENU et en sélectionnant l intervalle de temps souhaité 3 Appuyez sur pour dépla...

Страница 112: ...le nom que vous voulez pour votre nouvel album 3 Le nouvel album est maintenant créé Le PhotoFrame vous permet de créer jusqu à 12 albums personnalisés Appuyez sur ou pour sélectionner une lettre puis appuyez sur OK t pour entrer cette lettre Appuyez sur MENU pour basculer entre lettres et chiffres Pour ajouter un espace appuyez sur ou pour déplacer le champ de sélection jusqu à Espace puis appuye...

Страница 113: ...ur ou pour sélectionner un album dont vous souhaitez modifier le nom puis appuyez sur MENU 2 Sélectionnez Modifier le nom puis appuyez sur OK 3 Dans le champ Nom de l album qui apparaîtra utilisez le clavier à l écran pour entrer le nom que vous voulez pour votre nouvel album 4 Une fois que vous avez terminé de modifier le nom de l album appuyez sur ESC pour quitter Suppression de photos 1 Dans le...

Страница 114: ...tionnez Tout sélectionner dans le menu contextuel puis appuyez sur OK Passez ensuite à l étape 5 5 De la por menu appuyez sur ou pour sélectionner Supprimer puis appuyez sur OK Du menu raccourci Appuyez ou pour sélecte Delete et puis appuyez OK 1 Dans le menu principal appuyez sur ou pour sélectionner l option DIAPORAMA puis appuyez sur OK Les sources USB et Carte mémoire n apparaîtront que lorsqu...

Страница 115: ...ous souhaitez interrompre le diaporama appuyez sur OK 3 Pour régler les paramètres de configuration du diaporama appuyez sur MENU pour afficher le menu contextuel Vous pouvez régler les paramètres ci dessous Effet de transition sélectionne l effet de transition que vous souhaitez attribuer au diaporama Intervalle du diaporama sélectionne la durée d intervalle entre les photos du diaporama ...

Страница 116: ...APORAMA appuyez sur ou pour sélectionner l option CHRONOLOGIE puis appuyez sur OK 2 Dans l écran contextuel définissez un laps de temps comprenant un ensemble de photos que vous souhaitez afficher en diaporama Dans ce menu vous pouvez également rechercher des photos prises pendant une période de temps spécifique avec l album CHRONOLOGIE en appuyant sur MENU et en sélectionnant l intervalle de temp...

Страница 117: ...ique seulement aux photos stockées dans le mémoire interne Veuillez copier toutes les photos sur la lecteur USB ou le mémoire d USB à la mémoire interne si vous souhaitez accéder à ce dispositif Cadre photo numérique PhotoFrame Description Options Désactive la fonction Smart Energy Saver Désactivé Auto 50 La fonction Smart Energy Saver offre une série d options prédéfinies vous permettant de rédui...

Страница 118: ... définie comme allant de 7h00 à 21h00 L activation de la fonction Smart Energy Saver n affecte aucunement la qualité d affichage des photos Utilisation du menu HORLOGE bouton EZ Access Utilisation du menu HORLOGE bouton EZ Access Sélection d une apparence d affichage de l horloge Le PhotoFrame offre une variété d apparences d affichage de l horloge et du calendrier préenregistrées dans l appareil ...

Страница 119: ... basculer entre la vue et de l Horloge Lorsque vous basculer du mode horloge au mode diaporama le PhotoFrame lance le dernier diaporama à avoir été affiché Si le dernier diaporama à être affiché provenait d une carte mémoire ou d une clé USB ayant entre temps été retirée le PhotoFrame lancera un diaporama enregistré dans la mémoire interne La fonction ALBUM PERSONNALISÉ offre une toute nouvelle ex...

Страница 120: ...a selon le modèle d affichage sélectionné Utilisation du menu RÉGLAGES Utilisation du menu RÉGLAGES Le menu RÉGLAGES vous permet de régler les paramètres de configuration du PhotoFrame 1 Dans le menu principal appuyez sur ou sur pour sélectionner l option RÉGLAGES puis appuyez sur Le OK menu Date et heure apparaît 2 Appuyez sur ou pour basculer entre les menus Date et heure Réglages généraux et In...

Страница 121: ...r Menu Date et heure Date Heure Mode Horloge d écran Fuseau horaire actuel Fuseau horaire secondaire Description Élément Option Activé Désactivé Vous permet de régler la date Vous permet de régler l heure Vous permet de sélectionner le format d affichage de l heure format 12 heures ou format 24 heures On screen display of the digit clock during slideshow mode Vous permet de sélectionner le fuseau ...

Страница 122: ...depuis les périphériques de stockage externes vers la mémoire interne lorsque vous utilisez la fonction Copie intelligente Choisissez si vous souhaitez afficher les photos dans la taille d origine ou en plein écran Redimensionne automatiquement les photos pour économiser de l espace mémoire Conserve la taille d origine des fichiers Plein écran Redimensi onner Normal Original Français Définit la la...

Страница 123: ...s photos sont affichées à l envers Le PhotoFrame est posé à l envers Veuillez retourner le cadre Quels types de fichiers d images puis je afficher sur mon PhotoFrame Le PhotoFrame prend en charge les images sous format JPEG BMP JPEG Progressive et EXIF Puis je connecter mon PhotoFrame directement à mon ordinateur Vous pouvez connecter le PhotoFrame directement à votre ordinateur via un câble mini ...

Страница 124: ...yer de corriger ces interférences en appliquant une ou plusieurs des Foire aux questions Le PhotoFrame se fige et ne répond plus aux commandes que puis je faire If Si le PhotoFrame se fige vous n avez qu à le redémarrer en le débranchant de l alimentation électrique puis en appuyant à nouveau sur le bouton d alimentation Pourquoi la fonction CHRONOLOGIE est elle non disponible pour les photos enre...

Страница 125: ... doit accepter toute interférence reçue y compris les interférences qui peuvent perturber le fonctionnement GiiNii International 7060 Koll Center Parkway Suite 340 Pleasanton CA 94566 1 877 784 0999 Pour minimiser l impact sur l environnement les piles fournies avec le PhotoFrame ne contiennent pas de mercure ou de nickel cadmium Si possible utilisez les méthodes de recyclage offertes dans votre r...

Страница 126: ...écifications sont sujettes à changement sans préavis SPF3470 G7 SPF3480 G7 SPF3400 G7 7 8 10 LED LED LED 16 9 4 3 4 3 Numérique Numérique Numérique 800x480 800x600 800x600 128MB 128MB 128MB SD SDHC MMC MS MS PRO MS Duo SD SDHC MMC MS MS PRO MS Duo SD SDHC MMC MS MS PRO MS Duo JPEG BMP JPEG BMP JPEG BMP Mini USB USB host Mini USB USB host Mini USB USB host Oui Oui Oui Logement de carte mémoire 5 en...

Страница 127: ......

Страница 128: ...Philips and Philips Shield are used under license of Koninklijke Philips Electronics NV 2011 GiiNii International All rights reserved D 02 08 11 ...

Отзывы: