


1
Remove the attachment nut and the adapter from the water
selection unit (Fig. ).
Remove the aerator cap from the tap and pass the attachment nut
over the spout. Take out the original adapter and screw the
matching adapter (B-type) onto the tap (Fig. ).
Tighten the adapter further with a coin (Fig. 9).
Tighten the attachment nut firmly onto the water selection
unit (Fig. 10).
installation C-type adapter
For taps with an aerator (threaded on the inside) (Fig. 11).
1
Remove the attachment nut and the adapter from the water
selection unit (Fig. ).
Remove the aerator cap from the tap. Take out the original adapter
and screw the matching adapter (C-type) onto the tap through the
attachment nut. (Fig. 1)
Tighten the adapter further with a coin (Fig. 1).
Tighten the attachment nut firmly onto the water selection
unit (Fig. 1).
installation D-type adapter
For taps other than A, B or C. (Fig. 15)
1
Remove the attachment nut and the adapter from the water
selection unit (Fig. ).
Screw the D-type adapter about halfway onto the water selection
unit. Make sure to leave enough room in order to tighten the fitting
at a later step. (Fig. 16)
Push the water selection unit firmly onto the tap from below and
tighten the screws evenly. Make sure that you keep the tap in the
center of the screw fastener. At the same time maintain pressure
on the water purifier housing from below. (Fig. 17)
-
-
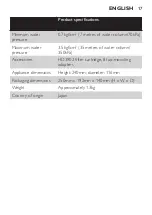
EnglisH
10
Содержание HD3802
Страница 1: ...HD3802 ...
Страница 2: ... ...
Страница 3: ...1 6 7 8 9 12 5 2 1 3 4 18 19 17 16 13 11 10 22 21 20 14 15 A D B C ...
Страница 4: ... ...
Страница 5: ...HD3802 English 6 繁體中文 18 ...
Страница 27: ...產品規格 重量 約 1 3 公斤 產地 日本 繁體中文 27 ...
Страница 28: ...28 ...
Страница 29: ...29 ...
Страница 30: ...30 2 A type 16mm adapter 3 4 5 6 7 8 9 10 11 12 13 14 15 16 17 18 19 20 21 ...
Страница 31: ...31 22 23 24 25 26 27 28 29 30 31 32 33 ...
Страница 32: ...www philips com u 4222 002 7091 1 ...