background image

English

7

EN

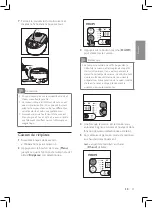
Press the start button (

On/Off

) to start 

cooking.

Note


• The cooking time is not displayed straight from 

the beginning. Small dashes are turning around 

on the screen during most of the cooking time 

as long as the multicooker detects water in the 

preparation. When the water has completely 

evaporated, the timer shows the remaining 

cooking time. 

When the cooking is finished, you will hear 

4 beeps and the selected cooking function 

light will be off. 

The multicooker will be in keep-warm 

mode automatically.


»

The keep-warm indicator (

Chaud

) lights 

up.

Note


• If the voltage is unstable at the area you live, it 

is possible that the multicooker overflows.


After the cooking is finished, stir the rice and 

loosen it immediately to release excessive 

moisture for fluffy rice.


• Depending on the cooking conditions, the 

bottom portion of the rice may become 

slightly browned.

Close the lid of the multicooker, and put 

the plug in the power socket.

Note


• For details about the ratio of rice and water, 

see the recipe.


• The level marked inside the inner pot is just 

an indication. You can always adjust the water 

level for different types of rice and your own 

preference.


• Make sure that the outside of the inner pot 

is clean and dry, and that there is no foreign 

residue on the heating element or the 

magnetic switch.

Cooking rice/pasta

Follow the steps in “Preparations before 

cooking”.

Press the menu button (

Menu

) until the 

rice/pasta cooking function (

Riz/pâtes

) is 

selected.

Содержание HD3137

Страница 1: ...HD3137 Enregistrez votre produit et obtenez de l assistance sur le site www philips com welcome Des questions Contactez Philips User manual 1 Mode d emploi 17 Toujours là pour vous aider ...

Страница 2: ......

Страница 3: ...ice pasta 7 Making jam 8 Making risotto 8 Boiling 9 Making yogurt 9 Reheating 10 Baking 10 Steaming 11 Stewing Slow cooking 11 Frying 12 Roasting 12 Manual 12 Keep warm mode 13 Adjusting the cooking time and temperature 13 Preset time for delayed cooking 14 5 Cleaning and Maintenance 15 Interior 15 Exterior 15 Accessories 15 6 Environment 15 7 Guarantee and service 15 8 Specifications 15 9 Trouble...

Страница 4: ...your purchase and welcome to Philips To fully benefit from the support that Philips offers register your product at www philips com welcome 2 What s in the box Multicooker main unit Power cord 2 pcs silicone gloves Measuring cup Spatula Soup ladle Steam basket User manual Recipe Safety leaflet Warranty card http www philips com welcome User manual http www philips com welcome Recipe http www phili...

Страница 5: ...8 hr 6 12 hr 1 24 hr 40 3 C Reheat Réchauffer 25 min 5 60 min 85 C Bake Four 45 min 20 min 2 hr 130 C Steam Vapeur 20 min 5 min 2 hr 1 24 hr 100 C Stew Mijoter 1 hr 20 min 10 hr 1 24 hr 90 C Fry Frire 15 min 5 60 min 145 150 C Slow cook Slow cook 5 hr 1 15 hr 1 24 hr 80 C Roast Rissoler 1 hr 1 24 hr 130 C Manual Manuel 2 hr 5 min 10 hr 1 24 hr 100 C Note The cooking temperature for the baking and ...

Страница 6: ...ker Before first use 1 Take out all the accessories from the inner pot Remove the packaging material of the inner pot 2 Clean the parts of the multicooker thoroughly before using it for the first time see chapter Cleaning and Maintenance Note Make sure all parts are completely dry before you start using the multicooker Preparations before cooking Before using the multicooker you need to do the fol...

Страница 7: ...hat the multicooker overflows After the cooking is finished stir the rice and loosen it immediately to release excessive moisture for fluffy rice Depending on the cooking conditions the bottom portion of the rice may become slightly browned 7 Close the lid of the multicooker and put the plug in the power socket Note For details about the ratio of rice and water see the recipe The level marked insi...

Страница 8: ...cator Chaud lights up Making risotto 1 Put food and ingredients into the inner pot 2 Follow steps 6 and 7 in Preparations before cooking 3 Press the menu button Menu until the risotto function Risotto is selected Note The cooking time is not displayed straight from the beginning Small dashes are turning around on the screen during most of the cooking time as long as the multicooker detects water i...

Страница 9: ...ically The keep warm indicator Chaud lights up Making yogurt 1 Whisk the ingredients for the yogurt well and put them in a glass container 2 Put the glass container in the inner pot Make sure that the container is sealed 3 Pour some water in the inner pot Make sure that half of the container is immersed in water 4 Follow steps 6 and 7 in Preparations before cooking 5 Press the menu button Menu unt...

Страница 10: ...ted function light will be off 7 The multicooker will be in keep warm mode automatically The keep warm indicator Chaud lights up Note When removing the inner pot from the multicooker use a kitchen glove or a cloth as the inner pot will be very hot Reheating 1 Loosen the cooled food and evenly distribute it in the inner pot 2 Pour some water onto the food to prevent it from becoming too dry The qua...

Страница 11: ...Adjusting the cooking time and temperature 4 Press the start button On Off to start cooking 5 When the cooking is finished you will hear a few beeps and the selected cooking function light will be off 6 The multicooker will be in keep warm mode automatically The keep warm indicator Chaud lights up Steaming 1 Pour some water into the inner pot 2 Put food to be steamed on a plate or in the steam tra...

Страница 12: ...h more control over the cooking time and temperature 1 Put food and ingredients into the inner pot 2 Follow steps 6 and 7 in Preparations before cooking 3 Press the menu button Menu until the manual function Manuel is selected Frying 1 Put food and ingredients into the inner pot 2 Follow step 6 in Preparations before cooking 3 Put the plug in the power socket 4 Press the menu button Menu until the...

Страница 13: ...rt button On Off to start cooking 5 When the cooking is finished you will hear 4 beeps and the selected cooking function light will be off 6 The multicooker will be in keep warm mode automatically The keep warm indicator Chaud lights up Note If you cook food at a temperature below 70 C please turn off the keep warm mode before start cooking In manual Manuel mode when cooking at a temperature highe...

Страница 14: ... Réchauffer mode The preset button is not responsive in standby mode 5 To set a different cooking temperature press the temperature button Temp and the default temperature starts flashing on the display 6 Press the increase or the decrease button to set the desired cooking temperature Preset time for delayed cooking You can preset the delayed cooking time for all cooking modes except the reheating...

Страница 15: ...o remove all the food residues around the control panel Accessories Spatula soup ladle inner pot steam basket and steam vent cap Soak in hot water and clean with sponge 6 Environment Do not throw away the appliance with normal household waste at the end of its life but hand it in at an official collection point for recycling By doing this you can help to preserve the environment 7 Guarantee and se...

Страница 16: ...e outside of the inner pot before switching the multicooker on The heating element is damaged or the inner pot is deformed Take the multicooker to your Philips dealer or a service center authorized by Philips The rice is too dry and not well cooked Add more water to the rice and cook for a bit longer The multicooker does not switch to the keep warm mode automatically You might have pressed the kee...

Страница 17: ...n de riz pâtes 21 Confiture 22 Risotto 22 Faire bouillir 23 Yaourt 23 Réchauffage 24 Cuisson au four 25 Cuisson à la vapeur 25 Faire mijoter Slow cook 26 Frire 26 Rissoler 27 Manuel 27 Mode de maintien au chaud 28 Réglage du temps de cuisson et de la température 28 Programmation départ différé 29 5 Nettoyage et entretien 30 Intérieur 30 Extérieur 30 Accessoires 30 6 Environnement 30 7 Garantie et ...

Страница 18: ... et bienvenue dans le monde de Philips Pour profiter pleinement de l assistance offerte par Philips enregistrez votre produit à l adresse suivante www philips com welcome 2 Contenu de l emballage Unité principale du multicuiseur Cordon d alimentation 2 maniques en silicone Mesure graduée Spatule Louche Panier vapeur Mode d emploi Livre de recettes Livret de sécurité Carte de garantie http www phil...

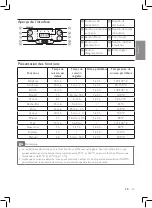
Страница 19: ...lir 1 h 20 min 10 h 1 24 h 100 C Yaourt 8 h 6 12 h 1 24 h 40 3 C Réchauffer 25 min 5 60 min 85 C Four 45 min 20 min 2 h 130 C Vapeur 20 min 5 min 2 h 1 24 h 100 C Mijoter 1 h 20 min 10 h 1 24 h 90 C Frire 15 min 5 60 min 145 150 C Slow cook 5 h 1 15 h 1 24 h 80 C Rissoler 1 h 1 24 h 130 C Manuel 2 h 5 min 10 h 1 24 h 100 C Remarque La température de cuisson pour les fonctions Four et Manuel est ré...

Страница 20: ...iseur Avant la première utilisation 1 Sortez tous les accessoires de la cuve Enlevez le plastique d emballage de la cuve 2 Nettoyez soigneusement les éléments du multicuiseur avant la première utilisation voir le chapitre Nettoyage et entretien Remarque Séchez bien tous les éléments avant d utiliser le multicuiseur Préparations avant cuisson Avant d utiliser le multicuiseur vous devez suivre les é...

Страница 21: ...ur passe en mode de maintien au chaud automatiquement Le voyant de maintien au chaud Chaud s allume 7 Fermez le couvercle du multicuiseur et insérez la fiche dans la prise secteur Remarque Pour en savoir plus sur les quantités de riz et d eau consultez la recette Le niveau indiqué à l intérieur de la cuve est une simple indication Vous pouvez toujours adapter le niveau d eau selon les différentes ...

Страница 22: ...empérature 4 Appuyez sur le bouton marche On Off pour démarrer la cuisson 5 Une fois la cuisson terminée vous entendez 4 signaux sonores et le voyant de la fonction de cuisson sélectionnée est éteint 6 Le multicuiseur passe en mode de maintien au chaud automatiquement Le voyant de maintien au chaud Chaud s allume Risotto 1 Mettez les ingrédients dans la cuve 2 Suivez les étapes 6 et 7 de la sectio...

Страница 23: ... de cuisson différent reportez vous au chapitre Réglage du temps de cuisson et de la température 4 Appuyez sur le bouton marche On Off pour démarrer la cuisson 5 Une fois la cuisson terminée vous entendez quelques signaux sonores et le voyant de la fonction de cuisson sélectionnée est éteint 6 Le multicuiseur passe en mode de maintien au chaud automatiquement Le voyant de maintien au chaud Chaud s...

Страница 24: ... automatiquement Le voyant de maintien au chaud Chaud s allume 5 Appuyez sur le bouton de menu Menu jusqu à ce que la fonction de yaourt Yaourt soit sélectionnée Pour définir un temps de cuisson différent reportez vous au chapitre Réglage du temps de cuisson et de la température 6 Appuyez sur le bouton marche On Off pour démarrer la cuisson 7 Une fois que la cuisson est terminée vous entendez 4 si...

Страница 25: ...ordon d alimentation sur la prise secteur Remarque Pour la cuisson d un gâteau gardez le couvercle fermé lors de la cuisson Si vous cuisez le gâteau à 130 C et pendant 45 minutes vous obtiendrez généralement les meilleurs résultats 4 Appuyez sur le bouton de menu Menu jusqu à ce que la fonction de cuisson au four Four soit sélectionnée Pour définir un temps de cuisson et une température différents...

Страница 26: ...6 de la section Préparations avant cuisson 3 Branchez le cordon d alimentation sur la prise secteur 6 Appuyez sur le bouton de menu Menu jusqu à ce que la fonction de cuisson à la vapeur Vapeur soit sélectionnée Pour définir un temps de cuisson différent reportez vous au chapitre Réglage du temps de cuisson et de la température 7 Appuyez sur le bouton marche On Off pour démarrer la cuisson 8 Une f...

Страница 27: ...e 2 Suivez les étapes 6 et 7 de la section Préparations avant cuisson 3 Appuyez sur le bouton de menu Menu jusqu à ce que la fonction manuelle Manuel soit sélectionnée 4 Appuyez sur le bouton de menu Menu jusqu à ce que la fonction de friture Frire soit sélectionnée Pour définir un temps de cuisson différent reportez vous au chapitre Réglage du temps de cuisson et de la température 5 Appuyez sur l...

Страница 28: ...églage du temps de cuisson et de la température 4 Appuyez sur le bouton marche On Off pour démarrer la cuisson 5 Une fois que la cuisson est terminée vous entendez 4 signaux sonores et le voyant de la fonction de cuisson sélectionnée est éteint 6 Le multicuiseur passe en mode de maintien au chaud automatiquement Le voyant de maintien au chaud Chaud s allume Remarque Si vous cuisez des aliments à u...

Страница 29: ...on est écoulé Vous entendez 4 signaux sonores et le voyant de la fonction de cuisson sélectionnée est éteint 7 Le multicuiseur passe en mode de maintien au chaud automatiquement Le voyant de maintien au chaud Chaud s allume Remarque La fonction de présélection n est pas disponible dans les modes de cuisson au four Four de friture Frire et de réchauffage Réchauffer Le bouton de présélection n est p...

Страница 30: ...e nominale 980 W Capacité nominale 5 0 l 5 Nettoyage et entretien Remarque Débranchez le multicuiseur avant de le nettoyer Attendez que le multicuiseur ait suffisamment refroidi avant de le nettoyer Intérieur Intérieur du couvercle supérieur et du corps de l appareil Essuyez à l aide d un chiffon humide bien essoré Veillez à enlever tous les résidus d aliments collés au multicuiseur Résistance cha...

Страница 31: ...auffant et l extérieur de la cuve avant d allumer le multicuiseur L élément chauffant est endommagé ou la cuve est déformée Confiez le multicuiseur à votre revendeur Philips ou à un Centre Service Agréé Philips Le riz est trop sec et pas bien cuit Ajoutez plus d eau au riz et poursuivez un peu la cuisson Le multicuiseur ne passe pas automatiquement en mode de maintien au chaud Vous avez peut être ...

Страница 32: ...Les caractéristiques sont susceptibles d être modifiées sans avis préalable 2014 Koninklijke Philips N V Tous droits reserves ...

Отзывы: