background image

13

English

Gameport Operations

About Gameport

Gameport allows you to connect your game
console to this mini system which enables you to
enjoy a total game immersion experience
through powerful sound output.

Preparation before use

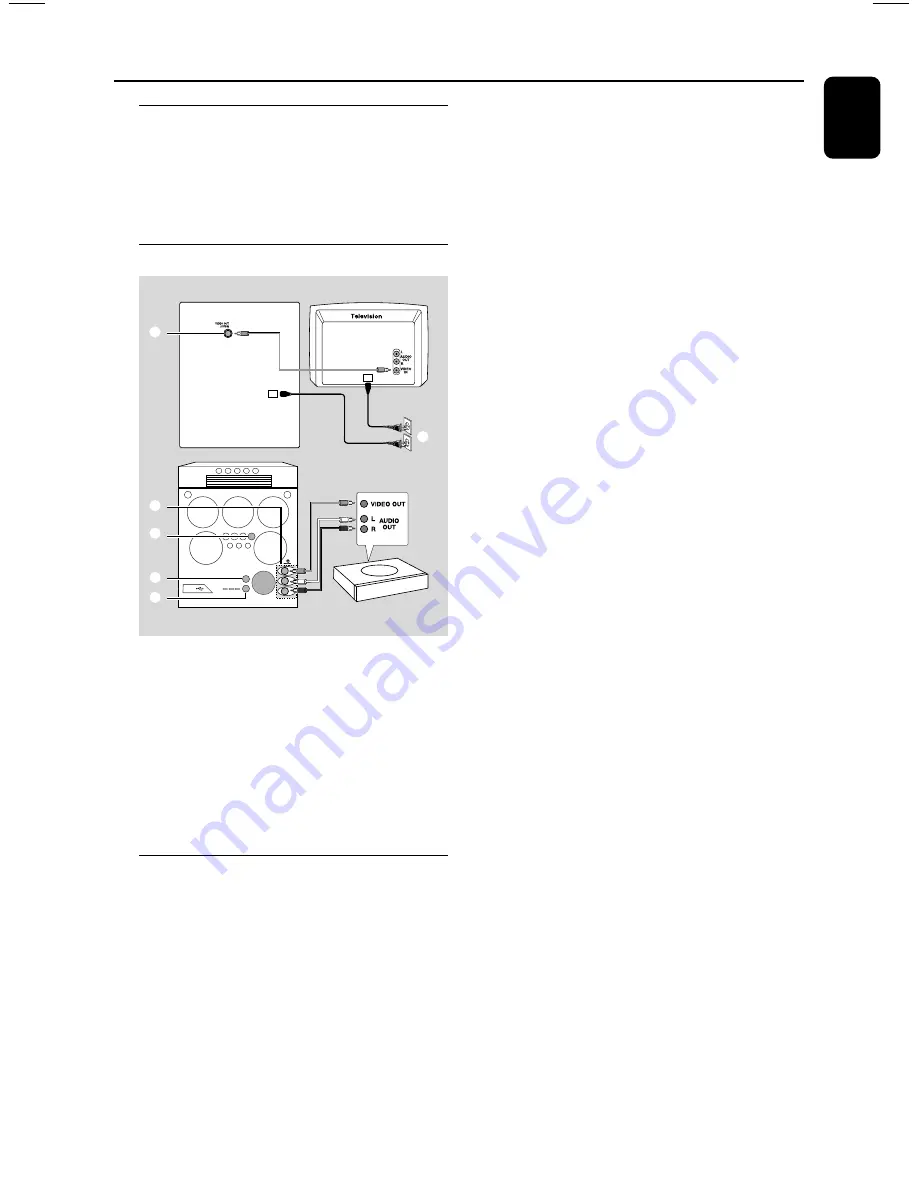
1

Connect your game console’s video and audio
output to the GAMEPORT video and audio
inputs respectively (refer to “

Connections –

Connecting to game console

).

2

Connect your TV’s video input to the 

VIDEO

OUT (CVBS)

 on the rear panel.

3

Connect all the AC power cords to the power
outlet.

Starting operation

4

Turn on the TV and set to the correct
video-in channel.
The TV’s video input channel may be called
AUX(iliary) IN, AUDIO/VIDEO (A/V) IN, EXT 1,
etc.  These channels are often near channel 00
on your TV.  Or, your TV remote control may
have a button or switch that chooses different
video modes.  See your TV manual for details.

5

Press 

AUX•GAME

 until “

GAMEPORT

” is

displayed.

6

Press 

MODE

 (or 

GAME SOUND

 on the

remote control to select the type of sound
setting that best suits the game : 

SPEED,

PUNCH, BLAST or OFF

.

7

If you like to mix your game sound with your
favourite music, press 

MIX-IT

 to select the

desired music source : 

CD, TUNER,

USB PC LINK, AUX or OFF

.

CD 

™ 

MIX-CD

TUNER 

™ 

MIX-TU

USB PC LINK 

™ 

MIX-USB

AUX 

™ 

MIX-AUX

OFF 

™ 

MIX-OFF

8

If necessary, start to play your chosen mixer
source.

9

Play your favourite game.

To adjust the game console’s volume
level

Adjust 

GAME VOLUME

.

To change the mixer source

Press 

MIX-IT

.

To control the current active mixer
source

Press the respective source button (for example,
CD, TUNER) on the remote control, then select
the desired function (for example 

É

,


í

,


ë

).

For example, if CD is the mixer source and you
want to change the disc tray, you have to press

CD

, then press 

CD 1~5

 to select the desired

disc tray.

Notes:
– You can only activate GAME VOLUME and
MIX-IT while in the game source mode.
– If your game console is switched on, the video
image will always appear on the TV even though
you are not in the gameport mode.

Game console

Front panel

Rear panel

SPEED

PUNCH

BLAST

MODE

MODE

MIX-IT

    GAME SOUND

    GAME SOUND

G

A

M

E

V

O

L

U

ME

 GAME

 GAME

AUX

UX

A

UD

IO

L.

V

ID

EO

A

UD

IO

R.

2

3

1
5

6

7

Содержание FWM799

Страница 1: ...WM799 Mini HiFi System User manual Manuel d utilisation Manual del usuario Benutzerhandücher Gebruikershandleidingen Manuale per l utente Användarhandböckerna Brugermanual Käyttöoppaita Manual do usuário ...

Страница 2: ...d red Do not connect either wire to the earth terminal in the plug marked E or e or coloured green or green and yellow Before replacing the plug cover make certain that the cord grip is clamped over the sheath of the lead not simply over the two wires Copyright in the U K Recording and playback of material may require consent See Copyright Act 1956 and The Performer s Protection Acts 1958 to 1972 ...

Страница 3: ... VOL DSC WOOX LEVEL VAC USB PC LINK STANDBY ON MP3 7 7 MP3 1 2 3 P3 P2 P1 P4 Energy Star As an ENERGY STARR Partner Philips has determined that this product meets the ENERGY STARR guidelines for energy efficiency ...

Страница 4: ...4 7 6 8 0 9 º 4 ª 1 2 3 4 5 6 7 0 9 8 ...

Страница 5: ...ätt än i denna bruksanvisning specificerats kan användaren utsättas för osynlig laserstrålning som överskrider gränsen för laserklass 1 Observera Stömbrytaren är sekundärt kopplad och bryter inte strömmen från nätet Den inbyggda nätdelen är därför ansluten till elnätet så länge stickproppen sitter i vägguttaget SF Luokan 1 laserlaite Varoitus Laitteen käyttäminen muulla kuin tässä käyttöohjeessa m...

Страница 6: ...e mode 17 Switching to Eco Power standby mode 17 Switching to standby mode view clock 17 Demonstration mode 17 Setting the clock 17 Dimming system s display screen 18 Volume control 18 Sound control 18 wOOx sound 18 Incredible Surround 18 Digital sound control 18 Virtual ambience control 18 Disc Operations Playable discs 19 Loading discs 19 Basic playback controls 19 Playing an MP3 disc 20 Repeat ...

Страница 7: ...sed to avoid dust on the lens No objects filled with liquid such as vases shall be placed on the apparatus No naked flame sources such as lighted candles shall be placed on the apparatus Avoid condensation problem The lens may cloud over when the system is suddenly moved from cold to warm surroundings making it impossible to play a disc Leave the system in the warm environment until the moisture e...

Страница 8: ...he hours USB PC LINK selects a playlist Press and hold the button for more than two seconds 0 PLAY PAUSE É Å CD starts pauses playback USB PC LINK starts pauses playback only on the main unit TUNER enters Plug Play mode and or starts preset radio station installation wOOx 1 2 3 wOOx LEVEL Selects different type of enhanced wOOx sound settings wOOx 1 wOOx 2 or wOOx 3 MIX IT GAME MIX IT Mixes the ga...

Страница 9: ... OPEN CLOSE 0 DISC 1 5 Opens closes the individual disc tray Control buttons available on the remote control only CD 1 5 Selects a disc tray to playback REPEAT Repeats a track disc all programmed tracks DIM Turns on off the dim mode SLEEP Sets the sleep timer function ª MUTE Mutes or restores the volume º TIMER ON OFF Turns on off the timer function SHUFFLE Turns on off the random play mode DISPLA...

Страница 10: ...Speaker left AC power cord FM wire antenna MW loop antenna A B C LINE OUT FM ANTENNA BOOSTER OUT R SPEAKERS 6Ω BOOSTER IN C A U T I O N RISK OF ELECTRIC SHOCK DO NOT OPEN AV I S RISQUE DE CHOC ELECTRIQUE NE PAS OUVRIR ON POWER SWITCH OFF AC MAINS Booster Speaker left Booster Speaker right D R L R AC power cord L L VOLTAGE SELECTOR 110V 127V 220V 240V ...

Страница 11: ...tem due to short circuit Do not connect more than one speaker to any one pair of speaker terminals Step 3 Connecting to PC Use the supplied USB cable to connect the system to your personal computer s USB port After installing the USB PC LINK application software onto your PC you can play your music collection via the system refer to USB PC Link Step 4 Connecting to game console IMPORTANT Gameport ...

Страница 12: ...Set the VOLTAGE SELECTOR to the local power line voltage 4 Plug in the AC mains to the wall socket 5 Switch on the POWER SWITCH to activate the power booster amplifier 6 Press STANDBY ON button to switch the system ON or to Standby mode 7 Rotate theVOLUME control to adjust the loudness of the power booster amplifier Connections Step 7 Inserting batteries into the remote control 1 Open the battery ...

Страница 13: ...ype of sound setting that best suits the game SPEED PUNCH BLAST or OFF 7 If you like to mix your game sound with your favourite music press MIX IT to select the desired music source CD TUNER USB PC LINK AUX or OFF CD MIX CD TUNER MIX TU USB PC LINK MIX USB AUX MIX AUX OFF MIX OFF 8 If necessary start to play your chosen mixer source 9 Play your favourite game To adjust the game console s volume le...

Страница 14: ...tup exe 3 Select your desired language from the list 4 Select install Software 5 Connect the USB cable to the PC and Audio System and press the USB PC Link button on the Audio set or the remote control 6 Follow the instructions as prompted on the screen to correctly install the USB PC Link Driver Philips Sound Agent 2 and MusicMatch Jukebox software Notes Minimum OS requirement for Philips Sound A...

Страница 15: ...You will be prompted to name the Playlist In the Name field type the name you d like to give this Playlist 4 Click the Save button Now you can play all the saved playlists with the audio system by pressing S or T buttons Details operation please refer to Connecting to USB PC Link Note It is not possible to create a playlist from the system s 5 CD changer If you encounter any problem using USB PC L...

Страница 16: ...tem to enhance the quality of MP3 Music playback via USB PC Link 1 Philips Sound Agent 2 will be automatically launched if USB PC Link is selected 2 Press DSC PRESET or VAC REVERB to select different Preset or Reverb sound effect 3 For more details about using Philips Sound Agent 2 features on your PC please refer to the User Manual in the supplied CD ROM or the Help menu Notes Philips Sound Agent...

Страница 17: ... until DEMO OFF is displayed Setting the clock The clock can be set in either 12 hour or 24 hour mode 11 59 PM or 23 59 for example VOL DSC WOOX LEVEL VAC 00 00 î 12 00AM 00 00 12 00AM 00 00 12 00AM 1 2 4 5 3 2 6 1 Press and hold CLK TIMER or CLOCK TIMER on main unit until SELECT CLOCK OR TIMER is displayed 2 Press ë to change the display to CLOCK and press CLK TIMER CLOCK TIMER again to confirm 3...

Страница 18: ...Press wOOx 1 2 3 respectively or press wOOx LEVEL repeatedly on remote control to select wOOx 1 wOOx 2 wOOx 3 or wOOx OFF Some discs might be recorded in high modulation which causes a distortion at high volume If this occurs deactivate wOOx or reduce the volume Incredible Surround Incredible Surround magnifies the virtual distance between the front speakers for an incredibly wide enveloping stere...

Страница 19: ... the first tray will automatically close before the second tray opens Basic playback controls Load discs page 3 P4 To play all discs on the disc trays Press É Å OR In the stop mode press CD to select a disc tray to begin then press É Å All the available discs will play once and then stop To play the selected disc only Press one of the CD 1 5 buttons on remote The selected disc will play once and t...

Страница 20: ... before or during playback Repeat play 1 Press REPEAT on the remote control repeatedly to select A B C D E A to repeat playback of the current track B to repeat playback of the current disc C to repeat playback of all available discs not available for this model D to repeat playback of the current programmed track only if the programme mode is active E to repeat playback of all the programmed trac...

Страница 21: ...o program more than 99 tracks PROGRAM FULL is displayed 6 To start program play press É Å 7 To stop playback or to end programming press Ç once PROG stays and the programming mode remains active Notes If the total playing time has reached 100 minutes or one of the programmed tracks has a number greater than 30 is displayed instead of the total playing time The system will exit the programming mode...

Страница 22: ...L TUNER is displayed All previously stored radio stations will be replaced Tuner Operations Once completed the last tuned radio station will be played Once completed the last tuned radio station or the first available RDS station will be played 3 If the first preset is a RDS station it will proceed to set the RDS clock INSTALL is displayed followed by TIME and SEARCH RDS TIME When RDS time is read...

Страница 23: ...Programme type for example News Affairs Sport etc Radio text messages Frequency Setting the RDS clock Some RDS radio station may be transmitting a real clock time at an interval of every minute It is possible to set the clock by using a time signal which is broadcast together with the RDS signal 1 Tuned to a RDS station from FM band refer to Tuning to radio stations 2 Press and hold CLOCK TIMER on...

Страница 24: ...Type data to be available in any of these RDS stations While searching NEWS in progress the current active mode remains uninterrupted 2 When NEWS transmission is detected the system will switch toTuner mode NEWS starts flashing If no RDS station is detected in the first five presets the system will exit NEWS function NO RDS NEWS is displayed Notes You have to exitTuner mode before selecting NEWS f...

Страница 25: ...t has been set icon remains on the display It indicates the timer is activated At the preset time the selected sound source will be played for 30 minutes before it switches to Eco Power standby mode if no button is being pressed within the time frame CD playing the first track of the last selected disc If the last selected disc tray is empty it will switch to the next available disc If all the dis...

Страница 26: ...for example are available for selection Always refer to the owner s manual of the other equipment for complete connection and use details Timer Operations Other Connection Sleep timer setting The sleep timer enables the system to switch to the Eco Power standby mode automatically at a preset time 1 Press SLEEP repeatedly until it reaches the desired preset turn off time The selections are as follo...

Страница 27: ...5 108 MHz MW wave range 531 1602 kHz Number of presets 40 Antenna FM 75 Ω wire MW Loop antenna Specifications SPEAKERS System 3 way Bass reflex Impedance 8 Ω Woofer 1 x 6 5 Tweeter 1 x 2 Ferro fluid cooled Dimensions w x h x d 348 x 322 x 245 mm Weight 4 35 kg each BOOSTER SPEAKERS System 3 way Impedance 6 Ω Woofer 2 x 4 Tweeter 1 x 2 Dimensions w x h x d 140 x 310 x 310 mm Weight 4 0 kg each GENE...

Страница 28: ...P Check the connection between your PC and the system and the inital setup required see Connections and USB PC Link Make sure the connected PC is turned on Select the PRESET Neutral mode Select the REVERB No environment mode If the signal is too weak adjust the antenna or connect an external antenna for better reception Increase the distance between the system and yourTV or VCR Insert a disc Load ...

Страница 29: ...orTUNER for example before pressing the function button É Å S T Reduce the distance between the remote control and the system Replace the battery Point the remote control directly toward the IR sensor Set the clock correctly PressTIMER ON OFF to switch on the timer Press and hold DEMO STOP on the main unit to switch off the demonstration mode Reboot the computer Problem Solution Refer to the FAQ F...

Отзывы: