background image

9

English

Radio mode: Automatic tuning

(for radio models only)

1

Press 

SOURCE

and select 

Radio

to enter the radio mode.

Any music playback will stop as you enter the radio mode.

2

Press 

SOURCE

and select 

Autosearching

to automatically 

select the 10 strongest radio stations. Press any key to abort.

3

Press 

3

to scroll up or 

4

to scroll down for your preset.

4

Highlight your preset and wait for 2 seconds.
You can now listen to the selected preset.

Radio mode: Manual tuning

(for radio models only)

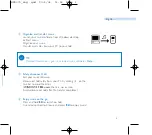
1

Press 

SOURCE

and select 

Radio

to enter the radio mode.

Any music playback will stop as you enter the radio mode.

2

Press 

3

to scroll up or 

4

to scroll down for your preset.

3

Press 

MENU/HOLD

and select 

Manual tuning

.

4

Press 

4

or 

3

to fine tune (tune step by step).

Wait for 2 seconds to abort, or press 

to save your preset.

HDD070_eng .qxd  29/6/04  11:52  Page 9

Содержание FR-HDD060

Страница 1: ...s Firmware upgrade files Since it is possible for you to upgrade your product we recommend that you register your product on www philips com register so we can inform you as soon as new free upgrades become available The typeplate is at the back of the set English 1 Español 49 Deutsch 33 Français 17 Nederlands 65 Italiano 81 Português 97 Svenska 113 HDD070_eng qxd 29 6 04 11 52 Page 1 ...

Страница 2: ...l music software Insert the supplied CD into your PC s CD ROM drive Follow screen instructions to complete installation ATTENTION WINDOWS 98 USERS To avoid installation problems DO NOT CONNECT hdd to the PC until AFTER installation completes 3 Connect your hdd and PC Connect your hdd to your PC using the supplied USB cable with hdd powered by supplied adapter The USB connection screen will automat...

Страница 3: ...music software Disconnect hdd safely from your PC by clicking on the task bar to avoid file error WINDOWS 98SE users there is no icon Simply disconnect hdd after file transfer completes 6 Enjoy music on the go Press and hold 2 to switch on hdd Use scroll controls to browse and press 2 to enjoy music TIP Detailed information is given in selected music software s Help HDD070_eng qxd 29 6 04 11 52 Pa...

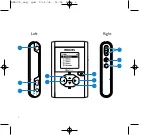
Страница 4: ...6 5 10 11 4 7 8 9 1 2 3 Left Right 4 HDD070_eng qxd 29 6 04 11 52 Page 4 ...

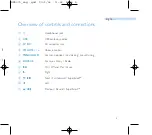
Страница 5: ...nector 3 5V DC AC converter jack 4 VOLUME Volume control 5 MENU HOLD For menu options key locking preset tuning 6 SOURCE For music library Radio 7 2 On Off and Play Pause 8 2 Right 9 4 2 Next Fast forward SuperScroll 0 1 Left 3 1 Previous Rewind SuperScroll HDD070_eng qxd 29 6 04 11 52 Page 5 ...

Страница 6: ...le for selection Option selected hdd has an intuitive display to show various information Music mode playback 1 Press SOURCE and select HDD to enter the music mode 2 Press 3 to scroll up or 4 to scroll down for your option Press 2 for next or 1 for previous levels of library 3 Press 2 to play or pause your selection TIP The 2 3 and 4 keys are multi functional They work according to how you press t...

Страница 7: ...m root menu Lock keys release locks on hdd Press and hold MENU HOLD Go to different levels of menu Press 2 for next and 1 for previous Scrolling and browsing 3 4 1 2 for up down left right Play music Highlight selection and press 2 Pause music Press 2 during playback Fast forward in a track Press halfway down and hold 4 Rewind in a track Press halfway down and hold 3 Change volume Press VOLUME Pla...

Страница 8: ...le and or repeatedly Repeat DBB Enable or disable Dynamic Bass Boost Sleep timer Set time to switch off hdd Equalizer Adjust sound settings key shortcut Adjust 2 key actions during playback Default Repeat Shuffle Display Adjust time for display to go dark and contrast level Auto shutdown Set time for switching off hdd automatically to save battery power Language Set hdd display language Informatio...

Страница 9: ...to scroll down for your preset 4 Highlight your preset and wait for 2 seconds You can now listen to the selected preset Radio mode Manual tuning for radio models only 1 Press SOURCE and select Radio to enter the radio mode Any music playback will stop as you enter the radio mode 2 Press 3 to scroll up or 4 to scroll down for your preset 3 Press MENU HOLD and select Manual tuning 4 Press 4 or 3 to ...

Страница 10: ...use the supplied power adapter to avoid loss of data 0 Always remove USB connection safely see Step 5 page 3 Environmental information All redundant packaging has been omitted We have done our utmost to make the packaging easily separable into four materials cardboard polystyrene foam PET and polyethylene Your set consists of materials which can be recycled if disassembled by a specialized company...

Страница 11: ...ious error with your hdd possibly caused by a faulty hard disk drive Please consult your dealer or service center Q How do I know which firmware version I have Scroll for Menu Settings Information to display FW vers Q How do I know how much free space I have Scroll for Menu Settings Information to display Free Otherwise you can check this with DMM from the status bar WARNING Do not open the set as...

Страница 12: ...dd connecting it to your PC or charging the battery it is normal for hdd to become warm The rear panel case functions as a cooling surface that transfers heat from inside the unit to the cooler air outside 0 hdd is not recommended for using during vigorous exercising hdd is not shock proof and may be damaged when subjected to excessive vibrations Using your headphones 0 Hearing safety Listen at a ...

Страница 13: ...ves as these may harm the finishing on hdd 0 Active mobile phones in the vicinity may cause interference to the device Using the power adapter charger 0 Use only the power adapter that came with hdd Adapters for other electronic devices may look similar but they may damage hdd 0 The only way to shut off power completely to your power adapter charger is to disconnect it from the power source 0 Alwa...

Страница 14: ...on Lens hardened optical glass Encasing Die cast molded magnesium Connections Stereo headphone Mini USB B type DC charger input Storage Hard disk 1 0 micro HDD Supported playback format MP3 8 320 Kbps and VBR WMA 32 192 Kbps Sample rates 8 11 025 16 22 050 32 44 1 48 ID3 tag support Yes PC Connectivity USB2 0 full speed File Transfer via Windows Explorer of data in general Music Transfer via DMM b...

Страница 15: ...lay mode 250mW It is not advised to run hdd on battery power during USB connection Tuner Frequency range FM 87 5 108 MHz 10 stations presets for radio models only General Dimensions 54 3 W x 84 5 L x 18 3 H mm 2 2 W x 3 4 L x 0 7 H inch Weight 93g 3 3oz PHILIPS reserves the right to make design and specification changes for product improvement without prior notice Modifications not authorized by t...

Страница 16: ...ot installed and used in accordance with the instruction manual may cause harmful interference to radio communications However there is no guarantee that interference will not occur in a particular installation If this equipment does cause harmful interference to radio or television reception which can be determined by turning the equipment off and on the user is encouraged to try to correct the i...

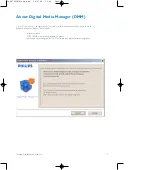
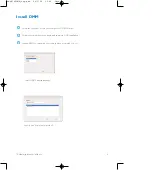
Страница 17: ...ary software components you need to work properly with your player These include playlist creation MP3 WMA transfer for playback on player paths and supporting link for DMM software and player firmware upgrades Actual display varies with use hdd070PDMM_eng qxd 24 6 04 15 45 Page 1 ...

Страница 18: ...ve 1 Follow screen instructions to begin and complete DMM installation 2 Launch DMM to customize your settings when prompted to do so 3 Select DMM s display language Specify one or more music folder Actual display varies with use hdd070PDMM_eng qxd 24 6 04 15 45 Page 2 ...

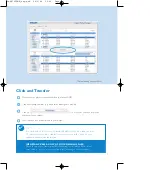
Страница 19: ...ll automatically appear 1 Launch DMM 2 Organize your music and playlists in DMM 3 Transfer your music from DMM to your player 4 TIP Please refer to your computer s manual for the exact position of your USB port Look for the USB symbol on the processing unit of your computer Actual display varies with use hdd070PDMM_eng qxd 24 6 04 15 45 Page 3 ...

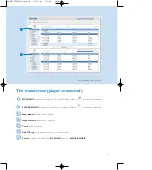
Страница 20: ...ys the contents of your player click on to minimize maximize 2 New playlist creates a new playlist Import music adds music or playlist Trash deletes selection Edit ID3 tag edits track information of selected track Search searches for music from MY MUSIC and or PLAYER MUSIC Actual display varies with use hdd070PDMM_eng qxd 24 6 04 15 45 Page 4 ...

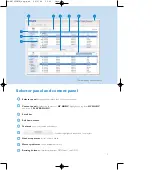
Страница 21: ...IC and drop to PLAYER MUSIC 2 1 2 5 6 8 9 3 4 7 Scroll bar 3 Pull down menus 4 Text area type your search criteria here 5 transfers highlighted tracks and or playlists 6 Header separator resizes column width 7 Memory indicator shows available memory 8 Resizing buttons minimizes maximizes DMM view exit DMM 9 Actual display varies with use hdd070PDMM_eng qxd 24 6 04 15 45 Page 5 ...

Страница 22: ...laylist not on the player 2 1 2 3 4 5 Click to highlight an item Press Delete on your keyboard to delete the highlighted item 3 indicates track is playing by DMM 4 collapsed view item contains more contents to display 5 Actual display varies with use hdd070PDMM_eng qxd 24 6 04 15 45 Page 6 ...

Страница 23: ...PORTANT KEEP A COPY OFYOUR ORIGINAL FILES Please keep a copy of the original files transferred to your player Philips is not responsible for any loss of content if the player is damaged or not readable Actual display varies with use TIP Press and hold Ctrl on your keyboard and click to select more than one item To select consecutive items click the first item press and hold Shift on your keyboard ...

Страница 24: ... IMPORTANT KEEP A COPY OFYOUR ORIGINAL FILES Please keep a copy of the original files transferred to your player Philips is not responsible for any loss of content if the player is damaged or not readable Actual display varies with use TIP Press and hold Ctrl on your keyboard and click to select more than one item To select consecutive items click the first item press and hold Shift on your keyboa...

Страница 25: ...ction to a destination playlist 3 Your selected track is now in the playlist 4 TIP Press and hold Ctrl on your keyboard and click to select more than one item To select consecutive items click the first item press and hold Shift on your keyboard and then click the last item Actual display varies with use hdd070PDMM_eng qxd 24 6 04 15 45 Page 9 ...

Страница 26: ...ew playlist You can now drag more tracks to the new playlist 3 Fill in the information in the pop up window 2 Follow screen instructions to import your new playlist You can now drag more tracks to the imported playlist 3 Import Playlists Actual display varies with use Click on to import a new playlist 1 hdd070PDMM_eng qxd 24 6 04 15 45 Page 10 ...

Страница 27: ...elete on your keyboard to delete your selection 3 Actual display varies with use TIP Press and hold Ctrl on your keyboard and click to select more than one item To select consecutive items click the first item press and hold Shift on your keyboard and then click the last item hdd070PDMM_eng qxd 24 6 04 15 45 Page 11 ...

Страница 28: ... up the ID3 Tag Editor 2 Click on the text boxes of Track name Track number Artist Album Genre Year Comments to edit relevant information 3 Click on OK to save the information Click Cancel to discard changes made 4 Actual display varies with use hdd070PDMM_eng qxd 24 6 04 15 45 Page 12 ...

Страница 29: ...ontain the search string 3 You can transfer delete or drag and drop these tracks as described in previous sections 4 TIP Deleting items from the searched results will delete them from your library Click on the Selector panel to exit the search view 5 Actual display varies with use hdd070PDMM_eng qxd 24 6 04 15 45 Page 13 ...

Страница 30: ...e for DMM Music folders For adding deleting or re arranging your Music folders Transfer options For selecting transfer options Player firmware For checking upgrading and restoring player firmware Upgrade DMM For checking and upgrading DMM Help DMM Help For additional help and tips Support For instant access to support site About DMM For software version information About Player For player informat...

Страница 31: ...ed to a certain size the content panel will only show the section icon 2 Drop Zone When PLAYER MUSIC is minimized you will see a Drop Zone You can drag selected items and drop them here Note that the Drop Zone icon turns grey when player memory is full 3 DMM provides different view options This is to minimize content refreshing time There are a few ways to customize DMM views hdd070PDMM_eng qxd 24...

Страница 32: ...Track Artist Album Genre to arrange music tracks according to the order you selected 1 Detailed summary view Click on the next to the contents header to turn on turn off detailed display of item contents 2 detailed view summary view hdd070PDMM_eng qxd 24 6 04 15 45 Page 16 ...

Страница 33: ...her information on how to download and upgrade your player firmware 1 Follow screen instructions to complete firmware upgrade 2 TIP Because you are updating the program of your player please make sure your player is connected to your computer before you launch DMM Keep it connected during the firmware upgrade process DMM Upgrade DMM is the software that enables best interactions between your playe...

Страница 34: ...rom the Start menu go to Control Panel Select Add Remove Programs Select DMM from your currently installed programs to uninstall 2 For further information on uninstalling programs please refer to Windows user manual 3 hdd070PDMM_eng qxd 24 6 04 15 45 Page 18 ...

Отзывы: