background image

E

n

g

li

sh

9

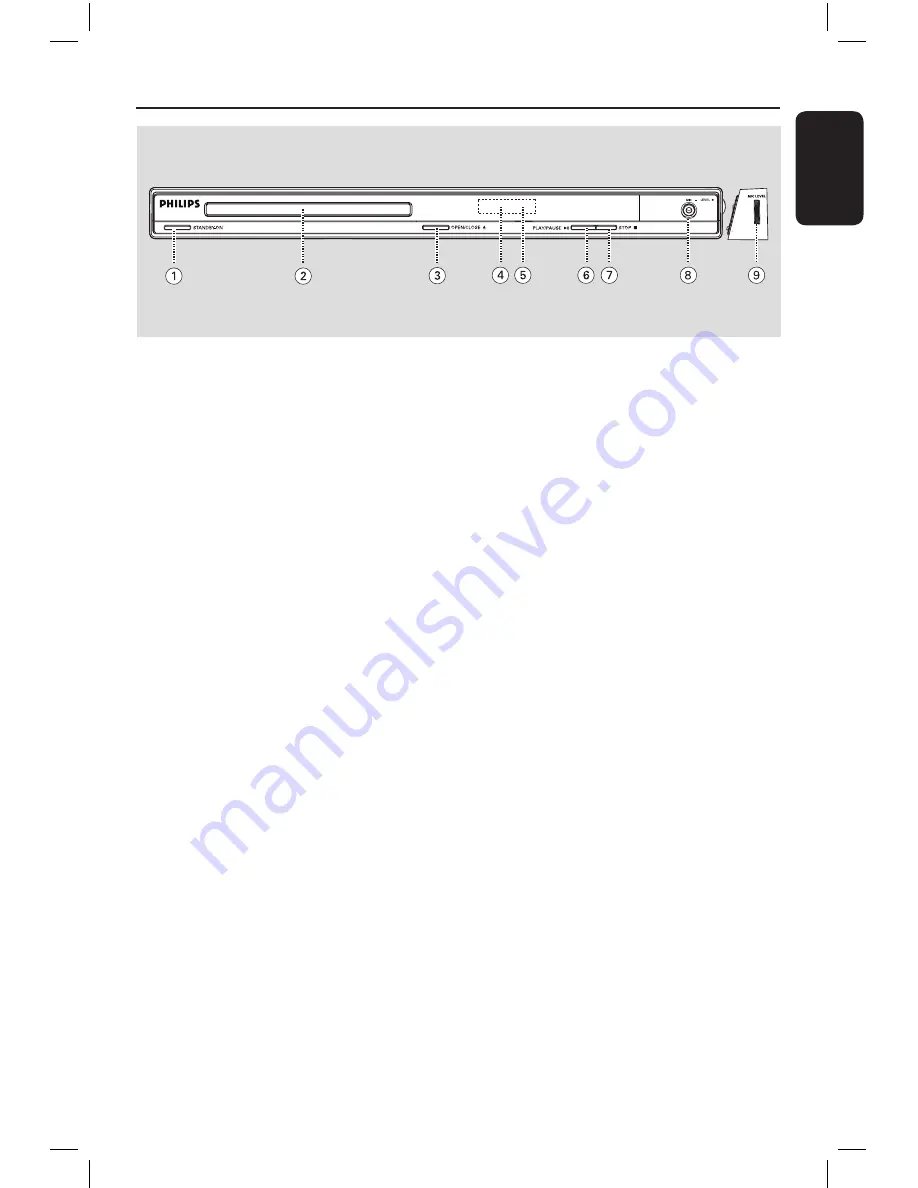
Your DVD Player

a


STANDBY-ON 

–  Turns on this unit or turns off to normal 

standby mode.

b


Disc tray

c

 OPEN/CLOSE 

ç

–  Opens/closes the disc tray. 

d

 Display panel

–  Show information about the current 

status of this unit. 

e


IR Sensor

–  Point the remote control towards this 

sensor.

f


PLAY/PAUSE  

u


–  Starts/pauses playback.

g


STOP 

Ç

–   Stops playback.

h

  MIC

–  For microphone connection. 

i

  MIC LEVEL

–  Microphone volume control.

dvp3980K_55_eng1.indd   9

2008-03-26   10:23:15 AM

Содержание DVP3980K

Страница 1: ...gister your product and get support at www philips com welcome DVP3980K EN DVDVideo Player 6 ES_LA Reproductor de video DVD 52 PT_BR Aparelho de vídeo DVD 98 dvp3980K_55_eng1 indd 1 2008 03 26 10 23 13 AM ...

Страница 2: ...rado de acuerdo con el instructivo del uso fuera de los valores nominales y tolerancias de las tensiones voltaje frecuencia ciclaje de alimentación eléctrica y las características que deben reunir las instalaciones auxiliares Por fenómenos naturales tales como temblores inundaciones incendios descargas eléctricas rayos etc o delitos causados por terceros choques asaltos riñas etc dvp3980K_55_eng1 ...

Страница 3: ...ivergence 60 degrees Ensure that the power outlet is always within reach If abnormal situations occur fully disconnect power unplug the power cord from the power outlet Registre su producto y obtenga asistencia técnica en www philips com welcome Registre o produto e obtenha suporte em www philips com welcome Evite o uso prolongado do aparelho com volume superior a 85 decibéis pois isto poderá prej...

Страница 4: ... Latvian 7686 Letzeburgesch 7666 Limburgan Limburger 7673 Lingala 7678 Lithuanian 7684 Luxembourgish 7666 Macedonian 7775 Malagasy 7771 Magyar 7285 Malayalam 7776 Maltese 7784 Manx 7186 Maori 7773 Marathi 7782 Marshallese 7772 Moldavian 7779 Mongolian 7778 Nauru 7865 Navaho Navajo 7886 Ndebele North 7868 Ndebele South 7882 Ndonga 7871 Nederlands 7876 Nepali 7869 Norsk 7879 Northern Sami 8369 North...

Страница 5: ...rademarks or registered trademarks of HDMI licensing LLC This product incorporates copyright protection technology that is protected by method claims of certain U S patents and other intellectual property rights owned by Macrovision Corporation and other rights owners Use of this copyright protec tion technology must be authorized by Macrovi sion Corporation and is intended for home and other limi...

Страница 6: ...og Stereo System 16 Connecting to a Digital AV Amplifier Receiver 16 Basic Setup Getting Started 17 20 Finding the correct viewing channel 17 Setting language preferences 17 18 On screen display OSD language 17 Audio Subtitle and Menu language for DVD playback 18 Setting up Progressive Scan feature 19 Setting the EasyLink control 20 One touch control 20 Disc Playback Disc Operations 21 32 Playable...

Страница 7: ...isc slide show 30 Preview function 30 Zooming 30 Flip Rotate picture 30 Playing a MP3 WMA disc 31 Playing music and photo files simultaneously 32 Karaoke Operation 33 Playing a Karaoke disc 33 Using the Karaoke Menu option 33 Setup Options Setup Menu Options 34 44 Accessing the setup menu 34 General Setup Page 35 Audio Setup Page 36 38 Video Setup Page 39 42 Preference Page 43 44 Others Software u...

Страница 8: ... high temperature moisture water and dust This unit must not be exposed to dripping or splashing Never place any object or items that can damage this unit e g liquid filled objects lighted candles Accessories supplied 1 remote control with batteries 1 audio video cables yellow white red 1 HDMI cable 1 power cable Cleaning discs CAUTION Risk of damage to discs Never use solvents such as benzene thi...

Страница 9: ...closes the disc tray d Display panel Show information about the current status of this unit e IR Sensor Point the remote control towards this sensor f PLAY PAUSE u Starts pauses playback g STOPÇ Stops playback h MIC For microphone connection i MIC LEVEL Microphone volume control dvp3980K_55_eng1 indd 9 2008 03 26 10 23 15 AM ...

Страница 10: ...o up or down P ress up or down for a slow forward or b ackward search Move cursor to left or right Press left or right for fast forward or backward search e SETUP Enters or exits the disc setup menu f u Play Pause Starts or pauses playback gÇ Stop Stops playback h Numeric keypad 0 9 Selects a track or title number of the disc i AUDIO Selects an audio language or channel dvp3980K_55_eng1 indd 10 20...

Страница 11: ...s title menu m Previous Next Skips to the previous or next title chapter track Press and hold this button for fast forward or backward search n Mute Mutes or restores the volume o SUBTITLE Selects a DVD subtitle language p Z OOM Zoom the picture on the TV q VOCAL Choose audio channel or karaoke method K ARAOKE Toggles between MIC Vol Echo Key or Karaoke Scoring Remote Control continued dvp3980K_55...

Страница 12: ...or IR on the front panel Note Never place any objects between the remote control and this unit while operating E Select the desired function for example u CAUTION Remove batteries if they are exhausted or if the remote control is not to be used for a long time Never mix batteries old and new or carbon and alkaline etc Batteries contain chemical substances they should be disposed of properly red w ...

Страница 13: ...rogressive scan video quality is only available when using Y Pb Pr connection and a progressive scan TV is required A Connect the component video cables red blue green not supplied from the Y Pb Pr jacks on this unit to the corresponding component video input jacks or labeled as Y Pb Cb Pr Cr or YUV on your TV B Connect the audio video cable red white supplied from the AUDIO OUT L R jacks on this ...

Страница 14: ...CEC compatible It enables connected devices to control each other over HDMI see Setup Menu Options Video Setup HDMI Setup EasyLink for details For HDCP compliant or DVI TV you need a HDMI DVI adaptor cable not supplied to connect the DVI input jack from your TV to the HDMI OUT jack on this unit Helpful Hint The HDMI DVI cable has only video output capability An audio connection is required for aud...

Страница 15: ...wer cord into the power outlet Never make or change any connections with the power turned on Helpful Hint Refer to the type plate at the rear or bottom of the product for identification and supply ratings TV OUT HDMI OUT Pb Pr Y COMPONENT VIDEO OUT DIGITAL OUT COAXIAL AUDIO OUT dvp3980K_55_eng1 indd 15 2008 03 26 10 23 16 AM ...

Страница 16: ... Audio Setup Page for optimum audio settings Optional Connections Connecting to a Digital AV Amplifier Receiver You can connect this unit to an AV amplifier receiver in order to enjoy quality sound A Connect a coaxial cable not supplied from the COAXIAL DIGITAL OUT jack on this unit to the digital coaxial input jack of the connected device B For video connection see Basic Connections Step 1 Connec...

Страница 17: ...vice user manual for detail Getting Started Setting language preferences The language options are different depending on your country or region It may not correspond to the illustrations shown on the user manual On screen display OSD language Select this to change the language of the On screen display menu of this unit The menu language will remain once you have set it A Press SETUP on the remote ...

Страница 18: ...nu French Parental Spanish PBC Portuguese Mp3 Jpeg Nav Polish Password Italian Preference Page Audio Select this to change disc sound track language Subtitle Select this to change the subtitle language Disc Menu Select this to change the language of the disc menu Getting Started continued D Use keys to select a language and press OK to confirm If the language you want is not in the list then selec...

Страница 19: ...ing Closed Caption HD JPEG HDMI Setup On Off Video Setup Page E Read the notification message on the TV and confirm your action by selecting the OK in the menu and press OK There will be no picture on your TV at this state until you have turned on the progressive scan mode on your TV F Turn on your TV progressive scan mode refer to your TVs user manual A message appears on the TV G Confirm your ac...

Страница 20: ... System Standby feature select Decline E To exit press SETUP One touch control Notes To enable one touch play function a video disc must be placed in the disc compartment before operation Philips does not guarantee 100 interoperability with all HDMI CEC compliant devices One touch play l Press 2 It turns on this unit and start disc play Your TV automatically turns on and switches to the correct vi...

Страница 21: ...le extensions has to be AVI MPG or MP4 DivX Certified DivX Ultra Certified Q pel accurate motion compensation Global Motion Compensation GMC playback Region codes for DVD discs DVD discs and players are designed with regional restrictions Before playing a disc make sure the disc is for the same region as this unit The region code for this unit is indicated at the rear panel Region U S A and Canada...

Страница 22: ...d on this unit due to the configuration and characteristics of the disc or due to the condition of recording and authoring software that was used Disc Operations continued Basic playback controls Pausing playback l During playback press u To resume playback press u Selecting another track chapter title l Press or use the numeric keypad 0 9 to enter a track chapter title number If the repeat track ...

Страница 23: ...k features for video discs AUDIO ZOOM SUBTITLE RETURN TITLE DISC MENU Note The operating features described here might not be possible for certain discs Always refer to the instructions supplied with the discs Using the Disc Menu Depending on the disc a menu may appear on the TV once you load in the disc To select a playback feature l Use keys or numeric keypad 0 9 on the remote control then press...

Страница 24: ...ation works only on DVDs with multiple subtitle languages You can change to your desired language during playback l Press SUBTITLE repeatedly to select different subtitle languages Playback Control VCD SVCD Playback Control PBC playback allows you to play Video CDs or SVCDs interactively following the menu on the display For VCDs with PBC feature version 2 0 only and SVCDs l Press DISC MENU to tur...

Страница 25: ... and press OK to access C Use the numeric keypad 0 9 to input the number time or use keys to make the selection D Press OK to confirm Playback changes to the selected operation Selecting title chapter track This option allows you to skip to a specific title chapter track in the current disc A Move to Title Chapter or Track option in the display menu and press Note Track option can only be selected...

Страница 26: ...lay menu and press B Use the numeric keypad 0 9 to input a valid number Playback changes to the selected angle Disc Operations continued Preview function VCD SVCD DVD This function allows you to preview the contents of a VCD SVCD DVD disc A Move to Preview in the display menu and press The preview menu appears DVD Select Digest Type Title Digest Chapter Digest Title Interval Chapter Interval Selec...

Страница 27: ...isc Off exit repeat mode For MP3 WMA JPEG DivX A In stop mode press DISPLAY repeatedly to select the following repeat mode Single repeat current file once Repeat One repeat current file Repeat Folder repeat all files in the current folder Folder repeat all files in a folder Helpful Hints Repeat playback is not possible on VCDs or SVCDs when the PBC mode is turned on Repeating a specific section A ...

Страница 28: ...tedly to toggle between different time input options Display Descriptions Disc Go To Time search within the disc Track Go To Time search within a track Select Track Select a track number B Use the numeric keypad 0 9 to enter the time where playback should start minutes seconds Playback skips to the selected time Disc Operations continued dvp3980K_55_eng1 indd 28 2008 03 26 10 23 19 AM ...

Страница 29: ... the following file name extensions srt smi sub ssa txt are supported but do not appear on the file navigation menu The subtitle file name sub has to be saved under the same file name as the movie avi in the same folder Advance features of the DivX Ultra Features Descriptions XSUB subtitles allow multiple language subtitles selection for movie Interactive video menus provide easy access and contro...

Страница 30: ...rding to the JPEG EXIF format typically used by almost all digital cameras It cannot display Motion JPEG or pictures in formats other than JPEG or sound clips associated with pictures Disc Operations continued Preview function A During playback press DISPLAY 12 thumbnail pictures will be displayed on the TV B Press to display pictures on the previous next page C Use keys to select one of the pictu...

Страница 31: ...ring playback l Use keys to playback another file in the current folder l Press repeatedly for fast forward backward search on the music file l To select another folder from current disc use keys to navigate back to the root menu D To stop playback press n Helpful Hints You can set to display or skip the folders when you load a MP3 JPEG disc Press SETUP then go to Preference Page Mp3 Jpeg Nav Only...

Страница 32: ...ress OK to start playback C During MP3 WMA playback use keys to select a JPEG file from the disc menu and press OK Slideshow begins and continues till the end of the photo folder or album D To stop simultaneous playback press x twice Helpful Hints Some files on Kodak or JPEG disc may be distorted during playback due to the configuration and characteristics of the disc During simultaneous playback ...

Страница 33: ...of the karaoke disc Start enjoying the karaoke Helpful Hint Before connecting the microphone set the microphone volume to the minumum level to prevent howling Using the Karaoke Menu option A Press KARAOKE on the remote control repeatedly to access the karaoke menu MIC Use keys to turn the microphone ON or OFF Vol Use keys to adjust the vocal level between 0 20 Select 0 for the lowest tone and 20 f...

Страница 34: ...e provided in the following pages If the option in the menu is grayed out that means the setting is not available or cannot be changed in the current state E To exit press SETUP General Setup Page Disc Lock OSD Language Sleep Lip Sync Volume DivX R VOD Code Auto Standby See General Setup Page on this chapter Analog Output Digital Audio Setup Sound Mode HDMI Audio CD Upsampling Night Mode Audio Set...

Страница 35: ...s if the video playback is slower than the audio output streams hence resulting in lip sync Access the lip sync setup menu Use tu keys to set the delay times 00 200 ms for the audio output and press OK to exit This setting allows you to adjust the volume level Access the volume setup menu Use tu keys to set the volume level between 00 20 and press OK to exit Select this to switch this unit to stan...

Страница 36: ...rs V SURR For virtual surround sound effects This setting is only required if you have connected the audio output of this unit to an amplifier receiver using the digital output jack Digital Output Off Disable digital audio output Select this if you are using the analog audio jacks to connect this unit to a TV or Stereo system All The connected device supports multi channel audio formats The digita...

Страница 37: ... the better the sound quality This setting is only required if you are using the HDMI OUT jack to connect your TV or other display device On Enable audio output through HDMI connection Off Disable HDMI audio output In this case an alternative audio connection is required from this unit to your TV Select the type of preset digital sound effect that can match the disc s content or optimize the sound...

Страница 38: ...the sampling rate of the CDs to twice as high as the original rate 176 4 kHz X4 Convert the sampling rate of the CDs to four times as high as the original rate Note CD upsampling is only possible when playback the music CD in stereo mode This mode optimizes playback of sound at low volume High volume outputs will be softened and low volume outputs will be enhanced to an audible level This feature ...

Страница 39: ... the progressive scan feature you must ensure that your TV can accept progressive signals a progressive scan TV is required and that you have connected this unit to your TV using the Y Pb Pr See Getting Started Setting up Progressive Scan feature for details On Turn on progressive scan mode Read the instructions on the TV and confirm your action by pressing OK on the remote control Off Turn off pr...

Страница 40: ...pports this feature such as phone ringing and footsteps On Turn on closed caption feature Off Turn off closed caption feature HD JPEG allows you to enjoy untouched and uncompressed pictures at it s original resolution This feature is only applicable if you have connected this unit to a HDMI compatible TV device On Display high definition picture Off Display standard picture Note This feature is on...

Страница 41: ...HDMI DVI TV a black screen will appear In this case wait for 5 seconds for auto recovery or use the composite yellow video cable to connect this unit and your TV Turn on your TV to the correct input channel for the composite video and adjust the resolution setting to 480p 576p Wide Screen Format Select a suitable screen display 4 3 Pillar Box Display the 4 3 picture disc on the wide screen TV with...

Страница 42: ...with all HDMI CEC compliant devices Auto Wake Up TV Press STANDBY button to turn on both your TV and this unit and start video disc play if a video disc is found in the disc tray Your TV automatically switches to the correct video channel To disable this feature select Off System Standby Press STANDBY POWER button to turn off this unit and all the HDMI CEC compliant devices To disable this feature...

Страница 43: ...he ratings are country dependent 1 is considered material that is least offensive and 8 is most offensive To disable parental controls and allow all discs to play select 8 Some DVDs are not encoded with a rating though the movie rating may be printed on the disc cover The rating level feature does not prohibit playback of such discs VCD SVCD and CD have no level indication so parental control has ...

Страница 44: ...e password menu Old Password New Password Confirm PWD OK 2 Use the numeric keypad 0 9 on the remote control to enter your existing six digit password at Old Password Note When doing this for the first time or if you forget your existing password enter 136900 3 Enter the new six digit password at New Password 4 Enter the new six digit password again at Confirm PWD 5 Press OK to confirm and exit Sel...

Страница 45: ...5 on the remote control C Write down the file name D Press SETUP then press numeric keypad 1379 to check the current software version E Go to www philips com support to check the latest software version available for this unit F If the latest software version is higher than the software version of this unit download it and store onto a CD R G Load the CD R to this unit for upgrade operation Note N...

Страница 46: ... connection Ensure that the disc is compatible with this unit Sometimes a small amount of picture distortion may appear This is not a malfunction The disc is dirty Clean the disc Check the audio connections to the connected audio device Make sure that the connected audio device is turned on to the correct input source Set the digital output setting correctly based on the device you connected to th...

Страница 47: ...ake sure the disc is not scratched or warped Check if the disc is defective by trying another disc The disc is of a different region code You may need to enter the password in order to unlock the disc for playback Moisture may have condensed inside this unit Remove the disc and leave this unit turned on for about an hour There is a technical problem Disconnect this unit from the power outlet for 1...

Страница 48: ...he resolution of this unit matches the device you have connected using the HDMI See Setup Menu Options Video Setup Page HDMI Setup for details During resolution selection for DVI TV a distorted or black screen may appear see HDMI Setup The audio codec may not be supported by this unit Check that file size of the movie does not exceed the file size of the disc during downloading Check that the DivX...

Страница 49: ...alog Sound Stereo Dolby Surround compatible downmix from Dolby Digital multi channel sound AUDIO PERFORMANCE DA Converter 24 bit 192 kHz DVD fs 96 kHz 4 Hz 44 kHz fs 48 kHz 4 Hz 22 kHz SVCD fs 48 kHz 4 Hz 22 kHz fs 44 1kHz 4 Hz 20 kHz CD VCD fs 44 1kHz 4 Hz 20 kHz Signal Noise 1kHz 90 dB Dynamic range 1kHz 80 dB Crosstalk 1kHz 70 dB Distortion noise 1kHz 65 dB MPEG MP3 MPEG Audio L3 CONNECTIONS Y ...

Страница 50: ...on technology developed by DivX Networks Inc that can shrink digital video to sizes small enough to be transported over the internet while maintaining high visual quality Dolby Digital A surround sound system developed by Dolby Laboratories containing up to six channels of digital audio front left and right surround left and right center and subwoofer EasyLink Philips EasyLink uses the HDMI CEC in...

Страница 51: ...ompression used in conversion Progressive Scan The progressive scan displays twice the number of frames per second than in an ordinary TV system It offers higher picture resolution and quality Region code A system allowing discs to be played only in the region designated This unit will only play discs that have compatible region codes You can find the region code of your unit by looking at the pro...

Отзывы: