background image

E

n

g

li

sh

5

What kind of disc should I use for 
recording?

You can only record on a DVD±R and 
DVD±RW discs. DVD±R/±RW is the most 
compatible recordable DVD format on the 
market today. They are fully compatible with 
most of the existing DVD-Video players and 
DVD-ROM drives in computers.

What is the capacity of a  
DVD±R/±RW disc?

4.7GB, or equivalent to 6CDs. You can store 
only one hour of recordings on a single disc at 
the highest quality (DVD standard) and about  
6 hours recordings at the lowest quality (VHS 
standard).
The recording mode indicates the number of 
hours that will fit on a single disc.

What is the difference between 
DVD±R and DVD±RW?

DVD±R is “recordable” and DVD±RW is 
“erasable” and “rewritable”. With a DVD±R, 
you can record multiple sessions on the same 
disc, but when the disc is full, you cannot 
record any more on the disc. The DVD±RW 
allows you to record over the same disc 
repeatedly.


What is DV?

Using DV, also known as i.LINK, you can 
connect a DV-equipped camcorder to this 
recorder using a single DV cable for input and 
output of audio, video, data and control signals. 
–  This recorder is only compatible with  
DV-format (DVC-SD) camcorders. Digital 
satellite tuners and Digital VHS video 
recorders are not compatible. 
–  You cannot connect more than one DV 
camcorder at one time to this recorder. 
–  You cannot control this recorder from the  
external equipment connected via the  
DV IN jack.

Can I copy a VHS tape or DVD 
from an external player?

Yes, but only if the VHS tape or DVD is not 
copy protected.

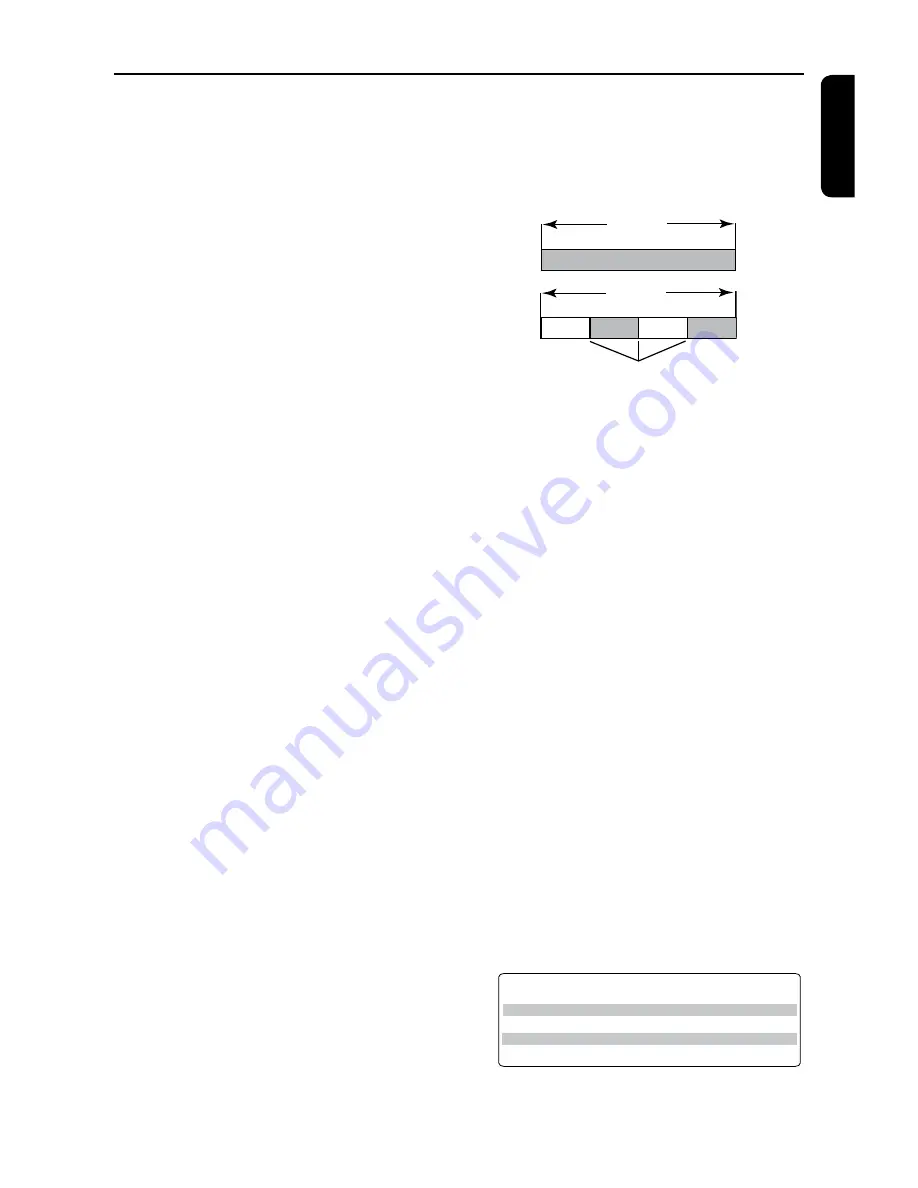
What are Titles and Chapters?

A DVD disc contains Titles and Chapters, 
which are similar to the Titles and Chapters of 
a book. A Title is often a complete movie and 
is broken down into Chapters, or individual 
scenes from the movies.

Title

Chapter

Title

Chapter Chapter Chapter Chapter

chapter markers

Programs are recorded as a single title; it may 
consist of one chapter or a few chapters 
within a title, depending on the recording 
settings.

How do I set up Titles and Chapters?

The DVD recorder automatically creates a 
new Title every time you start a new 
recording. You can then add Chapters to these 
recordings manually or have them 
automatically inserted at 5-minute intervals.

What does “finalizing” a disc do?

Finalizing a disc locks the disc so it can no 
longer be recorded and is only required for 
DVD±R. It will then be compatible with 
virtually any DVD player. To close a disc 
without finalizing it, simply stop recording and 
eject the disc. You will still be able to record 
on the disc if there is room for more 
recordings.

How good is the quality of the 
recording?

There are a few quality levels to choose from, 
ranging from “1 hour mode” (High Quality) to 
“6 hours mode” (VHS quality). Press REC 
MODE button on the remote control to 
choose the quality level that best suits your 
purpose and the length of material.

Record 

Mode

Picture Quality

Maximum Recording 

Time per Disc

1 Hour Mode
2 Hour Mode
4 Hour Mode
6 Hour Mode

HQ(High quality) 
SP(DVD quality-Standard Play)
EP(VHS quality-Extended Play)
SLP(VHS quality-Super Long Play)

1 hour
2 hours
4 hours
6 hours

Frequently Asked Questions

Содержание DVDR3375

Страница 1: ...3375 User Manual 4 60 ...

Страница 2: ...der Spielbarkeit oder eine Aktualisierung erforderlich Da die DVD Technologie sich ständig weiterentwickelt werden sich diese Erweiterungen durchsetzen und einfach auszuführen sein Gehen Sie zu für Ihre Software Aktualisierung zu www philips com support Doordat fabrikanten verschillende schijfindelingen aanbieden moet uw dvd systeem mogelijk worden geüpgradet of uitgebreid Naarmate de dvd technolo...

Страница 3: ...ents Use of this copyright protection technology must be authorized by Macrovision and is intended for home and other limited viewing uses only unless other wise authorized by Macrovision Reverse engineering or disassembly is prohibited U S Patent Number 4 631 603 4 819 098 4 907 093 5 315 448 and 6 516 132 61 ...

Страница 4: ...X Certified and associated logos are trademarks of DivX Networks Inc and are used under license This connection is also known as FireWire and IEEE 1394 This connection is used for the transfer of high bandwidth digital signals as used by digital video DV camcorders Audio and video signals are transmitted using a cable Special Features ...

Страница 5: ...es but only if the VHS tape or DVD is not copy protected What are Titles and Chapters A DVD disc contains Titles and Chapters which are similar to the Titles and Chapters of a book A Title is often a complete movie and is broken down into Chapters or individual scenes from the movies Title Chapter Title Chapter Chapter Chapter Chapter chapter markers Programs are recorded as a single title it may ...

Страница 6: ...SB flash drive or USB memory card reader 17 Main Unit 18 Jacks behind the flap 18 Remote control 19 21 Display window 22 Getting Started Step 1 Inserting Batteries 23 Using the remote control to operate the system 23 Step 2 Finding the correct viewing channel 23 Step 3 TV channel programming 24 Automatic TV channel search 24 Modifying Channel Information 25 Sorting the TV channels 26 Step 4 Settin...

Страница 7: ...SB flash drive USB memory card reader 44 Additional Playback Features Changing to another title chapter track 45 Pausing playback and step play 45 Searching forward backward 45 Zooming in 45 Using TITLE options 46 Selecting various repeat shuffle functions 46 Programming disc tracks 47 Changing the audio soundtrack language47 Changing subtitle language 48 Switching camera angles 48 Time search 48 ...

Страница 8: ... regulations regarding disposal of packaging materials exhausted batteries and old equipment Care and Safety Information CAUTION High voltage Do not open the device You run the risk of getting an electric shock The machine does not contain any user serviceable parts Please leave all maintenance work to qualified personnel Setup Finding a suitable location Place the set on a flat hard and stable su...

Страница 9: ...phone numbers and e mail addresses are given in the guarantee booklet Refer to the type plate on the rear or bottom of the product for identification and supply ratings Accessories supplied Remote control and batteries Audio Video AV cables RF coaxial cable Quick Start Guide User Manual Region codes DVD films are usually not released at the same time in all regions of the world thus all DVD player...

Страница 10: ...mplete connection to your TV A Connect existing Antenna Cable TV signal or from the Cable Box Satellite Receiver RF OUT or TO TV to the ANTENNA IN jack on the DVD recorder B Use the supplied RF coaxial cable to connect ANTENNA OUT jack on the DVD recorder to the antenna input jack on your TV VHF UHF RF IN TIPS Before making or changing any connections make sure that all the devices are disconnecte...

Страница 11: ...k or labeled as Y C or S VHS on the TV Option 3 Using ComponentVideo jack best picture quality A Use the component video cables red blue green not supplied to connect the Y Pb Pr OUT jacks on the DVD recorder to the corresponding component video input jacks or labeled as Y Pb Cb Pr Cr or YUV Y Pb Pr on the TV B If your TV accepts Progressive Scan signal see page 50 for detailed Progressive Scan se...

Страница 12: ...ng a Coaxial cable You can connect the DVD recorder to an AV amplifier receiver in order to enjoy multichannel surround sound l Use a coaxial cable not supplied to connect the COAXIAL socket on the DVD recorder to the digital input on the AV amplifier receiver with a digital multi channel sound decoder Before you start operating set the Digital Audio Output accordingly see page 55 If the Digital O...

Страница 13: ...nnection from the Cable Box Satellite Receiver to your TV B Use the audio video cables to connect the VIDEO AUDIO IN EXT on the DVD recorder to the matching VIDEO AUDIO output jacks on the Cable Box Satellite Receiver C Use the audio video cables to connect the VIDEO AUDIO OUT on the DVD recorder to the matching VIDEO AUDIO input jacks on the TV Back of a Cable Box or Satellite Receiver Example on...

Страница 14: ...les to connect the VIDEO AUDIO IN EXT on the DVD recorder to the matching VIDEO AUDIO output jacks on the DVD player D Use the audio video cables to connect the VIDEO AUDIO OUT on the DVD recorder to the matching VIDEO AUDIO input jacks on the TV Helpful Hints You may use the S VIDEO Y C jack instead of VIDEO CVBS jack if the connected device has the same S VIDEO input output jack This video conne...

Страница 15: ... on the Cable Box Satellite receiver to the ANTENNA IN jack on the DVD recorder C Use the supplied RF coaxial cable to connect the ANTENNA OUT jack on the DVD recorder to the antenna input jack on the TV D Use the audio video cables to connect the VIDEO AUDIO IN EXT on the DVD recorder to the matching VIDEO AUDIO output jacks on the VCR E Use the audio video cables to connect the VIDEO AUDIO OUT o...

Страница 16: ...see pages 27 29 Helpful Hints The DV IN jack does not support a connection to a Personal Computer It is not possible to record from the DVD recorder to your camcorder via the DV IN jack on your DVD recorder Option 2 UsingVIDEO In jack You can use VIDEO connection if your camcorder has only a single video output Composite Video CVBS A Connect the VIDEO jack at the front panel of the DVD recorder to...

Страница 17: ...red in the USB flash drive or USB memory card reader C To stop playback press STOP n or remove the USB flash drive USB memory card reader from the USB port Helpful Hints The USB port only supports the playback of JPEG MP3 files The USB port does not support the connection to other USB devices except for a USB flash drive USB memory card reader If the USB jack does not fit into the USB port a USB e...

Страница 18: ...he current status of the DVD recorder Jacks behind the flap Flip down the door as indicated by the OPEN label at the right hand corner i USB Input for USB flash drive USB memory card reader Press USB in order to view the input source j VIDEO Video input for camcorders or video recorders Press REC SOURCE on the remote control to select Front CVBS in order to view the input source k L R AUDIO Audio ...

Страница 19: ...ts recording the current TV channel or the current video input source f Skips to previous or next Chapter Track g TOP MENU For DVD R RW only Enters the disc editing menu h AUDIO Selects an audio language DVD VCD or an audio channel i SUBTITLE Selects a DVD subtitle language j REC MODE Toggles between recording modes 1 2 4 and 6 hour mode This determines the quality of the recording and the amount ...

Страница 20: ... Plays a disc p STOP n Stops playback recording Access VCD disc menu when PBC is turned on For VCD 2 0 SVCD only q Å Pauses the playback or recording Press repeatedly to advance a paused picture one frame at a time r EDIT For DVD R RW only Enters exits the video editing menu Enters exits the usb copy menu s ZOOM Enlarges a picture on the TV screen t USB Press USB in order to view the input source ...

Страница 21: ...X 32X z F FWD Fast forward there are four modes 2X 4X 16X 32X 27 SLOW Slow forward there are four modes 1 2 1 4 1 16 28 REPEAT Set repeat functions 29 ECHO Adjust the echo volume 30 MIC VOL Adjust the microphone volume Turn on the Karaoke mode 31 CH Select TV channel or external signal source 32 VOL Adjust the audio output volume Remote Control continued 22 24 25 28 29 31 26 23 30 32 27 ...

Страница 22: ...English 22 Display window Display window TIPS DTS discs are supported via passthrough mode through Digital Coaxial connection only ...

Страница 23: ... 2 Finding the correct viewing channel A Press STANDBY ON 2 on the DVD recorder to turn it on B Turn on the TV and set it to the correct video in channel You should see the blue DVD background screen Usually this channel is between the lowest and highest channels and may be called FRONT A V IN VIDEO See your TV s manual for more details Or you may go to channel 1 on your TV then press the Channel ...

Страница 24: ...ere is no disc in the disc tray SYSTEM SETUP OK AutomaticTV channel search This function will automatically scan all the receivable analog local TV channels and store these channels on the DVD recorder A Press SYSTEM SETUP on the remote control The system menu appears on the TV B Use keys to highlight System Setup Channel Setup and press OK C Use keys to highlight Channel Search and press OK The a...

Страница 25: ...current TV channel If required use keys to start the automatic frequency search and press OK to confirm TIPS Press to go back to previous menu item Press SYSTEM SETUP to exit the menu Sound mode Set the TV system that produces the least distortion of picture and sound Use keys to select a suitable sound mode then press OK to confirm See chapter TV System Guide at the back of this manual for more i...

Страница 26: ...nd press OK or u The selected channel will be inserted before the current position F Repeat steps D E until you have sorted all the TV channels you want Step 4 Setting the time date If the DVD recorder has not set the time and date correctly set the clock manually by following the steps below A Press SYSTEM SETUP The system menu appears B Use keys to select System Setup Clock and press OK to confi...

Страница 27: ...a can be added to the disc IMPORTANT Unrecordable pictures Television programs films video tapes discs and other materials may be copy protected and therefore cannot be recorded on this recorder Recording settings The default recording settings allow you to set the auto chapter markers preferred recording input source and recording mode Any changes made using the remote control will only apply to ...

Страница 28: ...anel Rear CVBS Input source from the device connected to the VIDEO CVBS IN EXT and AUDIO L R jacks on the back panel Rear S Video Input source from the device connected to the S VIDEO Y C IN EXT and AUDIO L R jacks on the back panel DV Input source from the device connected to DV IN jack at the front panel YUV Y Pb Pr Input source from the device connected to the YUV Y Pb Pr jacks on the back pane...

Страница 29: ...EXT and AUDIO L R jacks on the back panel DV Input source from the device connected to DV IN jack at the front panel YUV Y Pb Pr Input source from the device connected to the YUV Y Pb Pr jacks on the back panel TIPS Cannot record if YUV Y Pb Pr source is P SCAN signal input D Press REC l to start recording The recording will start automatically after the last recording on the DVD R RW E To stop th...

Страница 30: ... Timer Recording to automatically start and stop a recording at a later date time The DVD recorder will tune to the right program channel and begin recording at the specified time To make a timer recording your DVD recorder needs to know The date you want to make the recording The recording input source The start and stop time of the recording The recording quality see page 28 TIMER OK TIPS Ensure...

Страница 31: ...before the recording starts The TIMER icon will light up on the display panel if a timer recording is set Helpful Hint Set the timer recording one minute ahead of the program s start time This helps to ensure the entire program is recorded as the disc requires about 30 seconds to prepare for recording The alternation of two timing recorder task need at least 1 min Setting a timer recording from an...

Страница 32: ...ct the entry field and make the necessary changes G Once complete select OK in the menu and press OK to save the changes H Press TIMER to exit the menu Watching anotherTV channel during recording You can watch another TV channel while recording is in progress by using the TV s remote control to change the TV channels Helpful hint Remember to turn the TV back to its video input channel if you want ...

Страница 33: ...disc types You can change the disc content and settings of a recorded DVD R RW from the disc editing menu The edited contents may not be available if you play the disc on another DVD player The displayed options in the disc editing menu differ depending on the type of disc Play Start playing from the beginning of the disc Erase Disc DVD RW only Erase all the recordings in the disc Rename Disc Chan...

Страница 34: ... This erases the content of the DVD RW including those that was not recorded on this DVD recorder Once the existing content is erased it can be used for recording A Press TOP MENU then use keys to select Erase Disc and press OK A warning message will appear B Select YES in the menu to proceed or NO to abort then press OK to confirm Record new title This function allows you to start a new recording...

Страница 35: ...tected disc select Unlock Disc Finalize disc DVD R DVD RW only l Press TOP MENU then use keys to select Finalize Disc and press OK Playing your recordings DVD R on other DVD players It is necessary to finalize a DVD R or DVD RW disc before you can play it on any other DVD player Otherwise the DVD R or DVD RW will only playback on this DVD recorder After a DVD R or DVD RW disc has been finalized no...

Страница 36: ... editing menu A Insert a recorded DVD R RW into the DVD recorder The Index Picture screen appears on the TV l During playback press DISC MENU to access the Index Picture screen B Use keys to highlight a title recording and press The title editing menu appears C Use keys to access different options and OK to select Instructions and explanation of the options are provided in the following pages D To...

Страница 37: ...R Press to go back to the previous menu Rename title The original title name is automatically generated by the DVD recorder You can give a new name to the title by following the steps below A In title editing menu use keys to select Rename Title and press OK The keyboard screen appears B Use keys to highlight a character and press OK to select The maximum input is up to 12 characters l You can use...

Страница 38: ...ombine two chapters Hide Chapter Hide the unwanted scene in the recording Index Picture Select a scene in the recording as the index picture screen Split Title Divide the recording into two under separate titles T Elapsed x xx xx Display the elapsed time Accessing video editing menu EDIT PLAY OK A Insert a recorded DVD R RW into the DVD recorder The Index Picture screen appears on the TV B Use key...

Страница 39: ...ress EDIT to display the video editing menu then use keys to select Play and press OK B Use keys to select a playback mode and press OK Editing Finalizing Recording continued Creating chapter marker You can create a chapter by inserting chapter marker at any point within a title during playback This will allow you to access a specific point in the recording easily or set a chapter you wish to hide...

Страница 40: ...elpful Hint All the hidden chapters will be played back while in video editing mode Changing Index Picture The index picture is the picture of the title you will see when the DVD recorder loads up the Index menu Normally the first frame of a recording is shown as the title s index picture l Press EDIT to display the video editing menu then use keys to select Index Picture and press OK to select th...

Страница 41: ...d with regional restrictions Before playing a disc make sure the disc is for the same region as your player Do not push on the disc tray or put any objects other than discs on the disc tray It may cause the disc player to malfunction Inserting a disc A Press STANDBY ON to turn on the DVD recorder B Press OPEN CLOSE ç on the front of the DVD recorder The disc tray opens C Carefully place the disc i...

Страница 42: ...a Super Video CD Super Video CDs may feature PBC Play Back Control This allows you to play the video CDs interactively following the menu on the display A Insert a Super Video CD If the PBC is on the disc index menu will appear on the TV B Use numeric keypad 0 9 to input your selection or to select a play option l Press STOP on the remote control to return to the previous menu l To turn on off the...

Страница 43: ...within the menu and press OK to access the folder album C Use keys to select the track file to play l To go to the previous menu press DISC MENU D To create a playlist highlight the track file and press ADD CLEAR The selected tracks files will appear on the right screen Use tu keys to toggle between the left and right screen E Press PLAY to start playback F During playback you can press to select ...

Страница 44: ...ntrol menu and select AUDIO under the TYPE option File format The file extension has to be JPG JPE or JPEG It can only display DCF standard still pictures or JPEG pictures e g TIFF It cannot play back moving pictures Motion JPEG progressive JPEG and other formats or pictures in formats other than JPEG or pictures associated with sound It may require a longer time for the DVD recorder to display th...

Страница 45: ...an fast forward or fast reverse a disc at two four sixteen or thirty two times the normal playback speed A During playback press tt REW or uu F FWD to switch to the search function The search status bar appears It displays the search speed 2x 4x 16x 32x backward or forward only for DVD VCD 2x 4x backward or forward only for CD 2x 4x 8x 16x 32x backward or forward only for MP3 The sound will be mut...

Страница 46: ...specific segment within a title chapter track Press OK to mark the start and end of the segment you want to repeat Chapter Repeat Select this to repeat playback on the current chapter DVD DVD R RW only Repeat Track Title Select this to repeat playback on the current track title Repeat Directory Select this to repeat playback on the current folder directory MP3 JPEG picture disc only Repeat Disc Se...

Страница 47: ... the Disc Menu press DISC MENU Programming disc tracks You can play the contents of the disc in the order you want by programming the tracks to be played A Press DISPLAY twice on the remote control The TITLE menu appears B Use keys to select Mode Program and press OK The program menu appears DVD Title Program Title 1 Title 2 Title 3 Title 4 Title 5 Title 6 Title 7 Title 8 C If the disc is recorded...

Страница 48: ...se keys to select the language and press OK to confirm The languages may be numbered or abbreviated such as En for English If the language selected is not available on the disc the disc s default setting language will be used instead Helpful Hint Some DVDs discs allow subtitle language changes only via the DVD disc menu To access the disc menu press DISC MENU Switching camera angles This option is...

Страница 49: ...tem Setup General use keys to highlight Screen Saver and press OK On Select this if you wish to turn off the TV screen after playback has been stopped or paused for more than 5 minutes Off Select this to disable the screen saver B Use keys to select a setting and press OK to confirm Karaoke Mode A In System Setup General use keys to highlight Karaoke Mode and press OK On Select this to turn on the...

Страница 50: ...hould match Only then will it be possible to play a DVD on this system Before changing the TV system determine the colour system of your TV A In System Menu General use keys to select Video Output Format and press OK PAL Select this if the connected TV has the PAL colour system It will change the video signal of an NTSC disc and output it to PAL format NTSC Select this if the connected TV has the ...

Страница 51: ...Ratio Set the aspect ratio of the DVD recorder according to the TV type you have connected The format you select must also be available on the disc If it is not the setting for TV display will not affect the picture during playback A In System Menu Playback use keys to select TV Aspect Ratio and press OK 16 9 Select this for wide screen TV frame ratio 16 9 4 3 Letterbox Select this for a wide scre...

Страница 52: ...To disable parental controls and allow all discs to play select Off Rating explanations Off Parental Control is not active 1 Kid Safe 2 G Childsafe acceptable for viewers of all ages 3 PG Parental Guidance suggested 4 PG13 Unsuitable for children under age 13 5 PG R 6 R Restricted recommended that parents restrict children under 17 from viewing or allow to view only when supervised by a parent or ...

Страница 53: ...onfirm To abort the change select CANCEL and press OK Digital Audio Output After connecting the DVD recorder to your TV and other devices you may need to change the digital output setting Adjust the Digital Output only if you used the DVD recorder s coaxial jack A In System Setup Playback use keys to select Digital Audio Output and press OK ALL Select this if you use the COAXIAL jack to connect th...

Страница 54: ...ervice For more information visit us at www divx com vod A In System Menu Clock use keys to select DivX R VOD and press OK The registration code will appear B Press SYSTEM SETUP to exit C Use the registration code to purchase or rent the videos from DivX VOD service at www divx com vod Follow the instructions and download the video from your computer onto a CD R RW for playback on this DVD recorde...

Страница 55: ...OL to lower the playback volume to balance the mic volume Recording a Karaoke session Before you start Make sure you have connected a DVD player to the DVD recorder See Page 14 Optional connections connecting to a DVD player or similar device A Turn on the TV power Select the correct Video In channel at the TV B Turn on the DVD player C Insert a Karaoke disc into the DVD player and press PLAY to s...

Страница 56: ...region code The DVD must be coded for ALL regions or Region 6 in order to play on this DVD recorder There is no recording on the disc or wrong disc type Read chapter Playback Playable discs for details Make sure the disc is not scratched or warped Clean the disc or replace a new one Check if the disc is defective by trying another disc Check the audio connections the red and white jacks Read chapt...

Страница 57: ...that are broadcast in black and white cannot be recorded The TV channel you want to record is not stored or you selected the wrong program number Check TV channels stored If you adjust the clock after you set a timer recording you have to reset the timer recording If the DVD recorder cannot read the disc you cannot record You cannot use the DVD recorder to duplicate copyrighted materials DVDs or v...

Страница 58: ...Dolby Digital MP3 MPEG2 Multichannel PCM MP3 bit rates 32 256 kbps and VBR Still Picture Playback Disc formats DVD R RW Picture CD Picture compression formats JPEG Picture enhancement Rotate Storage Media Recording media DVD R DVD RW Recording speed 2 4x Tuner Reception Transmission TV system PAL Aerial Input 75 Ohm coaxial IEC75 Connectivity Rear Connections S Video Out Video CVBS Out Audio left ...

Страница 59: ...ion system proposed by the Joint Photographic Expert Group which features small decrease in image quality in spite of its high compression ratio MP3 A file format with a sound data compression system MP3 is the abbreviation of Motion Picture Experts Group 1 or MPEG 1 Audio Layer 3 By using the MP3 format one CD R or CD RW can contain about 10 times more data than a regular CD MPEG Motion Picture E...

Отзывы: