background image

13

Using your Digital Terrestrial Receiver

EN

G

LI

SH

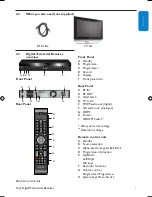
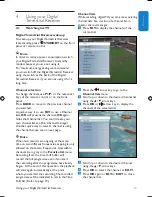
Channel lists

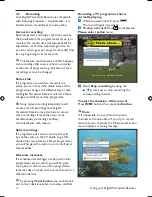
While watching digital TV, you can access existing 

channel lists. See creation of a channel list in 

chapter channel manager..

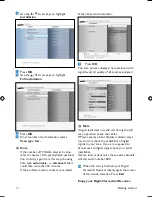
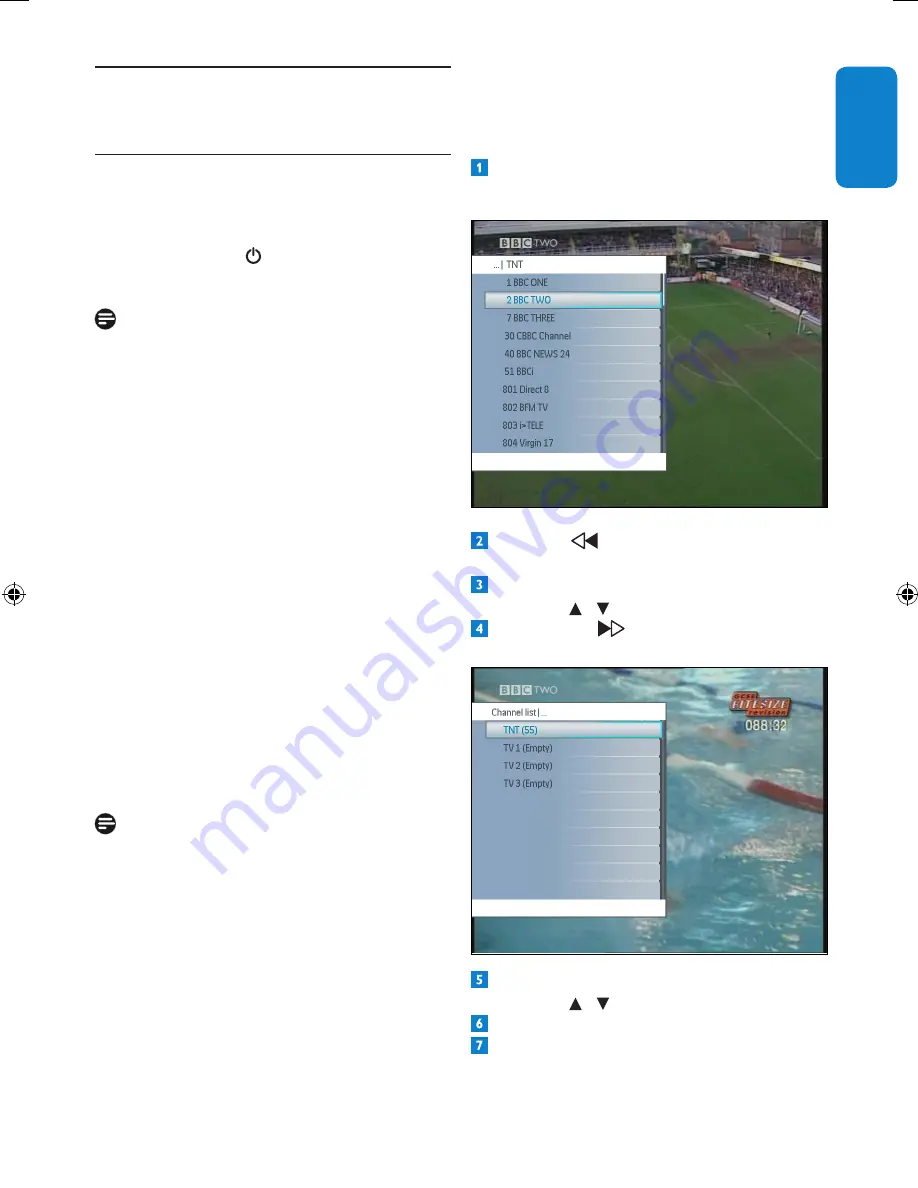
  Press 

FAV

 to display the channels of the 

current list.

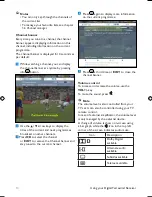
  Press the 

 arrow key to go to the 

Channel lists

 menu.

  Scroll up or down to the desired channel list 

using the   /   

arrow keys

.

  Press 

OK

 or 

 arrow key to display the 

channels of the selected list.

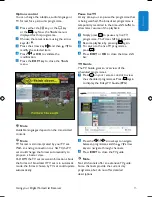
  Scroll up or down to the desired channel 

using the   /   

arrow keys

.

  Press 

OK 

to select the channel, or 

EXIT

.

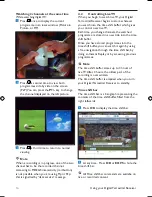
  Press 

OK

 again or 

FAV 

or 

EXIT

 to close 

the channel list.

Using your Digital 

Terrestrial Receiver

4.1 

Watching live TV 

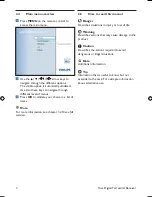
Digital Terrestrial Receiver wake-up

To wake up your Digital Terrestrial Receiver 

from standby, press:  


STANDBY

 on the front 

panel or remote control


Note

In order to reduce power consumption, switch 

your Digital Terrestrial Receiver to standby 

mode whenever you are not using it.

For maximum energy saving we recommend 

you to switch off the Digital Terrestrial Receiver 

using the switch at the back of the Digital 

Terrestrial Receiver if you are not using it for a 

long time.

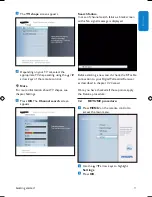
Channel selection

To change channels, use 

P+/P-

 or the numerical 

keys of the remote control or on the front 

panel.

Press 

BACK

 to move to the previous channel 

you watched.

A quicker way is to use 

FAV 

to use a Channel 

lists. 

OK

 will present the channel

, OK 

again 

hides the


Channel list.  You could create your 

own channel list, see §5.6 Channel manager.

Another quick way to select a channel is using 

the channel banner, see on next page.

 Note

When two records are ongoing at the same 

time on two different frequencies, zapping is only 

allowed on those two frequencies. Unavailable 

channels are in grey in the 

Favorite list

 menu.

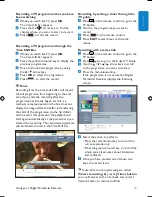
Recording from the time shift buffer will 

record the full programme even if you start 

the recording after the programme has already 

begun.  At the end of this operation, the playback 

will start again automatically at the point 

where you started the recording. The recorded 

programme will be indicated in red in the Time 

Shift bar (Refer to page 19).

DTR 7510 200910.indd   13

16/10/2009   17:40:52

Содержание DTR 7510

Страница 1: ...www philips com support For support call 0870 900 9070 EN Digital Terrestrial Receiver DTR 7510 ...

Страница 2: ... 2 ...

Страница 3: ...Terrestrial Receiver display full overview 23 5 3 Remote control full overview 25 5 4 Menu full overview 26 5 5 TV guide 26 5 6 Channel manager 30 5 7 HDD Library 32 5 8 USB 32 5 9 Settings 33 6 Maintenance 39 6 1 Cleaning 39 6 2 Replacement 39 6 3 Disposal 39 7 Accessories and connections 40 7 1 Connecting a DVD player external recorder 40 7 2 Connecting your audio equipment 40 7 3 Universal remo...

Страница 4: ...r electrical and electronic products Please act according to your local rules and do not dispose of your old products with your normal household waste The correct disposal of your old product will help prevent potential negative consequences for the environment and human health The Material recyclability symbol affixed on package cardboard and user manual means these parts are recyclable So do not...

Страница 5: ...lace any foreign objects in any of the openings Warnings Before connecting the AC power cord to the mains check that the mains supply voltage corresponds to the voltage printed on it If the mains voltage is different consult your dealer The AC power cord has been designed for indoor use only It is recommended to unplug the AC power cord from the mains during lightning storms Periodically inspect t...

Страница 6: ...ver need to schedule your life around your favourite TV programmes Thanks to the built in hard disk drive HDD that records programmes as you watch them you can pause live TV or repeat a scene you missed Want to record a programme so that you can watch it later Just press the record button Once you begin to record you are free to watch other recorded programmes You can even watch the programme that...

Страница 7: ...gital F L R audio out analogue G HDMI H Power I ON OFF Switch Safety extra low voltage Hazardous voltage Remote control unit A Standby B Source selection C Alphanumeric keypad Exit Back D Programme information E Up Down Left Right OK keys F Recorder functions G Volume control Programme Programme H System keys Menu Fav list 2 3 DigitalTerrestrial Receiver overview Front Panel Rear Panel Remote cont...

Страница 8: ...nus Press OK to validate your choice in a list of items Note For more information see chapter 5 4 Menu full overview 2 5 How to read this manual Danger Describes situations in injury or loss of life Warning Describes actions that may cause damage to the product Caution Describes the actions required to avoid dangerous or illegal situations Note Additional information Tip Information that is useful...

Страница 9: ...r installer or dealer 3 Getting started The basic steps to get you started are described in this chapter 3 1 Prepare Prepare the remote control Open the battery compartment Insert the two batteries supplied according to the indications inside the compartment Close the battery compartment Note Point the remote control directly at the remote sensor on the front panel and select the desired function ...

Страница 10: ...void overheating HDMI connection Use this connection if your TV set is fitted with a HDMI input Connect the aerial cable from the wall socket to the RF IN socket at the rear of the Digital Terrestrial Receiver Connect the RF OUT socket at the rear of the Digital Terrestrial Receiver to the RF input of your TV set using a RF cable Connect a HDMI cable to the HDMI input of the TV set and HDMI socket...

Страница 11: ...r 3 2 Connect Once you have checked all those points apply the Retune procedure 3 4 RETUNE procedure Press MENU on the remote control to access the main menu Use the arrow keys to highlight Settings Press OK The TV shape screen appears Depending on your TV set select the appropriate TV shape setting using the arrow keys of the remote control Note For more information about TV shapes see chapter Se...

Страница 12: ...n Scan mode selection Press OK The scan process displays channels found with signal level and quality of all sources analysed Note If signal level stays low and red during the full scan operation check the cables If Power seems ok but Quality indicator stays low and red check the availability of digital signals in your area If you are supposed to have access to digital signal check your aerial ins...

Страница 13: ...nergy saving we recommend you to switch off the Digital Terrestrial Receiver using the switch at the back of the Digital Terrestrial Receiver if you are not using it for a long time Channel selection To change channels use P P or the numerical keys of the remote control or on the front panel Press BACK to move to the previous channel you watched A quicker way is to use FAV to use a Channel lists O...

Страница 14: ...s audio mute Icon Description Dolby Digital available Alternate audio available Subtitles available Teletext available Notes You can only zap through the channels of the current list To manage your favourite lists see chapter 5 6 Channel manager Channel banner Every time you tune to a channel the channel banner appears displaying information on this channel including information on the current pro...

Страница 15: ... to close the TV guide Note Not all channels offer an extensive TV guide Some channels provide the current day programme but do not offer detailed descriptions Options control You can change the subtitles audio language or TV format for a particular programme Press either the key or the key or the key Now the Tools menu is displayed for this programme Choose the relevant item using the arrow keys ...

Страница 16: ...Digital Terrestrial Receiver to standby Time shift bar The time shift bar is a bar graph representing the contents of the time shift buffer filled from the right leftwards Press OK to display the time shift bar At any time Press OK or EXIT to hide the time shift bar All Time shift bar commands are availabe on live or recorded content Watching 2 channels at the same time While watching digital TV P...

Страница 17: ...e next title The arrow keys allow you to move according to the chapter size 5 minutes by default Press the key to return to live TV programme and then OK to exit the time shift bar High speed playback Can only be activated when watching live or recorded content not paused or slow motion Press longtime 1 or 2 seconds on or to display the Time shift bar and start the rewind or fast forward with doub...

Страница 18: ...al Receiver may also have to cancel some recordings if more than two occur simultaneously recording conflicts Use this feature with mesure Split recordings If a programme has two or more parts split by another entry in the TV Guide e g a film divided into two parts by a News programme you will be given the option to record all parts automatically Alternate instances If a scheduled recording s over...

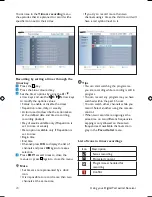
Страница 19: ...ration the playback will start again automatically at the point where you started the recording The recorded programme will be indicated in red in the Time Shift bar Recording by setting a timer through the TV guide Press on the remote control to go to the TV Guide Scroll to the programme you want to record Press on the remote control Press EXIT several times to close the menus Recording with a se...

Страница 20: ...nnels and press OK again to make a selection Press EXIT several times to close the menus or press again to close the menu Note Set timers are reprensented by a clock icon It is impossible to record more than two channels at the same time If you try to record more than two channels using a timer the third record will have a red symbol next to it Tips You can start watching the programme you are rec...

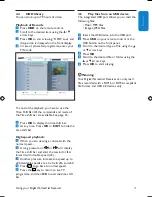
Страница 21: ...g pressure on or will display the Time shift bar and start the rewind or fast forward with double speed x2 Another pressure increase the speed up to x32 Available speeds are x2 x4 x8 x16 and x32 Press to go back to normal speed Press the key to return to live TV programme and then OK to exit the time shift bar 4 5 Play files from an USB device The integrated USB port allows you to read the followi...

Страница 22: ...cording 6 Display panel 7 EPG open close EPG 8 HDD open close HDD library 9 USB access USB contents 10 USB connector 11 Smart card reader Rear Panel 1 RF IN input to connect your aerial cable from the wall socket 2 RF OUT output to connect your recorder to aVCR TV set another receiver 3 AUX scart output to connect your external recorder or DVD player 4 TV scart output to connect your TV set 5 SPDI...

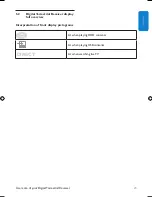
Страница 23: ...gital Terrestrial Receiver ENGLISH 5 2 DigitalTerrestrial Receiver display full overview Interpretation of front display pictograms Lit when playing HDD contents Lit when playing USB contents DIRECT Lit when watching live TV ...

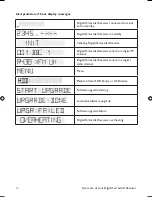
Страница 24: ...al Terrestrial Receiver in standby Initiating Digital Terrestrial Receiver Digital Terrestrial Receiver tuned on a digital TV channel Digital Terrestrial Receiver tuned on a digital radio channel Menu Playback from HDD library or USB device Software upgrade starting Successful software upgrade Software upgrade failure Digital Terrestrial Receiver overheating ...

Страница 25: ...k 12 P Select next previous channel 13 Colour keys Contextual keys 14 Select subtitles 15 Display hide teletext 16 FAV Channel selection Favourite lists 17 Pip Pap selection 18 Access to all recorded programmes 19 MENU Open close menu 20 Open close TV format menu 21 Open Close Tools menu 22 VOL Turn the volume up down 23 Mute Restore sound 24 Instant recording 25 Instant replay 26 Information bann...

Страница 26: ...ed to recordings moving in time to follow the accuraccy requirement 5 4 Menu full overview While watching digital TV Press MENU to display the main menu To scroll to the appropriate menu item press the arrow keys To display the corresponding sub items press OK or Note To open a locked menu item you must enter your PIN Code Once you have highlighted an adjustable item you can view the list of avail...

Страница 27: ...ide Press the blue coloured key to watch the highlighted channel Close the guide by pressing the EXIT key 8 daysTV guide EPG Once you are in the Programme guide menu press the yellow coloured key to display the 8 days TV guide EPG Press the appropriate contextual keys Press OK to preview the programme Press the red coloured key to record the highlighted programme Press the green coloured key to di...

Страница 28: ... the options are set press EXIT Your timer is set Clear timer Select the timer by using the arrow keys Press the yellow coloured key The timer is immediately cleared Modify a timer Select the timer by using the arrow keys Press the green coloured key You can now modify the timer settings Once you have modified all the options you needed to press EXIT to save the changes Tip If you want to record a...

Страница 29: ...timers menu select a timer by using the arrow keys Press OK The following screen is displayed Set the timer options by using the arrow keys and use the arrow keys to modify the options values Status to enable or disable the timer Repetition once daily or weekly Action used to describe the action taken at the defined date and time recording recording locked Day of week set the day when you want to ...

Страница 30: ...rite list Three lists are created by default TV1 to TV3 Press OK again Press FAV to select the current list The name of the list is displayed on top right corner Press the red coloured key Scroll to the channels you want to add or remove to the current list and select them individually by pressing OK Selected channels are marked with an arrow Clear a timer Select the timer by using the arrow keys ...

Страница 31: ...e of the screen You can then access various edition features Sort the selected list automatically Once you are in the Favourite lists menu scroll to the list you want to sort using FAV Press the yellow coloured key Press the appropriate colour key depending on the type of sorting you want to perform Press the red coloured key to sort all channels according to their name Press the green coloured ke...

Страница 32: ...t work with the Digital Terrestrial Receiver Plug an USB key into the USB port in the front panel behind the door Press MENU to display the main menu Scroll to the USB menu item using the arrow keys Press OK Press EXIT several times to exit the Favorite lists menu 5 7 HDD Library Press MENU to display the main menu Scroll to the HDD Library menu item using the arrow keys Press OK Note Content that...

Страница 33: ...lly press the blue coloured key to enable or disable the loop Picture Use the red coloured key to dezoom and the green coloured key to zoom Press the yellow coloured key to rotate the displayed picture Tip You can access directly to your USB key by pressing USB on the remote control or by using the USB button on the front panel Warning Only files recorded with a FAT16 or FAT32 compliant file forma...

Страница 34: ... OK to select an item Additionally the four coloured keys Red Green Yellow and Blue help you to navigate through the content of a page Their use varies for different stations Function is commonly explained at the bottom of the display Press again to leave the MHEG or press EXIT Language preferences Select your preferred language for the following Audio language Subtitle language You can also set t...

Страница 35: ...of live TV playback from 30 minutes to 3 hours or disable it Instant replay set the time of instant replay from 10 seconds to 1 minute Chapter size set the Time shift buffer s default storage size from 1 minute to 15 minutes Recording duration Set the recording default duration from 30 minute to 3 hours System settings TV scart output RGB level AUX scart SPDIF HDMI audio Set the value to PCM for s...

Страница 36: ...e or disable the following Menu lock Channel lock Maturity lock If you enable Maturity lock select a Maturity level Maturity level is used to set PIN Code protection on programmes according to their maturity rating This feature is based on broadcast ratings Very few channels are broadcasting ratings Set a maturity level from age 2 to 18 to prevent undesired access to programmes for which maturity ...

Страница 37: ...e need for using the internal fan Channel installation This sub menu is used to manage channel installation and update TV Radio services in the main list Update installation manual update Full installation choose between fast recommanded automatic and advanced long see Retune page 11 Erase channel lists Use this option to delete all channels and favorite lists Antenna setting This sub menu is used...

Страница 38: ... version is found press OK to install it Press OK to confirm When update is finished it will reboot the box Factory reset Factory Reset is used to restart the Digital Terrestrial Receiver in its initial state it is protected by code default 0000 Reset restart you lose all data and information previously stored and you have to restart first installation All recordings on hard drive are deleted Cond...

Страница 39: ...y qualified service centres 6 3 Disposal Your product is designed and manufactured with high quality materials and components which can be recycled and reused Please inform yourself about the local separate collection process for electrical and electronic products Please act according to your local rules and do not dispose of your old products with your normal household waste The correct disposal ...

Страница 40: ...n HDMI cable to the HDMI input of the TV set and to the HDMI socket at the rear of the Digital Terrestrial Receiver To connect the Digital Terrestrial Receiver to the mains refer to chapter Getting started 7 2 Connecting your audio equipment Option A Analogue connection Connect the L R audio outputs to the relevant inputs of your audio equipment using a double CINCH cable not supplied Consult the ...

Страница 41: ...l receiver By default volume control is performed through a Philips brand TV set When in TV VCR or DVD mode the volume functions VOL and keys can be controlled through your TV set or amplifier By default volume control is performed through a Philips brand TV set When in AMP mode the volume functions VOL and keys can be controlled through a Philips brand amplifier only Changing the volume and mute ...

Страница 42: ...uipment of the following list Philips cannot guarantee its operation with the complete range of products on the market To do so Press SELECT repeatedly to select the STB mode Simultaneously press keys 1 and 3 until the STB indicator turns on then release the keys Enter code 993 The indicator surrounding the key blinks once after each digit entry Press the VOL key The indicator surrounding the key ...

Страница 43: ...tem option 6 Item selection in menu OK Acknowledge of selection 7 P Channel Up Down 8 Colour keys Contextual keys in teletext 9 MENU Open Close menu 10 Movie Expand TV display format 11 Audio track selection 12 VOL Volume Up Down 13 Sound Mute 14 Open close On Screen Display 15 EXIT Exit menu off 16 SELECT Remote control Mode selection See p25 for Digital Recorder Mode STB 1 5 3 2 4 6 7 8 9 10 12 ...

Страница 44: ...mode 1 Standby 2 0 9 Channel selection 3 Play pause 4 Stop 5 P Channel Up Down 6 TIMER Recording Press TIMER OK to start recording 7 Movie Expand 8 VOL Volume Up Down 9 Sound Mute 10 Record 11 SELECT Remote control Mode selection See p25 for Digital Recorder Mode STB 1 2 3 4 5 6 7 8 9 10 11 ...

Страница 45: ...lection in menu OK Acknowledge of selection 6 Play pause 7 Stop 8 P Channel Up Down 9 Subtitle selection 10 TIMER Recording Press TIMER OK to start recording 11 MENU Open Close menu 12 Movie Expand TV display format 13 VOL Volume Up Down 14 Sound Mute 15 Open close On Screen Display 16 EXIT Exit menu off 17 SELECT Remote control Mode selection See p25 for Digital Recorder Mode STB 1 4 2 3 5 6 7 8 ...

Страница 46: ...annel selection 3 Tuning Down 4 Tuning Up 5 Preset Up Down 6 P Channel Up Down 7 Colour keys Red Select SAT input Green Select TV input Yellow Select DVD input Blue Select tuner amplifier input 8 VOL Volume Up Down 9 Sound Mute 10 SELECT Remote control Mode selection See p25 for Digital Recorder Mode STB 1 4 2 3 5 6 7 8 9 10 ...

Страница 47: ...ssion DVB Terrestrial Demodulation type COFDM 2K 8K MPEG 2 DVB compliant Network MFN SFN QAM QPSK Input frequency range 474 862 MHz Number of TV tuners 2 Video Recording Recording enhancements One Touch Record OTR split event series recording accuracy Storage Media Hard Disk Capacity 160 GB HDD video recording capacity 78 hrs HDD recording enhancements Instant Replay Pause Live TV Time Shift Buffe...

Страница 48: ...G 2 MP HL high definition MPEG 2 MP ML std definition Conditional access system Mediaguard card not supplied De scrambling Smart Card reader Resolution up to 1920 x 1080 interlaced Aspect Ratio 16 9 4 3 Letterbox 4 3 Pan Scan Video bitrate Up to 15 Mbit s Audio Decoding Compression format Dolby Digital MPEG layer I II MP3 Sound system Dolby Digital Dolby Digital downmixed to stereo Stereo System S...

Страница 49: ...on the front panel Set up The LED on the front panel does not light up after 5 secondes Check that the power cord is correctly connected Disconnect this cord and reconnect it to ensure it is in place Check that power is available at the wall socket No sound or picture but the front panel LED is blinking green Press the red coloured key and then enter your PIN Code to disable protection The remote ...

Страница 50: ...ur retailer Installation No sound or picture but the front panel LED is lit in green Check the connections at the wall socket and Digital Terrestrial Receiver Check the EXT1 TO TV SCART connection or the HDMI connection The picture on some channels seems to have been stretched or squashed Check the Digital Terrestrial Receiver TV shape setting following the information in paragraph Watching prefer...

Страница 51: ...te are managed by audio equipment Dolby Digital A surround sound system developed by Dolby Laboratories containing up to six channels of digital audio front left and right surround left and right centre and subwoofer Volume and mute are managed by audio equipment DVB DigitalVideo Broadcasting EPG Electronic Programme Guide HDD Hard Disk Drive HDMI HDMI is a standard for video interfacing it can co...

Страница 52: ...VCR or DVD player recorder connected to SCART EXT2 SDTV Standard Definition Television Smart Card Card to be inserted into the Common Interface It is provided by the pay TV provider whom you took out a subscription Surround A system for creating three dimension sound fields full of realism by arranging multiple speakers around the listener USB key Small size storage device It is used to store all ...

Страница 53: ...s 21 HDD titles Playback from HDD library 19 Install First installation 10 Search failure 11 Pause live TV 15 Playback Playback from HDD library 19 Playback from USB 19 Record 17 Remote control Use the remote control 23 Retune 11 Select a channel 13 Set programme options 14 Use channel lists 13 Use the time shift bar 16 View channel program info 14 Wake up the DigitalVideo Recorder 13 Watch 2 chan...

Страница 54: ...0741 0835 0907 1064 1190 1927 1936 Grundig 0036 0063 0097 0190 0222 0470 0514 0562 0583 0614 0657 0710 0733 Hitachi 0036 0062 0063 0071 0099 0129 0132 0135 0136 0184 0190 0205 0221 0244 0309 0383 0390 0500 0507 0508 0519 0526 0535 0543 0575 0605 0656 0661 0746 0751 0771 0911 1064 1072 1164 1197 1252 1508 1603 Hoher 0741 0892 InFocus 0779 JVC 0063 0097 0120 0220 0245 0398 0445 0535 0633 0677 0680 0...

Страница 55: ...193 0222 0244 0291 0439 0450 0535 0645 0671 0677 0741 0745 1190 1535 1731 Vestel 0244 0583 0695 1064 1190 Viewsonic 0751 1782 13 2 Setup Code For AllVCRs Aiwa 0027 0059 0064 0334 0375 0379 0769 1164 Akai 0047 0064 0068 0133 0267 0342 0375 0379 0669 Alba 0027 0047 0099 0108 0305 0342 0375 0379 Aristona 0108 0173 Daewoo 0047 0064 0072 0131 0305 0379 0664 0669 0871 1164 Denon 0069 0108 Emerson 0027 0...

Страница 56: ... 1167 1722 Bang Olufsen 1052 BenQ 1263 Daewoo 0732 0741 0797 0811 0859 0860 0896 0897 0899 1196 1933 1945 Denon 0517 0661 1661 Emerson 0618 0702 0732 Ferguson 0678 0722 0925 1722 1757 Firstline 0678 0740 0826 0870 0896 Funai 0702 0722 Goodmans 0678 0717 0740 0750 0757 0810 0817 0860 0906 1031 1167 1248 1281 1757 1950 2034 2041 Grundig 0566 0578 0678 0697 0713 0722 0728 0732 0740 0802 0817 1031 106...

Страница 57: ... Toshiba 0530 0566 0600 0722 1072 2033 Yamaha 0517 0566 0673 Yukai 0757 1757 1944 13 4 Setup Code for All Audio AMP Tuners Bang Olufsen 0826 Bose 1382 Cambridge Audio 1674 Denon 0148 1131 1387 1487 Harmon Kardon 1316 1331 1337 Hoher 1284 JBL 1317 JVC 0101 0491 1226 1227 1401 1522 Kenwood 0213 0739 1054 1308 1340 1596 1597 Koss 0771 LG 1320 1551 Magnavox 1296 Marantz 0771 1296 1316 Matsui 0771 0774...

Страница 58: ...Remote control brand code list 58 13 5 Setup Code for All Audio Amplifiers A Pioneer 0327 Sony 0716 Teac 1301 Telefunken 1357 Thomson 1156 Yamaha 0381 ...

Страница 59: ...inklijke Philips Electronics N V and are used by Pace plc under license from Koninklijke Philips Electronics N V Manufactured under license from Dolby Laboratories Dolby and the double D symbol are trademarks of Dolby Laboratories HDMI and HDMI logo and High Definition Multimedia Interface are trademarks or registered trademarks of HDMI licensing LLC Trademark of the DVB DigitalVideo Broadcasting ...

Страница 60: ... 2009 Koninklijke Philips Electronics N V All rights reserved Document order number 3111 176 53842 ...

Отзывы: