background image

48

EN

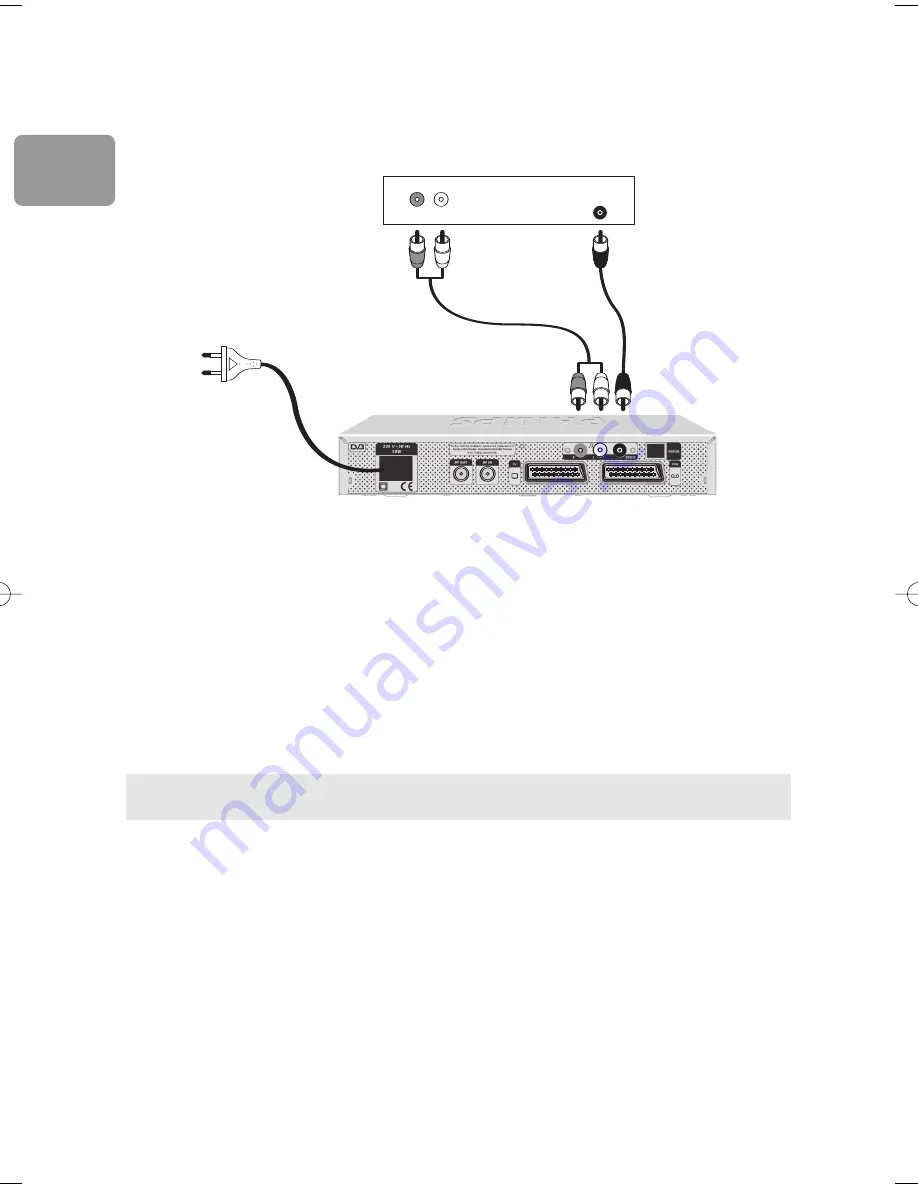
Connecting to your audio equipment

Analogue connection (A)

Connect the L/R audio output sockets to the relevant L/R audio input sockets of your

audio equipment using a double CINCH cable (not supplied). Consult the user manual

of your audio equipment to choose the proper analogue audio inputs.

Digital connection (B)

Connect the audio “

SPDIF

” output socket to the relevant digital audio input socket

of your audio equipment using a single CINCH cable (not supplied). Consult the user

manual of your audio equipment to choose the proper digital audio input.

With this connection set up you can only control the audio volume up/down and

mute from your audio equipment.

Cable Receiver

to AC outlet

Analogue

input

Audio equipment

L

R

AUDIO

Digital

input

A

B

DCR 2020_indice1  1/09/05  15:26  Page 48

Содержание DCR 2020

Страница 1: ...DCR 2020 Benutzerhandbuch 70 DE User manual 36 EN Handleiding 2 NL ...

Страница 2: ...al rules and do not dispose of your old products with your normal household waste The correct disposal of your old product will help prevent potential negative consequences for the environment and human health The Material recyclability symbol affixed on package cardboard and user manual means these parts are recyclable So do not dispose of them with your normal household waste The Material recycl...

Страница 3: ...ipment to rain or moisture The receiver should be placed on a firm surface and the ventilation openings must not be covered with items such as newspapers table clothes curtains etc Do not install the receiver near any heat sources such as radiators stoves or other apparatus that produce heat Protect it from direct sunlight When installing the receiver ensure there is a gap of approximately 2 5 cm ...

Страница 4: ... Plastic bags can be dangerous To avoid suffocation keep the bag away from babies and children Refer to the safety section before connecting your terminal 1 Disconnect your TV set and recorder from the mains 2 Screw the adapter supplied with your receiver on the RF IN connector of the rear panel 3 Integrate your terminal in your existing installation as shown on the diagram Unpacking the receiver ...

Страница 5: ...V set and select a channel 9 Plug the receiver s power cord to the mains The welcome screen appears then the First installation screen 10 Set your favourite menu language and press OK 11 Set appropriate values for the following Network ID applicable network ID as indicated by your operator Please see operator booklet for the right decimal value to be entered for your region Frequency broadcast fre...

Страница 6: ...ing your receiver 47 Connecting to TV and VCR DVD player using SCART Support 48 Connecting to your audio equipment 49 First installation 49 First installation settings 49 Channel scanning 50 Scanning failure 51 General Viewing Functions 51 Receiver wake up 51 Channel selection 52 Channel banner 52 Channel Lists 52 TV or Radio mode selection 53 Volume Audio Control 53 Recording timers 55 Guide Elec...

Страница 7: ...0 User preferences 61 Setup 62 System information 63 Menu Tree 64 More about recording VCR or DVD control 64 Connection for Easy Recording 65 Digital receiver and VCR or DVD settings 65 Recording with the VCR control feature 66 Troubleshooting 68 Technical specifications ...

Страница 8: ...cture and sound quality Wide screen format TV SCART and VCR DVD SCART connector Up to 500 presets for TV and Radio channels Easy installation and use through the well tested Euphoria User Interface Personal channel list and favourite lists Electronic Programme Guide This user manual covers the installation of your receiver and the necessary steps to use the various functions so you can optimally e...

Страница 9: ...ontinuously it indicates that an upgrade of your terminal software is taking place Do not interrupt this operation Wait for the green LED to light up indicating successful upgrade and then continue as normal Receiver operating mode LED1 LED2 Low Power red off Standby off red Running in TV mode off green Running in Radio mode off orange TV recording in progress red green Radio recording in progress...

Страница 10: ...receiver 4 TV SCART 1 socket used to connect to your TV set 5 VCR SCART 1 socket used to connect your video recorder or DVD player recorder 6 L R Left Right analogue audio cinch outputs used to connect your HiFi audio receiver system 7 SPDIF Digital audio cinch output used to connect your HiFi audio receiver system 8 SERIAL RS232 socket used for serial data transfer The label showing the type and ...

Страница 11: ...setting In standby wake up the receiver INFO Switch between normal viewing Channel Banner and Channel Banner with Extended Info EXIT Return to normal viewing MUTE Mute Demute the sound on your TV or receiver MENU Opens Closes the Menu REC Open Close the Timer screen TEXT In TV radio mode enable disable teletext display SUBTITLE Open the Subtitles Language screen to momentarily change subtitles lan...

Страница 12: ...ke sure you affix the reminder sticker supplied with your receiver on the smart card so as to cover the following text Deze zijde boven on the side that has no chip Insert the smart card with the chip facing up Push the smart card into the slot as far as it will go The end of the card will be visible outside the slot New and updated information may be downloaded onto the smart card from time to ti...

Страница 13: ... method for incorporating your digital receiver When adding new equipment be sure to refer to the related installation instructions of the manual of the respective devices Connecting toTV andVCR DVD player using SCART Support Screw the adapter supplied with your receiver on the RF IN connector of the rear panel Use the antenna cord type F IEC supplied to connect your receiver to the VCR DVD Use th...

Страница 14: ... analogue audio inputs Digital connection B Connect the audio SPDIF output socket to the relevant digital audio input socket of your audio equipment using a single CINCH cable not supplied Consult the user manual of your audio equipment to choose the proper digital audio input With this connection set up you can only control the audio volume up down and mute from your audio equipment Cable Receive...

Страница 15: ...cy predefined or entered manually as indicated by your operator see operator booklet Symbol Rate predefined value which should not be modified unless requested by your operator Modulation predefined modulation type which should not be modified unless requested by your operator Symbol rate and modulation may be modified manually upon request by your operator Press OK to start scanning for channels ...

Страница 16: ...p sub menu appears select Channels installation and proceed as described in paragraph Channels installation Before starting a new scan It is recommended to do the following checks connections to your receiver see chapter Connecting your receiver number of channels available in the region corresponding to your area network settings provided by your operator see operator booklet If the same failure ...

Страница 17: ... reduce power consumption please switch your receiver to standby whenever you are not using it For maximum energy saving we recommend you switch off the receiver by unplugging it from the mains if you are not using it for a long time Channel selection Using P P or number keys To change channels use P P or the number keys of the remote control Previous Channel Recall Press BACK to move to the previ...

Страница 18: ...mme Press INFO a third time to close the channel banner Channel Lists While watching digital TV or listening to digital radio you can access existing channel lists by pressing FAV Successively press FAV to toggle between the favourite lists you created and the list of all available channels The current channel list is indicated on the left hand side of the banner When one of the favourite lists is...

Страница 19: ...elect User preferences from the main menu then select Languages Scroll to Audio Language and set the desired language Press OK to save your changes and exit the screen If you want to change the audio mode or language for a particular programme press I II to directly access the audio options available for this programme Available languages depend on the audio content transmitted Recording timers Re...

Страница 20: ...rrow or number keys as appropriate for more details refer to paragraph Recording timers and Reminders Press OK to confirm Deleting an active timer A timer is active Recording is signalled by two front LEDs the right hand one lit in red and the left hand one lit in green in TV mode or in orange in Radio mode or both LEDs lit in red if your receiver is in standby To delete the active timer If your r...

Страница 21: ...ta Press GUIDE when watching a channel or select Guide from the main menu Highlight the name of the programme for which you want more detailed information Press INFO once to get extended information programme description and once again to close it Press OK to view the corresponding channel A No information yet message is displayed if the selected channel does not provide EPG data It may take a few...

Страница 22: ...ues and make changes using the u or i key to select an option or number keys to enter numerical values To open a locked menu item indicated by a L icon you need to enter your PIN Code Cancelling storing changes Either press EXIT to exit the menu system without storing changes Or press OK to validate changes and exit the screen Favourites lists At installation all the channels found are added to th...

Страница 23: ...e Sort Move features then use the red colour button to perform an automatic alphabetical sort or the green colour button to manually move individual channels Use the red colour button to lock or unlock channels belonging to the list If you lock a channel belonging to several lists it is locked in all the lists Locked channels are marked with a lock icon If you have selected the TV or Radio list on...

Страница 24: ...der Select Recording timers or Reminders depending on the type of timer you want to set Select Add timer To add a timer you may also press TIMER while watching digital TV or listening to digital radio or press the appropriate colour key from the Guide Set values for the following Date set the date using the number keys If you added the timer from the Guide or using the TIMER key the date is alread...

Страница 25: ...o confirm Delete an existing timer Select Delete timer from list from the Recording timers or Reminders sub menu depending on the type of timer you want to delete Scroll to the timer you want to delete from the list Press OK to confirm Sleep timer You can set a sleep timer to automatically switch your receiver to Standby mode after a given time lapse Set a sleep timer Select the time lapse after w...

Страница 26: ...itles Language Subtitles Mode Translation Hearing impaired or Off Press OK On screen display Set values for the following Banner timeout banner display duration from 3 to 10 seconds in steps of 1 second Volume bar display Yes or No Volume bar timeout volume bar display duration from 3 to 10 seconds in steps of 1 second Press OK Access Control Access control is used to enable and set up parental co...

Страница 27: ...red manually as indicated by your operator Modulation modulation type predefined or entered manually as indicated by your operator Symbol rate and modulation values should not be modified unless requested by your operator Press OK to start scanning for channels Signal Test Signal Test is used to view the signal level and quality for the frequency defined at installation TV Configuration Select app...

Страница 28: ...actory settings is used to restore the receiver factory configuration Press OK when prompted to confirm If you reset your receiver to factory settings you lose all data and information previously stored and you have to restart first installation System information System information is used to display the receiver reference software and hardware ID as well as Total running time in hours ...

Страница 29: ... Sleep timers Encryption status IRD status Loader status Message list Changing PIN code Languages On screen display Access control Channels installation Signal test TV configuration Software upgrade Factory settings Product reference Software ID Hardware ID Total running time Add timer Modify timer from list Delete timer from list Add timer Modify timer from list Delete timer from list 63 EN ...

Страница 30: ...tted with two SCART sockets Incorporate your receiver in your existing installation as shown below Screw the adapter supplied with your receiver on the RF IN socket of the rear panel Connect the receiver RF IN socket with adapter to the cable wall socket Connect the RF OUT socket of your digital receiver to the aerial input socket of your VCR or DVD using the antenna cord type F IEC Connect the RF...

Страница 31: ...n record the digital TV channel you are watching Some VCR or DVD recorders need to be in standby to use the Easy Recording feature Refer to your VCR or DVD User manual Digital receiver and VCR or DVD settings Refer to chapter More about recording VCR or DVD control for information on how to enable the Easy Recording function on your digital receiver Depending on your VCR or DVD brand and type you ...

Страница 32: ...is correctly connected Disconnect this cord and reconnect it to ensure it is in place Check that the power is available at the wall socket Press P P or any number key of the remote control If the receiver does not wake up press on the front panel Check the connections at the wall socket and receiver Press TV STB on the remote control once or twice Check the SCART connections Make sure the receiver...

Страница 33: ...our PIN code The recorder was set incorrectly They have been re arranged Check the receiver TV format setting following the information in paragraph TV Configuration If you have a wide screen TV you may also need to check the settings on your TV Enter your PIN code to access the channel or unlock it The default Pin code is 0000 Make sure that your recorder is set for the same time as your receiver...

Страница 34: ...trolled L R cinch L R cinch Audio Output Digital AC3 over SPDIF Optical Coaxial cinch Plug Play TV SCART out Controlled audio L R CVBS RGB S Video for LCD projector VCR SCART in Audio L R CVBS RGB Accessories Batteries 2 x AA Included Accessories Remote Control High quality SCART cable Mains cord Antenna Cord type F IEC Adapter F male IEC female Sticker to be put on your smart card Leaflet explain...

Страница 35: ...69 EN ...

Страница 36: ... subject to change without notice Trademarks are the property of Koninklijke Philips Electronics N V or their respective owners 2005 Koninklijke Philips Electronics N V All rights reserved www philips com 3111 176 52561 ...

Отзывы: