background image

2

EN

1  Safety and 

Notice

Read and understand all instructions before you 

use this product. If damage is caused by failure 

to follow the instructions, the warranty does 

not apply.

Safety

Warning


Never remove the casing of this apparatus. 


Never lubricate any part of this apparatus.


Never place this apparatus on other electrical 

equipment.


Keep this apparatus away from direct sunlight, naked 

flames or heat. 


Never look into the laser beam inside this apparatus.


Ensure that you always have easy access to the power 

cord, plug or adaptor to disconnect this apparatus from 

the power.

Read these instructions.

Keep these instructions.

Heed all warnings.

Follow all instructions.

Do not use this apparatus near water.

Clean only with dry cloth.

Do not block any ventilation openings. 

Install in accordance with the 

manufacturer's instructions.

Do not install near any heat sources such 

as radiators, heat registers, stoves, or 

other apparatus (including amplifiers) that 

produce heat. 

Protect the power cord from being 

walked on or pinched, particularly at 

plugs, convenience receptacles, and the 

point where they exit from the apparatus.

Only use attachments/accessories 

specified by the manufacturer.

Use only with the cart, stand, tripod, 

bracket, or table specified by the 

manufacturer or sold with the apparatus. 

When a cart is used, use caution when 

moving the cart/apparatus combination to 

avoid injury from tip-over. 


Unplug this apparatus during lightning 

storms or when unused for long periods 

of time. 

Refer all servicing to qualified service 

personnel. Servicing is required when 

the apparatus has been damaged in any 

way, such as power-supply cord or plug 

is damaged, liquid has been spilled or 

objects have fallen into the apparatus, the 

apparatus has been exposed to rain or 

moisture, does not operate normally, or 

has been dropped.

Apparatus shall not be exposed to 

dripping or splashing. 

Do not place any sources of danger on 

the apparatus (e.g. liquid filled objects, 

lighted candles). 

Where the MAINS plug or an appliance 

coupler is used as the disconnect device, 

the disconnect device shall remain readily 

operable.

Make sure there is enough free space 

around the product for ventilation.

Batteries (battery pack or batteries 

installed) shall not be exposed to 

excessive heat such as sunshine, fire or 

the like.

Содержание DCM3155/12

Страница 1: ...www philips com welcome DCM3155 12 User manual Always there to help you Register your product and get support at Question Contact Philips ...

Страница 2: ......

Страница 3: ...iPhone 12 Charge the iPod iPhone 12 6 Listen to radio 13 Tune to a radio station 13 Program radio stations automatically 13 Program radio stations manually 13 Select a preset radio station 13 Select stereo mono broadcast 13 Show RDS information 14 7 Adjust sound 14 Adjust volume 14 Select a preset sound effect 14 Mute sound 14 8 Other features 15 Set the sleep timer 15 Set the alarm timer 15 Play ...

Страница 4: ...convenience receptacles and the point where they exit from the apparatus j Only use attachments accessories specified by the manufacturer k Use only with the cart stand tripod bracket or table specified by the manufacturer or sold with the apparatus When a cart is used use caution when moving the cart apparatus combination to avoid injury from tip over l Unplug this apparatus during lightning stor...

Страница 5: ...old product helps to prevent potential negative consequences for the environment and human health Your product contains batteries covered by the European Directive 2006 66 EC which cannot be disposed with normal household waste Please inform yourself about the local rules on separate collection of batteries because correct disposal helps to prevent negative consequences for the environmental and h...

Страница 6: ...anges or modifications made to this device that are not expressly approved by WOOX Innovations may void the user s authority to operate the equipment Environmental information All unnecessary packaging has been omitted We have tried to make the packaging easy to separate into three materials cardboard box polystyrene foam buffer and polyethylene bags protective foam sheet Your system consists of m...

Страница 7: ...ps com welcome Introduction With this unit you can enjoy audio from disc USB mass storage devices iPod iPhone and other external devices or listen to radio stations The unit supports the following media formats What s in the box Check and identify the contents of your package Main unit Remote control 1 x AAA battery AC power cable Short user manual Safety Notice sheet ...

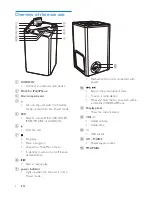
Страница 8: ...Access the iPod iPhone menu In standby mode turn on off feature demonstration h Start or pause play i power indicator Light up when the the unit is in Eco Power mode a d e c b f g h i j k l m n o Flash when the unit is connected with power j Skip to the previous next track Tune to a radio station Press and hold the key to search within a track disc USB iPod iPhone k Display panel Show the current ...

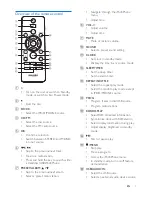
Страница 9: ...Adjust time h VOL Adjust volume Adjust time i MUTE Mute or restore volume j SOUND Select a preset sound setting k CLOCK Set clock in standby mode Display the time in any source mode l SLEEP TIMER Set the sleep timer Set the alarm timer m REPEAT SHUFFLE Select the repeat play mode Select the random play mode except in IPOD IPHONE source n PROG Program tracks in disc USB source Program radio station...

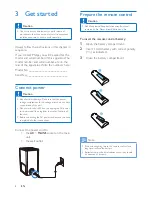
Страница 10: ...e voltage printed on the back or underside of the unit Risk of electric shock When you unplug the AC power cord always pull the plug from the socket Never pull the cord Before connecting the AC power cord ensure you have completed all other connections Connect the power cord to the AC MAINS socket on the main unit the wall outlet Prepare the remote control Caution Risk of explosion Keep batteries ...

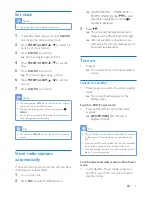
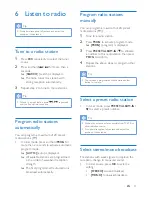
Страница 11: ...2 Press SRC to selectTUNER source AUTO INSTALL PRESS PLAY STOP CANCEL press to start automatic installation or press to cancel is displayed 3 Press The unit automatically stores radio stations with sufficient signal strength After all available radio stations are stored the first stored radio station is broadcast automatically Turn on Press The unit switches to the last selected source Switch to s...

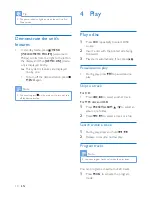
Страница 12: ...he demonstration 4 Play Play a disc 1 Press SRC repeatedly to select DISC source 2 Insert a disc with the printed side facing frontward 3 Play starts automatically If not press Pause resume play During play press to pause resume play Skip to a track For CD Press to select another track For MP3 disc and USB 1 Press PRESET ALBUM to select an album or a folder 2 Press to select a track or a file Sear...

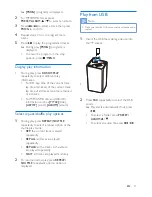
Страница 13: ...WMA disc and USB ID3 information such as TITLE title ARTIST artist ALBUM album Select repeat shuffle play options 1 During play press REPEAT SHUFFLE repeatedly to select a repeat option or the shuffle play mode REP the current track is played repeatedly REP ALL all tracks are played repeatedly REP ALB all the tracks in the album are played repeatedly SHUF all tracks are played randomly 2 To resume...

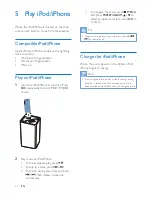
Страница 14: ...ay music on iPod iPhone To resume pause play press To skip to a track press To search during play press and hold then release to resume normal play To navigate the menu press MENU and press PRESET ALBUM to select an option and then press OK to confirm Tip To search during play you can also press and hold on the main unit Charge the iPod iPhone When the unit is power on the docked iPod iPhone begin...

Страница 15: ...n strength The first programmed radio station is broadcast automatically Program radio stations manually You can program a maximum of 20 preset radio stations FM 1 Tune to a radio station 2 Press PROG to activate program mode PROG program is displayed 3 Press PRESET ALBUM to allocate a number to this radio station then press PROG to confirm 4 Repeat the above steps to program other stations Tip To...

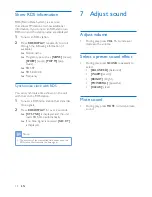
Страница 16: ...nize time shown on the unit with that on the RDS station 1 Tune to a RDS radio station that transmits time signals 2 Press RDS DISPLAY for over 2 seconds CT SYNC is displayed and the unit reads RDS time automatically If no time signal is received NO CT is displayed Note The accuracy of the transmitted time depends on the RDS station that transmits the time signal 7 Adjust sound Adjust volume Durin...

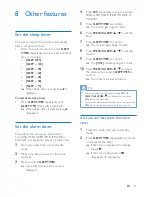
Страница 17: ... select the source is displayed 4 Press SRC repeatedly to select a source DISC USB TUNER IPOD IPHONE or PLAYLIST 5 Press SLEEP TIMER to confirm The hour digits begin to blink 6 Press PRESET ALBUM to set the hour 7 Press SLEEP TIMER to confirm The minute digits begin to blink 8 Press PRESET ALBUM to set the minute 9 Press SLEEP TIMER to confirm The VOL volume begins to blink 10 Press PRESET ALBUM t...

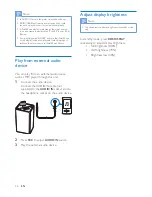
Страница 18: ...witches the alarm source to iPod iPhone library Play from external audio device You can play from an external audio device such as MP3 player through this unit 1 Connect the audio device Connect the AUDIO IN cable not supplied to the AUDIO IN socket and to the headphone socket on the audio device 2 Press SRC to select AUDIO IN source 3 Play the external audio device Adjust display brightness Note ...

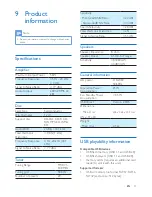
Страница 19: ...0 Sensitivity Mono 26dB S N Ratio Stereo 46dB S N Ratio 22 dBf 43 dBf Search Selectivity 28 dBf Total Harmonic Distortion 2 Signal to Noise Ratio 55 dB Speakers Speaker Impedance 8 ohm Speaker Driver 65 mm full range Sensitivity 83dB m W 4dB m W General information AC power 110 240V 50 60Hz Operation Power Consumption 25 W Eco Standby Power Consumption 0 5 W USB Direct Version 2 0HS Dimensions Mai...

Страница 20: ...320 kbps variable bit rates Maintenance Clean the cabinet Use a soft cloth slightly moistened with a mild detergent solution Do not use a solution containing alcohol spirits ammonia or abrasives Clean discs When a disc becomes dirty clean it with a cleaning cloth Wipe the disc from the centre out Do not use solvents such as benzene thinner commercially available cleaners or antistatic spray intend...

Страница 21: ...erated Remote control does not work Before you press any function button first select the correct source with the remote control instead of the main unit Reduce the distance between the remote control and the unit Insert the battery with its polarities signs aligned as indicated Replace the battery Aim the remote control directly at the sensor on the front of the unit No disc detected Insert a dis...

Страница 22: ...20 EN ...

Страница 23: ...21 EN ...

Страница 24: ...tice 2014 WOOX Innovations Limited All rights reserved Philips and the Philips Shield Emblem are registered trademarks of Koninklijke Philips N V and are used by WOOX Innovations Limited under license from Koninklijke Philips N V DCM3155_12_UM_V3 0 ...

Отзывы: