background image

10

EN

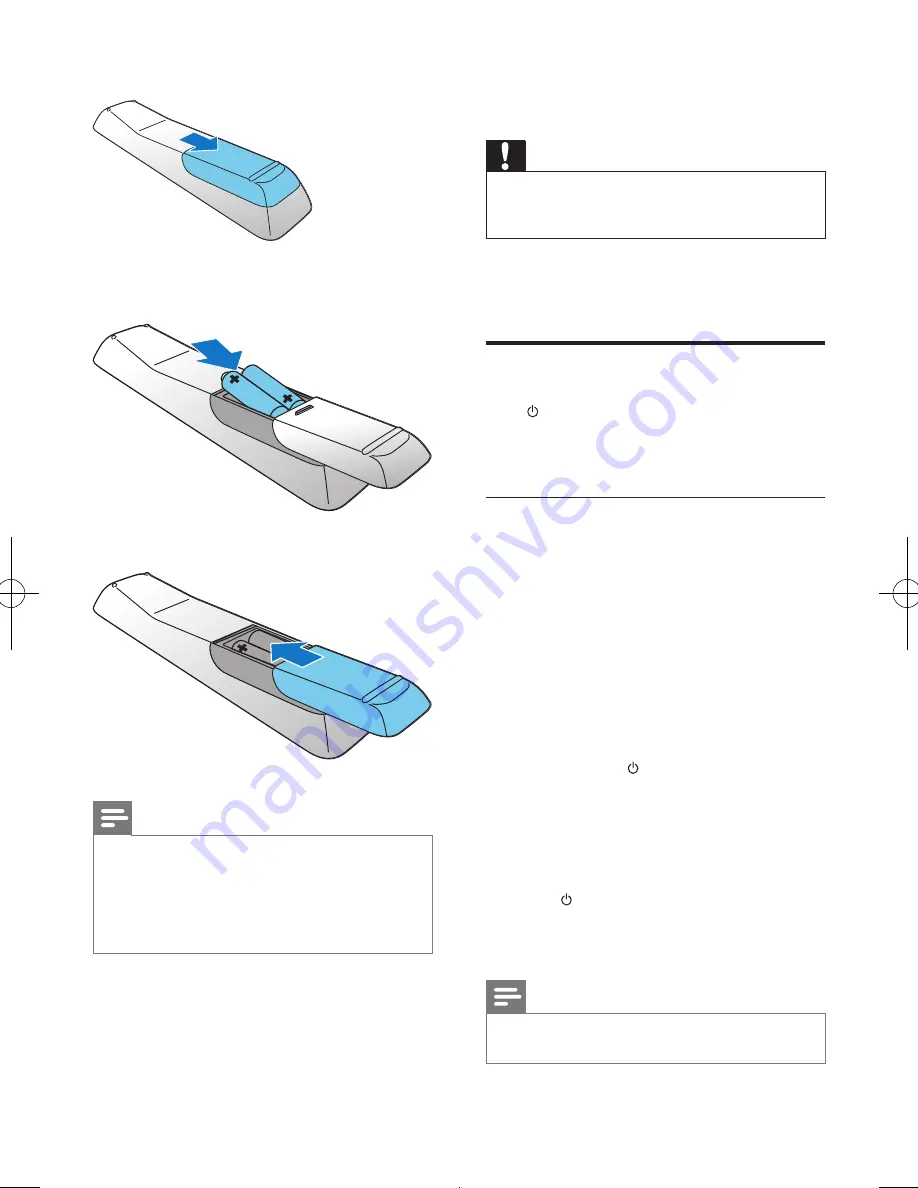
Open the battery compartment.


Insert 2 AAA batteries with correct 

polarity (+/-) as indicated.


Close the battery compartment.


Note


If you are not going to use the remote control for a 

long time, remove the batteries.


Do not use old and new or different types of batteries 

in combination. 


Batteries contain chemical substances, so dispose of 

them properly.

4  Get started

Caution


Use of controls or adjustments or performance of 

procedures other than herein may result in hazardous 

radiation exposure or other unsafe operation.

Always follow the instructions in this chapter in 

sequence.

Turn on

Press  .


»

This product switches to the last 

selected source.

Switch modes

Automatically switch the modes:

• 

After this product keeps inactive for 15 

minutes, it automatically switches to the 

normal standby mode.

• 

After this product keeps in the normal 

standby mode for 15 minutes, it 

automatically switches to the eco power 

standby mode. 


Manually switch the modes:

• 

Press and hold   to switch this product: 

• 

from the working mode or normal 

standby mode to the eco power 

standby mode.

• 

from the eco power standby mode to 

the normal standby mode.

• 

Press   to switch this product

• 

between the working mode and a 

standby mode. 

Note


When an iPod/iPhone/iPad is connected, this product 

does not switch to the eco-power standby mode.

Содержание DCB2020 -

Страница 1: ...gister your product and get support at www philips com welcome Εγχειρίδιο χρήσης 101 Mode d emploi 129 Manuale utente 155 Gebruiksaanwijzing 181 User manual 3 Brugervejledning 27 Benutzerhandbuch 51 Käyttöopas 77 ...

Страница 2: ...d iPhone iPad 13 Load the iPod iPhone iPad 13 Charge the iPod iPhone iPad 14 Listen to the iPod iPhone iPad 14 Remove the iPod iPhone iPad 15 7 Listen to radio 15 Store DAB radio stations automatically 15 Basic operations 16 Use the menu 16 8 Other features 17 Set sleep timer 17 Set alarm timer 17 Listen to external audio device 18 Listen through headphone 18 9 Upgrade the firmware 19 Register you...

Страница 3: ...inside the disc compartment Never place the product or any objects on power cords or on other electrical equipment If the product is transported in temperatures below 5 C unpack the product and wait until its temperature matches room temperature before connecting it to the power outlet Risk of overheating Never install this product in a confined space Always leave a space of at least four inches a...

Страница 4: ... hazardous situations Note The type plate is located on the bottom of the product 2 Your Micro Music System Congratulations on your purchase and welcome to Philips To fully benefit from the support that Philips offers register your product at www philips com welcome Introduction With this product you can enjoy audio from discs USB storage devices iPod iPhone iPad and other external devices listen ...

Страница 5: ...sensor Receive signals from the remote control a b c d e f g h i j k o n m l h SOURCE Select a source i Skip to the previous or next track Press and hold to search within a track disc Tune to a radio station j OK Start pause or resume play In DAB or FM mode confirm the menu option In FM mode and with no menu option displayed switch the sound mode between stereo and monophonic k MENU Stop the play ...

Страница 6: ... previous or next album Select a preset radio station Navigate through iPod iPhone iPad menu m Display panel Display current status n Eject or close the disc tray o VOLUME Adjust the volume level or time Overview of the remote control a Turn on the product Switch to eco power standby mode or normal standby mode b Mute or restore volume a b c e f g p o d h i j m n k l s r q ...

Страница 7: ...o tracks Program radio stations Set the clock k SLEEP TIMER Set the sleep timer or alarm timer l DSC Select a preset sound setting m DBB Turn on or off dynamic bass enhancement n MODE SCAN Select a play mode normal play repeat or shuffle Search for available FM or DAB radio stations o MENU Stop the play of music Press twice to erase a program In normal standby mode turn on or off feature demonstra...

Страница 8: ...e socket flap 2 Insert the stripped part of the wire completely Insert the right speaker wires to R left speaker wires to L Insert the red wires to black wires to 3 Release the socket flap Connect power Caution Risk of product damage Make sure that the power supply voltage corresponds to the voltage printed on the back or the underside of the product Risk of electric shock When you unplug the AC p...

Страница 9: ...structions in this chapter in sequence Turn on Press This product switches to the last selected source Switch modes Automatically switch the modes After this product keeps inactive for 15 minutes it automatically switches to the normal standby mode After this product keeps in the normal standby mode for 15 minutes it automatically switches to the eco power standby mode Manually switch the modes Pr...

Страница 10: ...gain The minute digits begin to blink 5 Press or VOL to set the minute 6 Press PROG CLOCK SET to confirm the clock setting The set clock is displayed To exit clock setting without storing press Note If no button is pressed in 90 seconds the system exits clock setting mode automatically Tip To adjust the digits of hour or minute you can also turn the VOLUME knob or press PRESET ALBUM on the main un...

Страница 11: ... higher than 500 mA through the USB socket Note Philips does not guarantee compatibility with all USB devices NTFS NewTechnology File System data format is not supported 1 Connect the USB storage device into the USB socket 2 Press USB to select the USB source Play starts automatically If the play does not start automatically 1 Press PRESET ALBUM to select a folder 2 Press to select a file 3 Press ...

Страница 12: ...ad You can enjoy audio from iPod iPhone iPad through this product Note No audio output from the headphone socket in this situation Compatible iPod iPhone iPad This product supports the following iPod iPhone and iPad models iPad 2 iPad iPhone 4 iPhone 3GS iPhone 3G iPhone iPod touch 1st 2nd 3rd and 4th generation iPod nano 1st 2nd 3rd 4th 5th and 6th generation iPod classic iPod with video iPod wit...

Страница 13: ...tarts charging automatically Tip For certain iPod models it may take up to a minute before the charging indication appears Note iPod with color display iPod classic and iPod with video are not compatible with dock charging Listen to the iPod iPhone iPad 1 Press DOCK to select the iPod iPhone iPad source 2 Select and play a track on your iPod iPhone iPad To pause or resume the play press To skip to...

Страница 14: ...f 30 DAB radio stations and 30 FM radio stations Check with local retailer or go to www WorldDAB org for the applicable DAB radio frequencies in your area Refer to Product information RDS program types for more information about RDS radio stations Store DAB radio stations automatically If no DAB radio station is stored this product can search and store DAB radio stations automatically 1 Press DAB ...

Страница 15: ...edly Synchronize the clock with an RDS radio station 1 Tune to an RDS radio station that transmits time signals 2 Press and hold RDS DISPLAY until CT SYNC is displayed Use the menu When you listen to radio you can access the menu for control options 1 Press MENU FM mode SCAN SETTINGS scan setting is displayed DAB mode STATION station is displayed 2 Press to select a menu option and then press OK o...

Страница 16: ...alarm timer This product can be used as an alarm clock You can select CD iPod iPhone iPad library PHILIPS playlist FM DAB or USB as alarm source Note Make sure that you have set the clock correctly 1 In standby mode press and hold SLEEP TIMER until TIMER SET set timer scrolls on the display SELECT SOURCE select source scrolls on the screen 2 Press VOL SOURCE or PRESET ALBUM repeatedly to select a ...

Страница 17: ...laylist includes no playable track this product switches the alarm source to iPod iPhone iPad library If other alarm sources are unavailable this product switches to FM mode automatically Listen to external audio device You can listen to an external audio device for example MP3 player through this product 1 Press MP3 LINK USB repeatedly to select MP3 link source 2 Connect the MP3 Link cable to the...

Страница 18: ...you can get information about software update and product support at this website or via your mailbox that is registered as the account for Club Philips Check the current firmware version Follow the steps to check the current version of firmware on your product 1 Press DAB FM to switch to radio mode 2 Press MENU to access the menu 3 Press to select SYSTEM system 4 Press OK or 5 Press to select SWV...

Страница 19: ...reo 46dB S N Ratio 22 dBf 43 dBf Search Selectivity 28 dBf Total Harmonic Distortion 2 Signal to Noise Ratio 55 dB DAB Tuner Tuning Range 174 240 MHz Band III Sensitivity 90 dBf Speakers Speaker Impedance 6 ohm Speaker Driver 10 cm full range Sensitivity 84 dB m W 4 dB m W General information AC power 220 240V 50 60 Hz Operation Power Consumption 25 W Power Consumption in Eco power Standby 0 5 W U...

Страница 20: ...track file number 999 depending on file name length Maximum album number 99 Supported sampling frequencies 32 kHz 44 1 kHz 48 kHz Supported bitrates 32 320 kbps variable bitrates RDS program types NOTYPE No RDS programme type NEWS News services AFFAIRS Politics and current affairs INFO Special information programs SPORT Sports EDUCATE Education and advanced training DRAMA Radio plays and literatur...

Страница 21: ...ct Reconnect the AC power plug and then turn on the product again With a power saving feature the system switches off automatically 15 minutes after the product stays inactivity Remote control does not work Before you press any function button select the correct source with the remote control instead of the main unit Reduce the distance between the remote control and the main unit Insert each batt...

Страница 22: ...e product and other electrical appliances Fully extend the antenna Connect an outdoor FM DAB antenna instead Timer does not work Set the clock correctly Switch on the timer Clock timer setting erased Power has been interrupted or the AC power cord has been disconnected Reset the clock timer ...

Страница 23: ...sposed with normal household waste Please inform yourself about the local rules on separate collection of batteries because correct disposal helps to prevent negative consequences for the environmental and human health Copyright The making of unauthorized copies of copy protected material including computer programs files broadcasts and sound recordings may be an infringement of copyrights and con...

Страница 24: ...paratens underside Observer Nettbryteren er sekundert innkoplet Den innebygde netdelen er derfor ikke frakoplet nettet så lenge apparatet er tilsluttet nettkontakten For å redusere faren for brann eller elektrisk støt skal apparatet ikke utsettes for regn eller fuktighet ...

Страница 25: ...Specifications are subject to change without notice 2012 Koninklijke Philips Electronics N V All rights reserved DCB2020_12_UM_V2 0 ...

Отзывы: