
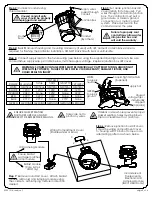


Step 8:
NOTE: To help decrease moisture
, energize fixture for 20
minutes prior to attaching main lens. Place main lens assembly
on the housing. (Do not remove protective tape on edge of
lens). Screw lens frame to housing with 70 in-lb of torque in an
alternating star pattern as shown.
DO NOT
torque in a radial
pattern (1 to 3 to 5 etc).
6
1
3
5
2
4
Main Lens Assembly
(Main Lens, Lens Gasket & Lens Frame)
Torque sequence
Bottom
Band
Pins
T6 Optics - Seating Illustration
RELAMPING
All fixtures ship pre-lamped unless otherwise specified. Fixtures may be relamped in the field or in a
controlled indoor environment. It may be desirable to keep spare lamping modules to field swap. MAKE SURE
POWER IS OFF BEFORE RELAMPING. Remove lens frame, main lens and lens gasket. Inspect gasket for damage
and replace, if necessary.
Relamping indoors: Remove lamping module from main housing and disconnect cordset. Replace lamping
module with a pre-lamped one. Re-seal fixture per Step 8 above - ensure gasket seating surfaces are clean and
free of debris. Take lamping module to work area and relamp per below. Keep this pre-lamped module for
future use.
Relamping in the field: Twist the lens frame on the lamping module and lift up to remove. Remove lamp module
lens and any internal accessory. Replace lamp with a new one of identical electrical characteristics. [NOTE: For
metal halide T6 (G12 base) lamps, Bronzelite recommends using only Philips MasterColor™ lamps or
GE ConstantColor CMH™ lamps. If using a lamp from another manufacturer, ensure it is electrically compatible
with supplied ballast.] For T6 optics, if it is necessary to remove the optics assembly, position the bottom band of
the optics assembly around the four pins indicated in the "T6 Optics - Seating Illustration" below and simply
press-fit into place.
Replace internal accessory (if applicable) and lamp module lens, re-seat lamp module lens
frame and twist to secure. Re-seal the fixture per Step 8 above - ensure gasket seating surfaces are clean and
free of debris.
page 4 of 4
32001316, revision J


