Philips Cineos 32PW9570 Скачать руководство пользователя страница 6

4

16)

x  

Pixel Plus 2 demo on/off

In the right part Pixel Plus 2 and  Digital Natural Motion are switched on.

17)

Ì  

Cinema Go:

See separate Cinema Link booklet supplied.

18)

Q  

Surround mode

Incredible surround
With stereo transmission, and when Incredible surround is selected, it seems as
though the loudspeakers are spread further apart from one another.
Virtual Dolby Surround
Optimal with Dolby surround signals. Enables you to experience the effect of
Dolby surround Pro Logic, reproducing a rear sound effect. See Sound menu, 3D
effect, p. 10.

Note:You can make the same selection in the Sound menu, surround mode, p. 10.

19)

b  

Teletext on/off 

(only available on certain versions) 

p. 13

Press the 

b

key to show teletext on the right half of the screen.

20)

U

Time display:

The time is displayed on the screen.

21)MENU:

Main menu  on/off  see p. 5

22)–P+ Programme selection

To browse through the TV channels and sources stored in the favourite list.

23)

0  

Smart surf  

With this key you can easily switch between 2 up to 9 different TV channels or
sources. See General, Smart surf, p. 7.
Press the 

OK

key or wait for the time out to dismiss the Smart surf display.

24)

w  

Zoom on/off

Press the zoom key to activate/ deactivate the zoom function.
Press the OK key repeatedly to select one of the zoom magnifications 
(x1, x4, x9, x16).
Use the cursor up/down, left/right to shift the selected zoom window over
the screen with the cursor.
The zoom window is reset after: selecting another TV channel, another
picture format or when another picture format is selected automatically.
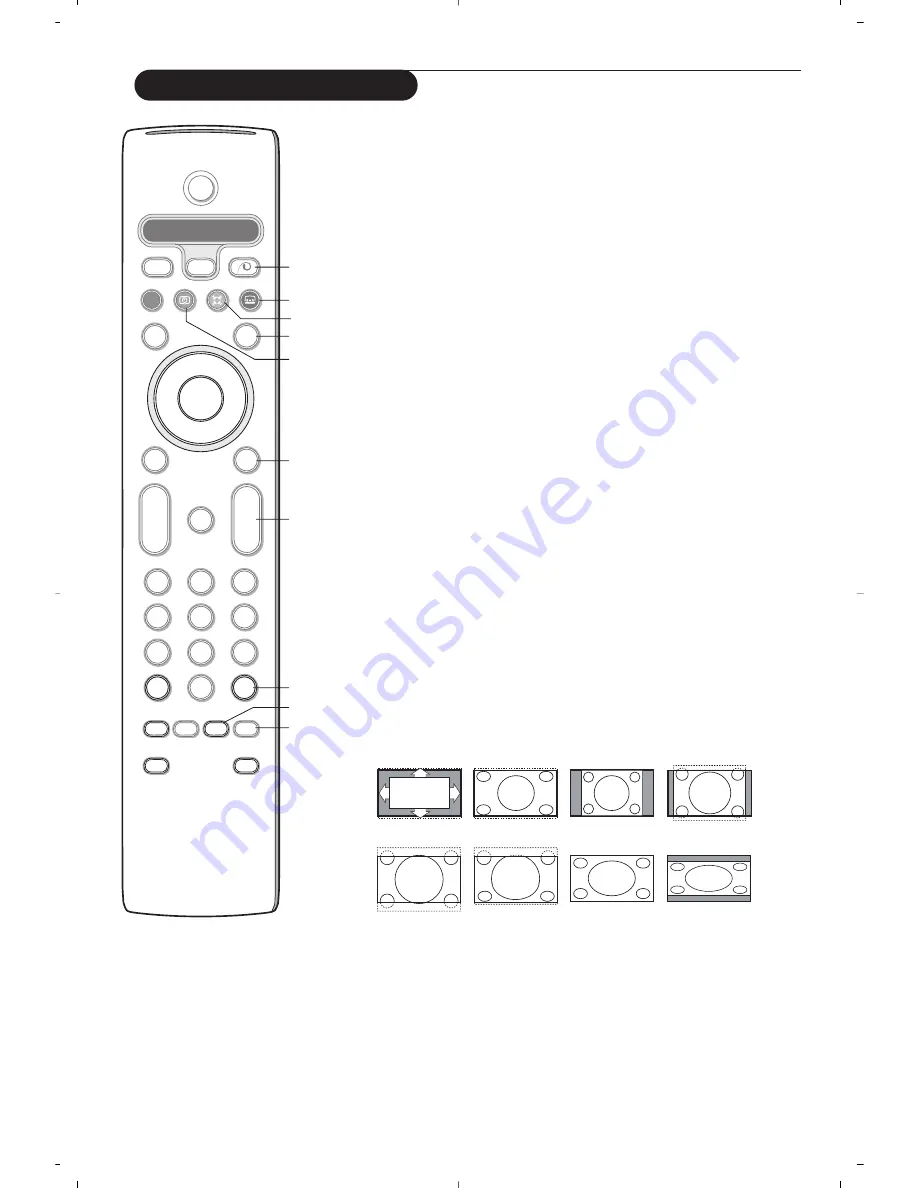
25)

q  

Picture format

Press this key repeatedly or press the cursor up/down to select another picture
format:
If your television is equipped with a 16:9 screen: Auto format, Super zoom,
4:3, Movie Expand 14:9, Movie Expand 16:9, Subtitle zoom or Wide screen.
If your television is equipped with a 4:3 screen: Auto format, 4:3 or
Vertical Squeeze.

Auto format makes the picture fill the screen as much as possible.
In case of subtitles in the bottom black bar, Auto format makes the subtitles
visible. If subtitles are only partly visible, press cursor up.
In case of a broadcaster logo in the corner of the top black bar, the logo
disappears from the screen.
Super zoom removes the black bars on the sides of 4:3 programs with minimal
distortion.
When in Movie Expand 14:9, 16:9, Super zoom or Subtitle zoom picture format,
you can make subtitles visible with the cursor up/down.

Auto format

Super zoom

4:3

Movie Expand 14:9

Movie Expand 16:9

Subtitle zoom

Wide screen

Vertical Squeeze

B

b

¬

+

-

V

+

-

P

v

i

0

Select

VCR DVD SAT AMP CD

MENU

OK

1

2

3

4

5

6

7

8

9

0

Ò

®

π

S

®

®

®

®

æ

b

w

h

q

ACTIVE CTRL

M

a

SMART

SMART

ZOOM

(16

(17
(18
(19

(20

(21

(22

(23
(24
(25

Use of the remote control

Содержание Cineos 32PW9570

Страница 1: ...tv ...

Страница 2: ...MODEL PROD NO GB Please note the reference numbers for yourTV set located on the packaging or on the back of the set ...

Страница 3: ...k function and connected with the eurocable supplied with your video recorder R End of life directives Philips is paying a lot of attention to producing environmentally friendly in green focal areas Your new TV contains materials which can be recycled and reused At the end of its life specialised companies can dismantle the discarded TV to concentrate the reusable materials and to minimise the amo...

Страница 4: ...ower switch A on the front of your TV A blue indicator on the front of the TV lights up and the screen comes on If the TV is in standby mode red indicator press the P keys or the red B key on the remote control Preparation 1m min 2 Should your remote be lost or broken you can still change some of the basic settings with the keys on top of your TV Press the VOLUME or key to adjust the volume the PR...

Страница 5: ... information about the selected TV channel and programme Menu Remote control info When a menu is on screen press i to display info on the selected menu item For information on the remote control functions while the menu info is displayed press any key on the remote control The normal function of the key is not executed 13 h Active control only available on certain versions see p 10 14 b Dual scree...

Страница 6: ...y to select one of the zoom magnifications x1 x4 x9 x16 Use the cursor up down left right to shift the selected zoom window over the screen with the cursor The zoom window is reset after selecting another TV channel another picture format or when another picture format is selected automatically 25 q Picture format Press this key repeatedly or press the cursor up down to select another picture form...

Страница 7: ...e remote control é Use the cursor down to select Install Use the cursor right to select Language Follow the instructions on screen Use the cursor up down to select your preferred language and press the OK key to confirm your selection Use the cursor right to select Country Select the country where you are now located and press the OK key Select Other when none of the countries applies è Proceed wi...

Страница 8: ...nstructions on screen Note Search or direct selection of a TV channel If you know the frequency the C or S channel number enter the 3 or 2 digits of the frequency or the channel number directly with the digit keys 0 to 9 e g 048 Press the cursor down to proceed Repeat to search for another TV channel It is possible to change the name stored in the memory or to assign a name to a TV channel for whi...

Страница 9: ...ent and the previously selected channel 9 programmes if you want the 0 key to summon a list of up to 9 channels which can be selected To add remove a channel or source Tune to the channel or source you wish to add or remove Press the 0 key and press the cursor right to add or remove Note If there are already 9 channels sources in the list the one at the bottom of the list will be removed Factory s...

Страница 10: ...rsonal Identification Number PIN Select Set Change code é If no code exists yet the menu item is set to Set code If a code has previously been entered the menu item is set to Change code Follow the instructions on screen Important You have forgotten your code Select Change code in the General menu and press OK é Press the cursor right and enter the overriding code 8 8 8 8 Press the cursor again an...

Страница 11: ... or 100 Hz Digital Scan Note When 60 Hz NTSC material is used the options are changed to Pixel Plus 2 Movie Plus or Progressive progressive scan without motion compensation TV menu Press the MENU key on the remote control to summon the main menu Press the i key on the remote control to get information about the selected menu item Picture Sound Features Smart picture Contrast Brightness Colour Shar...

Страница 12: ...olume Balance Loudness Headphone volume Surround mode Dual I II Mono Stereo Nicam Analogue 3D effect AVL Delta volume TV Sound menu Active Control The TV continuously measures and corrects all incoming signals in order to provide the best picture possible Press the h key on the remote control é The Active Control menu appears Press the cursor up down to select the Active Control values Off Minimum...

Страница 13: ...OK key to validate Programme lock if you want to lock a certain TV channel or external Select Unlock to disable all locks you have set On timer Select On timer with the cursor down é Select On with the cursor right Press the cursor right again to enter the programme list Select the TV channel or external you want your TV to switch to on a selected time and day Press the cursor right again to selec...

Страница 14: ...programmes that are marked as reminders those that have to be recorded and those that are locked This menu can be used to change or remove marked programmes Record to programme the recording of the video recorder if it has a NEXTVIEWLink function and is connected to EXT 2 Remind to automatically switch on the TV if it is in standby or to display a message if the TV is on Lock to lock certain progr...

Страница 15: ...ext on the right of the screen é Use the cursor keys to select a TV channel Press the b key to switch off dual screen Active screen selection When in dual screen picture teletext b key enter the desired page number with the P key then press the MENU key then select the left screen with the blue ball at the top You can now select a compressed or full screen view of picture teletext with the q key H...

Страница 16: ...between lowercase or capital characters Special to display special characters on the keyboard and press the OK key Press the cursor left repeatedly to return to the Teletext menu again Searching a word Type in the word on screen or select a word from the history list on the right and press OK é Select Accept and press OK again The message Searching appears To cancel the searching or to search for ...

Страница 17: ...our camera or camcorder as shown é Connect to VIDEO 2 and AUDIO L 3 for mono equipment For stereo equipment also connect AUDIO R 3 S VHS quality with an S VHS camcorder is obtained by connecting the S VHS cables with the S VIDEO input 1 and AUDIO inputs 3 Do not connect cable 1 and 2 at the same time This may cause picture distortion Headphone Insert the plug into the headphone socket L as shown é...

Страница 18: ...menu with the cursor up down Press the cursor left right up down to select one of the recorder or DVD functions The key for recording can be operated in the TV mode If your EasyLink recorder has the system standby function when you press the B key for 3 seconds both TV and the recorder are switched to standby Ò p π Ï Rwd Play Stop Play Ffw Rec Eject Recorder Ò p π Ï Prev Play Stop Play Next Eject ...

Страница 19: ...m a peripheral connected to EXT 1 EXT 3 or SIDE you can not select another TV programme on the screen This system remote control operates the following Philips equipment TV VCR DVD SAT RC5 AMP TUNER CD Press the Select key to operate any of the equipment indicated in the display Another device can be selected by pressing Select repeatedly within 2 seconds The led will blink slowly to indicate the ...

Страница 20: ...e entered the correct frequency See Installation p 6 Are brightness sharpness and contrast out of adjustment Select Factory settings in the Setup General menu p 7 Sometimes poor picture quality is possible when having activated an S VHS camera or camcorder connected to the right side of your TV and another peripheral is connected to one of the peripherals at the same time In this case switch off o...

Страница 21: ...erience the most suitable type for your locality Should you wish to use the set in conjunction with other equipment which connects to the aerial socket such as TV games or a video camera it is recommended that you consult your dealer on the best method of connection Stand if provided Use only the stand provided with the set making sure that the fixings are properly tightened A diagram showing how ...

Страница 22: ......

Страница 23: ......

Страница 24: ...ß 3111 256 1336 1 ESP EMG ...

Отзывы: