background image

9

Notes on speaker connection

Never connect speaker wires to the 

metal body or chassis of the car.
Never connect speaker wires with stripes 

to one another.

Mount in the dashboard

Note

Check wire connection before you mount the 

unit into a car.
If preset radio stations are lost when the 

ignition key is turned OFF and then back ON, 
reconnect the red leads crosswise to the 
yellow ones.

1

  If the car does not have an on-board 

drive or navigation computer, disconnect 
the negative terminal of the car battery. 

If you disconnect the car battery in 

a car that has an on-board drive or 
navigation computer, the computer 
may lost its memory. 
If the car battery is not disconnected, 

to avoid short-circuit, ensure that 
bare wires do not touch each other.

2

  Take out the original car audio and keep 

the screws.

3

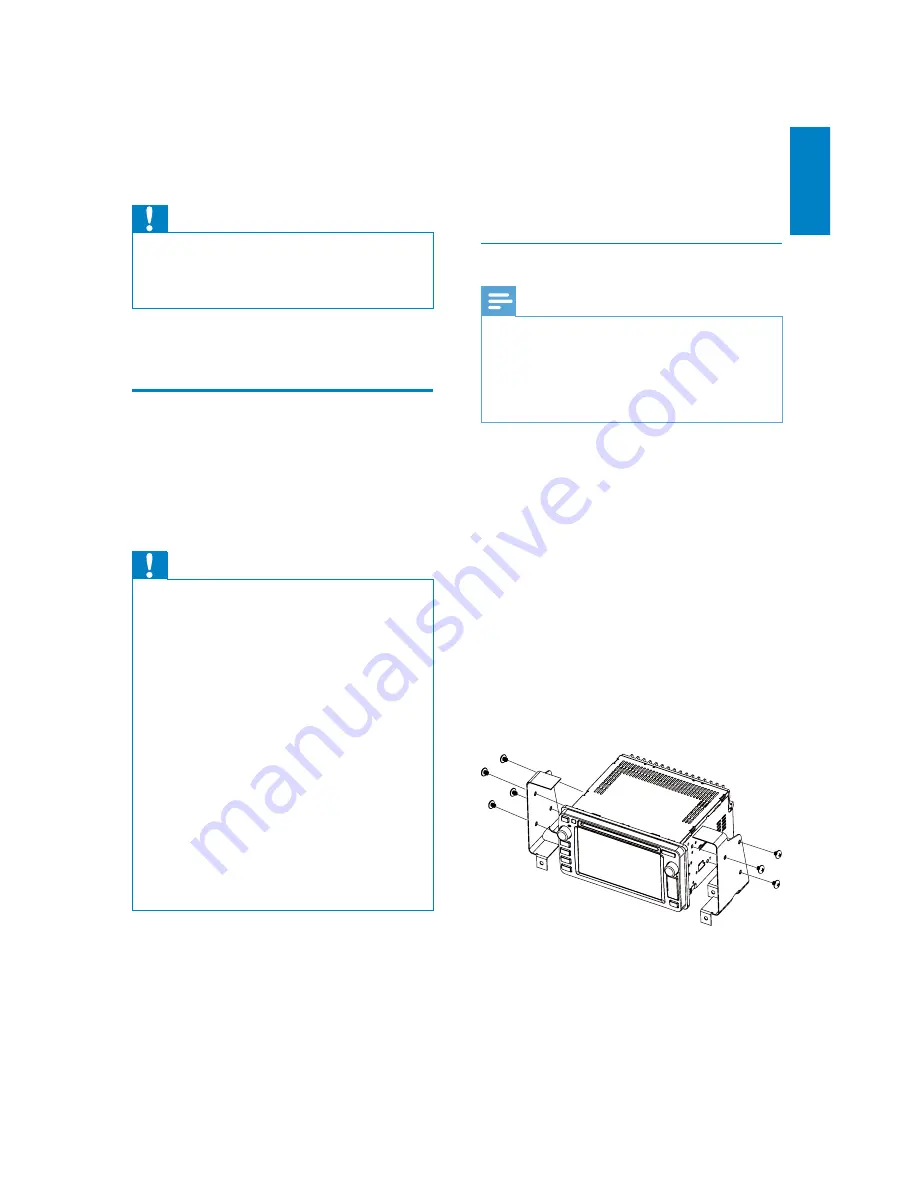
  Take off the mounting brackets from the 

original car audio and mount them onto 
this car audio system. 

4

  Connect wires (see “Connect wires” 

section).

5

  Take off the two screws on the top side 

of the unit.

3 Get 

started

Caution

Use of controls or adjustments or 

performance of procedures other than herein 
may result in hazardous radiation exposure or 
other unsafe operation.

Always follow the instructions in this chapter in 
sequence.

Install the car audio

These instructions are for a typical installation. 
However, if your car has different requirements, 
make the corresponding adjustment. If you have 
any questions regarding installation kits, consult 
your Philips car audio dealer.

Caution

This unit is designed for negative ground 

(earth) 12 V DC operation only.
Always install this unit in the car dashboard. 

Other locations can be dangerous as the rear 
of the unit heats up during use.
To avoid short-circuit: before you connect, 

ensure that the ignition is off.
Ensure that you connect the yellow and red 

power supply leads after all other leads are 
connected.
Ensure that all loose leads are insulated with 

electrical tape.
Ensure that the leads do not get caught under 

screws orin parts that will move (e.g. seat rail).
Ensure that all ground (earth) leads are run to 

a common ground (earth) point.
Use only the supplied mounting hardware for a 

safe and secure installation.
Improper fuses can cause damage or fi re. 

When you need to change the fuse, consult a 
professional.

Note on the power supply lead (yellow)

When you connect other devices to this 

system, ensure that the rating of the car 
circuit is higher than the total fuse value 
of all the connected devices.

English

EN

Содержание CID3291

Страница 1: ...Register your product and get support at www philips com welcome EN User manual ZH CN Ⴌ߀ Ҭ CID3291 ...

Страница 2: ...subtitle language 19 Rotate pictures 19 Zoom 19 Select slide show duration 19 7 Play with Bluetooth device 20 Pair the Bluetooth enabled devices 20 Make a call 20 Receive call 21 Listen to music from Bluetooth device 21 Adjust Bluetooth settings 21 8 Adjust sound 23 Adjust volume 23 Mute 23 Select preset equalizer 23 Adjust fader balance 23 Set Dynamic Bass Boost DBB 24 9 Adjust settings 24 Displa...

Страница 3: ...e warranty does not apply Use of controls or adjustments or performance of procedures other than herein may result in hazardous radiation exposure or other unsafe operation This unit is designed for negative ground earth 12 V DC operation only To reduce the risk of traffic accident do no watch video during driving To ensure safe driving adjust the volume to a safe and comfortable level Improper fus...

Страница 4: ...thout notice Trademarks are the property of Koninklijke Philips Electronics N V or their respective owners Philips reserves the right to change products at any time without being obliged to adjust earlier supplies accordingly This apparatus includes this label This product complies with the radio interference requirements of the European Community Recycling Your product is designed and manufacture...

Страница 5: ...ngratulations on your purchase and welcome to Philips To fully benefit from the support that Philips offers register your product at www philips com welcome Introduction With the car entertainment system you can Quickly found routine through the navigation system And you can also enjoy Audio video JPEG pictures from DVD VCD or CD USB devices SD SDHC MMC cards External devices FM or AM MW radio Audi...

Страница 6: ...source Overview of the main unit a Disc slot b Map card slot c TUNE SELECT Tune for radio station Skip to the previous or next title chapter or track Confirm an entry or selection Start pause or resume play d RESET Reset the unit when it hangs up e DISP Adjust screen brightness Turn on off the screen display c e f g b h d i j k l m a n o E n g l i sh EN ...

Страница 7: ...8 k NAVI Enter the GPS navigation system or exit l MENU Return to the home menu m VOL MUTE Adjust volume Turn the unit on or off Turn mute on or off n Eject disc o Built in microphone EN ...

Страница 8: ...on exposure or other unsafe operation Always follow the instructions in this chapter in sequence Install the car audio These instructions are for a typical installation However if your car has different requirements make the corresponding adjustment If you have any questions regarding installation kits consult your Philips car audio dealer Caution This unit is designed for negative ground earth 12...

Страница 9: ...10 6 Slide the unit into the dashboard until a click sound is heard 7 Fix the unit onto the dashboard with screws 8 Reconnect the negative terminal of the car battery EN ...

Страница 10: ...deo or adjust settings while you drive 1 Press to turn on the unit The available OSD On Screen Display languages are displayed Yellow Green Blue Red Black Yellow Blue white Pink Green white Gearbox White brown Orange white Brown black Red White Yellow Red White Yellow AV system AUX White White Red Red Brown Amplifier Optional accessory GPS antenna Radio antenna Yellow Yellow Rear display Rear disp...

Страница 11: ...een is turned off To turn on the screen press DISP To adjust screen brightness 1 Press DISP Brightness bar is displayed 2 Rotate TUNE SELECT to adjust the value To turn off the unit press for 3 seconds Set date and time 1 Press MENU The main menu is displayed 2 Tap Settings 3 Tap Time The date time setup menu is displayed Set date 1 Tap Date 2 Tap the displayed date information A submenu is displa...

Страница 12: ...ion menu is displayed in a few seconds 3 Refer to the map manual to operate the navigation tool Tip You can press NAVI to enter exit the navigation system Upgrade the map 1 Turn off the car audio system 2 Open the map card door 3 Press the map card sold separately until you hear a click sound 4 Take out the card and bring it to the authorized service center for upgrade 5 Insert the upgraded map ca...

Страница 13: ... signals can be broadcast Store radio stations in memory You can store up to 6 stations in each band Store stations manually 1 Tune to the station 2 Tap 3 Tap Save 5 Listen to radio Tune to a radio station 1 Tap to display home menu 2 Tap Radio Band and frequency information is displayed 3 Tap on FM or AM to select band FM band options FM1 FM2 FM3 AM band options AM1 AM2 4 Briefly tap or to tune to...

Страница 14: ... broadcasts a 10 second preview of each detected radio station 1 Select band 2 Tap 3 Tap Search Auto search starts The six strongest stations of the selected band are saved in preset channels 1 6 automatically Tune to a preset station 1 Tap Radio 2 Select band 3 Tap one of the preset channels 01 to 06 to select a preset station E n g l i sh EN ...

Страница 15: ...MMC card into the SD MMC card slot Play starts automatically 6 Play Load discs You can play video audio or images stored on the following discs DVD video DVD R DVD RW VCD Audio CD CD R CD RW Note Ensure that the disc contains playable content 1 Insert the disc into the disc slot with label side facing up Play starts automatically To remove the disc press the button When the disc is ejected the uni...

Страница 16: ...y Direct select 1 Tap anywhere except for the upper left corner to display menu on the screen if necessary 2 Tap The search screen is displayed Remove the SD MMC card 1 Switch to another source 2 Press the card until you hear a click sound The card is now disengaged 3 Remove the SD or MMC card Play Pause 1 Once a disc USB or SD MMC card is inserted play starts automatically For DVD movie if a menu...

Страница 17: ...t A B off is displayed Random play You can play audio tracks files in random order 1 During play tap repeatedly to turn random play on or off is highlighted start random play turns gray cancel random play 3 Tap the numbers to enter chapter file number then tap To clear the previous input tap To clear all input tap Repeat one all During play you can select different repeat play modes For DVD VCD movi...

Страница 18: ...o language For video discs that contain two or more audio channels 1 During play tap anywhere except for the upper left corner to display menu on the screen if necessary 2 Tap to display the 2nd menu 3 Tap repeatedly The audio channel information is displayed on the upper line of the screen Select audio mode When you playVCDs you can select an audio mode R L Stereo 1 During play tap anywhere excep...

Страница 19: ...led phones through the unit You can also listen to music from a Bluetooth enabled device Pair the Bluetooth enabled devices To connect your Bluetooth device to the unit you need to pair the device to the unit Pairing needs only to be done once You can pair up to eight devices Note The operational range between this unit and a Bluetooth device is approximately 10 meters 30 feet Before you connect a...

Страница 20: ...w Bluetooth settings Bluetooth to turn on or off Bluetooth function Auto connect to turn on or off Auto connect function Auto answer to turn on or off Auto answer function Pairing code to set paring code Phone Book Sync to synchronize phone book Missed calls Received calls Dialed calls Phone book Sim phone book Local phone book Or tap to dial number directly then tap to dial Receive call By defaul...

Страница 21: ...22 1 In Bluetooth menu tap The option menu is displayed 2 Tap an option to change the setting Tip You can also adjust Bluetooth settings in the Settings menu EN ...

Страница 22: ... 1 Tap anywhere except for the upper left corner to display menu on the screen if necessary 2 Tap 3 Tap Below options are displayed 4 Tap or to select subwoofer volume Sub subwoofer volume 0 to 24 8 Adjust sound Adjust volume 1 Turn clockwise to increase volume Turn anti clockwise to reduce volume Mute 1 During play press To turn the sound back on press again Tip You can also turn off sound by tap...

Страница 23: ...neral settings 1 Tap General if necessary 2 Tap or to highlight a setting 3 Tap an option 5 Tap F R L or R to adjust fader balance value Fade fader range 24 to 24 F front speaker R rear speaker Balance balance range 24 to 24 L left speaker R right speaker 6 Tap to exit Set Dynamic Bass Boost DBB 1 Tap to toggle between the settings DBB on The icon is illuminated DBB off default The icon is gray EN...

Страница 24: ...allPaper 4 Tap or to select an option Blue Turn background color to blue Black Turn background color to black F1 Select the F1 picture as background User Choose a picture as wallpaper General settings Options Description Radio region USA S Amer 1 Arabia China S Amer 2 Europe Korea OIRT Select one that matches your location Radio range Local Only stations with strong signals can be broadcast Distan...

Страница 25: ...d in the United States Canada Japan Mexico the Philippines South Korea Taiwan and some other countries If User is selected a new window is displayed Tap or select a picture from the list Or Tap Scan SD to select a picture from the map card The background picture is changed 5 Tap to exit Note Only picture saved in 800 x 480 pixel resolution and in bmp format can be used as wallpaper Adjust sound se...

Страница 26: ...o English Select DVD audio language Options available are depends on DVD disc ࡩ ᇓ໗ ْ ᇓ໗ PAL Used in China India Singapore the western European countries except France Australia and some other countries Rear camera Normal When you drive in reverse the rear view is displayed normally Mirror When you drive in reverse the rear view is displayed in mirror Parking On Disable video view during drive Off ...

Страница 27: ...nsuitable for children under age 17 Adult Acceptable for adults only Load factory Restore to default settings 3 Tap to exit DVD subtitle English Select DVD subtitle language Options available are depends on DVD disc ࡩ ᇓ໗ ْ ᇓ໗ Off Turn off subtitle language display Disc menu English Select DVD menu language Options available are depends on DVD disc ࡩ ᇓ໗ ْ ᇓ໗ 3 Tap to exit Adjust volume settings You...

Страница 28: ...ction In such case consult your Philips dealer 10 Others Listen to other devices You can connect an external audio video device to the unit 1 Connect the car audio to the device with the supplied AV cable 2 Tap to display the main menu 3 Tap AV IN1 4 Operated the connected the device see the instructions manual of the device Tip If you connected the system to other audio device through the REAR OU...

Страница 29: ...ange Line of sight approx 8m Frequency band 2 4 GHz band 2 4000 GHz 2 4835 GHz 11 Product information Note Product information is subject to change without prior notice General Power supply 12 V DC 11 V 16 V negative ground Fuse 15 A Suitable speaker impedance 4 8 Maximum power output 50 W x 4 channels Continuous power output 24 W x 4 channels 4 10 T H D Pre Amp output voltage 2 0 V CD play mode 1...

Страница 30: ...SB devices USB flash memory USB 2 0 or USB1 1 USB flash players USB 2 0 or USB1 1 memory cards SD MMC SDHC Supported formats USB or memory file format FAT16 FAT32 MP3 bit rate data rate 32 320 Kbps and variable bit rate WMA v9 or earlier Directory nesting up to a maximum of 8 levels Number of albums folders maximum 99 Number of tracks titles maximum 999 ID3 tag v2 0 or later File name in Unicode UTF8...

Страница 31: ...bstacle between the device and the system 12 Troubleshooting Warning Never remove the casing of this apparatus To keep the warranty valid never try to repair the system yourself If you encounter problems when using this apparatus check the following points before requesting service If the problem remains unsolved go to the Philips web site www philips com welcome When you contact Philips ensure th...

Страница 32: ...ll other connected devices and then try again The paired mobile phone connects and disconnects constantly The Bluetooth reception is poor Move the mobile phone closer to the system or remove any obstacle between the mobile phone and the system Some mobile phones may connect and disconnect constantly when you make or end calls This does not indicate any malfunction of the system For some mobile pho...

Страница 33: ...protocol that is meant to allow mobile devices to share information and applications without the worry of cables or interface incompatibilities The name refers to a Viking King who unified Denmark Operate at 2 4GHz For more information see www bluetooth com M MMC MultimediaCard A type of memory card with a flash memory MP3 A file format with a sound data compression system MP3 is the abbreviation of ...

Страница 34: ... 2010 Koninklijke Philips Electronics N V All rights reserved Printed in China CID3291 _00_UM_V1 0 ...

Отзывы: