background image

We will describe:

– Digital recording from internal CDC

(fast or normal

recording).

– Recording from external CD player:

– Digital
– Digital (synchronized start with external CD player) 
– Analog

– Finalizing discs:

Finalizing a CDR(W) disc is a simple procedure, necessary to:
– play a recorded CDR on a standard CD player
– play a recorded CDRW on a CDRW compatible CD player

• The recording procedure is the same for CDR and CDRW discs.

Make sure that the CDR(W) is absolutely free of
scratches and dust particles.

• It is advisable to use a CDRW disc for your first try.

• If the disc already contains recordings, the CD recorder will

automatically search for the end of the last track, so that
recording can start from there.

• For recordings, the minimum track length is 4 seconds. You can

record up to a maximum of 99 tracks on a disc. The minimum of
recording time left on the disc is 7 seconds. Else, 

NOT

FITTING

is displayed and you cannot enter into the record

standby mode.

• When you try to record a copy protected material from an

external source, 

COPY PROTECT

will be displayed. No

further digital recording is possible then.

• The 

Serial Copy Management System

(SCMS) only allows

digital recording under specific conditions:
– This means that it is not possible to make a digital copy from

a digital copy. 

– Analog recording is always possible !
– The number of recordings from the original is unlimited. 

• Recordings from DAT or DCC players will not always stop

automatically.

Important:

If you want to play the recorded CDR disc on any regular
CD player, it must first be finalised. See finalising discs.

Finalised CDRW discs play only on CDRW compatible CD
players.

For recording from external CD changers do not use 

AUX

MANUAL

, but 

AUX TRACK

or 

AUX CD

.

The CD recorder is equipped with the high-performance 

D

irect

L

ine 

R

ecording technique. It ensures a perfect recording of the

source material, meaning a true “bit for bit” recording. DLR will
always become active, when you make normal recordings in listen
mode as well as in double speed mode.

A

uto 

L

evel 

C

ontrol ensures that the tracks on the recorded disc

have a similar volume level. Always the already recorded tracks of
the CDR(W) disc will be taken as reference for the volume level of
the following recordings. ALC is active, when 

ALC

is shown.

Auto level control becomes active, when:

– COMPILE CD is being used,
– a disc, a track or a track edit (A-B) is being high speed

recorded,

– a program from the CD changer is being high speed recorded.

Auto level control will not become active, when:

– CD

CD is being used for an empty CDR(W),

– making recordings from an external source, or
– making normal recordings in listen mode.

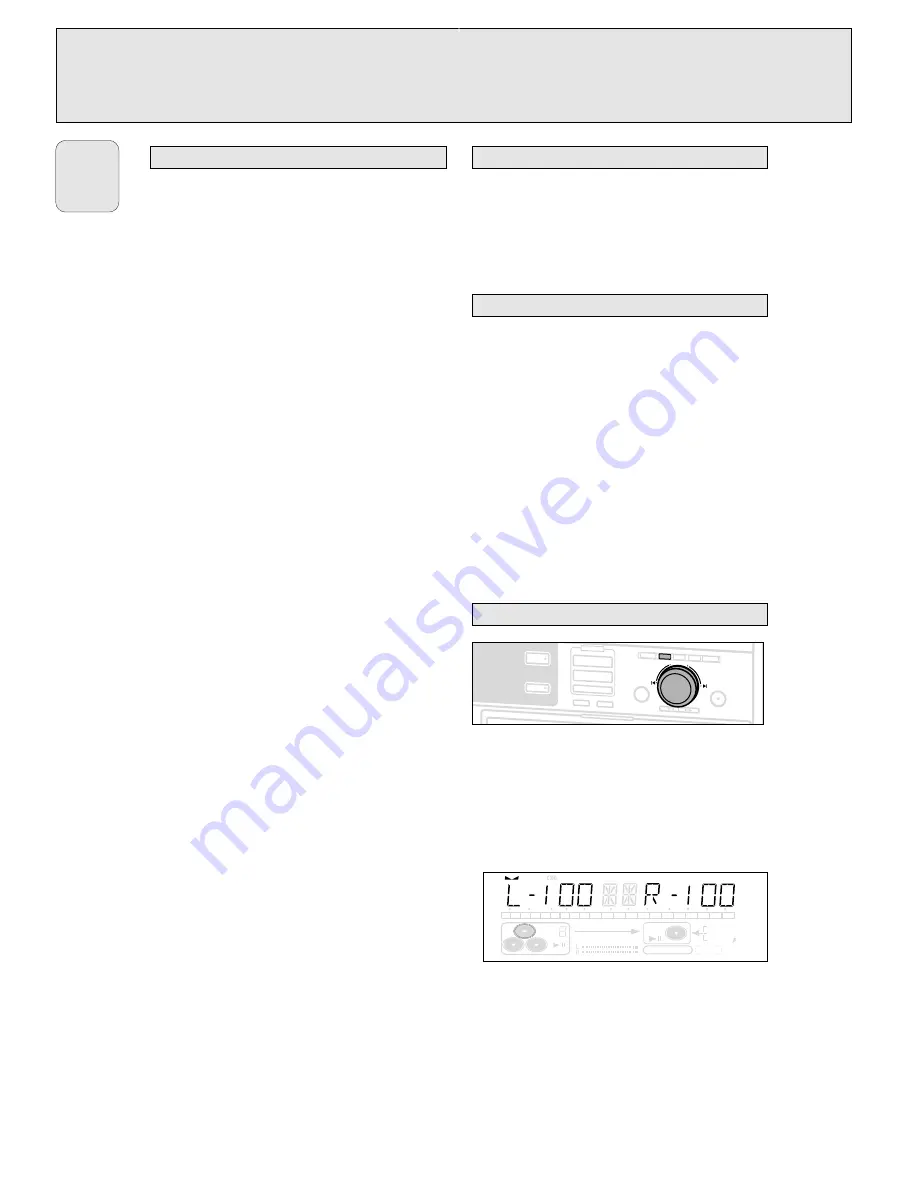
You can set the reference record balance for both digital and
analog recordings.

1

Keep BALANCE on the set pressed to enable the

¡

JOG CONTROL 

to set the BALANCE.

2

Rotate the 

¡

JOG CONTROL 

to set the desired balance.

The set balance will be displayed.

• The balance is reset after the set has been switched to

standby.

TEXT TOTAL TRACK TIME

TOTAL

REM

STEP

DIGITA

CDRW

CDRW

RECORD IN PROGRESS

REC

TRACK TIME

1

2

3

4

5

6

7

8

9 10 11 12 13 14 15 16 17 18 19 20

+

OPTICAL

ANALOG

FINALIZE

ALC

COMPILE CD  TRACK  PROG

SHUFFLE  REPEAT  ALL  EDIT

CDR

AUX

CD   CD

COMPILE CD

RECORD

JOG CONTROL

NO

YES

REC TYPE

ERASE

FINALIZE

REC LEVEL

BALANCE

TEXT

PROG

TRACK EDIT

R

W

BALANCE key

Auto Level Control (ALC)

Direct Line Recording (DLR)

Basic information

RECORDING GENERAL

22

English

Содержание CDR 785

Страница 1: ......

Страница 2: ......

Страница 3: ......

Страница 4: ...te the product the local Philips service organization will attempt to pro vide service although there may be a delay if the appropriate spare parts and technical manual s are not readily available MAKE SURE YOU KEEP Please keep your sales receipt or other document showing proof of purchase Attach it to this owner s manual and keep both nearby Also keep the original box and packing material in case...

Страница 5: ......

Страница 6: ... Discs for recording 8 Discs for playback 8 Maintenance 8 CDR W handling 8 CONTROLS AND CONNECTIONS Controls on the front 9 Connections at the back 10 DISPLAY DISPLAY indications 11 DISPLAY messages 12 INSTALLATION Connections general 14 Analog connections 14 Digital coaxial connections 15 Digital optical connections 15 Power supply MAINS 16 Setup recommendations 16 Inserting batteries in the remo...

Страница 7: ...ponding keys available on the remote control they can be used as well All redundant packing material has been omitted We have done our utmost to make the packaging easily separable into three mono materials cardboard box polystrene foam buffer and polyethylene bags protective foam sheet Your set consists of materials which can be recycled if disassembled by a specialized company Please observe the...

Страница 8: ...htly dampened lint free cloth Do not use any cleaning agents as they may have a corrosive effect Do not expose the set batteries or CDs to humidity rain sand or excessive heat caused by heating equipment or direct sunlight The lenses may cloud over when the set is suddenly moved from cold to warm surroundings Playing a CD RW is not possible then Leave the set in a warm environment until the moistu...

Страница 9: ...PILE CD selects high speed recording mode opens program memory REC ord TYPE selects other recording modes REC ording LEVEL enables the EASY JOG key to set the recording level control BALANCE enables the EASY JOG key to set the balance TEXT store opens Text Edit mode and and stores entered text Disc tray ERASE erases recordings Recording Led Blue in Stop and Play mode Red during recording Red blink...

Страница 10: ...nd right 4 DIGITAL IN connects to the digital coaxial output of an external CD player 5 DIGITAL OUT CDR CD connects to the digital coaxial input of e g amplifier or recording device 6 OPTICAL IN connects to the digital optical output of an external CD player Connections at the back CONTROLS AND CONNECTIONS 10 English ANALOG DIGITAL IN OUT IN OUT OPTICAL IN AC MAINS L R 1 2 3 4 5 6 ...

Страница 11: ...ng recording time REM TRACK TIME remaining track time TOTAL REM TRACK TIME total remaining track time in dubbing mode 6 disc or program contains more than 20 tracks 7 CD CD inserted a pre recorded CD or finalised CD R or CD RW disc CD R unfinalised CD R disc inserted CD RW unfinalised CD RW disc inserted 8 DIGITAL digital input selected for external recording OPTICAL optical input selected for ext...

Страница 12: ...nised Start of recording of a complete disc from external source AUX TRACK Synchronised Start of recording of a single track from external source AUX MANUAL Manual Start of recording from external source selected AUX MIX MIC Manual Start of mixed recording of microphone and external source input REC TR X select a track for recording MIC ONLY Manual Start of microphone recording CLEAR A B when clea...

Страница 13: ...t Edit mode ALBUM ARTIST when editing or erasing an artist name ALBUM TITLE when editing or erasing a title TR N ARTIST when editing or erasing an artist name per track TR N TITLE when editing or erasing a title per track TEXT ERASE when erasing text ALL TEXT when erasing all text selected ERASE when confirmation for erasing has to be given with YES key ERASE ALL when confirmation for erasing has ...

Страница 14: ...nd quality via the analog output We advise you to always establish both digital and analog connections In this way you can always make analog recordings when digital recording is not possible We have described the most common ways of connecting the CD recorder If you still have difficulties with the connections you can always contact the Philips Consumer Service desk in your country This connectio...

Страница 15: ... cord make sure it is fully inserted until there is a click 1 Remove the dust caps from the digital optical connection We recommend you save the cap 2 For external recording connect a fibre optic cord 4 between the digital optical input of the set and the digital optical output of an external CD player Note For playback the digital coaxial outputs or analog outputs of the CD Changer and CD recorde...

Страница 16: ...lug from the wall outlet For users in the U K please follow the instructions on page 3 Place the set on a solid vibration free surface Make sure there is sufficient space around the set to prevent overheating Do not place the set near a source of heat or in direct sunlight Do not use the set under extremely damp conditions If the set is placed in a cabinet make sure that a 2 5 cm space remains fre...

Страница 17: ...will scroll by IMPORTANT For recording it is important that the blank disc is completely free from dust particles or scratches see CD RW handling TEXT TOTAL TRACK TIME TOTAL REM STEP DIGITAL CDRW CDRW RECORD IN PROGRESS REC TRACK TIME 1 2 3 4 5 6 7 8 9 10 11 12 13 14 15 16 17 18 19 20 12 OPTICAL12 ANALOG FINALIZE ALC COMPILE CD TRACK PROG SHUFFLE REPEAT ALL EDIT TEXT TOTAL TRACK TIME TOTAL REM STE...

Страница 18: ...once twice or three times to see remaining track time total remaining time permanent CD text To interrupt play temporarily press PLAY PAUSE 2 again lights on the display To continue play press PLAY PAUSE 2 again 3 To stop play press STOP 9 The number of tracks and the total playing time appear on the display After the last track play will stop If CDC was selected play will continue with the next d...

Страница 19: ...the beginning of the selected track or Press or on the remote control one or more times Play skips to the beginning of the present previous or subsequent tracks Note For tracks on another disc first select the required disc by pressing CD 1 CD 2 CD 3 or CDR Selecting a track when CD play is stopped 1 Rotate JOG CONTROL until the required track number appears on the display 2 Press PLAY PAUSE 2 or ...

Страница 20: ...ights up the selected disc in the changer or the or the recorder plays repeatedly 2 To return to normal play press REPEAT one or more times until the REPEAT label disappears from the display Note You can use shuffle in combination with REPAT ALL or programmed play of the CD Changer REPEAT is also cleared if you open the disc tray TEXT TOTAL TRACK TIME TOTAL REM STEP DIGITAL CDRW CDRW RECORD IN PRO...

Страница 21: ...s The track number at the selected step and the total program time are displayed 4 Press NO to remove the track from the program CLEARED is displayed briefly The next programmed track number will move up to this position and is displayed together with the step number and the remaining total program time 1 If necessary press STOP 9 2 Press NO CLEAR PROG is displayed 3 Press YES to clear the program...

Страница 22: ...play only on CDRW compatible CD players For recording from external CD changers do not use AUX MANUAL but AUX TRACK or AUX CD The CD recorder is equipped with the high performance Direct Line Recording technique It ensures a perfect recording of the source material meaning a true bit for bit recording DLR will always become active when you make normal recordings in listen mode as well as in double...

Страница 23: ...eed All other tracks will be copied normally at double speed Warning No more recording possible after finalizing CDR discs For recording from the internal CD Changer deck you can choose following recording modes High speed recording and automatic finalizing Fast and easy Record and finalize your CDR W in one quick step while the sound is muted You can record the current CD CD CD a program COMPILE ...

Страница 24: ...ying time of the program and RECORD PROG are displayed If the total time of the program is of bigger size than the remaining recording time of the CDR W NOT FITTING will be displayed briefly followed by the remaining recording time and RECORD PROG If you still start recording only the tracks of the program that fit onto the CDR W will be recorded 3 Press either NO to change the program PROG starts...

Страница 25: ...ant to play the recorded CDR disc on any regular CD player it must first be finalised See Finalising discs Finalised CDRW discs play only on CDRW compatible CD players Normal recording and listening of an entire disc a track a program or a track edit 1 Make sure that the CDR W is absolutely free of scratches and dust particles 2 Follow step 2 and 3 of High speed recording 3 Rotate JOG CONTROL to s...

Страница 26: ... the desired track The selected source is mixed to the microphone 12 Press STOP 9 to stop recording To perform microphone recording only see Manual recording of the chapter External recording Note The set is standard adjusted for a mono microphone If you wish to use a stereo microphone press AUX for more than 5 seconds The set will display MONO Press NO to select STEREO or YES to select MONO STERE...

Страница 27: ...increment function on AUTO TR ON is displayed and the function is switched on Track increments are now automatically detected from digital source material In analog source material a silence of 2 7 seconds or more is detected as a track increment Press as often as necessary TRACK INCREMENT on the remote control during stop when CDR is selected to switch the automatic track increment function off A...

Страница 28: ...l key under Recording General 6 Start playback on the selected source The CD recorder starts to record simultaneously and recording in progress is shown The remaining recording time left of the CDR W is displayed Note If you start playback on the selected source within a track recording starts at the beginning of the next track or after 2 7 seconds of silence in analogue recordings 7 If a digital ...

Страница 29: ...epeatedly AUX to select the input for the external source you wish to mix the microphone with 5 Press REC TYPE on the set to enter into the recording menu 6 Rotate JOG CONTROL to select the record type AUX MIX MIC the microphone is mixed to the external source MIC ONLY only the microphone is recorded 7 Press YES to confirm your selection WAIT is displayed RECORD AUX and the remaining recording tim...

Страница 30: ...your recordings will be finalized automatically see High speed recording and automatic finalizing Manual finalizing when recording is in progress 1 Press FINALIZE on the set during recording AUTO FINAL is displayed 2 Press YES to confirm FINALIZE is shown The finalization will start after recording and the actual finalizing time left will start to count down Manual finalizing when recording is sto...

Страница 31: ...ual erased track will go off in the music calendar Erasing one or more tracks 1 Insert the CDRW you want to erase from in the CD recorder tray 2 Press CDR to select the CD recorder 3 Press ERASE to enter into the erasing menu 4 Rotate JOG CONTROL to select the track number s you wish to erase ERASE and the track number e g 10 are displayed To select more tracks to be erased repeat step 4 Note When...

Страница 32: ...g and automatic finalizing to enter the text before finalizing starts otherwise automatic finalizing will be cancelled Follow steps 3 10 of Storing text during stop mode Note Editing text is not possible when a copy protected track is analogue recorded Editing is stopped CD TEXT SAVED is displayed and your text is saved for later editing Auto copied text When an artists name has been stored for a ...

Страница 33: ...a new disc to the text memory you have either to erase another disc from the memory or you have to finalize another disc 1 Press TEXT store to enter into the text edit menu TEXT lights up and TEXT EDIT is displayed 2 Rotate í JOG CONTROL ë to select the memory view menu TEXT MEMORY is displayed 3 Press YES to confirm 4 Rotate JOG CONTROL to select the disc you wish to erase from the text memory 5 ...

Страница 34: ...seconds 7 Press YES to confirm the marked passage TRACK EDIT is shown A B and the track edit time are displayed Press TRACK EDIT again to leave Track Edit mode The new track will be stored Note If you open the CD changer tray the edit is deleted Clearing the track edit 1 Press NO during stop CLEAR A B is displayed 2 Press YES to clear the markers The markers A B are cleared TEXT TOTAL TRACK TIME T...

Страница 35: ...still be done INSERT DISC indication replace or clean the disc insert a CD RW label upwards wait until the lens has cleared USE AUDIO CD indication insert a digital audio disc marked with Digital audio and the special logo CHECK INPUT indication select the correct input make sure the connection cord is properly connected Will not record clean the disc check if CDR W is an unfinalised disc check th...

Отзывы: