background image

Содержание BTM2360

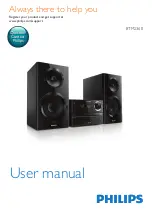
Страница 1: ...www philips com support BTM2360 User manual Always there to help you Register your product and get support at Question Contact Philips ...

Страница 2: ......

Страница 3: ...l play 10 Skip tracks 11 Program tracks 11 Play from Bluetooth enabled devices 11 5 Listen to the radio 13 Tune to a radio station 13 Program radio stations automatically 13 Program radio stations manually 13 Select a preset radio station 13 6 Adjust sound 14 Select a preset sound effect 14 Adjust volume level 14 Mute sound 14 7 Other features 15 Set the alarm timer 15 Set the sleep timer 15 Liste...

Страница 4: ...sure that you always have easy access to the power cord plug or adaptor to disconnect the apparatus from the power The device shall not exposed to dripping or splashing Do no place any source of danger on the device e g liquid filled objects lit candles Where the MAINS plug or an appliance coupler is used as the disconnect device the disconnect device shall remain readily operable Make sure that t...

Страница 5: ...itted We have tried to make the packaging easy to separate into three materials cardboard box polystyrene foam buffer and polyethylene bags protective foam sheet Your system consists of materials which can be recycled and reused if disassembled by a specialized company Please observe the local regulations regarding the disposal of packaging materials exhausted batteries and old equipment The Bluet...

Страница 6: ...s You can enrich sound output with below sound effect Digital Sound Control DSC The unit supports these media formats What s in the box Check and identify the contents of your package Main unit Remote control with one AAA battery Speaker boxes 2 Short user manual Safety and notice Overview of the main unit a d e c b f g h i j k l a d e c b f g h i j k l m o n a Turn on the product Switch to standb...

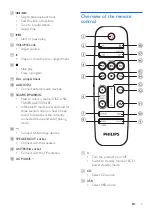
Страница 7: ... a source DISC USB TUNER AUDIO IN BT In Bluetooth mode press and hold for three seconds until you hear a beep sound to disconnect the currently connected device and enter pairing mode l Connect USB storage devices m SPEAKER OUT socket Connect with the speakers n ANTENNA socket Connect with the FM antenna o AC MAINS Overview of the remote control a Turn the product on or off Switch to standby mode ...

Страница 8: ...ss During playback display the play information h SLEEP TIMER Set sleep timer Set alarm timer i CLOCK Set the clock View clock information j PROG Program tracks Program radio stations Auto store FM radio stations k Mute or restore volume l SOUND Enrich sound effect with Digital Sound Control DSC m VOL Adjust volume n Play a track or all tracks repeatedly o Stop play or erase a program p PAIRING Pr...

Страница 9: ...ckets on the main unit marked L 4 Repeat step 2 to insert the left speaker wire To insert each speaker wire 1 Hold down the socket flap 2 Insert the speaker wire fully 3 Release the socket flap Connect power Caution Risk of product damage Ensure that the power supply voltage corresponds to the voltage printed on the back or the underside of the unit Before you connect the AC power cord ensure that...

Страница 10: ...king mode and ECO power standby mode Note The product switches to ECO power standby mode after 15 minutes in standby mode Switch between standby mode and ECO powerstandby mode Press and hold for more than two seconds Note If no button is pressed over 15 minutes in standby mode this product goes to ECO standby mode automatically Set the clock 1 In standby mode press and hold CLOCK for more than two...

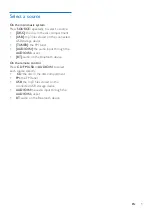
Страница 11: ... TUNER the FM tuner AUDIO IN the audio input through the AUDIO IN socket BT audio on the Bluetooth device On the remote control Press CD FM USB orAUDIO IN to select each source directly CD the disc in the disc compartment FM the FM tuner USB the mp3 files stored on the connected USB storage device AUDIO IN the audio input through the AUDIO IN socket BT audio on the Bluetooth device ...

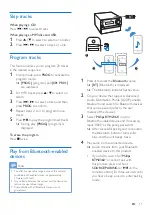
Страница 12: ...ontent 1 Insert a USB device into the socket 2 Press USB to select the USB source Play starts automatically If not press Control play Start pause or resume play Stop play Select an album or a folder Press to skip to the previous or next track Press and hold to search backward forward within a track Play a track or all tracks repeatedly Play tracks randomly VOL Increase or decrease the volume Mute ...

Страница 13: ...obstacle between the system and the device can reduce the operational range Compatibility with all Bluetooth devices is not guaranteed 1 Press to select the Bluetooth source BT Bluetooth is displayed The Bluetooth indicator flashes blue 2 On your device that supports Advanced Audio Distribution Profile A2DP enable Bluetooth and search for Bluetooth devices that can be paired refer to the user manu...

Страница 14: ...eyond the communication range Enter Bluetooth pairing mode Press and hold SOURCE PAIRING for three seconds until your hear a beep sound to disconnect the currently connected device and enter Bluetooth pairing mode Clear Bluetooth pairing history Press and hold on the main set for 8 seconds The current Bluetooth connection is disconnected After successful clearing the product beeps ...

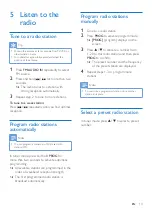
Страница 15: ...20 preset radio stations FM In tuner mode press and hold PROG for more than two seconds to activate automatic programming All available stations are programmed in the order of waveband reception strength The first programmed radio station is broadcast automatically Program radio stations manually 1 Tune to a radio station 2 Press PROG to activate program mode PROG program displays on the screen 3 ...

Страница 16: ...ported media Select a preset sound effect Press SOUND repeatedly to select a preset sound effect DSC1 DSC2 DSC3 DSC4 and DSC5 Adjust volume level On the remote control press VOL repeatedly On the main unit rotate the volume knob Mute sound Press to mute or unmute the sound ...

Страница 17: ...ctivate alarm timer In standby mode press SLEEP TIMER repeatedly to activate or deactivate timer If timer is activated is displayed Tip Alarm timer is not available in AUDIO IN mode Note If CD USB source is selected but no disc is placed or no USB device is connected theTUNER source is selected automatically Set the sleep timer This music system can switch to standby automatically after a set peri...

Страница 18: ...ell phone MP3 player or other mobile devices 1 Use a USB cable to connect the USB socket of product with the USB socket of your devices 2 Connect the product to power Once the device is recognized the charging starts AUDIO IN Note Philips does not guarantee the compatibility of this product with all devices ...

Страница 19: ...ivity 30 dBf Total Harmonic Distortion 3 Signal to Noise Ratio 45 dB USB USB DirectVersion 2 0 Full Speed Charging support 5V 500mA Disc LaserType Semiconductor Disc Diameter 12 cm 8 cm Support Disc CD DA CD R CD RW MP3 CD Audio DAC 24 Bits 44 1 KHz Total Harmonic Distortion 3 1 KHz Frequency Response 20 Hz 20 kHz 44 1 KHz S N Ratio 80 dBA Bluetooth BluetoothVersion V4 0 Bluetooth Frequency Band 2...

Страница 20: ...aximum 999 File name in Unicode UTF8 maximum length 32 bytes Unsupported USB formats Empty albums an empty album is an album that does not contain MP3 WMA files and will not be shown in the display Unsupported file formats are skipped For example word documents doc or MP3 files with extension dlf are ignored and not played WMA AAC WAV PCM audio files DRM protected WMA files wav m4a m4p mp4 aac WMA...

Страница 21: ... unit Reduce the distance between the remote control and the unit Insert the battery with its polarities signs aligned as indicated Replace the battery Aim the remote control directly at the sensor on the front of the unit No disc detected Insert a disc Check if the disc is inserted upside down Wait until the moisture condensation at the lens has cleared Replace or clean the disc Use a finalized C...

Страница 22: ...y obstacle between them Some mobile phones may connect and disconnect constantly when you make or end calls This does not indicate any malfunction of this unit For some devices the Bluetooth connection may be deactivated automatically as a power saving feature This does not indicate any malfunction of this unit Timer does not work Set the clock correctly Switch on the timer Clock timer setting era...

Страница 23: ......

Страница 24: ...ctured by and is sold under the responsibility of Gibson Innovations Ltd and Gibson Innovations Ltd is the warrantor in relation to this product Philips and the Philips Shield Emblem are registered trademarks of Koninklijke Philips N V and are used under license BTM2360_12_UM_V3 0 ...

Отзывы: