background image

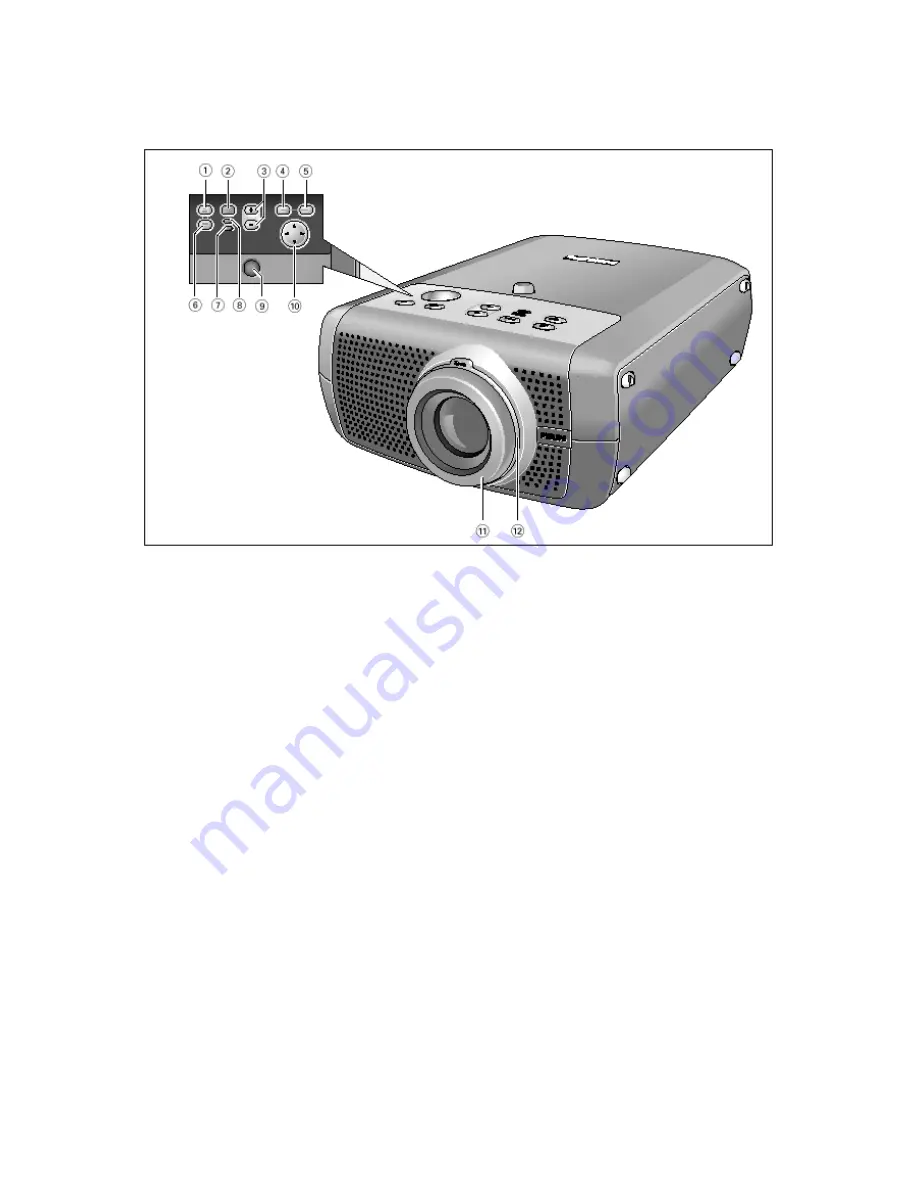
Controls


1. 

A/V Mute

: To mute the sound of the projector and to mute the picture. 

2. 

Source

: To select the current projection source (Computer, Component, RGBS, S-Video, 

Video). The button toggles between the five signals. 

3. 

-/+

: To adjust the volume. 

4. 

Menu

: To activate and deactivate the menu. 

5. 

OK

: To confirm actions in the menu when the menu is on screen. 

6. 

Standby/Standby indicator

: To switch the projector in or out of the Power/Standby 

mode. The 

Standby indicator

 (text on button/ring around button): 

• 

lights up orange when the projector is warming up; 

• 

lights up red when the projector is in Power/Standby mode; 

• 

lights up green as when the projector is operating; 

• 

slowly blinks orange when the projector is cooling down. 

7. 

Temperature indicator

:  

• 

Lights up red in case of temperature error.  

• 

Flashes in case of fan error.  

8. 

Lamp indicator

:  

• 

Lights up green when the lamp is on. 

• 

Lights up orange when lamp life has almost expired. 

• 

Lights up red when lamp life has expired. 

• 

Fast blinks red when lamp start has failed. 

9. 

IR sensor

: To receive the signals from the remote control. 

10. 

Cursor Control

: When the menu is active the Cursor Control controls the menu cursor to 

navigate through the OSD menu. The cursor control works with up/down and left/right 
button operation. 

11. 

Focus ring

: To adjust the focus of the projected image. 

12. 

Zoom ring

: To adjust the size of the projected image. 


Содержание bSure 2

Страница 1: ...bSure 2 Philips Multimedia Projector User Guide ...

Страница 2: ...n Power Standby mode lights up green as when the projector is operating slowly blinks orange when the projector is cooling down 7 Temperature indicator Lights up red in case of temperature error Flashes in case of fan error 8 Lamp indicator Lights up green when the lamp is on Lights up orange when lamp life has almost expired Lights up red when lamp life has expired Fast blinks red when lamp start...

Страница 3: ...elected using Cursor Control and the image is magnified with the zoom factor chosen under Magnification 8 A V Mute To mute the sound of the projector and to mute the picture 9 Cursor Control To manipulate the mouse cursor on the connected computer as long as the menu is not active When the menu is active the Cursor Control controls the menu cursor to navigate through the OSD menu The cursor contro...

Страница 4: ...ct sunlight and away from sources of excessive dust dirt heat water moisture vibration and strong magnetic fields Allow sufficient cooling of the product by keeping all air inlets and outlets clear from obstructions 2 The projector and laptop should be turned off 3 Connect the Data out socket of the computer to the Computer in socket of the projector 1 and secure the plugs by tightening the thumb ...

Страница 5: ... bottom width or vice versa Keystone correction allows you to correct picture distortion of the vertical keystone type by internal scaling This correction function is accessible through the Keystone Correction option in the Settings menu of the On Screen Display OSD menu Pressing the menu button will give you access to many setting that can be adjusted including zoom brightness contrast color temp...

Страница 6: ...ector make sure that the cooling fan has stopped about 3 minutes after the projector has been switched to Power Standby 2 Wait until the cooling fan has stopped before moving the projector 3 Replace the lens cap 4 Disconnect the cables 5 Store the projectors and cables in the provided bag ...

Отзывы: