Philips BDP2600/98 Скачать руководство пользователя страница 5

2.

Safety Instructions, Warnings, Notes, and Abbreviation List

Index of this chapter:

2.1 Safety Instructions
2.2 Warnings
2.3 Notes
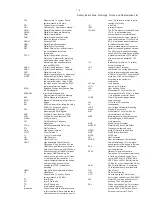
2.4 Abbreviation List

2.1

Safety Instructions

Safety regulations require the following 

during

 a repair:

Connect the set to the Mains/AC Power via an isolation 
transformer (> 800 VA).

Replace safety components, indicated by the symbol 

,

only by components identical to the original ones. Any 
other component substitution (other than original type) may 
increase risk of fire or electrical shock hazard.

Safety regulations require that 

after

 a repair, the set must be 

returned in its original condition. Pay in particular attention to 
the following points: 

Route the wire trees correctly and fix them with the 
mounted cable clamps.

Check the insulation of the Mains/AC Power lead for 
external damage. 

Check the strain relief of the Mains/AC Power cord for 
proper function.

Check the electrical DC resistance between the Mains/AC 
Power plug and the secondary side (only for sets that have 
a Mains/AC Power isolated power supply): 
1.

Unplug the Mains/AC Power cord and connect a wire 
between the two pins of the Mains/AC Power plug. 

2.

Set the Mains/AC Power switch to the “on” position 
(keep the Mains/AC Power cord unplugged!). 

3.

Measure the resistance value between the pins of the 
Mains/AC Power plug and the metal shielding of the 
tuner or the aerial connection on the set. The reading 
should be between 4.5 M

:

 and 12 M

:

.

4.

Switch “off” the set, and remove the wire between the 
two pins of the Mains/AC Power plug. 

Check the cabinet for defects, to prevent touching of any 
inner parts by the customer. 

2.2

Warnings

All ICs and many other semiconductors are susceptible to 
electrostatic discharges (ESD 

). Careless handling 

during repair can reduce life drastically. Make sure that, 
during repair, you are connected with the same potential as 
the mass of the set by a wristband with resistance. Keep 
components and tools also at this same potential.

Be careful during measurements in the high voltage 
section.

Never replace modules or other components while the unit 
is switched “on”. 

When you align the set, use plastic rather than metal tools. 
This will prevent any short circuits and the danger of a 
circuit becoming unstable. 

2.3

Notes

2.3.1

General

Measure the voltages and waveforms with regard to the 
chassis (= tuner) ground ( ), or hot ground ( ), depending 
on the tested area of circuitry. The voltages and waveforms 
shown in the diagrams are indicative. Measure them in the 
Service Default Mode (see chapter 5) with a colour bar 
signal and stereo sound (L: 3 kHz, R: 1 kHz unless stated 
otherwise) and picture carrier at 475.25 MHz for PAL, or 
61.25 MHz for NTSC (channel 3).

Where necessary, measure the waveforms and voltages 
with (

) and without (

) aerial signal. Measure the 

voltages in the power supply section both in normal 
operation ( ) and in stand-by ( ). These values are 
indicated by means of the appropriate symbols.

2.3.2

Schematic Notes

All resistor values are in ohms, and the value multiplier is 
often used to indicate the decimal point location (e.g. 2K2 
indicates 2.2 k

:

).

Resistor values with no multiplier may be indicated with 
either an “E” or an “R” (e.g. 220E or 220R indicates 220

:

).

All capacitor values are given in micro-farads (

P   u

10

-6

),

nano-farads (n

  u

10

-9

), or pico-farads (p

  u

10

-12

).

Capacitor values may also use the value multiplier as the 
decimal point indication (e.g. 2p2 indicates 2.2 pF).

An “asterisk” (*) indicates component usage varies. Refer 
to the diversity tables for the correct values.

The correct component values are listed in the Spare Parts 
List. Therefore, always check this list when there is any 
doubt.

2.3.3

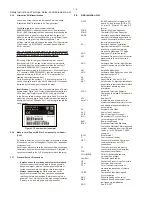
BGA (Ball Grid Array) ICs

Introduction

For more information on how to handle BGA devices, visit this 
URL:

www.atyourservice.ce.philips.com

 (needs subscription, 

not available for all regions). After login, select “Magazine”, 
then go to “Repair downloads”. Here you will find Information 
on how to deal with BGA-ICs.

BGA Temperature Profiles

For BGA-ICs, you 

must

 use the correct temperature-profile, 

which is coupled to the 12NC. For an overview of these profiles, 
visit the website 

www.atyourservice.ce.philips.com

 (needs 

subscription, but is not available for all regions)
You will find this and more technical information within the 
“Magazine”, chapter “Repair downloads”.
For additional questions please contact your local repair help 
desk.

2.3.4

Lead-free Soldering

Due to lead-free technology some rules have to be respected 
by the workshop during a repair:

Use only lead-free soldering tin Philips SAC305 with order 
code 0622 149 00106. If lead-free solder paste is required, 
please contact the manufacturer of your soldering 
equipment. In general, use of solder paste within 
workshops should be avoided because paste is not easy to 
store and to handle.

Use only adequate solder tools applicable for lead-free 
soldering tin. The solder tool must be able:

To reach a solder-tip temperature of at least 400°C.

To stabilize the adjusted temperature at the solder-tip.

To exchange solder-tips for different applications.

Adjust your solder tool so that a temperature of around 
360°C - 380°C is reached and stabilized at the solder joint. 
Heating time of the solder-joint should not exceed ~ 4 sec. 
Avoid temperatures above 400°C, otherwise wear-out of 
tips will increase drastically and flux-fluid will be destroyed. 
To avoid wear-out of tips, switch “off” unused equipment or 
reduce heat.

Mix of lead-free soldering tin/parts with leaded soldering 
tin/parts is possible but PHILIPS recommends strongly 

to 

avoid

 mixed regimes. If this cannot be avoided, carefully 

clear the solder-joint from old tin and re-solder with new tin.

1 - 

4

Содержание BDP2600/98

Страница 1: ...ermission of Philips Blu ray Disc Player Version 1 3Version 0 0 LASER PRODUCT TABLE OF CONTENTS Page Technical Speci cations 1 2 Safety Instruction Warning Notes 1 3 Mechanical and Dismantling Instructions 2 Software Version Upgrades 3 Trouble Shooting Chart 4 Block Diagram 5 Electrical Diagrams and PCB layouts 6 Set Mechanical Exploded view Parts List 7 Revision List 8 Location of PCB Boards 1 1 ...

Страница 2: ... 51 94 55 93 F8 05 98 93 MAIN BOARD M M C M C M C M C M C C M C M PF BOARD C C C C C M C C M C M C M LOADER M M M M M M M M M FRONT CABINET M M M M M M M M M Tips Board in used BDP2600 C Component Lever Repair M Module Lever Repair X Used LOCATION OF PCBS 1 1 ...

Страница 3: ...W DVD R RW DVD R R DL Dual Layer VCD SVCD XGLR 5 5 03 PHGLD 3 ÀOHV DivX Ultra DivX Plus HD media MKV media USB storage device File format Video avi divx mp4 mkv Audio mp3 wav 3LFWXUH MSJ JLI SQJ Video Signal system PAL NTSC HDMI output 480p 576p 720p 1080i 1080p 1080p24 Audio HDMI output Digital output 0 5 Vp p 75 ohm Coaxial Sampling frequency MP3 32 kHz 44 1 kHz 48 kHz Constant bit rate MP3 112 ...

Страница 4: ... Dimensions w x h x d 360 x 44 x 210 mm Net Weight 1 26 kg Accessories supplied Remote control and a battery HDMI cable User manual DVHU 6SHFLÀFDWLRQ Laser Type Diode AlGaInN BD AlGaInP DVD CD Wave length 405 7nm 7nm BD 655 10nm 10nm DVD 790 10 20nm CD Output power max ratings 1 7mW BD 0 19mW DVD 0 25mW CD Specifications Note 6SHFLÀFDWLRQV DUH VXEMHFW WR FKDQJH ZLWKRXW QRWLFH Region code This play...

Страница 5: ...d voltages with and without aerial signal Measure the voltages in the power supply section both in normal operation and in stand by These values are indicated by means of the appropriate symbols 2 3 2 Schematic Notes All resistor values are in ohms and the value multiplier is often used to indicate the decimal point location e g 2K2 indicates 2 2 k Resistor values with no multiplier may be indicat...

Страница 6: ... sources are expected to have a possible dangerous impact others of quite high potential are of limited current and are sometimes held in less regard Always respect voltages While some may not be dangerous in themselves they can cause unexpected reactions that are best avoided Before reaching into a powered TV set it is best to test the high voltage insulation It is easy to do and is a good servic...

Страница 7: ...Frequency Interlaced Scan mode where two fields are used to form one frame Each field contains half the number of the total amount of lines The fields are written in pairs causing line flicker IR Infra Red IRQ Interrupt Request ITU 656 The ITU Radio communication Sector ITU R is a standards body subcommittee of the International Telecommunication Union relating to radio communication ITU 656 a k a...

Страница 8: ...s SD Standard Definition SDA Serial Data I2 C SDA F DAta Signal on Fast I2 C bus SDI Serial Digital Interface see ITU 656 SDRAM Synchronous DRAM SECAM SEequence Couleur Avec Mémoire Color system mainly used in France and East Europe Color carriers 4 406250 MHz and 4 250000 MHz SIF Sound Intermediate Frequency SMPS Switched Mode Power Supply SoC System on Chip SOG Sync On Green SOPS Self Oscillatin...

Страница 9: ...the Top Cover Figure 1 Figure 1 Step2 If it is necessary to dismantle Loader or Front Panel the Front door should be removed first Figure 2 Note Make sure to operate gently otherwise the guider would be damaged Figure 2 2 1 Please kindly note that dismantle the front door assembly carefully to avoid damage tray and the front door Detailed information please refer to the model set ...

Страница 10: ... in normal way you can make it through the instruction as below Figure 3 Figure 3 Step4 Dismantling Front Panel need release 2 snaps of Front Panel and 2 snaps of bottom cabinet then gently pull the Panel out from the set Figure 4 Figure 4 2 2 Detailed information please refer to the model set ...

Страница 11: ...ng Main Board remove 4 screws Figure 6 Step7 Remove 2 screws on PF Board at first then dismantling DuPont connector to dismantle the Power Board from Main Board Figure 6 Step5 Dismantling Loader disconnect the 4 connectors XP7 XP11 XP12 J13 Figure 1 aiming in the below figure and remove 2 screws that connects the loader and the bottom cabinet Figure 5 ...

Страница 12: ... be damaged entirely 4 Press Right cursor button to choose Start then press OK 5 The software will updagrde and screen will display as below Upgrade is ongoing Please wait Please do not unplug or switch off the device 6 The screen will display as below when upgrading complete Upgrade has completed successfully Power off after 1s Power Off 7 Restart the set B Upgrade softwar via network 1 Setup the...

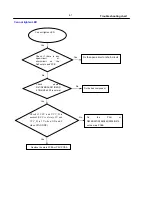
Страница 13: ...e open circuit or short circuit Fix the bad component Fix the PSU or Q209 R297 R298R299 R300 Q210 on the main PCBA Replace the main PCBA or PSU PCBA Yes No Check whether R47 R48 R36 R37 R40 R 41 Q6 Q7 LED1 is normal Check if VCC and VCC_D is normal VCC is always 5V and VCC_D is 5V when ON and 0 when STANDBY Trouble shooting chart 4 1 Yes ...

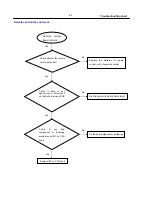
Страница 14: ...n the PSU and main board is normal Replace the main PCBA or PSU PCBA Yes Check if K1 K2 is normal Keys do not work Yes Trouble shooting chart 4 2 Check if there is any open circuit or short circuit on the DuPont pin and PCB No Fix the open circuit or short circuit Yes Yes No No ...

Страница 15: ...eck whether the remote control works well Check if there is any open circuit or short circuit on the DuPont pin and PCB Fix the open circuit or short circuit Replace IR1 on PSU board Trouble shooting chart 4 3 Check if any bad component or soldering exists around IR1 on PSU board Fix the bad component or soldering No No Yes Yes No Yes ...

Страница 16: ...nd cable socket is well Replace U15 U21 or the main board No Check if 12V and 12V_D is normal Fix the bad cable or socket Yes Trouble shooting chart 4 4 Check if any bad component or soldering exists around U15 U21 and XP7 including the bottom layer Fix the bad component or soldering Try to replace loader or update software to fix the issue Yes Yes No No Yes ...

Страница 17: ...ix the PSU or main board Check if every voltage on the PSU and main board is normal Replace the main board Fix the bad component or soldering Trouble shooting chart 4 5 Configuration does not match between player and sink No Change the settings of player or sink to fix this issue Yes Yes No Yes Yes No ...

Страница 18: ...o Can not connect to network Yes Fix or replace P1 and U12 Check if the LAN socket P1 and U12 is broken Fix the abnormal components or soldering Check weather the twisted pair has connect to Internet No Connect the twisted pair to Internet Yes Replace the main board Trouble shooting chart 4 6 Yes Yes ...

Страница 19: ...SH 128MB 256MB A CH DDR3 128MB 256MB B CH DDR3 128MB RESET DC DC AT1259 1256 DC DC AT1259 1256 LDO G966A G9661 5V 5V 5V 1 2V 1 5V 3 3V LDO G9091 5V 3 3V_STBY MOTOR DRIVER AM2158 OSCILLATOR 27MHz30ppm OPU INTERFACE 45PIN FFC LOADER TBL200plus IM 220 OPU TRAVERSE INTERFACE 8PIN FFC TRAVERSE 4PIN CABLE TRAY TRAY INTERFACE SPINDLE SLED M0TOR CONTROL TRAY IN OUT M0TOR CONTROL RF SIGNAL and OTHER MAIN B...

Страница 20: ... 6 8K D509 SR360 3A 60V D509 SR360 3A 60V 12V 12V LF501 30mH LF501 30mH CY505 470pF 250VAC CY505 470pF 250VAC K2 OPEN CLOSE K2 OPEN CLOSE R36 100 R36 100 D507 1N4148 D507 1N4148 U501 TNY178PN U501 TNY178PN S 8 EN UV 1 S 5 S 6 Drain 4 S 7 NC 3 BP M 2 VCC3 VCC3 NC 220uF 16V CE36 NC 220uF 16V CE36 GND1 GND1 R325 NC R325 NC 10uF 16V CE505 10uF 16V CE505 R520 2 49K 1 R520 2 49K 1 D503 1N4007 1A 1000V D...

Страница 21: ...F 16V Y5V C30 0 1uF 16V Y5V C216 0 1uF 16V Y5V C216 0 1uF 16V Y5V R7 15K 1 R7 15K 1 U6 LDO_G9091 330T11U U6 LDO_G9091 330T11U VIN 1 GND 2 EN 3 NC 4 VOUT 5 C14 22uF 6 3V Y5V C14 22uF 6 3V Y5V R28 4 7K 1 R28 4 7K 1 C327 22uF 6 3V Y5V C327 22uF 6 3V Y5V C314 0 1uF 16V Y5V C314 0 1uF 16V Y5V R5 15K 1 R5 15K 1 C34 0 1uF 16V Y5V C34 0 1uF 16V Y5V C218 0 1uF 16V Y5V C218 0 1uF 16V Y5V C215 2 2uF 10V Y5V ...

Страница 22: ...DGND12_K M16 DGND12_K U6 DGND12_K N11 DGND12_K R10 DGND12_K N13 DGND12_K N15 DGND12_K N16 DGND12_K N22 DGND12_K N23 DGND12_K P12 DGND12_K P14 DGND12_K P16 DGND12_K K21 DGND12_K R11 RDQ0 V24 RDQ1 V23 RDQ2 U25 RDQ3 U23 RDQ4 K22 RDQ5 J23 RDQ6 K23 RDQ7 J24 RDQ8 T23 RDQ9 T22 RDQ10 R24 RDQ11 T24 RDQ12 M24 RDQ13 L23 RDQ14 L22 RDQ15 M23 RDQM0 R23 RDQM1 R22 RDQS0 P24 RDQS0_ P25 RDQS1 N25 RDQS1_ N24 RODT W2...

Страница 23: ...RA4_B AA10 RA5_B AC8 RA6_B AA8 RA7_B AD8 RA8_B W10 RA9_B AD7 RA10_B AB6 RA11_B W12 RA12_B Y8 RCLK0_B AD22 RCLK0__B AE22 DVCC12_K T17 DVCC12_K N17 DVCC12_K K17 DVCC12_K N18 DVCC12_K K18 DVCC12_K P18 RA13_B AB11 DVCC12_K L17 DVCC12_K R17 DVCC12_K K15 DVCC12_K U11 DVCC12_K T16 DVCC12_K T12 DVCC12_K T14 RVREF0_B Y18 DVCC12_K U12 DVCC12_K U14 DVCC12_K U15 DVCC12_K U16 C71 0 1uF 16V Y5V C71 0 1uF 16V Y5...

Страница 24: ...5 6 7 8 9 10 11 12 13 14 15 16 17 18 19 22 21 20 23 R183 33 R183 33 C84 0 1uF 16V Y5V C84 0 1uF 16V Y5V ESD4 LVSL10180Z020 18V 2pF ESD4 LVSL10180Z020 18V 2pF 2 1 R48 27K R48 27K TP61 TP61 C94 NC 27pF C94 NC 27pF R42 1 8K R42 1 8K R185 33 R185 33 R51 NC 0 R51 NC 0 TP62 TP62 C87 33pF 50V NP0 C87 33pF 50V NP0 C613 0 1uF 16V Y5V C613 0 1uF 16V Y5V R41 1M R41 1M R187 33 R187 33 TP63 TP63 ESD7 LVSL10180...

Страница 25: ...5V R189 10K R189 10K C115 NC 0 1uF 16V Y5V C115 NC 0 1uF 16V Y5V C118 10uF 10V Y5V C118 10uF 10V Y5V R60 NC 10K R60 NC 10K C937 0 1uF 16V Y5V C937 0 1uF 16V Y5V R186 10K R186 10K R61 4 7K R61 4 7K R66 10K R66 10K TP48 TP48 C936 0 1uF 16V Y5V C936 0 1uF 16V Y5V R55 10K R55 10K R62 NC 10K R62 NC 10K R188 10K R188 10K TP41 TP41 TP35 TP35 R59 NC 10K R59 NC 10K C113 0 1uF 16V Y5V C113 0 1uF 16V Y5V TP3...

Страница 26: ...NC 100 R84 NC 100 3V3_STBY 3V3_STBY R86 100 R86 100 C201 33pF 50V NP0 C201 33pF 50V NP0 12_D VCC_D1 12_D VCC_D1 C125 0 1uF 16V Y5V C125 0 1uF 16V Y5V R90 NC 100 R90 NC 100 C227 NC 27pF 50V NP0 C227 NC 27pF 50V NP0 USB_V USB_V C203 33pF 50V NP0 C203 33pF 50V NP0 C219 NC 4 7uF 16V Y5V C219 NC 4 7uF 16V Y5V R128 10K R128 10K C228 NC 27pF 50V NP0 C228 NC 27pF 50V NP0 C223 33pF 50V NP0 C223 33pF 50V NP...

Страница 27: ...50 1 VWDC2O1 VWDC2O1 CO_B CO_B R137 2K R137 2K R829 470 R829 470 Q809 PNP_MMBT2907ALT1 Q809 PNP_MMBT2907ALT1 MDI_BD1 MDI_BD1 XP7 45PIN 0 5mm XP7 45PIN 0 5mm 1 1 2 2 3 3 4 4 5 5 6 6 7 7 8 8 9 9 10 10 11 11 12 12 13 13 14 14 15 15 16 16 17 17 18 18 19 19 20 20 21 21 22 22 23 23 24 24 25 25 26 26 27 27 28 28 29 29 30 30 31 31 32 32 33 33 34 34 35 35 36 36 37 37 38 38 39 39 40 40 41 41 42 42 43 43 44 ...

Страница 28: ...1 R800 NC 120 1 R103 0 R103 0 LOAD LOAD XP11 4PIN 1 0mm XP11 4PIN 1 0mm 1 1 2 2 3 3 4 4 R101 0 R101 0 C229 100pF 50V NP0 C229 100pF 50V NP0 R104 10K R104 10K REIC_A REIC_A C188 0 1uF 16V Y5V C188 0 1uF 16V Y5V MGND1 MGND1 C184 0 1uF 16V Y5V C184 0 1uF 16V Y5V R102 0 R102 0 FB800 NC 0 FB800 NC 0 C232 0 1uF 16V Y5V C232 0 1uF 16V Y5V R100 NC 0 R100 NC 0 U21 AM2158 U21 AM2158 VC 1 OUT1 2 OUT1 3 GND2 ...

Страница 29: ...6 10 6 10 PF Board Print Lay out Bottom Side ...

Страница 30: ...6 11 6 11 Main Board Print Lay out Top Side ...

Страница 31: ...Main Board Print Lay out Bottom Side 6 12 6 12 ...

Страница 32: ...1 2 ...

Страница 33: ......

Страница 34: ...ON LIST Version 1 0 Initial release for BDP2600 12 94 51 55 8 1 Version 1 1 Initial release for BDP2600 93 Version 1 2 Initial release for BDP2600 05 98 Version 1 3 Initial release for BDP2600 F 8 BDP2610 93 ...

Отзывы: