background image

User Manual BDL5571V 


24 

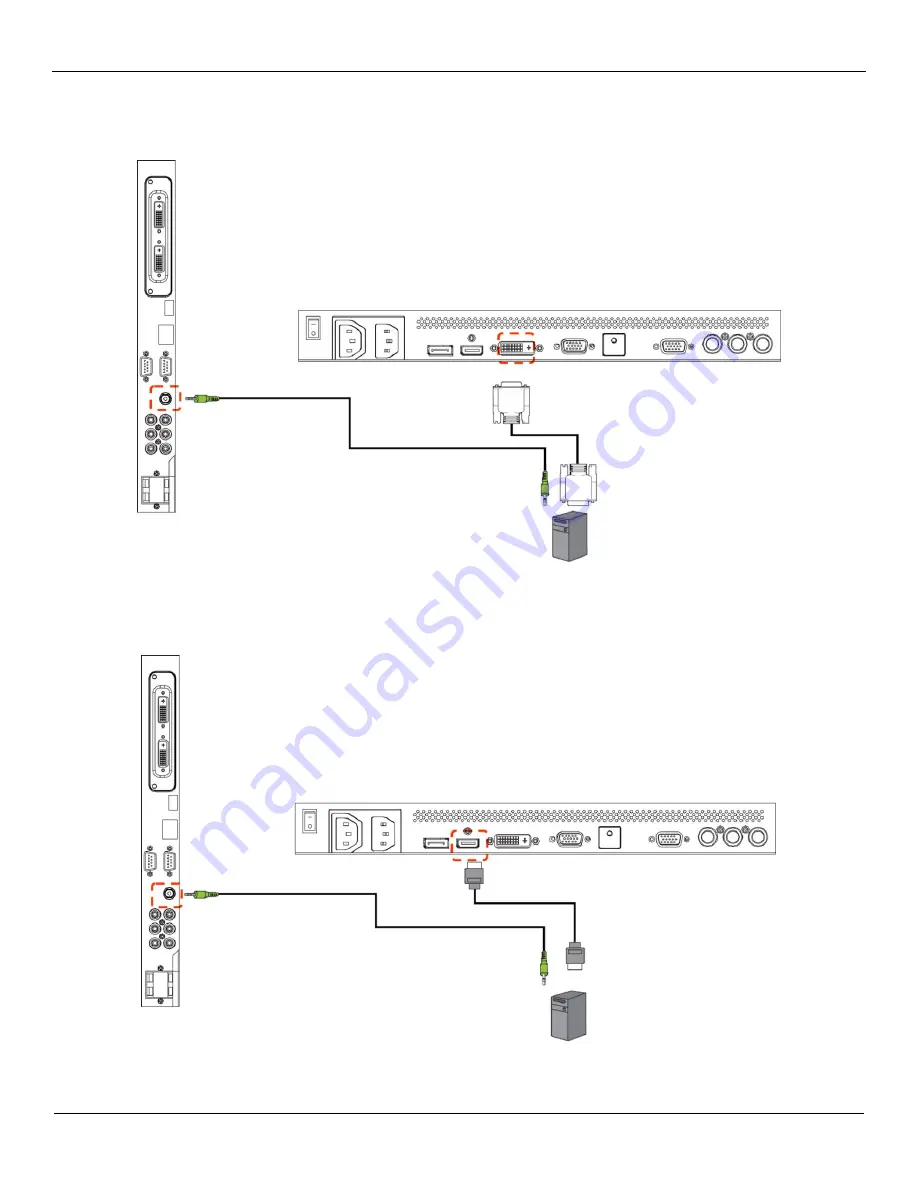
3.4.2.  USING DVI INPUT 

1.  Connect the DVI-D connector of the PC to the DVI-D connector of the monitor. 
2.  Connect the audio cable to the AUDIO IN (AUDIO1) input of the monitor. 


3.4.3.  USING HDMI INPUT 

1.  Connect the DVI-D connector of the PC to the HDMI connector of the monitor. 
2.  Connect the audio cable to the AUDIO IN (AUDIO1) input of the monitor. 


PC 

PC 

Содержание BDL5571V

Страница 1: ...BDL5571V www philips com welcome User Manual English ...

Страница 2: ...guidelines for proper grounding and in particular specifies that the cable ground shall be connected to the grounding system of the building as close to the point of cable entry as practical Caution FCC CSA regulations state that any unauthorized changes or modifications to this equipment may void the user s authority to operate it Caution To prevent electric shock match the wide blade of plug to ...

Страница 3: ...les on the cabinet Keep the monitor dry To avoid electric shock do not expose it to rain or excessive moisture If turning off the monitor by detaching power cable or DC power cord wait for 6 seconds before attach the power cable or DC power cord for normal operation To avoid the risk of shock or permanent damage to the set do not expose the monitor to rain or excessive moisture When positioning th...

Страница 4: ...ed to provide reasonable protection against harmful interference when the equipment is operated in a commercial environment This equipment generates uses and can radiate radio frequency energy and if not installed and used in accordance with the instructions manual may cause harmful interference to radio communications Operation of this equipment in a residential area is likely to cause harmful in...

Страница 5: ...standards PN 93 T 42107 and PN 89 E 06251 ELECTRIC MAGNETIC AND ELECTRONMAGNETIC FIELDS EMF 1 MMD manufactures and sells many products targeted at consumers which like any electronic apparatus in general have the ability to emit and receive electromagnetic signals 2 One of MMDs leading Business Principles is to take all necessary health and safety measures for our products to comply with all appli...

Страница 6: ...hould not be greater than 5A Note The severed plug must be destroyed to avoid a possible shock hazard should it be inserted into a 13A socket elsewhere How to connect a plug The wires in the mains lead are coloured in accordance with the following code BLUE NEUTRAL N BROWN LIVE L GREEN YELLOW EARTH E 1 The GREEN AND YELLOW wire must be connected to the terminal in the plug which is marked with the...

Страница 7: ... in accordance to local state and federal regulations For additional information on recycling contact www eia org Consumer Education Initiative WASTE ELECTRICAL AND ELECTRONIE EQUIPMENT WEEE Attention users in European Union private households This marking on the product or on its packaging illustrates that under European Directive 2002 96 EG governing used electrical and electronic appliances thi...

Страница 8: ...0 3 3 CONNECTING EXTERNAL EQUIPMENT DVD VCR VCD 21 3 3 1 USING COMPONENT VIDEO INPUT 21 3 3 2 USING HDMI INPUT 21 3 3 3 USING DisplayPort INPUT 22 3 4 CONNECTING A PC 22 3 4 1 USING VGA INPUT 22 3 4 2 USING DVI INPUT 24 3 4 3 USING HDMI INPUT 24 3 4 4 USING DISPLAY PORT INPUT 25 3 5 EXTERNAL AUDIO CONNECTION 25 3 5 1 CONNECTING EXTERNAL SPEAKERS 25 3 5 2 CONNECTING EXTERNAL AUDIO DEVICE 27 3 6 CON...

Страница 9: ...TYPES OF PIXEL DEFECTS DOT DEFINITION 51 6 3 BRIGHT DOT DEFECTS 52 6 4 DARK DOT DEFECTS 52 6 5 PROXIMITY OF PIXEL DEFECTS 52 6 6 PIXEL DEFECT TOLERANCES 52 7 CLEANING AND TROUBLESHOOTING 53 7 1 CLEANING 53 7 2 TROUBLESHOOTING 54 8 TECHNICAL SPECIFICATIONS 55 ...

Страница 10: ... table stands are prepared as options 1 3 INSTALLATION NOTES Due to the high power consumption always use the plug exclusively designed for this product If an extended line is required please consult your service agent The product should be installed on a flat surface to avoid tipping The distance between the back of the product and the wall should be maintained for proper ventilation Avoid instal...

Страница 11: ... protective film from the logo c Adjust the logo guider to align it with the long side of the front bezel and press the guider with your hand d Keep pressing the guider with your one hand and use the other hand to fold the logo out Make sure that the logo is aligned with the front short bezel Press firmly and repeatedly on the logo to make the logo stick tight on the front bezel e Remove the guide...

Страница 12: ...screws on both sides of the monitor NOTE The long end of the stand should face to the front while installing 1 5 2 How to remove the stands 1 Spread the protective sheet on a flat surface 2 Place the monitor face down on a protective sheet 3 Remove screws using a screwdriver and place them in a safe place for reuse Screw Screw Screw Screw Stands Longer end comes to the front ...

Страница 13: ... figure below secure the monitor to a solid wall or pillar using a cord which is strong enough to bear the weight of the monitor BDL5571V approx 47 5 kg Screw hooks ring type are recommended Caution Although the above method is recommended it is not guaranteed that the monitor will not tilt over Before moving the monitor remove the cord first Clamper Screw Screw Holes Screw Hook etc ...

Страница 14: ...and the image brightness will be auto adjusted when LIGHT SENSOR set to ON on OSD menu Indicates the operating status of the monitor lights green when the monitor is turned on lights red when the monitor is in standby mode lights amber when the monitor enters DPMS mode When SCHEDULE is enabled it would blink green and red If the indicator blinks red it tells that a failure is detected Off when the...

Страница 15: ...while OSD menu is on or to decrease the audio output level while the OSD menu is off 5 MINUS button To decrease the adjustment while OSD menu is on or to decrease the audio output level while the OSD menu is off 6 UP button To move the highlight bar up to adjust the selected item while OSD menu is on 7 DOWN button To move the highlight bar down to adjust the selected item while OSD menu is on 8 ME...

Страница 16: ...sly for three 3 seconds 2 3 INPUT OUTPUT TERMINALS 1 OPTIONAL SLOT Slot for installed optional module e g optional DVI module 2 USB For technical support only 3 RJ 45 LAN control function for the use of remote control signal from control center 4 RS232C OUT IN RS232C network connection input output for the use of loop through function 5 AUDIO IN AUDIO1 AUDIO2 AUDIO3 Connect to the audio output of ...

Страница 17: ...er cord to the wall outlet 11 DISPLAY PORT Connect to the DisplayPort output of a PC or an AV device 12 VIDEO IN HDMI Connect to the HDMI output of an AV device or connect to the DVI D output of a PC Using a DVI HDMI cable 13 VIDEO IN DVI D Connect to the DVI D output of a PC or connect to the HDMI output of an AV device Using a DVI HDMI cable 14 VGA IN Connect to the VGA output of a computer 15 V...

Страница 18: ...ivate the audio source selection menu Press it repeatedly to select the audio input source from HDMI AUDIO1 AUDIO2 and AUDIO3 Picture format button To switch screen aspect ratio between PC signal Full Normal Custom and Real Video signal Full Normal Dynamic Custom and Real PIP Picture In Picture buttons ON OFF button To turn PIP mode ON OFF INPUT button To select the input signal for the sub pictur...

Страница 19: ...highlight bar right to the 1st or 2nd submenu when OSD menu is on To increase the adjustment with OSD menu To move the sub picture right in PIP mode MINUS button To move the highlight bar left to the 1st submenu or main menu when OSD menu is on To decrease the adjustment with OSD menu To move the sub picture left in PIP mode SET button To activate the setting with OSD menu AUTO ADJUST button Note ...

Страница 20: ...ery life or leakage of batteries Remove dead batteries immediately to prevent battery liquid from leaking into the battery compartment Don t touch exposed battery acid it cause damage to your skin Note If you do not intend to use the Remote Control for a long period remove the batteries 2 4 3 OPERATING RANGE OF THE REMOTE CONTROL Point the top of the remote control toward the monitor s remote cont...

Страница 21: ...r Manual BDL5571V 20 3 CONNECTIONS TO EXTERNAL EQUIPMENT 3 1 USING THE CABLE RETAINER 3 2 USING THE SWITCH COVER You can use the switch cover to prevent the monitor from being turned on or off accidentally ...

Страница 22: ... colored labeled as Pb jack of the device to the blue colored Pb jack of the monitor 3 Connect the red colored labeled as Pr jack of the device to the red colored Pr jack of the monitor 4 Connect the red R and white L audio jacks of the device to the AUDIO IN AUDIO2 or AUDIO3 jacks of the monitor 3 3 2 USING HDMI INPUT Connect the HDMI connector of the external device to the HDMI input of the moni...

Страница 23: ...ight want to remove the audio connection from the drawing below because like HDMI cable DP cable carries audio besides video No audio connection is required 3 4 CONNECTING A PC 3 4 1 USING VGA INPUT 1 Connect the 15 pin VGA connector of the PC to the VGA IN connector of the monitor 2 Connect the audio cable to the AUDIO IN AUDIO1 input of the monitor DVD VCR VCD ...

Страница 24: ...User Manual BDL5571V 23 PC ...

Страница 25: ...C to the DVI D connector of the monitor 2 Connect the audio cable to the AUDIO IN AUDIO1 input of the monitor 3 4 3 USING HDMI INPUT 1 Connect the DVI D connector of the PC to the HDMI connector of the monitor 2 Connect the audio cable to the AUDIO IN AUDIO1 input of the monitor PC PC ...

Страница 26: ...r Allen You might want to remove the audio connection from the drawing because like HDMI cable DP cable carries audio besides video No audio connection is required 3 5 EXTERNAL AUDIO CONNECTION 3 5 1 CONNECTING EXTERNAL SPEAKERS 1 Connect the speaker wires to the external speaker SPEAKERS output of the monitor 2 Turn on the monitor Note Before connecting the speaker wires to the monitor turn off y...

Страница 27: ...User Manual BDL5571V 26 External speaker ...

Страница 28: ...User Manual BDL5571V 27 3 5 2 CONNECTING EXTERNAL AUDIO DEVICE Connect the red R and white L audio jacks of the external audio device to the AUDIO OUT R L jacks of the monitor External audio device ...

Страница 29: ...optional DVI Modules Connect the DVI D OUT connector of the monitor optional DVI Module to the DVI D IN connector of another BDL5571V monitor optional DVI Module Connect the RS232C OUT connector of the monitor to the RS232C IN connector of another BDL5571V monitor Do not connect the AC OUT connector of the monitor to the AC IN connector of another BDL5571V monitor All the monitors in the daisy cha...

Страница 30: ... button on the remote control to display the OSD menu 2 Press the UP DOWN button to choose the item you want to adjust 3 Press the PLUS SET button to enter the submenu 4 In the submenu press the UP DOWN button to toggle between items or press PLUS MINUS button to adjust settings If there is a submenu press the SET PLUS button to enter the submenu 5 Press the EXIT button on the remote control to re...

Страница 31: ...item you want to adjust 3 Press the SOURCE or PLUS button to enter the submenu 4 In the submenu press the button to toggle between items or press PLUS MINUS button to adjust settings If there is a submenu press the SOURCE or PLUS button to enter the submenu 5 Press the MENU button to return to the previous menu or press the MENU button several times to exit the OSD menu ...

Страница 32: ...ighter Press the SET PLUS button to open the submenu and then press the PLUS MINUS button to adjust Sharpness Adjust to improve detail Press the SET PLUS button to open the submenu and then press the PLUS MINUS button to adjust Black level Adjust to change the image brightness Press the SET PLUS button to open the submenu and then press the PLUS MINUS button to adjust Noise reduction Adjust to rem...

Страница 33: ...nd looks bluish with a higher color temperature Press the SET PLUS button to open the submenu and then press the UP DOWN button to toggle between 5000K 6500K 7500K 9300K 10000K Native User Color control Note This function is only available when Color temperature is set to User With this function you can adjust the color tones of the image precisely by changing the R Red G Green and B Blue settings...

Страница 34: ... and then press the UP DOWN button to toggle between Display Port DVI D Card DVI D VGA HDMI YPbPr Componment Picture reset Reset all settings in the Picture menu Press the SET PLUS button to open the submenu and then press the PLUS MINUS button to make selection Select Reset and press the SET button to restore settings to factory preset values Press the EXIT button or select Cancel and press the S...

Страница 35: ...ss the SET PLUS button to open the submenu and then press the PLUS MINUS button to adjust Press the PLUS button to expand the width of the image or press the MINUS button to shrink the width of the image Clock phase Note For the VGA input only Adjust to improve the focus clarity and stability of the image Press the SET PLUS button to open the submenu and then press the PLUS MINUS button to adjust ...

Страница 36: ...s set to Custom You can use this function to further customize the zoom settings to suit the image you want to display Press the SET PLUS button to open the submenu Use the UP DOWN button to toggle between the following items and use the PLUS MINUS button to adjust Zoom Expands the horizontal and vertical sizes of the image simultaneously H zoom Expands the horizontal size of the image only V zoom...

Страница 37: ...se or decrease lower pitched sounds Press the SET PLUS button to open the submenu and then press the PLUS MINUS button to adjust Speaker Set the monitor to play audio using the built in internal speaker or external speakers Use the UP DOWN button to toggle between Internal External Volume Adjust to increase or decrease the audio output level Press the SET PLUS button to open the submenu and then p...

Страница 38: ... then press the UP DOWN button to toggle between HDMI AUDIO1 AUDIO2 AUDIO3 Audio reset Reset all settings in the AUDIO menu Press the SET PLUS button to open the submenu and then press the PLUS MINUS button to make selection Select Reset and press the SET button to restore settings to factory preset values Press the EXIT button or select Cancel and press the SET button to cancel and then return to...

Страница 39: ...b picture Press the SET PLUS button to open the submenu and then press the UP DOWN button to make selection PIP size Select the size of the sub picture in the PIP Picture in Picture mode Press the SET PLUS button to open the submenu and then press the UP DOWN button to toggle between Small Medium Large PIP audio Select the audio source in the PIP Picture in Picture mode Press the SET PLUS button t...

Страница 40: ... press the SET button to cancel and then return to the previous menu Notes The PIP function is only available under certain signal source combinations as shown in the table below Main picture signal source DP HDMI DVI D Card DVI D VGA YPbPr Sub picture signal source DP HDMI DVI D Card DVI D VGA YPbPr PIP function available PIP function unavailable The availability of the PIP function will also dep...

Страница 41: ...ng mode when no signal is detected from the YPbPr inputs after three successive cycles Use the PLUS MINUS button to make selection Language Select the language for the OSD menu Press the SET PLUS button to open the submenu and then press the UP DOWN button to toggle between English Deutsch Pyccкий 中文 Polski Français Italiano Español Türkçe Panel saving Choose to enable the panel saving functions t...

Страница 42: ...ion If enabled the display will be assigned IP address Subnet mask and Default gateway automatically If disabled you will be prompted to enter the following value manually Finally press SET to store and save the chosen values IP address Subnet mask Default gateway Login user name Login password Configuration reset Reset all settings in the Configuration 1 menu Press the SET PLUS button to open the...

Страница 43: ...o turn itself off to standby mode within an amount of time you specify Off 1 24 hours from current time Press the SET PLUS button to open the submenu and then press the UP DOWN button to adjust Note When the Sleep timer is activated the Schedule settings will be disabled OSD H position Adjust the horizontal position of the OSD menu Press the SET PLUS button to open the submenu and then press the U...

Страница 44: ... 640x400 1440x900 and 1600x900 Auto Determines the resolution automatically The setting you select becomes effective when POWER is turned OFF and ON again Black level expansion Note For Video mode inputs only Select a suitable black level expansion setting to reveal more details in the dark parts of an image Press the SET PLUS button to open the submenu and then press the UP DOWN button to toggle ...

Страница 45: ... function for movies and motion pictures The monitor converts a 24 frames per second 24 fps input signal format to DVD video signal format Once this function is enabled it is recommended that you set the Scan conversion function to Progressive Off Disable the film mode frame conversion function This mode is suitable for TV broadcasting and VCR signals IR control Select the operation mode of the re...

Страница 46: ...l side Position Select the position of this monitor in the screen matrix Frame comp Choose to turn on or off the frame compensation function If turned on the monitor will adjust the image to compensate for the width of the monitor bezels in order to accurately display the image Frame comp OFF Frame comp ON Enable Choose to enable or disable the Tiling function If enabled the monitor will apply the...

Страница 47: ...o make a selection and then press UP DOWN button to adjust Schedule Note You should set up current date and time in Date and time before using this function This function allows you to program up to seven different scheduled time intervals for the monitor You can select the time the monitor turns on and turns off the days in a week the monitor is activated and which input source the monitor will u...

Страница 48: ... same time then the highest numbered schedule has priority Monitor ID Set the ID number for controlling the monitor via the RS232C connection Each monitor must have an unique ID number when multiple BDL5571V monitors are connected Press the SET PLUS button to open the submenu and then press the PLUS MINUS button to select a monitor ID DDC CI Choose to turn On or Off the DDC CI communication functi...

Страница 49: ...vice USB to monitor When select YES the OSD setting will be downloaded from USB device to the monitor to change the OSD setting for this monitor Advanced option reset Reset all settings in the Advanced option menu Press the SET PLUS button to open the submenu and then press the PLUS MINUS button to make selection Select Reset and press the SET button to restore settings to factory preset values Pr...

Страница 50: ...ixel Rate Aspect Ratio Stand for Mode H Pixels V Lines 480i 720 480 29 97 Hz 13 5 MHz 4 3 Modified NTSC Standard 480p 59 94 Hz 27 MHz 576i 720 480 25 Hz 13 5 MHz 4 3 Modified PAL Standard 576p 50 Hz 27 MHz HDTV Resolution Standard Resolution Active Resolution Refresh Rate Pixel Rate Aspect Ratio Stand for Mode H Pixels V Lines 720p 1280 720 50 Hz 74 25 MHz 16 9 Normally DVB Mode 60 Hz 1080i 1920 1...

Страница 51: ... irregular in RGB mode check PC power saving mode or cable connections The display settings table complies to the IBM VESA standards and based on the analog input The DVI support mode is regarded as same to the PC support mode The best timing for the vertical frequency to each mode is 60Hz ...

Страница 52: ... or combinations of pixel defects are more noticeable than others Philips sets even higher quality standards for those 6 1 PIXELS AND SUB PIXELS A pixel or picture element is composed of three sub pixels in the primary colors of red green and blue Many pixels together form an image When all sub pixels of a pixel are lit the three colored sub pixels together appear as a single white pixel When all ...

Страница 53: ...L DEFECTS Because pixel and sub pixels defects of the same type that are nearby one another may be more noticeable Philips also specifies tolerances for the proximity of pixel defects In the table below you can find specifications about Allowed amount of adjacent dark dots adjacent dark dots 1 pair of dark dots Minimum distance between dark dots Total no of all defective dots 6 6 PIXEL DEFECT TOLE...

Страница 54: ...soft lint free cloth If the surface becomes dirty soak a soft lint free cloth in a mild detergent solution Wring the cloth to remove excess liquid Wipe the surface of the display to remove dirt Then use a dry cloth of the same type to dry Do not scratch or hit the surface of the panel with fingers or hard objects of any kind Do not use volatile substances such as insert sprays solvents and thinner...

Страница 55: ...n The zoom mode is not correctly set Use the Zoom mode or Custom zoom function in the Screen menu to fine tune display geometry and time frequency parameter Can hear sound but no picture Improperly connected source signal cable Make sure that both video inputs and sound inputs are correctly connected Can see picture but no sound is heard 1 Improperly connected source signal cable 2 Volume is turne...

Страница 56: ...32C D Sub Jack x 2 9 pin TXD RXD 1 1 USB USB Jack Type A USB 2 0 Slave RJ 45 RJ 45 Jack x 1 8 pin 10 100 Lan Port DisplayPort Input DisplayPort Jack x 1 20 pin Digital RGB Video Max 720p 1080P 1920 x 1080 60 Hz HDMI Input HDMI Jack x 1 Type A 18 pin Digital RGB TMDS Video Audio MAX Video 720p 1080p 1920 x 1080 60 Hz WUXGA Audio 48 KHz 2 Channel L R Supports LPCM only DVI D Input DVI D jack Digital...

Страница 57: ...Operational Storage 20 80 RH No condensation 5 95 RH No condensation Pressure Operational Storage Shipment 795 1013 hPa Altitude 0 4 500 m 300 1013 hPa Altitude 0 9 000 m Internal Speaker Item Specifications Type 1 Way 1 Speaker Input 10 W RMS Impedance 8Ω Output Sound Pressure 82 dB W M Frequency Response 160 Hz 13 KHz Your BDL5571V supports HDMI CEC Consumer Electronics Control protocol through ...

Страница 58: ...All rights reserved Philips and the Philips Shield Emblem are registered trade marks of Koninklijke Philips Electronics N V and are used under license from Koninklijke Philips Electronics N V Specifications are subject to change without notice ...

Отзывы: