background image

User Manual BDL4251V 


28 

Main-Menu 


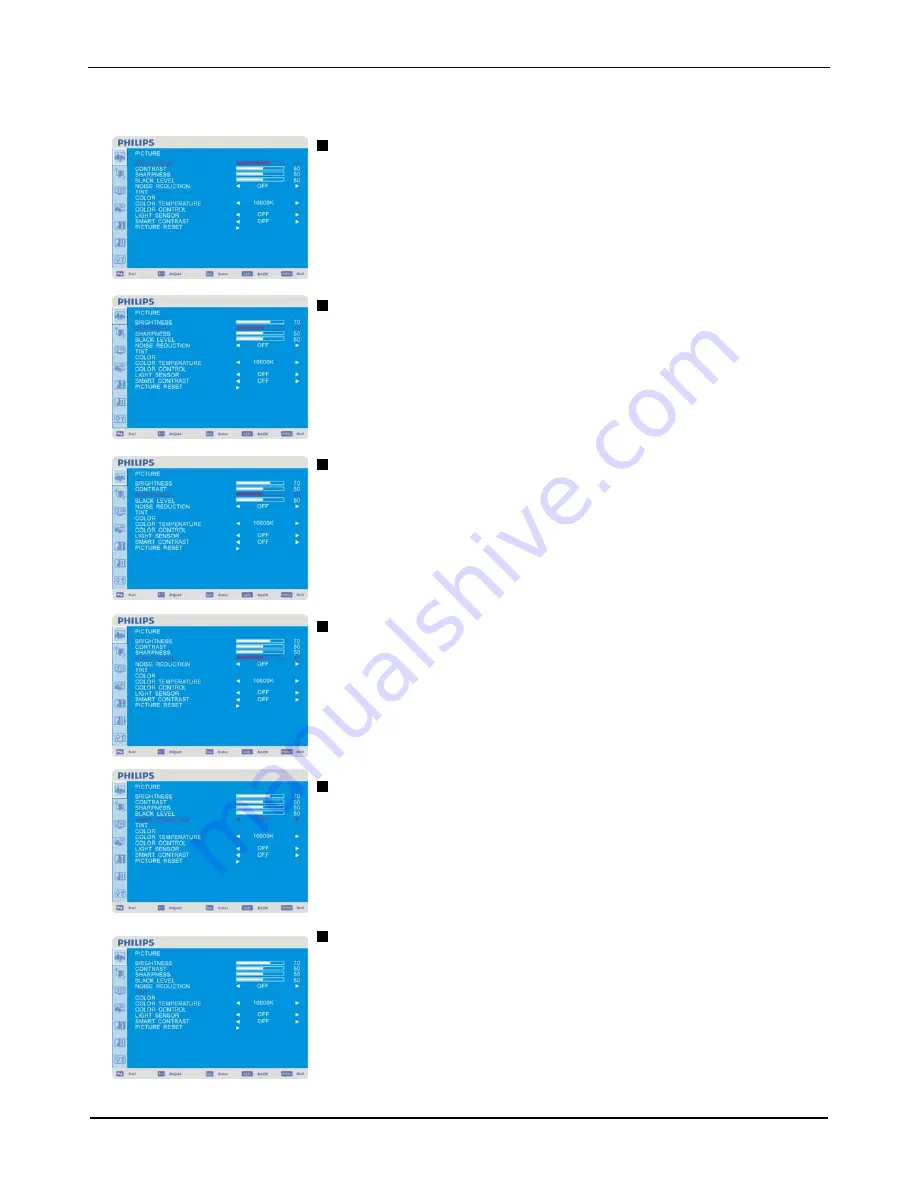
PICTURE 

BRIGHTNESS 


Adjusts the overall image and background screen brightness.   
Press + button to increase brightness. 
Press - button to decrease brightness. 


CONTRAST


Adjusts the image brightness for the input signal.   
Press + button to increase contrast.   
Press - button to decrease contrast. 


SHARPNESS


This function is digitally capable to keep crisp images at any timing. 
It is adjustable to get a distinct image or a soft one as you prefer and set independently for each   
picture mode.   
Press + button to increase sharpness. 
Press - button to decrease sharpness. 


BLACK LEVEL


Adjusts the image brightness for the background.   
Press + button to increase black level. 
Press - button to decrease black level. 
NOTE: sRGB picture mode is standard and cannot be changed. 


NOISE REDUCTION


Adjusts the noise reduction level. 
Press + button to increase reduction level.   
Press - button to decrease reduction level. 


TINT 

* : INPUT HDMI , (HDMI INPUT MODE-HD), COMPONENT, S-VIDEO, VIDEO only 


Adjusts the tint of the screen. 
Press + button the flesh tone color becomes greenish.   
Press - button the flesh tone color becomes purplish. 


Содержание BDL4251V

Страница 1: ...Public Signage Solutions EN User Manual TYPE NR BDL4251V ...

Страница 2: ...ing to a Digital Interface Equipment 21 Connecting to a DVD Player 22 Connecting to a Stereo Amplifier 23 Connecting to a display mounted PC 23 Basic Operation 24 Power ON and OFF Modes 24 Power Indicator 25 Using Power Management 25 Display Signal ofVideo Source Setting to VIDEO 25 Picture Size 25 Smart Picture Mode 26 Audio Source Switching 26 Control Lock Mode 26 OSD Information 26 OSD On Scree...

Страница 3: ...AIN OR MOISTURE The Socket outlet shall be installed near the apparatus and shall be easily accessible Read and follow these instructions when connecting and using your computer monitor Unplug the monitor if you are not going to use it for an extensive period of time Unplug the monitor if you need to clean it with a slightly damp cloth The screen many be wiped with a dry cloth when the power is of...

Страница 4: ...ction against harmful interference when the equipment is operated In a commercial environment This equipment generates uses and can radiate radio frequency energy and if not installed and used in accordance with the instructions manual may cause harmful interference to radio communications Operation of this equipment in a residential area is likely to cause harmful interference in which case the u...

Страница 5: ...standards PN 93 T 42107 and PN 89 E 06251 ELECTRIC MAGNETIC AND ELECTRONMAGNETIC FIELDS EMF 1 MMD manufactures and sells many products targeted at consumers which like any electronic apparatus in general have the ability to emit and receive electromagnetic signals 2 One of MMDs leading Business Principles is to take all necessary health and safety measures for our products to comply with all appli...

Страница 6: ...hould not be greater than 5A Note The severed plug must be destroyed to avoid a possible shock hazard should it be inserted into a 13A socket elsewhere How to connect a plug The wires in the mains lead are coloured in accordance with the following code BLUE NEUTRAL N BROWN LIVE L GREEN YELLOW EARTH E 1 The GREEN AND YELLOW wire must be connected to the terminal in the plug which is marked with the...

Страница 7: ... 铅 Pb 汞 Hg 镉 Cd 六价铬 Cr 6 多溴联苯 PBB 多溴二苯醚 PBDE 外壳 液晶面板 电路板组件 附件 遥控器 电源线 连接线 遥控器电池 表示该有毒有害物质在该部件所有均质材料中的含量均在SJ T11363 2006标准规定的限量要求 以下 表示该有毒有害物质至少在该部件的某一均质材料中的含量超出SJ T11363 2006 标准规定的限 量要求 环保使用期限 此标识指期限 十年 电子信息产品中含有的有毒有害物质或元素在正常使用的条件下不会发生外 泄或突变 电子信息产品用户使用该电子信息产品不会对环境造成严重污染或对其人身 财产造成 严重损害的期限 ...

Страница 8: ...S A This product may contain lead and or mercury Dispose of in accordance to local state and federal regulations For additional information on recycling contact www eia org Consumer Education Initiative WASTE ELECTRICAL AND ELECTRONIE EQUIPMENT WEEE Attention users in European Union private households This marking on the product or on its packaging illustrates that under European Directive 2002 96...

Страница 9: ... regions apply a power cord that conforms to the AC voltage of the power socket and has been approved by and complies with the safety regulations of the particular country You might like to save the package box and packing material for shipping the monitor The following components are prepared as options External Speakers Table stand Clamper Screw for Clamper M4 x 8 x 2 CD User Manual QSG BNC TO R...

Страница 10: ...off EXIT button To return to previous menu while OSD menu is on or to activate the OSD menu when the OSD menu is off Main Power Switch To turn the main power on off Remote control sensor Power indicator and ambient light sensor To receive the IR signal from the remote control The indicator would show green when the LCD monitor is active and would turn red when the LCD is POWER OFF While in the cas...

Страница 11: ...r S VIDEO IN connector MINI DIN 4 pin To input the S video Y C separate signal COMPONENT IN Y Pb Pr BNC To connect an equipment such as a DVD player HDTV device or Laser disc player AC OUT connector Bypass AC power output from AC IN connector Rating 100 240Vac 50 60Hz 3A Max AC IN connector To connect with the supplied power cord EXTERNAL SPEAKERTERMINAL To output the audio signal to external spea...

Страница 12: ...AUTO ADJUST button To execute the AUTO ADJUST function MUTE button To turn the mute function on off VIDEO SOURCE button To activate input selection menu and push or to select input source from HDMI DVI D VGA COMPONENT S VIDEO and VIDEO and then push SET to switch to selected input source AUDIO SOURCE button To activate audio selection menu and push or to select audio source from AUDIO1 AUDIO2 AUDI...

Страница 13: ... angle 30 with a distance of about 3 m 10 ft Handling the remote control Do not subject to strong shock Do not allow water or other liquid to splash the remote control If the remote control gets wet wipe it dry immediately Avoid exposure to heat and steam Other than to install the batteries do not open the remote control NOTE The remote control system may not function when direct sunlight or stron...

Страница 14: ...rn the monitor off 2 After inserting stand in guide block fasten the thumbscrews on both sides of the monitor NOTE Install the table stand with the longer end of the feet directing to the front In the upright position How to remove the stands 1 Spread the protective sheet on the flat surface 2 Make the monitor lying on the protective sheet 3 Remove screws using a screwdriver and place them in a sa...

Страница 15: ...e 2 This device cannot be installed without the correct and complete mounting accessories not provided in the box Make sure you have all related parts available for wall mounting 3 Follow the instructions that come with the base mounting kit Failure to follow correct mounting procedures could result in damage to the equipment or injury to the user or installer Product warranty does not cover damag...

Страница 16: ...User Manual BDL4251V 15 Ventilation Requirements for enclosure locating To allow heat to disperse leave space between surrounding objects as shown in the diagram below ...

Страница 17: ...ts Place AAA batteries matching the and signs on each battery to the and signs of the battery compartment Do not mix battery types Do not combine new batteries with used ones It causes shorter battery life or leakage of batteries Remove dead batteries immediately to prevent battery liquid from leaking into the battery compartment Don t touch exposed battery acid it cause damage to your skin NOTE I...

Страница 18: ... on the application being used POWER SAVE PANEL SAVING DATE AND TIME 11 To prevent the main power switch from being changed To prevent the possibility of main power switch being carelessly pushed please attach the main switch cover accessory onto it NOTE With the main power switch cover in place the main power switch can not be turned off Remove main power switch cover in order to turn off the dis...

Страница 19: ...ey are attached 2 The logo should be on the LEFT side when facing the monitor How to Remove the Logo for landscape mode 1 Remove the logo sticker by forcing a piece of paper under the logo 2 Using a knife carefully remove the logo sticker with the paper placing beneath 3 Tear off the logo sticker How to Use the Logo Guider for Portrait Mode 1 Before applying make sure the guider is well shaped The...

Страница 20: ...251V 19 Connectivity Before making connections First turn off the power of all the attached equipments before make connections Refer to the user manual included in each separate piece of equipment Connectivity Diagram ...

Страница 21: ...ing more than one LCD monitors to a PC apply another VGA signal cable mini D sub 15 pin to mini D sub 15 pin it s commercially available to make connection between the LCD monitor VGA OUT connector and the other VGA IN connector The AUDIO IN 1 2 3 or HDMI can be connected for audio input After choosing one of the AUDIO IN connectors you might need to select AUDIO 1 2 3 or HDMI using the AUDIO SOUR...

Страница 22: ...cable HDMI and DVI D can receive HDMI video signals from either a HDMI output of for instance a DVD player or from a DVI D output of a PC To ensure the display quality use a cable with a quality prescribed by DVI standards The AUDIO IN 1 2 3 or HDMI connector can be chosen to receive an audio source Select AUDIO 1 2 3 or HDMI from the AUDIO SOURCE button on the remote control HDMI for audio is onl...

Страница 23: ...you can only obtain RCA connectors on both ends you can use the in box available BNC to RCA converters DVD player Y Pb Pr Out and LCD monitor COMPONENT You might need BNC to RCA adapters including in the accessories to convert the BNC connectors to RCA connectors if you are using the separated signaling Y Pb Pr RCA cable If your DVD player supports HDMI signaling apply a HDMI to HDMI cable for the...

Страница 24: ...er audio in and the LCD monitor audio out Do not reverse the audio left and right jacks For the preferred audio signal select AUIDO1 AUDIO2 AUDIO3 or HDMI from the AUDIO SOURCE button on the remote control HDMI for audio is selectable only when HDMI or DVI D for video is selected The AUDIO OUT RCA connectors output sound from the selected AUDIO SOURCE Connecting to a display mounted PC This monito...

Страница 25: ... NOTE When the Main Power Switch is used to power off the LCD monitor the remote control the power button and the indicator will not work Make sure to turn the Main Power Switch on before using the other two options 2 Pressing the power button NOTE Before pressing the power button be sure to turn on the Main Power button on the LCD monitor 3 Using the remote control NOTE Before operating the remot...

Страница 26: ...EO SOURCE button on the remote control to set video source to VIDEO Use the COLOR SYSTEM OSD menu to select AUTO NTSC PAL SECAM PAL60 4 43NTSC according to your video format Picture Size HDMI DVI D VGA FULL NORMAL CUSTOM REAL COMPONENT VIDEO FULL NORMAL DYNAMIC REAL CUSTOM SignalType NORMAL SIZE Recommended Size NORMAL 4 3 DYNAMIC Squeeze FULL NORMAL Display with the input signal aspect ratio from...

Страница 27: ...wn the and buttons together for at least 3 seconds To enable the buttons press and hold down the and buttons together for at least 3 seconds again OSD Information HDMI VGA VGA 1024 x 768 48kHz 60Hz AUDIO 1 SIZE FULL Video Source Input signal Information Audio Source Picture Size COMPONENT COMPONENT AUDIO 3 SIZE FULL Video Source Audio Source Picture Size S VIDEO VIDEO S VIDEO NTSC AUDIO 3 SIZE NOR...

Страница 28: ...s SET button to enable setting Press INPUT button to enable the setting Press UP or DOWN and PLUS or MINUS button to select function or adjust the setting Press SET button to enable the setting Press UP or DOWN and PLUS or MINUS button to select function or adjust the setting Press INPUT button to enable the setting Press MENU or EXIT button to exit Press EXIT button to exit UP or DOWN button INPU...

Страница 29: ...as you prefer and set independently for each picture mode Press button to increase sharpness Press button to decrease sharpness BLACK LEVEL Adjusts the image brightness for the background Press button to increase black level Press button to decrease black level NOTE sRGB picture mode is standard and cannot be changed NOISE REDUCTION Adjusts the noise reduction level Press button to increase reduct...

Страница 30: ...ses COLOR CONTROL The color levels of red green and blue are adjusted by the color bars R Red G Green B Blue LIGHT SENSOR Select ON to enable the ambient light sensor The image brightness will be auto adjusted when ambient light changed SMART CONTRAST Select ON to enable the smart contrast Can enhancement the image of high contrast ratio PICTURE RESET Selecting Picture reset allows you to reset al...

Страница 31: ... narrow the width of the image on the screen the left CLOCK PHASE INPUT VGA only Improves focus clarity and image stability by increasing or decreasing this setting ZOOM MODE You can select FULL NORMAL and CUSTOM and REAL INPUT HDMI DVI D VGA only You can also select FULL NORMAL DYNAMIC and CUSTOM and REAL INPUT COMPONENT S VIDEO VIDEO only Selecting DYNAMIC will make the screen display panoramic ...

Страница 32: ...tal size only VZOOM expands the vertical size only H POSITION moves to the right with button moves to the left with button V POSITION moves up with button moves down with button SCREEN RESET Selecting Screen reset allows you to reset all OSD settings from PICTURE setting Select Yes and press SET button to restore the factory preset data Press EXIT button to cancel and then return to the previous m...

Страница 33: ... button to decrease TREBLE sound BASS This feature helps you to accentuate or reduce the low frequency sound Press button to increase BASS sound Press button to decrease BASS sound SPEAKER This feature helps you to cut the internal or the external loudspeaker Press or button to exchanges the internal and the external loudspeaker AUDIO RESET Selecting Audio reset allows you to reset all OSD setting...

Страница 34: ... and Small are available PIP AUDIO Selecting the sound source in PIP mode When selecting MAIN AUDIO you will get the sound for the main picture and when selecting PIP AUDIO you will get the sound for the picture instead PIP RESET Selecting PIP Reset allows you to reset all OSD settings from PIP setting Select Yes and press SET button to restore the factory preset data Press EXIT button to cancel a...

Страница 35: ...e risk of the image persistence COOLING FAN The cooling fan will be auto turned on and off according to temperature of monitor when selected AUTO The cooling fan will be turned on always when selected ON BRIGHTNESS The brightness is decreased when selected ON PIXEL SHIFT Image is slightly expanded and moves 4 directions UP DOWN RIGHT LEFT periodically Need setting the time for movement Movement ar...

Страница 36: ...ory preset data Press EXIT button to cancel and return the previous menu FACTORY RESET Selecting YES allows you to reset PICTURE SCREEN AUDIO CONFIGURATION1 2 and ADVANCED OPTION will be back to factory settings except LANGUAGE DATE AND TIME and SCHEDULE Select YES and press SET button to restore the factory preset data Press EXIT button to cancel and return the previous menu ...

Страница 37: ...ed or not The information OSD will be displayed when the input signal is changed or a source change or warning message like no signal or out of range A time between 1 to 10 seconds is available SLEEP TIMER To select SLEEP TIMER mode ON OFF In the SLEEP TIMER menu you can preset the monitor to automatically power down A time between 1 to 24 hours is available When the SLEEP TIMER is set the SCHEDUL...

Страница 38: ...User Manual BDL4251V 37 MONITOR INFORMATION Indicates the model and serial number of your monitor ...

Страница 39: ...om OFF LOW MIDDLE and HIGH In case of go under the black cut off level please adjust the Black level in moderation on OSD menu GAMMA SELECTION Selects a display gamma It refers to the brightness performance curve of signal input 2 2 2 4 S gamma Native NOTE sRGB picture mode is standard and cannot be changed SCAN MODE INPUT HDMI DVI D MODE HD S VIDEO VIDEO only Changes the display area of the image...

Страница 40: ...lects the operation mode of the keyboard control Select LOCK to disable the keyboard Select UNLOCK to enable the keyboard TILING TILING demonstrates multiple screens This feature provides a single large screen using up to 25 monitors It will be able to divide up to 5 each H and V This requires you to feed the PC output into each of the monitors through a distributor H MONITORS Select number of hor...

Страница 41: ...evel of power saving condition Select OFF to set the system in normal power condition Select MEDIUM to set the system in medium level power saving status Select HIGH to set the system in high level power saving status Press EXIT button to cancel and then return the previous menu ADVANCED OPTION RESET Selecting ADVANCED OPTION RESET allows you to reset all OSD settings from ADVANCED OPTION settings...

Страница 42: ...riodically move the image in four directions 3 When not in use please turn off the monitor with your remote control or use Power Management Function or use the Schedule Function of monitor 4 Reducing the environmental temperature will increase the life of your monitor When Protection board glass acryl is installed over the LCD surface enclosed into the box wall or stack the monitor please utilize ...

Страница 43: ...to PRIMARY and those of the other monitors are set to SECONDARY 3 When you direct the remote controller at the remote control signal sensor of the PRIMARY monitor and press the DISPLAY button on the remote controller the ID selection OSD appears at the upper left of the screen ID number of the currently viewed monitor Select the ID number of the monitor you want to control using the button on the ...

Страница 44: ...Sub pixels A pixel or picture element is composed of three sub pixels in the primary colors of red green and blue Many pixels together form an image When all sub pixels of a pixel are lit the three colored sub pixels together appear as a single white pixel When all are dark the three colored sub pixels together appear as a single black pixel Other combinations of lit and dark sub pixels appear as ...

Страница 45: ...proximity of pixel defects In the table below you can find specifications about Allowed amount of adjacent dark dots adjacent dark dots 1 pair of dark dots Minimum distance between dark dots Total no of all defective dots Pixel Defect Tolerances In order to qualify for repair due to pixel defects during the warranty period a PDP TFT panel in a Philips Plasma LCD display must have pixel or sub pixe...

Страница 46: ...anel Network controllability RS232C Network controllability allows user to control and adjust monitors remotely through RS232C protocol Smart insert Professional PC s are part of most public signage installations Quite often they add additional depth to the public display and a lot of cable clutter This public display contains a Smart insert in the backcover that will fit many professional small f...

Страница 47: ...vices PHILIPS recommends displaying moving images and using a moving panel saving at regular intervals whenever the screen is idle or turning off the monitor when not in use Image is unstable unfocused or swimming is apparent Signal cable should be completely attached to the computer Use the OSD Image Adjust controls to focus and adjust display by increasing or decreasing the fine adjustment When ...

Страница 48: ...sor SCHEDULE SLEEP TIMER function is not working properly The SCHEDULE function will be disabled when the SLEEP TIMER is set If the SLEEP TIMER function is enabled and the power to the LCD monitor is turned off if the power supply is interrupted unexpectedly then the SLEEP TIMER will be reset Stripe Noise Either light vertical or horizontal stripes may appear depending on the specific display patt...

Страница 49: ...7 W 8 ohm 9 Pin Mini D sub Resolutions Supported 640 x 480 at 60 Hz 800 x 600 at 60Hz 1024 x 768 at 60Hz 1280 x 720 at 60Hz 1280 x 768 at 60Hz 1360 x 768 at 60Hz 1600 x 1200 at 60 Hz 1900x1200 reduced Blanking only 1920 x 1080 at 60Hz Recommended Resolution NTSC PAL SECAM 4 43NTSC PAL60 DVD 480i 480p 576i 720p 1080i 1080p Power Supply 2 4 1 2 A 100 240 V AC 50 60 Hz Power Consumption Power Save Ty...

Страница 50: ... SDA 3 TMDS Data2 10 TMDS Clock 17 DDC CEC Ground 4 TMDS Data1 11 TMDS Clock Shield 18 5V Power 5 TMDS Data1 Shield 12 TMDS Clock 19 Hot Plug Detect 6 TMDS Data1 13 CEC 7 TMDS Data0 14 Reserved N C on device Pin No Name 1 NC 2 RXD 3 TXD 4 NC 5 GND 6 NC 7 RTS 8 CTS 9 NC Pin Assignment 1 Analog Video Signal Input Mini D SUB 15P VGA Mini D SUB 15P 1 5 6 10 11 15 2 S VIDEO input MINI DIN 4P S VIDEO 3 ...

Страница 51: ...N V All rights reserved Philips and the Philips Shield Emblem are registered trademarks of Koninklijke Philips Electronics N V and are used under license from Koninklijke Philips Electronics N V Specifications are subject to change without notice www philips com ...

Отзывы: