background image

User Manual BDL3231/BDL4231

4.2 

EXTERNAL AUDIO CONNECTION

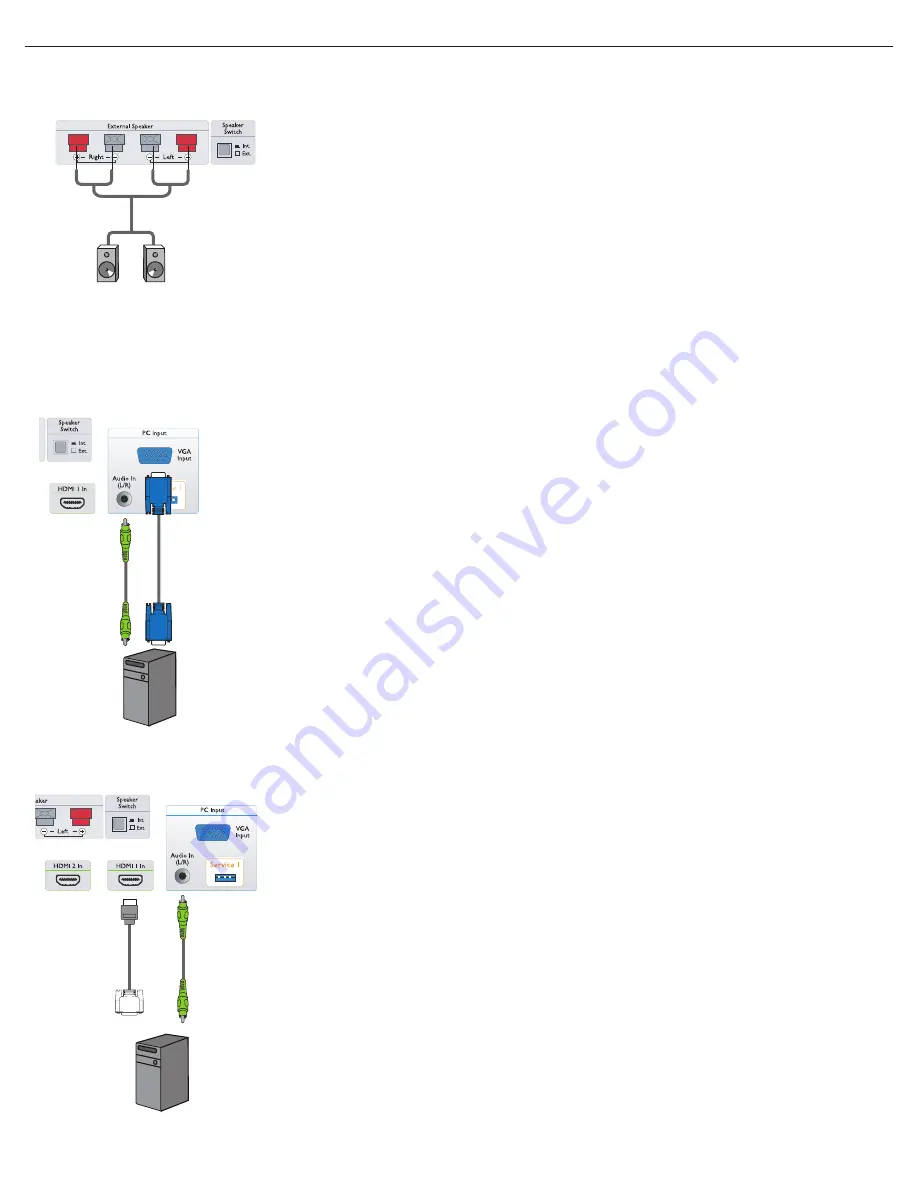
4.2.1   CONNECTING EXTERNAL SPEAKER

1. Connect the speaker wires to the external speaker output of the monitor.

2. Turn on the monitor.

3. Press the speaker switch button and set it as external.

Note: Before connecting the speaker wires to the monitor, turn off your monitor.

4.3 

CONNECTING A PC

4.3.1   USING PC INPUT

1. Connect the 15-pin VGA connector of the PC to the VGA connector of 

    the monitor.
2. Connect the audio cable to the audio L/R input of the monitor.

4.3.2   USING HDMI INPUT

1. Connect the DVI connector of the PC to the HDMI connector of 
    the monitor.

2. Connect the audio cable to the audio L/R input of the monitor.

RETURN TO THE CONTENTS

Содержание BDL3231C

Страница 1: ...Philips Professional Business Solutions TYPE NR BDL3231 BDL4231 User Manual EN ...

Страница 2: ...of the building as close to the point of cable entry as practical Caution FCC CSA regulations state that any unauthorized changes or modifications to this equipment may void the user s authority to operate it Caution To prevent electric shock match the wide blade of plug to the wide slot and fully insert the plug Attention Pour éviter les chocs électriques introduire la lame la plus large de la fich...

Страница 3: ... occur in a particular installation If this equipment does cause harmful interference to radio or television reception which can be determined by turning the equipment off and on the user is encouraged to try to correct the interference by one or more of the following measures Reorient or relocate the receiving antenna Increase the separation between the equipment and receiver Connect the equipmen...

Страница 4: ...42107 and PN 89 E 06251 ELECTRIC MAGNETIC AND ELECTRONMAGNETIC FIELDS EMF 1 Philips Royal Electronics manufactures and sells many products targeted at consumers which like any electronic apparatus in general have the ability to emit and receive electromagnetic signals 2 One of Philips leading Business Principles is to take all necessary health and safety measures for our products to comply with al...

Страница 5: ...should not be greater than 5A Note The severed plug must be destroyed to avoid a possible shock hazard should it be inserted into a 13A socket elsewhere How to connect a plug The wires in the mains lead are coloured in accordance with the following code BLUE NEUTRAL N BROWN LIVE L GREEN YELLOW EARTH E 1 The GREEN AND YELLOW wire must be connected to the terminal in the plug which is marked with th...

Страница 6: ...through a designated waste electrical and electronic equipment collection To determine the locations for dropping off such waste electrical and electronic contact your local government office the waste disposal organization that serves your household or the store at which you purchased the product Attention users in United States Like all LCD products this set contains a lamp with Mercury Please di...

Страница 7: ...件 遙控器 電源線 連接線 遙控器電池 鎘 六價鉻 多溴聯苯 多溴二苯醚 表示該有毒有害物質在該部件所有均質材料中的含量均在SJ T11363 2006 標准規定的限量要求以下 表示該有毒有害物質至少在該部件的某一均質材料中的含量超出SJ T11363 2006 標准規定的限量要求 汞 鉛 中國電子信息產品污染控制標識要求 中國RoHS法規標示要求 10 環保使用期限 此標識指期限 十年 電子信息產品中含有的有毒有害物質或元素在正常使用的條件下不會發生外泄或突變 電子信息產品用戶使用該電子信息產品不會對環境造成嚴重污染或對其人身 財產造成嚴重損害的期限 ...

Страница 8: ...RAL FUNCTIONS 3 3 2 TELETEXT FUNCTIONS 3 3 3 INSERTING THE BATTERIES IN THE REMOTE CONTROL 4 CONNECTIONS TO EXTERNAL EQUIPMENT 4 1 CONNECTING EXTERNAL EQUIPMENT DVD VCR VCD HI FI SYSTEM 4 1 1 USING COMPONENT VIDEO INPUT 4 1 2 USING AV INPUT 4 1 3 USING SPDIF OUT 4 2 EXTERNAL AUDIO CONNECTION 4 2 1 CONNECTING EXTERNAL SPEAKER 4 3 CONNECTING A PC 4 3 1 USING PC INPUT 4 3 2 USING HDMI INPUT 5 OSD MEN...

Страница 9: ...y with a cart stand tripod bracket or table specified by the manufacturer or sold with the apparatus When a cart is used use caution when moving the cart apparatus combination to avoid injury from tip over 1 2 3 4 5 6 7 8 9 10 11 12 Unplug this apparatus during lightning storms or when unused for long periods of time Refer all servicing to qualified service personnel Servicing is required when the a...

Страница 10: ...e all around the monitor Do not place the monitor on a carpet The equipment shall not be exposed to dripping or splashing The equipment shall not be exposed to rain or moisture and objects filled with liquids such as vases shall be placed on the apparatus The apparatus must be connected to a mains socket outlet with a protected earthed connection The appliance coupler is used as the disconnect devi...

Страница 11: ...uct This can result in a risk of electric shock Should not be adhered to a power supply plug and receptacle This can result in a risk of fire Do not use new batteries with old ones together This can result in a risk of electric shock Do not place this product in the place to reach children s hands Do not take out a power supply plug with the wet hand This can result in a risk of electric shock Bend...

Страница 12: ...the cabinet finish Do not allow a still image to be displayed for an extended period of time as this can cause a permanent after image to remain 1 4 OHTER RELATED INFORMATION 1 4 1 INFORMATION FOR USERS IN THE U S For units set at 115 V Use a UL Listed Cord Set consisting of a minimum 18 AWG Type SVT or SJT three conductor cord a maximum of 15 feet long and a parallel blade grounding type attachmen...

Страница 13: ...craped easily the product has to be handled with care Never place the product with the glass faced down unless it is protected with pads After opening the carton ensure that the content is in good condition and complete 2 2 PACKAGE CONTENTS Please verify that you received the following items with your package content 1 LCD 2 Base with screw 3 Remote control with batteries 4 EDFU 5 Logo guider 6 PH...

Страница 14: ...tronic components The product can normally operate only under 2000m in height It might abnormally function at a place over 2000m in height and do not install and operate there 2 4 PORTRAIT MOUNTING RETURN TO THE CONTENTS Note When installing the LCD monitor on the wall please consult a professional technician for proper installing The manufacturer accepts no liability for installations not perform...

Страница 15: ... these as UP DOWN menu buttons 2 MENU button Use this button to engage the On Screen Display menu 3 CH button Use these buttons to select the input source When the On Screen Menu is active use these as LEFT RIGHT menu buttons 4 POWER button Use this button to switch monitor on off 3 PARTS AND FUNCTIONS 1 2 3 4 RETURN TO THE CONTENTS ...

Страница 16: ...t jacks of a DVD player or Set Top box 7 AV Input Video input S Video Audio L R input Connect to video and audio output of an external device Connect S video signals from external sources such as VCRs or DVD players 1 2 3 4 5 6 7 8 10 11 12 13 9 8 Mono Speaker Out Connect 1W 8Ω audio cable to the external speaker 9 RS232 RS232 network connection input for the use of loop through function 10 Servic...

Страница 17: ...ng this button Subtitle button Press to select subtitles in case function is supported on applicable card Closed caption button Function in North America and Asia Pacific in case applicable tuner card is in the set Information button Press to see additional information of the set or inserted card in the set Home button Press to go to the memory content of the available memory USB on media player ca...

Страница 18: ...ress to disable or enable the audio P button Press to select the input source Numerical buttons Press to direct access to programs Dot button Use the dot for digital channels Channel return button Press to return or recall the channel A D button DVB or ATSC function to select either analogue or digital channels PIP button Press to call up a subscreen size Smart sound button Press to choose audio e...

Страница 19: ...Note The following buttons are using in Teletext mode only which are available in Europe and some of the Asia Pacific TV systems Auto Teletext button Press to switch Teletext on off When a CVBS AV CARD AV source is selected with teletext content teletext can be shown by pressing this button Numerical buttons Press to enter a 3 digit page number Cursor left right Press to jump to the previous or nex...

Страница 20: ...ack of the monitor 4 Connect the red R and white L audio jacks of the device to the audio L R input jacks of the monitor 4 CONNECTIONS TO EXTERNAL EQUIPMENT DVD VCR VCD 4 1 2 USING AV INPUT 1 Connect S Video connector of the external device to the S VIDEO input of the monitor 2 Connect the yellow video jack of the device to the video input of the monitor 3 Connect the red R and white L audio jacks...

Страница 21: ...ote Before connecting the speaker wires to the monitor turn off your monitor 4 3 CONNECTING A PC 4 3 1 USING PC INPUT 1 Connect the 15 pin VGA connector of the PC to the VGA connector of the monitor 2 Connect the audio cable to the audio L R input of the monitor 4 3 2 USING HDMI INPUT 1 Connect the DVI connector of the PC to the HDMI connector of the monitor 2 Connect the audio cable to the audio ...

Страница 22: ... I T C H 5 1 1 OSD MENU LANGUAGE Choose of languages in user interface Use cursor LEFT RIGHT button to toggle between ENGLISH ITALIANO FRANCAIS ESPANOL DEUTSCH 中文 5 1 2 OSD MENU COMMUNICATION 1 Press DISPLAY MENU button on the remote control 2 Use cursor DOWN button to highlight COMMUNICATION 3 Use cursor RIGHT button to enter it 4 Press cursor UP DOWN button to toggle between SMARTPORT STORE RS23...

Страница 23: ... U R C E S W I T C H S M A R T P O R T S T O R E R S 2 3 2 I D S P E E D D C M T Y P E C O M M U N I C AT I O N S P S P I 6 3 1 2 0 0 N O S O U R C E S W I T C H STORE Press to store or set the setting of communication menu Use cursor RIGHT to select STORED RS232 ID Press to control monitor via RS232 interface Use cursor LEFT RIGHT to setup the monitor ID DCM TYPE This function is only for SP SPI ...

Страница 24: ...he main switch or a set up remote control or by ESP function User Manual BDL3231 BDL4231 5 1 3 OSD MENU CONFIGURATION 1 Press DISPLAY MENU button on the remote control 2 Use cursor DOWN button to highlight CONFIGURATION 3 Use cursor RIGHT button to enter it 4 Press cursor UP DOWN button to toggle between SWITCH ON OSD PICTURE SOUND SECURITY CONTROL VIDEO ADJUSTMENT and FEATURES 5 Press DISPLAY MEN...

Страница 25: ... V O L U M E I N D I C AT O R D I S P L AY S O U R C E P O W E R L E D W E L C O M E M E S S A G E S W I T C H O N O S D F O R C E D O N AV 3 0 W I D E S C R E E N Y E S A L L A C T I V E P O W E R O N S W I T C H O N S O U R C E S W I T C H O N V O L U M E S W I T C H O N P I C F M T V O L U M E I N D I C AT O R D I S P L AY S O U R C E P O W E R L E D W E L C O M E M E S S A G E S W I T C H O N ...

Страница 26: ... D 5 0 5 0 5 0 5 0 Y E S Y E S 5 0 5 0 O N B R I G H T N E S S C O L O U R C O N T R A S T S H A R P N E S S P I X E L S H I F T A C T I V E C O N T R O L T R E B L E B A S S AV L P I C T U R E S O U N D 5 0 5 0 5 0 5 0 Y E S Y E S 5 0 5 0 O N B R I G H T N E S S C O L O U R C O N T R A S T S H A R P N E S S P I X E L S H I F T A C T I V E C O N T R O L T R E B L E B A S S AV L P I C T U R E S O U...

Страница 27: ...C O N T R O L V I D E O A D J U S T M E N T F E AT U R E S C O N F I G U R AT I O N K E Y B O A R D L O C K R E M O T E C O N T R O L L O C K S T O R E S E C U R I T Y Y E S Y E S K E Y B O A R D L O C K R E M O T E C O N T R O L L O C K S T O R E S E C U R I T Y Y E S Y E S K E Y B O A R D L O C K R E M O T E C O N T R O L L O C K S T O R E S E C U R I T Y Y E S Y E S S W I T C H O N O S D P I C ...

Страница 28: ... I P P O S I T I O N P I P Y E S AV 1 RETURN TO THE CONTENTS VIDEO ADJUSTMENT Only supported in PC A mode Fine tuning display geometry and time frequency parameter Use cursor UP DOWN button to toggle between Use cursor LEFT RIGHT to adjust HORIZONTAL adjust the horizontal placement of the picture VERTICAL adjust the vertical placement of the picture PHASE eliminate the horizontal interfering lines...

Страница 29: ...ERWIDE This mode is used to display 4 3 pictures using the full surface of the screen by enlarging the sides of the pictures 4 3 The picture is reproduced in 4 3 format and a black band is displayed on either side of the picture ZOOM 14 9 The picture is enlarged to 14 9 format a thin black band remains on both sides of the picture ZOOM 16 9 The picture is enlarged to 16 9 format This mode is recom...

Страница 30: ...5 MHz 16 9 Normally DVB Mode 60 Hz 1080i 1920 1080 25 Hz 74 25 MHz 16 9 Normally ATSC Mode 30 Hz RETURN TO THE CONTENTS The PC text quality is optimum in WXGA mode 1360 x 768 60Hz When this LCD is used as a PC display 24 bit color is supported over 16 7 million colors Your PC display screen might appear different depending on the manufacture and your particular version of Windows Check your PC ins...

Страница 31: ...XD RXD 1 1 HDMI Input HDMI Jack x 2 Type A Digital RGB TMDS Video Audio MAX Video 720p 1080i 1280 x 1024 60 Hz SXGA Audio 48 KHz 2 Channel L R RGB Input D Sub Jack x 1 15 pin Analog RGB 0 7V p p 75Ω H CS V TTL 2 2kΩ SOG 1V p p 75Ω MAX 720p 1080i 1280 x 1024 60 Hz SXGA RCA Jack x 1 Audio 0 5V rms Normal 2 Channel L R Component Input RCA Jack x 2 Y 1V p p 75Ω Pb 0 7V p p 75Ω Pr 0 7V p p 75Ω MAX 480i...

Страница 32: ... Stand 13 21 Kg 12 67 Kg 21 8 Kg 21 Kg Environment Condition Item Specification 32 LCD 42 LCD Temperature Operational Storage 0 40 C 20 60 C Humidity Operational Storage 20 80 RH No condensation 5 95 RH No condensation Pressure Operational Storage Shipment 800 1100 hPa Altitude 0 2 000 m 700 1100 hPa Altitude 0 3 000 m Internal Speaker Item Specification 32 LCD 42 LCD Type 1 Way 1 Speaker Input 10 W...

Страница 33: ...icular dirty soak a soft lint free cloth in a mild detergent solution Wring the cloth to remove excess liquid Wipe the surface of the display to remove dirt Then use a dry cloth of the same type to dry Do not scratch or hit the surface of the panel with fingers or hard objects of any kind Do not use volatile substances such as insert sprays solvents and thinners Cabinet Cleaning Instructions If the...

Страница 34: ...nected and speaker switch Int Ext is on the Ext position Full position Some pixels of the display may not turn on A still picture is displayed for an over extended period of time 1 Plug in the power cord 2 Make sure the power switch is switched on 3 Connect a signal connection to the monitor Move the monitor to another location to see is the interference is reduced Make sure that the signal cable ...

Отзывы: