


3 - 4
2.
To prevent sound interference the bass control
options operate exclusively
. Y
ou cannot combine
the bass from
EQUALIZER
with
wOOx
4.
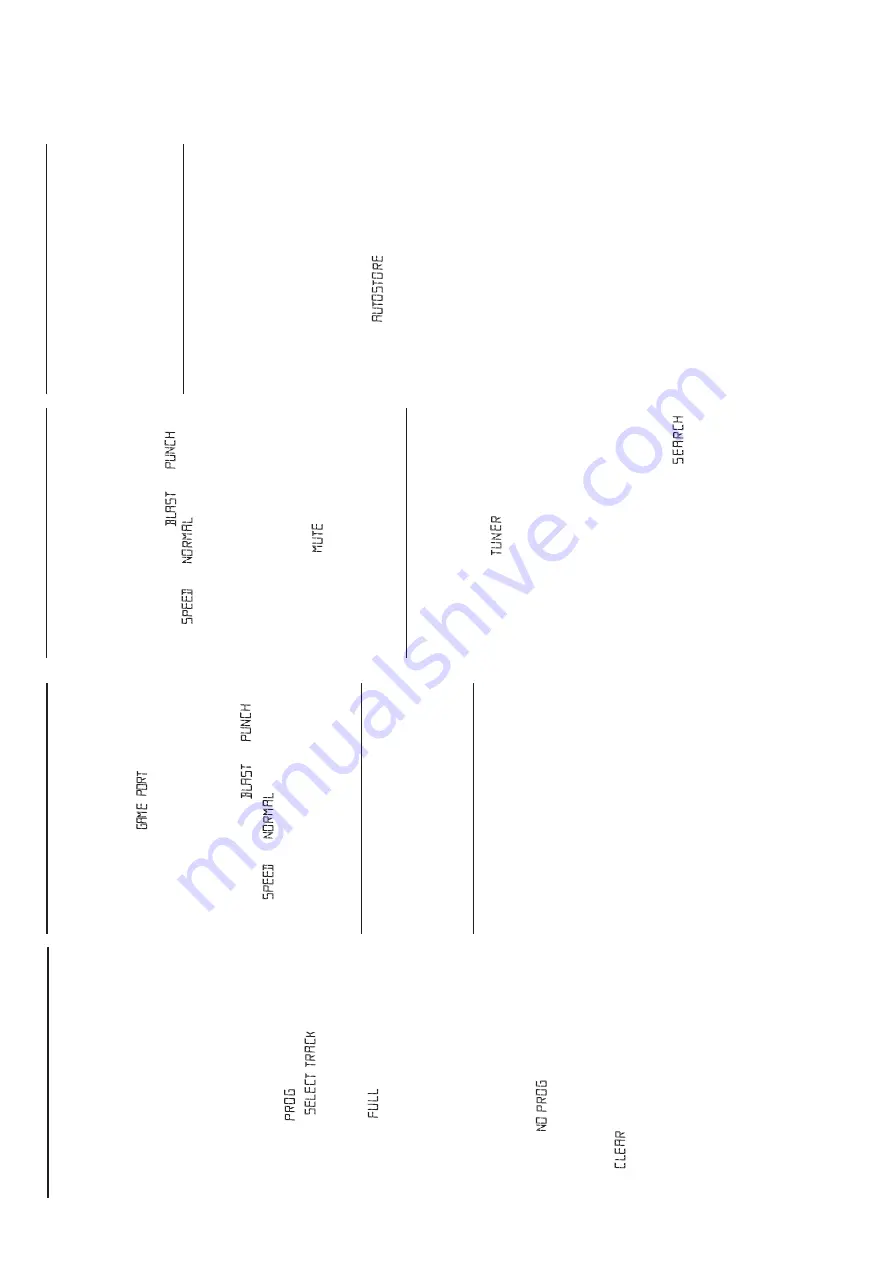
GAMESOUND
To
adjust the game sound, press
GAMESOUND
once
or more to select your option.
=
Display briefly shows
, ,
or
.
Note:
GAMESOUND
is only available when you
play in
GAME
•AUX
source.
How to MUTE the sound
1.
Press
MUTE
on the remote control to interrupt
sound reproduction instantly
.
=
Playback continues without sound and the
display flashes
.
2.
To
reactivate sound reproduction you can:
–
press
MUTE
again;
–
adjust the volume controls;
–
change to another source.
DIGIT
AL TUNER
(See
3
)
Tuning to stations
1.
Press
ST
ANDBY
ON
y
to on, then press
SOURCE
once or more to select
TUNER
(or press
TUNER
once on the remote control).
=
Display: shows
briefly followed by
waveband, frequency
, and preset station
number if already stored.
2.
Press
BAND / DISPLA
Y
once or more to select your
waveband (
TUNER
on the remote control)
3.
Tuning to stations
: you can tune to your
stations manually or by automatic search tuning:
Press down on
or
§
(
5
or
6
on the remote
control
)
and release button when the frequency in
the display starts running.
=
The radio automatically tunes to a station of
sufficient reception. Display shows
during automatic tuning.
4.
Repeat step 3 if necessary until you find the
desired station.
•T
o tune to a weak station, press
or
§
§
§
§
§
(
5
or
6
on the remote control ) briefly
and
repeatedly
until you have found optimal reception.
To
improve radio reception:
•
For
FM
, extend, incline and turn the telescopic
antenna. Reduce its length if the signal is too
strong.
•
For
MW
, the set uses a built-in antenna. Direct
this antenna by turning the whole set.
Programming tuner stations:
You can store up to a total of 30 radio stations in the
memory
, manually or automatically (Autostore).
Autostore
Automatic programming will start from preset 1. The
set will only program stations which are not in the
memory already
.
1.
Press
ALBUM
/
PRESET
-
or
+
once or more to
select the preset number .
2.
Press
PROG
for 4 seconds or more to activate
auto store programming.
=
Display: is
shown
and
available
stations are programmed in order of waveband
FM
, followed by
MW
, preset 1 station will
then be played after all stations are stored
automatically
.
Manual programming
1.
Tune to your desired station (see
Tuning to
stations
).
2.
Press
PROG
to activate programming.
=
Display:
program
flashes.
3.
Press
ALBUM
/
PRESET
-
or
+
once or more to
allocate a number from 1 to 30 to this station.
4.
Press
PROG
again to confirm.
=
Display shows the preset number
, waveband
and the frequency of the preset station.
5.
Repeat the above four steps to store other
stations.
Note :
You can erase a preset station by storing
another frequency in its place.
To
listen to a preset station
Press
ALBUM
/
PRESET
-
or
+
once or more until
the desired preset station is displayed.
Programming
track numbers
Program in the stop position to select and store your
CD tracks in the desired sequence. If you like, store
any
track more than once. Up to 20 tracks can be
stored in the memory
.
1.
Press
SEARCH
or
§
on the set to select your
desired
track number
.(on the remote control
¡
or
™
)
MP3-CD mode only:
First
press
ALBUM/
PRESET
–
or +
once or more to
find your album, then press
SEARCH
or
§
. (on
the remote control
¡
or
™
)
2.
Press
PROG
.
™
Display:
program
and the selected track
number .appears
briefly
.
™
Display :
if no track
selected for programming.
3.
Repeat steps
1-2
to select and store all desired
tracks.
™
Display:
if you try to program more
than 20 tracks.
4.
To
start playback of your disc program, press
2;
.
Note:
During normal playback, you can press
PROG
to add a current track to your program list.
Reviewing the program
In stop position, press and hold down
PROG
for a
while until the display shows all your stored track
numbers in sequence.
=
Display
if no tracks programmed.
Erasing a program
You can erase the program by:
•p
ressing
9
twice;
=
displayed briefly
, and
program
disappears.
•p
ressing
ST
ANDBY ON
y
•
selecting another sound source
•
opening the CD door
.
GAMESOUND (See
8
)
PLA
YING WITH GAMESOUND:
1.
Press
SOURCE
once or more on the set to select the
GAME
•AUX
function (
AUX
on the remote control)
=
Display scrolls :
2.
Connect your console to the cinches on the front
of the set
AUDIO IN ( LEFT / RIGHT)
and
VIDEO
IN
.
3.
Press
GAMESOUND
once or more to select your
game sound option.
=
Display briefly shows
, ,
or
.
Connecting other equipment to your system
Use the supplied video cable to connect the
VIDEO
OUT
terminal on the back of the set to
VIDEO IN
on
a TV or VCR for viewing or recording.
USB PC LINK
Quick Setup Guide
PC system requirements
– USB port with Windows 98 SE / ME/ 2000/ XP
– Intel
Pentium
MMXX200
or
higher
– CD-ROM
drive
Installing MusicMatch software
1.
Use the supplied USB cable to connect the set to the
USB port on your computer
.
(See
B
)
2.
Press
SOURCE
(
USB
on the remote control) once or
more to select
USB PC LINK
.
3.
Tu
rn on your PC then insert the supplied USB PC LINK
installer disc in the PC's CD-ROM drive. This
application software can also be downloaded from
http://www
.audio.philips.com
.
IM
PORTANT!
Please use this customized MusicMatch
software for your USB PC Link application.
Remember to un-install all other MusicMatch
jukebox software first from your PC system (if
available).
DIGIT
AL TUNER
DIGIT
AL TUNER
MP3-CD / CD PLA
YER
GAMESOUND / USB PC LINK
INSTRUCTION FOR USE
Содержание AZ 2558
Страница 18: ...6 3 6 3 KEY BOARD LAYOUT DIAGRAM COPPER SIDE VIEW ...
Страница 19: ...6 4 6 4 KEY BOARD LAYOUT DIAGRAM COMPONENT SIDE VIEW ...
Страница 24: ...8 3 8 3 CD99 BOARD LAYOUT DIAGRAM COPPER SIDE VIEW ...
Страница 25: ...8 4 8 4 CD99 BOARD LAYOUT DIAGRAM COMPONENT SIDE VIEW ...
Страница 28: ...9 3 9 3 MP3 BOARD LAYOUT DIAGRAM COPPER SIDE VIEW ...
Страница 29: ...9 4 9 4 MP3 BOARD LAYOUT DIAGRAM COMPONENT SIDE VIEW ...
Страница 32: ...11 2 11 2 POWER BOARD LAYOUT DIAGRAM COPPER SIDE VIEW ...
Страница 33: ...11 3 11 3 POWER BOARD LAYOUT DIAGRAM COMPONENT SIDE VIEW ...
Страница 35: ...12 2 12 2 USB BOARD LAYOUT DIAGRAM ...


