background image

44

MS-MY

4  Gunakan 

perkakas

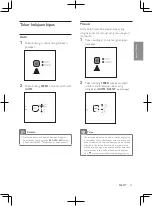
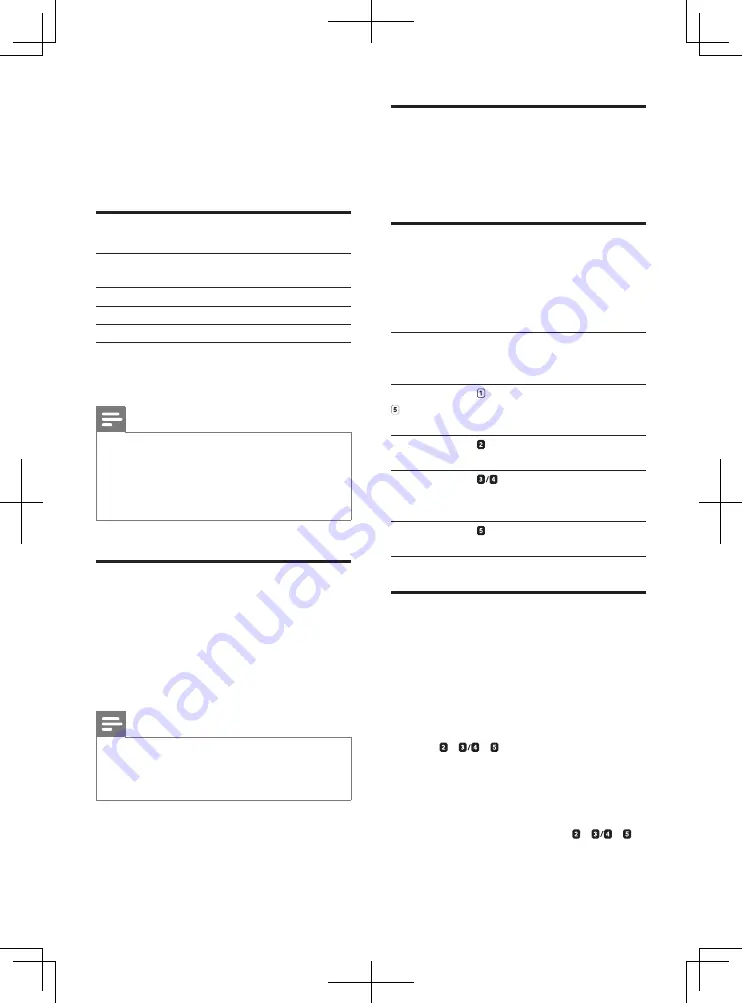
Fahami lampu kualiti udara

Warna lampu kualiti 

udara

Paras kualiti udara

Biru

baik

Ungu

sederhana

Merah

tidak baik

Lampu kualiti udara menyala secara automatik 

apabila perkakas dihidupkan.

Catatan


Sensor kualiti udara terbina dalam mengukur kualiti 

udara dan memilih warna lampu kualiti udara yang 

bersesuaian secara automatik. Apabila kualiti udara 

bersih, warna lampu kualiti udara menjadi biru. 

Apabila kualiti udara merosot, warna lampu kualiti 

udara berubah menjadi ungu atau merah.

Fahami penunjuk lampu 

kelembapan

Perkakas dilengkapi dengan sensor 

kelembapan terbina dalam. Lampu 

CURRENT 

HUMIDITY

 (

30%

40%

50%

 atau 

60%

menunjukkan kelembapan semasa.

Catatan


Ketepatan penunjuk kelembapan adalah lebih atau 

kurang 5%.


Paras kelembapan dalam bilik mengambil sedikit masa 

untuk diukur.

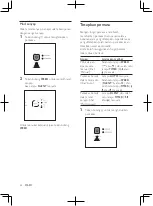
Fahami mod auto

Sensor kualiti udara terbina dalam mengukur 

kualiti udara ambien secara automatik dan 

memilih kelajuan kipas yang paling sesuai. 

Fahami isyarat perlindungan 

udara sihat

Lampu penapis menunjukkan bahawa penapis 

perlu dibersihkan atau digantikan. 

Lampu isyarat 

perlindungan udara 

sihat berlainan

Ikuti ini

Lampu penapis   / 

 berkelip.

Bersihkan pra-tapis 

dan kikis penapis 

pelembapan.

Lampu penapis 


berkelip.

Gantikan penapis 

berbilang jagaan.

Lampu penapis 


berkelip.

Gantikan penapis 

karbon diaktifkan dan 

penapis HEPA.

Lampu penapis 


berkelip.

Gantikan penapis 

pelembapan.

Fahami kunci perlindungan 

udara sihat

Perkakas ini dilengkapi dengan Kunci 

perlindungan udara sihat untuk memastikan 

penapis dalam keadaan yang optimum apabila 

perkakas beroperasi. Apabila penapis hampir 

penuh dan perlu digantikan, lampu penapis 

khusus (   / 

 /   ) mula berkelip.

Apabila anda tidak menggantikan penapis 

mengikut masa:


»

Perkakas berhenti beroperasi dan 

dikunci. 


»

Lampu penapis khusus (   / 

 /   ) 

menyala berterusan.

Содержание AC4084

Страница 1: ...AC4084 AC4085 Register your product and get support at www philips com welcome Always there to help you Question Contact Philips EN User Manual 3 MS MY Manual Pengguna 37 ZH CN 用户手册 71 ...

Страница 2: ......

Страница 3: ... 16 5 Clean your appliance 17 Clean the body of the appliance 17 Clean the air quality sensor and humidity sensor 17 Clean the water bucket 18 Clean the humidification filter tray 19 6 Clean the pre filter and humidification filter 20 Clean the pre filter 20 Clean the humidification filter 22 Rinse the humidification filter 22 Descale the humidification filter 23 Cleaning schedule 24 7 Replace the...

Страница 4: ... period of disuse If the filters are very dirty replace them see the chapter Replace the filters The appliance is only intended for household use under normal operating conditions Do not use the appliance in wet surroundings or in surroundings with high ambient temperatures such as the bathroom toilet or kitchen The appliance does not remove carbon monoxide CO or radon Rn It cannot be used a safet...

Страница 5: ...ot put fragrance in the water bucket If you do not use the humidification function for a long time clean the water bucket and humidification filter tray Dry the humidification filter If you need to move the appliance disconnect the appliance from the power supply first Then empty the water bucket Carry the appliance horizontally by both handles on the sides of the appliance EN ...

Страница 6: ...r 2 Multi care filter for AC4085 only 滤网2 多功能过滤网 只适用于 AC4085 濾網2 多功能過濾網 只適用於 AC4085 AC4141 Filter 3 Activated carbon filter 滤网3 活性碳过滤网 濾網3 活性碳過濾網 AC4143 Filter 4 HEPA filter 滤网4 HEPA过滤网 濾網4 HEPA過濾網 AC4144 Filter 5 Humidification filter 滤网5 加湿过滤网 濾網5 加濕過濾網 AC4148 Filter 1 Pre filter 滤网1 预过滤网 濾網1 預過濾網 AC4016 Register your product and get support at www philips com welcome English 3 简体中文 19 繁體中文 33 A...

Страница 7: ...ace them back into the appliance described as follows Tip When you remove or insert filters place the appliance against a wall for more stability Note Insert the filters in the correct position Make sure that you place the filters in the order of HEPA filter activated carbon filter Multi care filter and finally the pre filter The Multi care filter is sold separately from AC4084 Make sure that the ...

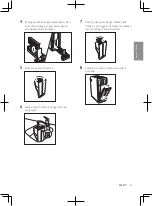
Страница 8: ...rom the humidification filter 7 Place the pre filter in the appliance 4 1 2 Note Make sure that the side with the two clips is pointing towards you and that all hooks of the pre filter are properly attached to the purifier 8 To reattach the front panel mount the panel onto the top of the appliance first 1 Then gently place the panel against the body of the appliance 2 4 2 1 EN ...

Страница 9: ...il you feel and hear a rattling sound 8 Place the water bucket back into the appliance 2 1 4 Put the humidification filter back and slide the humidification filter tray back to the appliance 5 Unscrew the top cap of the water bucket 6 Fill the water bucket with cold tap water EN ...

Страница 10: ...shing for approximately 2 weeks Approximately one day before the appliance locks it beeps every 30 minutes to inform you that the filter needs to be replaced 4 Use the appliance Understand the air quality light Color of the air quality light Air quality level Blue good Purple fair Red bad The air quality light automatically goes on when the appliance is switched on Note The built in air quality se...

Страница 11: ...rates In this way the appliance operates as an air purifier only PURIFIER light and REFILL WATER light are on Switch on and off the appliance The appliance always operates under air purification combined with humidification If you want to operate the appliance only as an air purifier you need to empty the water in the water bucket 1 Plug the appliance into the power supply All lights go on twice a...

Страница 12: ...switch on the appliance Set the sensitivity of the air quality sensor People with certain health problems for example allergies or asthma have a greater need for healthy air For this reason the appliance allows you to adjust the sensitivity of the air quality sensor If you set it to higher sensitivity level the appliance starts cleaning the air at lower pollution level There are 3 sensitivity leve...

Страница 13: ...ple color this means the air quality is good or excellent and you can select a lower fan speed On the other hand if the air quality light is in red or in purple color this means the air quality is bad or fair You can select the fan speed to clean the air quickly Change the fan speed Auto 1 Press the button to switch on the appliance 2 Press the SPEED button to select AUTO mode Note In auto mode yo...

Страница 14: ...ER lights or are on The appliance is in auto mode see Auto The AUTO light is on One of the SPEED lights SILENT or and one of the TIMER lights or are on The appliance is in silent mode see Silent mode The SILENT light and one of the TIMER lights or are on 1 Press the button to switch on the appliance Silent mode In silent mode the air filter operates very quietly 1 Press the button to switch on the...

Страница 15: ...ed level the humidity stays at this level constantly Press the HUMIDITY SET button once or more times to set the desired air humidity to 40 50 or 60 The corresponding HUMIDITY SET light 40 50 or 60 goes on 2 Press the TIMER button to activate the timer The TIMER light or goes on 3 Press the TIMER button repeatedly to choose the number of hours you want the appliance to operate The corresponding TI...

Страница 16: ...can memorize the settings when the appliance is switched off e g electricity shortage When the appliance is plugged in switched on again it automatically starts at the previous setting Water level The water level in the water bucket is visible through the water level window on the side of the appliance When there is not enough water in the water bucket the REFILL WATER light flashes to indicate th...

Страница 17: ...rifier filters are NOT washable nor vacuum cleanable Clean the body of the appliance Regularly clean the inside and outside of the appliance to prevent dust from collecting 1 Wipe away dust with a soft dry cloth from the body of the appliance 2 Clean the air inlet and the air outlet with a soft dry cloth Clean the air quality sensor and humidity sensor Clean the air quality and humidity sensors ev...

Страница 18: ...of the water bucket with fresh water several times 9 Screw the top cap tightly back onto the water bucket Clean the water bucket Clean the water bucket every day to keep it hygienic 1 Unscrew the top cap of the water bucket 2 Fill the water bucket for 1 3 with water 3 Add some mild washing up liquid to the water in the water bucket 4 Screw the top cap tightly back onto the water bucket EN ...

Страница 19: ...you can remove the humidification filter tray 2 Take the humidification filter out of the humidification filter tray 3 Rinse the humidification filter tray under a running tap Note If necessary use a mild detergent to clean the humidification filter tray In this case rinse the humidification filter tray thoroughly 4 Dry the humidification filter tray with a soft dry cloth 5 Place the humidificatio...

Страница 20: ...t keeps flashing for 24 hours After you have cleaned the pre filter and descale the humidification filter the light stops flashing and the filter lifetime is reset automatically When you turn off the appliance the light stops flashing Clean the pre filter Note Clean the pre filter when the filter light flashes to ensure optimal functioning of the appliance 1 Switch off the appliance and unplug it ...

Страница 21: ...nto the appliance Attach all hooks properly to the appliance 4 1 2 9 To reattach the front panel insert the top hooks into the top of the air appliance first 1 Then push the panel against the body of the appliance 2 4 2 1 Note Alternatively you can clean the pre filter by removing the dust with a vacuum cleaner Make sure that the pre filter is completely dry If it is still wet bacteria may multipl...

Страница 22: ...cleaning brush supplied under a slowly running tap 6 Put the humidification filter back into the humidification filter tray Clean the humidification filter Rinse the humidification filter every week to keep it hygienic In addition descale the humidification filter when the filter light flash Rinse the humidification filter 1 Switch off the appliance and unplug it 2 Remove the water bucket from the...

Страница 23: ...gar 1 1 1 hour Note If there are white deposits scale on the filter make sure that the side with the white deposits is immersed in the water 6 Let the humidification filter soak in the solution for one hour 7 Discard the water vinegar solution Descale the humidification filter Note It is important to descale the humidifying filter to avoid scale build up which seriously affects the humidifying per...

Страница 24: ...r mixture Every month Clean the air quality sensor and air humidity sensor with a dry cotton swab When necessary Wipe the surface of the appliance with a soft dry cloth 8 Rinse the humidification filter under the tap to rinse away vinegar residues During rinsing turn the humidification filter so that both the front and back sides are rinsed 9 Let excess water drip off the humidification filter 10 ...

Страница 25: ...eplace the filters The filter lights indicate which filter has to be replaced Note If you remove the front panel for filter changing while the appliance is switched on all lights on the control panel are off and the appliance stops operating Once the front panel is placed back to the appliance all lights flash twice Then the appliance returns to its operating state Replace the Multi care filter No...

Страница 26: ... the front panel mount the panel onto the top of the appliance first 1 Then gently place the panel against the body of the appliance 2 4 2 1 10 Reset the Multi care filter lifetime see the chapter Reset the filter lifetime counter 5 Remove the Multi care filter if available from the pre filter 6 Remove all packaging material from the new Multi care filter 7 Slide the new Multi care filter into the...

Страница 27: ...ated carbon and the HEPA filters are not washable nor vacuum cleanable Replace both the activated carbon filter and the HEPA filter when the filter light flashes Tip When you remove or insert filters place the appliance against a wall for more stability Note Insert the filters in the correct position Make sure that you place the filters in the order of HEPA filter activated carbon filter Multi car...

Страница 28: ...fetime counter Replace the humidification filter Replace the humidification filter when the filter light flashes 1 Switch off the appliance and unplug it 6 Place the new HEPA filter in the appliance first 4 7 Then place the new activated carbon filter in the appliance 4 3 8 Place the pre filter in the appliance 4 1 2 Note Make sure that the side with two clips is pointing towards you and that all ...

Страница 29: ...tion filter back and slide the humidification filter tray back to the appliance 2 Remove the water bucket from the appliance 3 Remove the humidification filter tray from the appliance 4 Remove the packaging material from the humidification filter ...

Страница 30: ... pollen and ultra fine particles Activate the Multi care filter After you have installed the Multi care filter you can activate it as follows Note For information of how to install the Multi care filter see the chapter Replace the filters section Replace the Multi care filter 1 Switch off the appliance 2 Press the RESET button once The filter lights and are on The filter light is off 3 Press and h...

Страница 31: ...e appliance when it is plugged in and switched on Only replace the respective filters when you see the respective filter lights flash After replacing the filters the respective filter light still flashes or continuous on until you reset the filter lifetime counter After you have replaced the filter reset the filter time 1 Put the plug in the power socket and switch on the appliance again 2 Press a...

Страница 32: ...ter drops keep dripping from the bottom of the water bucket check if the cap has been screwed onto the water bucket tightly If the problem persists contact the Consumer Care Center in your country The water level in the water bucket drops very quickly after I empty the humidification filter tray This is normal The water in the water bucket is used to fill the humidification filter tray the humidif...

Страница 33: ...ble and 4 pre filter The air quality sensor is wet The humidity level in your room is high and causes condensation Make sure that the air quality sensor is clean and dry see the chapter Clean your appliance section Clean the air quality sensor and air humidity sensor The color of the air quality light always stays the same The air quality sensor is dirty Clean the air quality sensor see the chapte...

Страница 34: ...ause I have an allergy You can change the air quality sensor sensitivity see the chapter Use the appliance section Set the sensitivity of the air quality sensor to make the appliance clean the air even better The appliance is extra loud You have not removed all packaging material from the filters Make sure that you have removed all packaging material You can change the fan speed to lower fan speed...

Страница 35: ...n the worldwide guarantee leaflet If there is no Consumer Care Centre in your country go to your local Philips dealer Order parts or accessories If you have to replace a part or want to purchase an additional part go to your Philips dealer or visit www philips com support If you have problems obtaining the parts please contact the Philips Consumer Care Center in your country you find its phone num...

Страница 36: ... their respective owners Philips reserves the right to change products at any time without being obliged to adjust earlier supplies accordingly 12 Notices Electomagnetic fields EMF This Philips appliance complies with all standards regarding electromagnetic fields EMF If handled properly and according to the instructions in this user manual the appliance is safe to use based on scientific evidence...

Страница 37: ...5 Bersihkan perkakas anda 51 Bersihkan badan perkakas 51 Bersihkan sensor kualiti udara dan sensor kelembapan 51 Bersihkan timba air 52 Bersihkan dulang penapis pelembapan 53 6 Bersihkan pra tapis dan penapis pelembapan 54 Bersihkan pra tapis 54 Bersihkan penapis pelembapan 56 Bilas penapis pelembapan 56 Kikis penapis pelembapan 57 Jadual pembersihan 58 7 Gantikan penapis 59 Gantikan penapis berbi...

Страница 38: ...dan salur keluar udara contohnya dengan meletakkan item di salur keluar udara atau di hadapan salur masuk udara Awas Perkakas ini bukan pengganti bagi pengalihan udara yang betul pembersihan vakum secara tetap atau penggunaan hud atau kipas pengekstrak semasa memasak Jika soket kuasa yang digunakan untuk menyalurkan kuasa kepada perkakas mempunyai sambungan yang lemah plag perkakas akan menjadi pa...

Страница 39: ...basah atau dalam persekitaran dengan suhu ambien yang tinggi seperti dalam bilik mandi tandas atau dapur Perkakas ini tidak mengeluarkan karbon monoksida CO atau radon Rn Ia tidak boleh digunakan sebagai peranti keselamatan jika berlaku kemalangan dengan proses pembakaran dan bahan kimia berbahaya Bersihkan timba air setiap hari untuk memastikannya bersih Hanya isikan timba air dengan air paip yan...

Страница 40: ... 空气质量感应器 空氣質量感應器 Filter 2 Multi care filter for AC4085 only 滤网2 多功能过滤网 只适用于 AC4085 濾網2 多功能過濾網 只適用於 AC4085 AC4141 Filter 3 Activated carbon filter 滤网3 活性碳过滤网 濾網3 活性碳過濾網 AC4143 Filter 4 HEPA filter 滤网4 HEPA过滤网 濾網4 HEPA過濾網 AC4144 Filter 5 Humidification filter 滤网5 加湿过滤网 濾網5 加濕過濾網 AC4148 Filter 1 Pre filter 滤网1 预过滤网 濾網1 預過濾網 AC4016 Register your product and get support at www philips com welcome Engli...

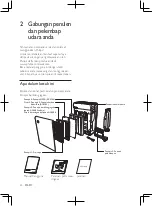
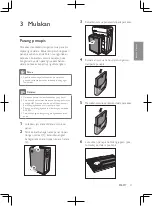
Страница 41: ... yang betul Pastikan anda memasukkan penapis mengikut urutan penapis HEPA penapis karbon diaktifkan penapis berbilang jagaan dan akhir sekali pra tapis Penapis berbilang jagaan dijual berasingan daripada AC4084 Pastikan bahagian dengan tag menghadap ke arah anda 1 Letakkan jari anda di dalam ceruk sisi panel 2 Tarik keluar bahagian atas panel depan dengan cermat 1 kemudian angkat bahagian atas pan...

Страница 42: ...purna pada penulen 8 Untuk memasang semula panel depan pasang panel ke bahagian atas perkakas terlebih dahulu 1 Kemudian letakkan panel terhadap badan perkakas dengan cermat 2 4 2 1 Bersedia untuk pelembapan 1 Tarik timba air dari sisi perkakas 2 Tarik dulang penapis pelembapan daripada perkakas 3 Keluarkan bahan pembungkusan daripada penapis pelembapan ...

Страница 43: ...ng penapis pelembapan kembali ke dalam perkakas 5 Buka tukup atas timba air 6 Hanya isikan timba air dengan air paip yang sejuk 7 Pasang tukup atas dengan ketat pada timba air sehingga anda dapat merasakan dan mendengar bunyi berdetar 8 Letakkan timba air kembali ke dalam perkakas 2 1 ...

Страница 44: ...sa untuk diukur Fahami mod auto Sensor kualiti udara terbina dalam mengukur kualiti udara ambien secara automatik dan memilih kelajuan kipas yang paling sesuai Fahami isyarat perlindungan udara sihat Lampu penapis menunjukkan bahawa penapis perlu dibersihkan atau digantikan Lampu isyarat perlindungan udara sihat berlainan Ikuti ini Lampu penapis berkelip Bersihkan pra tapis dan kikis penapis pelem...

Страница 45: ...m timba air 1 Pasangkan plag perkakas ke bekalan kuasa Semua lampu menyala dua kali dan anda mendengar bip Kemudian lampu terpadam sekali lagi 2 Tekan butang untuk menghidupkan perkakas Lampu PURIFIER dan HUMIDIFIER menyala Lampu kualiti udara menunjukkan kualiti udara semasa Lampu CURRENT HUMIDITY menunjukkan paras kelembapan semasa 3 Tekan butang untuk menghidupkan perkakas Catatan Pelembap tida...

Страница 46: ...nsitiviti lebih tinggi penulen mula membersihkan udara pada paras pencemaran lebih rendah untuk memastikan udara lebih bersih 1 Pastikan penulen telah dihidupkan 2 Tekan butang dan secara serentak Penulen berbunyi bip dua kali dan lampu kelajuan kipas menyala untuk menunjukkan paras sensitiviti semasa sensor kualiti udara Lampu kelajuan kipas Paras sensitiviti lebih sensitif sensitif standard 3 Te...

Страница 47: ...ecara manual yang menulis ganti mod auto 1 Tekan butang untuk menghidupkan perkakas 2 Tekan butang SPEED sekali atau lebih untuk memilih kelajuan kipas yang diinginkan AUTO SILENT atau Petua Jika lampu kualiti udara menjadi biru atau ungu gelap ini bermakna kualiti udara bagus atau cemerlang dan anda boleh memilih kelajuan kipas yang lebih rendah Sebaliknya jika lampu kualiti udara menjadi merah a...

Страница 48: ...ila masa yang ditetapkan telah berlalu perkakas akan dimatikan secara automatik Anda boleh menggunakan fungsi pemasa dalam situasi berikut Situasi Anda akan melihat Pilih kelajuan kipas secara manual lihat Manual Salah satu lampu SPEED atau dan salah satu lampu TIMER atau menyala Perkakas berada dalam mod auto lihat Auto Lampu AUTO menyala Salah satu lampu SPEED SILENT atau dan salah satu lampu TI...

Страница 49: ...apan kekal pada paras ini dengan tetap Tekan butang HUMIDITY SET sekali atau lebih untuk menetapkan kelembapan udara yang diinginkan kepada 40 50 atau 60 Lampu HUMIDITY SET 40 50 atau 60 yang bersamaan menyala Catatan Jika anda tidak menetapkan paras kelembapan lampu HUMIDITY SET padam Pelembap melembapkan udara di bawah mod AUTO dan paras kelembapan praset adalah 50 Jika anda menukar kelajuan kip...

Страница 50: ... yang mencukupi dalam timba air lampu REFILL WATER berkelip untuk menunjukkan anda perlu mengisikan semula timba air Catatan Perkakas boleh beroperasi di bawah penulenan udara hanya apabila air dalam timba habis dan lampu REFILL WATER berkelip Fungsi pelembapan hanya boleh diaktifkan apabila timba diisikan dengan air ...

Страница 51: ...ra dan salur keluar udara dengan kain lembut yang kering Bersihkan sensor kualiti udara dan sensor kelembapan Bersihkan kualiti udara dan sensor kelembapan setiap bulan untuk fungsi optimum perkakas Bersihkannya dengan lebih kerap jika anda menggunakan perkakas dalam persekitaran berhabuk Catatan Apabila paras kelembapan dalam bilik sangat tinggi kondensasi boleh berlaku pada sensor kualiti udara ...

Страница 52: ...mba air sehingga 1 3 dengan air 3 Tambah cecair pembersihan yang lembut pada air dalam timba air 4 Pasang tukup atas dengan ketat pada timba air 5 Goncang timba dengan kedua dua tangan untuk membersihkan bahagian dalam timba air 6 Buka tukup atas timba air 7 Kosongkan timba air ke dalam singki 8 Bilas bahagian dalam timba air dengan air segar beberapa kali 9 Pasang tukup atas dengan ketat pada tim...

Страница 53: ... mengeluarkan dulang penapis pelembapan 2 Keluarkan penapis pelembapan dari dulang penapis pelembapan 3 Bilang dulang penapis pelembapan di bawah air paip yang mengalir Catatan Jika perlu gunakan detergen lembut untuk membersihkan dulang penapis pelembapan Dalam kes ini bilas dulang penapis pelembapan dengan bersih 4 Keringkan dulang penapis pelembapan dengan kain lembut yang kering 5 Pasang kemba...

Страница 54: ...apis kekal berkelip selama 24 jam Selepas anda membersihkan pra tapis dan mengikis penapis pelembapan lampu berhenti berkelip dan hayat penapis ditetapkan semula secara automatik Apabila anda mematikan perkakas lampu berhenti berkelip Bersihkan pra tapis Catatan Bersihkan pra tapis apabila lampu penapis berkelip untuk memastikan fungsi optimum perkakas 1 Matikan perkakas dan cabut plagnya 2 Letakk...

Страница 55: ... semula penapis ke dalam perkakas Pasang semua cangkuk pada perkakas dengan betul 4 1 2 9 Untuk memasang semula panel depan selitkan cangkuk atas ke bahagian atas perkakas udara terlebih dahulu 1 Kemudian letakkan panel terhadap badan perkakas 2 4 2 1 Catatan Secara alternatif anda boleh membersihkan pra tapis dengan mengeluarkan habuk dengan pembersih vakum Pastikan pra tapis kering sepenuhnya Ji...

Страница 56: ...as 3 Tarik dulang penapis pelembapan daripada perkakas 4 Keluarkan penapis pelembapan daripada dulang penapis pelembapan Catatan Anda boleh mengeluarkan timba air dahulu sebelum anda boleh mengeluarkan dulang penapis pelembapan lihat bab Bersedia untuk pelembapan 5 Bersihkan penapis pelembapan dengan cermat dengan menggunakan berus pembersih yang dibekalkan di bawah air paip yang mengalir perlahan...

Страница 57: ...s 4 Keluarkan penapis pelembapan daripada dulang penapis pelembapan Catatan Keluarkan timba air dahulu sebelum anda boleh mengeluarkan dulang penapis pelembapan 5 Campurkan cuka putih 5ml 100 ml asid asetik dengan jumlah air paip yang sama dalam bekas yang cukup besar untuk merendamkan penapis pelembapan Air Cuka 1 1 1 jam Catatan Jika terdapat mendapan putih kerak pada penapis pastikan sisi denga...

Страница 58: ...mbapan ke dalam dulang penapis pelembapan Jadual pembersihan Frekuensi Kaedah pembersihan Setiap hari Bilas timba air Setiap minggu Bilas penapis pelembapan Bersihkan dulang penapis pelembapan Apabila lampu penapis berkelip Bersihkan pra tapis Kikis penapis pelembapan dengan campuran cuka dan air Setiap bulan Bersihkan sensor kualiti udara dan sensor kelembapan udara dengan kapas kesat kering Bila...

Страница 59: ...rasingan Penapis berbilang jagaan tidak dapat dicuci atau dibersihkan dengan vakum Gantikan penapis berbilang jagaan apabila lampu penapis menyala Petua Apabila anda mengeluarkan atau memasukkan penapis letakkan perkakas terhadap dinding agar lebih stabil Catatan Masukkan penapis dalam kedudukan yang betul Pastikan anda memasukkan penapis mengikut urutan penapis HEPA penapis karbon diaktifkan pena...

Страница 60: ...kkan pra tapis ke dalam perkakas 4 1 2 Catatan Pastikan sisi dengan dua klip menghadap anda dan semua cangkuk pra tapis dipasang dengan sempurna pada perkakas 9 Untuk memasang semula panel depan pasang panel ke bahagian atas perkakas terlebih dahulu 1 Kemudian letakkan panel terhadap badan perkakas dengan cermat 2 4 2 1 10 Tetapkan semula hayat penapis berbilang jagaan lihat bab Tetap semula pembi...

Страница 61: ...l Catatan Masukkan penapis dalam kedudukan yang betul Pastikan anda memasukkan penapis mengikut urutan penapis HEPA penapis karbon diaktifkan penapis berbilang jagaan jika tersedia dan akhir sekali pra tapis Pastikan bahagian dengan tag menghadap ke arah anda 1 Matikan perkakas dan cabut plagnya 2 Letakkan jari anda di dalam ceruk sisi panel 3 Tarik keluar bahagian atas panel depan dengan cermat 1...

Страница 62: ...pra tapis dipasang dengan sempurna pada perkakas 9 Untuk memasang semula panel depan pasang panel ke bahagian atas perkakas terlebih dahulu 1 Kemudian letakkan panel terhadap badan perkakas dengan cermat 2 4 2 1 10 Tetapkan semula hayat penapis karbon diaktifkan dan penapis HEPA lihat bab Tetap semula pembilang hayat penapis Gantikan penapis pelembapan Gantikan penapis pelembapan apabila lampu pen...

Страница 63: ...a air daripada perkakas 3 Tarik dulang penapis pelembapan daripada perkakas 4 Keluarkan bahan pembungkusan daripada penapis pelembapan 5 Pasang kembali penapis pelembapan yang baru dan luncurkan dulang penapis pelembapan kembali ke dalam perkakas ...

Страница 64: ...k debunga dan zarah ultra kecil Aktifkan penapis berbilang jagaan Selepas anda memasang penapis berbilang jagaan anda boleh mengaktifkannya seperti berikut Catatan Untuk maklumat mengenai cara memasang penapis berbilang jagaan lihat bab Gantikan penapis bahagian Gantikan penapis berbilang jagaan 1 Matikan perkakas 2 Tekan butang RESET sekali Lampu penapis dan menyala Lampu penapis tidak menyala 3 ...

Страница 65: ...n semula perkakas apabila ia dipasang dan dihidupkan Hanya gantikan penapis masing masing apabila anda melihat lampu penapis masing masing berkelip Selepas menggantikan penapis lampu penapis masing masing masih berkelip atau menyala tetap sehingga anda menetapkan semula pembilang hayat penapis Selepas anda menggantikan penapis tetapkan semula masa penapis 1 Masukkan plag ke dalam soket kuasa dan h...

Страница 66: ... ke perkakas Kemudian hidupkan perkakas dan cuba lagi Timba air bocor Adalah biasa bagi tudung timba air basah sedikit apabila anda mengeluarkannya daripada perkakas Walau bagaimanapun jika titisan air terus menitis dari bahagian bawah timba air periksa sama ada tudung telah dipasang dengan ketat pada timba air Jika masalah berterusan hubungi Pusat Penjagaan Pelanggan dalam negara anda Paras air d...

Страница 67: ...lah mengeluarkan semua bahan pembungkusan daripada penapis Kualiti udara tidak meningkat walaupun perkakas telah beroperasi untuk jangka masa yang panjang Salah satu penapis tidak digantikan dalam perkakas Pastikan semua penapis dipasang dengan betul mengikut urutan bermula dengan penapis paling dalam 1 penapis HEPA 2 penapis karbon diaktifkan 3 penapis berbilang jagaan jika tersedia dan 4 pra tap...

Страница 68: ... juga mungkin mengeluarkan bau yang kurang menyenangkan apabila salah satu penapis kotor Dalam kes ini bersihkan atau gantikan penapis yang berkenaan Saya memerlukan udara yang lebih bersih kerana saya mempunyai alergi Anda boleh menukar sensitiviti sensor kualiti udara lihat bab Gunakan perkakas bahagian Tetapkan sensitiviti sensor kualiti udara untuk membolehkan perkakas membersihkan udara denga...

Страница 69: ...dalam buku risalah jaminan seluruh dunia Jika tiada Pusat Layanan Pelanggan di negara anda pergi ke penjual Philips tempatan anda Pesan bahagian dan aksesori Jika anda perlu menggantikan bahagian atau ingin membeli bahagian tambahan pergi ke penjual anda atau lawati www philips com support Jika anda menghadapi masalah mendapatkan bahagian sila hubungi Pusat Penjagaan Pelanggan Philips di negara an...

Страница 70: ...ps membuat jangkaan terhadap pembangunan lanjut dalam pemiawaian bagi integrasi awal di dalam produk produknya Kitar semula Produk anda direka bentuk dan dikilangkan dengan menggunakan bahan dan komponen yang berkualiti tinggi yang boleh dikitar semula dan digunakan semula Apabila simbol tong beroda yang dipangkah ini dilekatkan pada sesuatu produk ia bermakna produk tersebut diliputi oleh Arahan ...

Страница 71: ...应器的灵敏度 79 更改风速 80 自动 80 手动 80 静音模式 81 设置定时器 81 设置湿度 82 水位 83 5 清洁产品 84 清洗产品机身 84 清洁空气质量感应器和湿度感应器 84 清洁水桶 85 清洁加湿滤网托盘 86 6 清洁预过滤网和加湿滤网 87 请清洁预过滤网 87 清洁加湿滤网 88 冲洗加湿滤网 88 为加湿滤网除垢 89 清洁计划 91 7 更换过滤网 92 更换多功能过滤网 92 立即更换活性炭过滤网和 HEPA 过滤 网 94 更换加湿滤网 95 8 添加多功能过滤网 97 激活多功能过滤网 97 9 重置过滤网使用寿命计数器 98 9 故障种类和处理方法 99 10 保修与服务 101 订购部件或附件 101 11 注意事项 102 电磁场 EMF 102 符合 EMF 标准 102 回收 102 简体中文 ...

Страница 72: ...表面上放置 和使用本产品 产品的后侧及两侧均要留出至少 20 厘米的空 间 产品上方至少要留出 30 厘米的空间 切勿在产品顶部放置任何物品 也不要坐在产 品上 切勿将产品直接放在空调下方 以防冷凝水滴 到产品中 打开产品电源之前 务必确保已经正确安装所 有过滤网 只能使用 Philips 专门为本产品设计的原装过滤 网 切勿使用任何其它过滤网 请勿用硬物敲击本产品 尤其是进风口和出风 口 请务必通过产品两端的手柄提起或移动产品 请勿将手指或其他任何物体插入出风口或进风 口 以防止产品出现物理损坏或发生故障 当您使用室内喷雾式驱虫剂或在充满油污 易燃 气体或化学烟雾的地方时 请勿使用本产品 请勿在气体用具 加热装置或火炉附近使用本 产品 使用之后和清洁产品前 务必先将电源插头拔 掉 请勿在温度变化较大的房间内使用本产品 因为 这可能导致产品内部的冷凝 为防止产生干扰 产品与使用无线电波的电...

Страница 73: ...过滤网 只适用于 AC4085 濾網2 多功能過濾網 只適用於 AC4085 AC4141 Filter 3 Activated carbon filter 滤网3 活性碳过滤网 濾網3 活性碳過濾網 AC4143 Filter 4 HEPA filter 滤网4 HEPA过滤网 濾網4 HEPA過濾網 AC4144 Filter 5 Humidification filter 滤网5 加湿过滤网 濾網5 加濕過濾網 AC4148 Filter 1 Pre filter 滤网1 预过滤网 濾網1 預過濾網 AC4016 Register your product and get support at www philips com welcome English 3 简体中文 19 繁體中文 33 AC4016 um en indd 1 04 05 2011 19 01 12 快速入门指南...

Страница 74: ... 明卸下所有过滤网并除去其包装 然后重新放 回产品中 提示 取出或插入过滤网时 可将产品按在墙上以增 强稳定性 注 将过滤网插到正确位置 确保您更换过滤网的顺序是 HEPA 过滤网 活 性炭过滤网 多功能过滤网和预过滤网 多功能过滤网与 AC4084 单独出售 确保带拉片的一面朝向您 1 请将您的手指放在侧面板的凹陷处 2 轻轻地将面板顶部撤走 然后将前面板的 顶部面朝向您提起 4 2 1 3 卸下产品内部的所有过滤网 4 除去过滤网上的所有包装材料 5 将过滤网放回产品内 4 3 6 将多功能过滤网 若可用 滑入预过滤网 ...

Страница 75: ...75 ZH CN 7 将预过滤网放入产品内 4 1 2 注 确保带两个固定夹的一面朝向您 并确保预过滤 网的所有挂钩均已正确连接到净化器上 8 要重新连接前面板 请先将面板安装到产品 的顶部 1 然后 朝产品机身方向轻放面 板 2 4 2 1 加湿准备 1 将水桶从产品侧面拉出 2 将加湿滤网托盘从产品拉出 3 拆除加湿滤网的包装材料 简体中文 ...

Страница 76: ...76 ZH CN 4 放回加湿滤网 然后将加湿滤网托盘滑入 产品 5 拧开水桶的顶盖 6 向水桶中注入冷水 7 将顶盖拧回到水桶上并拧紧 直到您听到 咔哒 一声 8 将水桶放入本产品内 2 1 ...

Страница 77: ... 50 或 60 显示当前湿度 注 湿度指示的准确度约为正负 5 测量房间湿度需要一些时间 了解自动模式 内置空气质量感应器自动测量周围的空气质 量 并选择最适合的风速 了解健康空气滤网更换提醒指 示灯 过滤网指示灯表示必须清洁或更换过滤网 不同的健康空气滤网更 换提醒指示灯 按此操作 过滤网指示灯 闪 烁 清洁预过滤网并为加 湿滤网除垢 过滤网指示灯 闪烁 更换多功能过滤网 过滤网指示灯 闪 烁 立即更换活性炭过滤 网和 HEPA 过滤网 过滤网指示灯 闪烁 更换加湿滤网 了解健康空气智能锁 本产品具有健康空气智能锁 旨在确保产品运 行过程中 过滤网在最佳条件下工作 当过滤 网快满载并且必须进行更换时 特定过滤网指 示灯 开始闪烁 如果您不及时更换过滤网 产品将停止运行并且锁定 特定过滤网指示灯 持 续亮起 注 过滤网指示灯闪烁大约两周后产品锁定 产品锁定之前 1 天左右 它会每 30 ...

Страница 78: ... 您需要 倒空水桶中的水 1 将产品插头插入电源 所有指示灯都将亮起两次 且您将听 到一声蜂鸣声 之后 指示灯将再次 熄灭 2 按 按钮启动产品 PURIFIER 和 HUMIDIFIER 指示灯 亮起 空气质量指示灯会显示当前空气质 量 CURRENT HUMIDITY 指示灯显示 当前湿度 3 按 按钮关闭产品 注 在空气净化器未工作的情况下 加湿器不可单 独使用 如果水桶已清空 加湿器将关闭 但空气净 化器仍工作 这样 产品只用作空气净化器 PURIFIER 和 REFILL WATER 指示灯亮 起 ...

Страница 79: ...敏度 您可通过以下 方法调节空气质量感应器的灵敏度 注 如果将其设置为较高的灵敏度级别 则本产品开 始清洁污染程度较低的空气 从而使空气前所 未有地清新 1 确保净化器已启动 2 同时按 SPEED 和 HUMIDITY SET 按 钮 净化器将发出两声哔声 并且风速指示 灯 闪烁 以指示空气质量感应器 当前的灵敏度级别 风速指示灯 灵敏度级别 SILENT 超级灵敏 灵敏 标准 3 按 SPEED 按钮可调节空气质量感应器的 灵敏度级别 其中一个 SPEED 指示灯 SILENT 或 亮起 以指示空气质量感应 器首选的灵敏度级别 4 再次按住 SPEED 和 HUMIDITY SET 按钮确认设置 注 当您更改灵敏度之后 只要打开产品 它就会按 照您设置的灵敏度级别自动开始运行 简体中文 ...

Страница 80: ...按钮选择 AUTO 自动 模式 注 在自动模式下 您可以设置房间中的所需湿度 40 50 60 请参阅 设置湿度 一 章 手动 您可以手动选择所需的风速 它将覆盖自动模 式 1 按 按钮启动产品 2 按一下或按几下 SPEED 按钮 选择所需的 风速 AUTO SILENT 或 提示 如果空气质量指示灯显示为蓝色或深紫色 则 表示空气质量良好或非常好 此时您可以选择较 低的风速 另一方面 如果空气质量指示灯呈红色或紫色 则表示空气质量较差或一般 您可以选择风速 快速清洁空气 ...

Страница 81: ...为其它风速 请按 SPEED 按钮 设置定时器 使用定时器功能 您可设定产品运行的小时 数 到达设定的时间时 产品将自动关闭 您可以在以下情况使用定时器功能 情况 您将会发现 手动选择风速 请参阅 手 动 其中一个 SPEED 指示灯 或 和其中一个 TIMER 指 示灯 或 亮起 产品处于自动 模式 请参阅 自动 AUTO 指示灯亮起 其中一个 SPEED 指示灯 SILENT 或 和其中 一个 TIMER 指示灯 或 亮起 产品处于静音 模式 请参阅 静音模式 SILENT 指示灯和其中一个 TIMER 指示灯 或 亮起 1 按 按钮启动产品 简体中文 ...

Страница 82: ...R 按钮可选择您想要产品运 行的小时数 相应的 TIMER 指示灯亮 起 要禁用定时器功能 请反复按 TIMER 按钮 直至 TIMER 指示灯 或 熄灭 设置湿度 注 请确保您想使用加湿功能时水桶已装满水 请参 阅 使用入门 一章的 加湿准备 部分 您仅可在 AUTO 模式下设置所需的湿度 当 室内湿度达到所需的级别时 湿度将持续保持 此水平 按一下或按几下 HUMIDITY SET 按钮 将所需的空气湿度设置为 40 50 或 60 相应的 HUMIDITY SET 指示灯 40 50 或 60 亮起 ...

Страница 83: ... 如果您更改风扇速度 SILENT 或 加湿器将根据风速自动工作 并且 AUTO 模式 将禁用 如果您想在更短时间内增加湿度 则可以选择 更高风速 产品具有智能记忆功能 在产品关闭时 如供电 不足 它可以记忆设置 再次插入 打开产品 时 产品将自动以先前的设置启动 水位 可通过产品侧面的水位窗看见水桶的水位 水 桶中的水量不足时 REFILL WATER 指示灯将 开始闪烁 以指明必须重新向水桶中注水 注 当水桶中没有水并且 REFILL WATER 指示灯闪 烁时 产品只可在空气净化下工作 当水桶装满 水时 才可激活加湿功能 简体中文 ...

Страница 84: ...清洁 清洗产品机身 定期清洁产品的内侧和外侧 防止灰尘积聚 1 使用柔软的干布擦去产品机身上的灰尘 2 使用柔软的干布清洁进风口和出风口 清洁空气质量感应器和湿度感 应器 每月清洁一次空气质量和空气湿度感应器 确 保产品以最佳性能运行 如果产品用在多尘的 环境中 请经常进行清洁 注 当室内的湿度非常高时 空气质量感应器上可能 会形成冷凝水 因此 即使空气质量良好 空气 质量指示灯也可能指示空气质量差 在这种情 况下 您必须清洁空气质量感应器或者使用任一 手动速度设置 1 使用软刷清洁空气质量和空气湿度感应器 的进风口和出风口 2 卸下空气质量和空气湿度感应器的盖子 3 使用稍微浸湿的棉签 清洁感应器 进风口 和出风口 4 使用干棉签将其擦干 5 重新装上感应器的盖子 ...

Страница 85: ...85 ZH CN 清洁水桶 每天清洁水桶 使其保持卫生 1 拧开水桶的顶盖 2 向水桶注入 1 3 水位的水 3 向水桶里的水中添加一些温和的洗涤剂 4 将顶盖拧回到水桶上并拧紧 5 用双手来回晃动水桶以清洁水桶内侧 6 拧开水桶的顶盖 7 将水桶中的水全部倒入水槽 8 用清水反复清洗水桶的内侧 9 将顶盖拧回到水桶上并拧紧 简体中文 ...

Страница 86: ...86 ZH CN 清洁加湿滤网托盘 每周清洁一次加湿滤网托盘以使其保持卫生 1 将水桶从产品中取出 然后将加湿滤网托 盘从产品中取出 注 先取出水桶 然后取出加湿滤网托盘 2 从加湿滤网托盘中取出加湿滤网 3 在水龙头下冲洗加湿滤网托盘 注 如有必要 用温和的清洁剂清洁加湿滤网托盘 在此情况下 彻底冲洗加湿滤网托盘 4 使用柔软的干布擦干加湿滤网托盘 5 放回加湿滤网 然后将加湿滤网托盘滑入 产品 ...

Страница 87: ...当过滤网指示灯 闪烁时 您必须清洁 预过滤网并为加湿滤网除垢 该指示灯大约每两周闪烁一次 注 过滤网指示灯 保持 24 小时闪烁 清洁预过滤网并为加湿滤网除垢后 指示灯停止 闪烁 过滤网使用寿命自动重置 关闭产品时 指示灯停止闪烁 清洁预过滤网 注 当过滤网指示灯 闪烁时 请清洁预过滤 网 以确保产品以最佳性能运行 1 关闭产品并拔下电源插头 2 将手指放在侧面板的凹处 然后面向您的 方向提起并卸下前面板的底部 从产品轻 轻拉出前面板的顶部 4 2 1 3 要卸下预过滤网 请向下按两个固定夹 然 后朝您自己的方向拉动过滤网 4 1 2 简体中文 ...

Страница 88: ...过滤网 8 将预过滤网放回产品内部 然后将所有挂 钩正确连接到产品上 4 1 2 9 要装回前面板 请首先将顶部的挂钩插到空 气净化器顶部 1 然后 朝产品机身方向 推动面板 2 4 2 1 注 您也可以使用吸尘器来除去上面的灰尘 从而达 到清洁预过滤网的目的 确保预过滤网完全干燥 如果仍然是湿的 细 菌可能会乘虚而入 因此缩短预过滤网的使用 寿命 确保带两个固定夹的一面朝向您 并确保预过滤 网的所有挂钩均已正确连接到产品上 清洁加湿滤网 每周冲洗一次加湿滤网以使其保持卫生 此 外 当过滤网指示灯 闪烁时 请为加湿 滤网除垢 冲洗加湿滤网 1 关闭产品并拔下电源插头 ...

Страница 89: ...89 ZH CN 2 将水桶从产品中取出 3 将加湿滤网托盘从产品中取出 4 从加湿滤网托盘中取出加湿滤网 注 必须先取出水桶 然后才能取出加湿滤网托盘 请参阅 加湿准备 一章 5 在水龙头的慢速水流下用随附的清洁刷轻 轻地清洁加湿滤网 6 将加湿滤网放回加湿滤网托盘中 为加湿滤网除垢 注 由于水垢会严重影响加湿性能 因此务必为加湿 滤网除垢 防止水垢积聚 1 关闭产品并拔下电源插头 简体中文 ...

Страница 90: ...取出 4 从加湿滤网托盘中取出加湿滤网 注 必须先取出水桶 然后才能取出加湿滤网托盘 5 将白醋 5 毫升 100 毫升醋酸 与等量的 自来水倒入能够完全浸泡加湿滤网的容器 中 水 白醋 1 1 1 小时 注 如果过滤网上面有白色残留物 水垢 请确保 将带有白色残留物的一面浸入水中 6 让加湿滤网在溶液中浸泡 1 小时 7 倒掉水醋溶液 8 在水龙头下清洗加湿滤网以冲洗掉残留的 醋 在冲洗过程中 翻转加湿滤网 以便 将正面和背面都冲洗干净 9 甩掉加湿滤网上的多余水份 ...

Страница 91: ...91 ZH CN 10 将加湿滤网放回加湿滤网托盘中 清洁计划 频率 清洁方法 每天 清洗水桶 每周 冲洗加湿滤网 清洁加湿滤网托盘 当过滤网指 示灯 闪 烁时 请清洁预过滤网 用水醋混合液为加湿滤网除 垢 每月 用干燥的棉签清洁空气质量 感应器和空气湿度感应器 必要时 使用干软布清洁产品表面 简体中文 ...

Страница 92: ...灯就都会闪烁 两次 之后 产品恢复运行状态 更换多功能过滤网 注 仅 AC4085 提供多功能过滤网 对于 AC4084 多功能过滤网单独出售 多功能过滤网不可用水洗 也不可用真空吸尘 器清洁 当过滤网指示灯 闪烁时 请更换多功能过 滤网 提示 取出或插入过滤网时 可将产品按在墙上以增 强稳定性 注 将过滤网插到正确位置 确保您更换过滤网的顺序是 HEPA 过滤网 活 性炭过滤网 多功能过滤网和预过滤网 确保带拉片的一面朝向您 1 关闭产品并拔下电源插头 2 请将您的手指放在侧面板的凹陷处 3 轻轻地将面板底部撤走 然后前面板的顶 部面朝向您提起 4 2 1 4 从产品中取出预过滤网 4 1 2 ...

Страница 93: ... 从预过滤网中取出多功能过滤网 若可用 6 除去新的多功能过滤网上的所有包装材 料 7 将新的多功能过滤网滑入预过滤网 8 将预过滤网放回产品 4 1 2 注 确保带两个固定夹的一面朝向您 并确保预过滤 网的所有挂钩均已正确连接到产品上 9 要重新连接前面板 请先将面板安装到产品 的顶部 1 然后 朝产品机身方向轻放面 板 2 4 2 1 10 重置多功能过滤网使用寿命 请参阅 重置 过滤网使用寿命计数器 一章 简体中文 ...

Страница 94: ...用水洗 也不 可用真空吸尘器清洁 当过滤网指示灯 闪烁时 请更换活性炭过 滤网和 HEPA 过滤网 提示 取出或插入过滤网时 可将产品按在墙上以增 强稳定性 注 将过滤网插到正确位置 确保您更换过滤网的顺序是 HEPA 过滤网 活性炭过滤网 多功能过滤网 若可用 和预过 滤网 确保带拉片的一面朝向您 1 关闭产品并拔下电源插头 2 请将您的手指放在侧面板的凹陷处 3 轻轻地将面板底部撤走 然后前面板的顶 部面朝向您提起 4 2 1 4 卸下产品内的所有过滤网 4 3 5 除去新过滤网上的所有包装材料 ...

Страница 95: ... 4 7 然后新的活性炭过滤网放回产品 4 3 8 将预过滤网放入产品内 4 1 2 注 确保带两个固定夹的一面朝向您 并确保预过滤 网的所有挂钩均已正确连接到产品上 9 要重新连接前面板 请先将面板安装到产品 的顶部 1 然后 朝产品机身方向轻放面 板 2 4 2 1 10 重置活性炭过滤网和 HEPA 过滤网使用寿 命 请参阅 重置过滤网使用寿命计数器 一章 更换加湿滤网 当过滤网指示灯 闪烁时 请更换加湿过滤 网 1 关闭产品并拔下电源插头 简体中文 ...

Страница 96: ...96 ZH CN 2 将水桶从产品中取出 3 将加湿滤网托盘从产品中取出 4 拆除加湿滤网的包装材料 5 放回新的加湿滤网 然后将加湿滤网托盘 滑入产品 ...

Страница 97: ...网和 HEPA 过滤网 要享受多功能过滤网的更多益处 您可单独购 买此过滤网 与 HEPA 过滤网相结合 多功 能过滤网可滤除灰尘 花粉和微小颗粒 激活多功能过滤网 安装多功能过滤网后 您可按以下方法将其 激活 注 有关如何安装多功能过滤网的信息 请参阅 更 换过滤网 一章的 更换多功能过滤网 部分 1 关闭产品 2 按一下 RESET 按钮 过滤网指示灯 和 亮 起 过滤网指示灯 熄灭 3 按住 RESET 按钮 2 秒钟 多功能过滤网使用寿命计数器已激 活 过滤网指示灯 亮起 注 要禁用多功能过滤网使用寿命计数器 请再次 按住 RESET 按钮 2 秒钟 然后过滤网指示灯 熄灭 简体中文 ...

Страница 98: ... ZH CN 9 重置过滤网使用 寿命计数器 更换过滤网后 请务必也重置过滤网使用寿命 计数器 这可使产品与过滤网使用寿命同步 注 插入并打开净化器时 请重置产品 仅在看到相应的指示灯开始闪烁时更换相应的 过滤网 更换过滤网之后 相应的指示灯仍然闪烁或持续 亮灯 直到您重置过滤网使用寿命计数器 更换过滤网后 请重置过滤网使用寿命 1 重新将插头插入电源插座并打开产品 2 按住 RESET 按钮 2 秒钟 ...

Страница 99: ...断滴水 请检查盖是否已拧紧到水桶上 如果问题仍然存 在 请联系您所在国家 地区的客户服务中心 清空加湿滤网托盘后 水桶中的水位迅速下 降 这是正常的 水桶中的水用于为加湿滤网托盘加水 而加湿滤网也会吸 收一些水 我没有看到当前湿度指 示有任何变化 确保您已将加湿滤网放入加湿滤网托盘中 加湿滤网变脏 请冲洗加湿滤网和 或为其除垢 请参阅 清洁预过 滤网和加湿滤网 一章的 清洁加湿滤网 部分 确保 PURIFIER 和 HUMIDIFIER 指示灯亮起 加湿滤网上面有一些白 色残留物 这些白色残留物被称为水垢 它们由水中的矿物质组成 加湿滤网上的 水垢会影响加湿性能 因此 当过滤器指示灯 闪烁时 您必须为 加湿滤网除垢 请参阅 清洁预过滤网和加湿滤网 一章的 清洁加湿滤 网 部分 出风口中没有排出空 气 请将产品插入电源并启动产品 在激活静音模式后 风 速没有变化 在静音模式下 风速将被设置在...

Страница 100: ...果水蒸气非常细小 就无法看见 本产品具有专门设计的加湿滤网 可 产生非常细小的水蒸气 因此 您看不到水蒸气 我想检查空气湿度感应 器是否正常工作 卸下空气质量 湿度感应器的盖子 然后轻轻地朝开口吹入湿空气 一段 时间后 CURRENT HUMIDITY 指示变化 请注意 如果 CURRENT HUMIDITY 指示已经达到 60 则当您朝感应器吹入湿空气时 该指示 将无法显示更高的湿度 产品散发出一种奇怪的 味道 前几次使用本产品时 可能会产生塑料味 这是正常的 但是 如果产 品发出烧焦的气味 请联系飞利浦经销商或经授权的飞利浦服务中心 另外 如果某个滤网很脏 也可能会发出难闻的气味 在这种情况下 请 清洁或更换相关的过滤网 由于我患有过敏症 我 需要更洁净的空气 您可以更改空气质量感应器的灵敏度 请参阅 使用产品 一章的 设置 空气质量感应器的灵敏度 部分 使本产品更全面细微地净化空气 ...

Страница 101: ...m 您也可以与您所在国家 地区的 Philips 客户服 务中心联系 可在全球保修卡中找到 Philips 客 户服务中心的电话号码 如果您所在的国 家 地区没有 Philips 客户服务中心 请向当地 的 Philips 经销商求助 订购部件或附件 如果您必须更换部件或需要购买额外的部件 请转到您的 Philips 经销商或访问 www philips com support 如果获取部件有问题 请与您所在国家 地区的 Philips 客户服务中心联系 可在全球保修卡中 找到 Philips 客户服务中心的电话号码 简体中文 ...

Страница 102: ...Philips 确认 据目前的科学 证明 如果其产品使用得当 则对人体毫无危 害 长期以来 Philips 始终在国际 EMF 和安全标准 的制定工作中扮演着积极的角色 这就使 Philips 总能预知标准的发展趋势 并率先应用到其产 品中去 回收 本产品采用可回收利用的高性能材料和组件制 造而成 如果产品上贴有带叉的轮式垃圾桶符号 则表 示此产品符合欧盟指令 2002 96 EC 切勿将本产品与其它生活垃圾一起处理 请自 行了解当地关于分类收集电子和电气产品的规 定 正确弃置旧产品有助于避免对环境和人类 健康造成潜在的负面影响 环境信息 为使包装尽量简化 已省去所有不必要的包装 材料 包装材料分为三类 纸板 盒 泡沫 塑料 缓冲物 和聚乙烯 袋 保护膜 本系统的所有材料均可回收和再利用 如果由 专业公司拆卸 请遵守当地有关包装材料 废电池和旧设备的处理的规定 规格如有更改 恕不另行通知 ...

Страница 103: ......
Страница 104: ...4241 210 72571 Specifications are subject to change without notice 2013 Koninklijke Philips Electronics N V All rights reserved AC4084_AC4085_UM_MS MY_V0 1 ...

Отзывы: