background image

11

3. Image Optimization

3.  Image Optimization

3.1  SmartImage


What is it?

SmartImage provides presets that 
optimize display for different types 
of content, dynamically adjusting 
brightness, contrast, color and 
sharpness in real time. Whether 
you're working with text applications, 
displaying images or watching a video, 
Philips SmartImage delivers great 
optimized monitor performance. 


Why do I need it? 

You want a monitor that delivers 
optimized display all your favorite 
types of content, SmartImage software 
dynamically adjust brightness, 
contrast, color and sharpness in real 
time to enhance your monitor viewing 
experience.


How does it work? 

SmartImage is an exclusive, leading 
edge Philips technology that analyzes 
the content displayed on your screen. 
Based on a scenario you select, 
SmartImage dynamically enhances the 
contrast, color saturation and sharpness 
of images to enhance the contents 
being displayed - all in real time with 
the press of a single button.


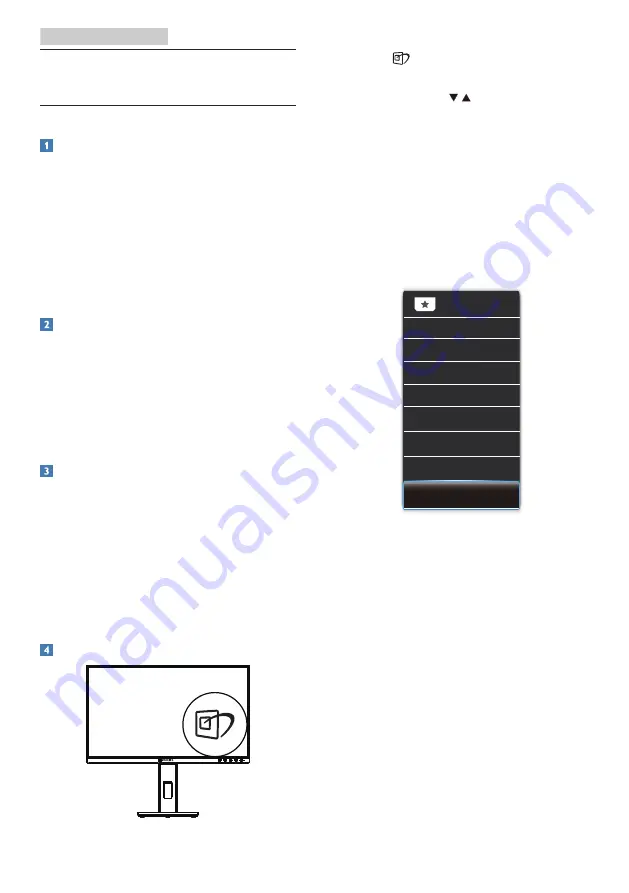
How to enable SmartImage?

1. 

Press 

 to launch the SmartImage 

on screen display.

2. 

Keep pressing     to toggle among 
EasyRead, Office, Photo, Movie, 
Game, Economy, LowBlue Mode, 
Off.

3. 

The SmartImage on screen display 
will remain on screen for 5 seconds, 
or you can also press "OK" to make 
confirmation.

There are multiple selections: EasyRead, 
Office, Photo, Movie, Game, Economy, 
LowBlue Mode, Off.

















 

•  EasyRead: 

Helps improve reading 

of text based application like PDF 
ebooks. By using a special algorithm 
which increases the contrast and 
boundary sharpness of text content, 
the display is optimized for a 
stress-free reading by adjusting 
the brightness, contrast and color 
temperature of the monitor. 

•  Office:

 Enhances text and dampens 

brightness to increase readability 
and reduce eye strain. This mode 
significantly enhances readability 
and productivity when you’re 
working with spreadsheets, PDF 
files, scanned articles or other 
general office applications.

Содержание 8PH272B1G

Страница 1: ...www philips com welcome 241B8 B line 272B1 EN User manual 1 Customer care and warranty 23 Troubleshooting FAQs 27 ...

Страница 2: ...VESA Mounting 10 3 Image Optimization 11 3 1 SmartImage 11 3 2 SmartContrast 12 4 Adaptive Sync 13 5 PowerSensor 14 6 Designs to prevent computer vision syndrome CVS 16 7 LightSensor 17 8 Technical Specifications 18 8 1 Resolution Preset Modes 21 9 Power Management 22 10 Customer care and warranty 23 10 1 Philips Flat Panel Monitors Pixel Defect Policy 23 10 2Customer Care Warranty 26 11 Troublesh...

Страница 3: ...onment may result in discoloration and damage to the monitor Remove any object that could fall into ventilation holes or prevent proper cooling of the monitor s electronics Do not block the ventilation holes on the cabinet When positioning the monitor make sure the power plug and outlet are easily accessible If turning off the monitor by detaching the power cable or DC power cord wait for 6 second...

Страница 4: ...aver program when you leave your monitor unattended Always activate a periodic screen refresh application if your monitor will display unchanging static content Uninterrupted display of still or static images over an extended period may cause burn in also known as after imaging or ghost imaging on your screen Burn in after imaging or ghost imaging is a well known phenomenon in LCD panel technology...

Страница 5: ...llows Note This icon indicates important information and tips that help you make better use of your computer system Caution This icon indicates information that tells you how to avoid either potential damage to hardware or loss of data Warning This icon indicates the potential for bodily harm and tells you how to avoid the problem Some warnings may appear in alternate formats and may not be accomp...

Страница 6: ...been omitted We have done our utmost to make the packaging easily separable into mono materials Please find out about the local regulations on how to dispose of your old monitor and packing from your sales representative Taking back Recycling Information for Customers Philips establishes technically and economically viable objectives to optimize the environmental performance of the organization s ...

Страница 7: ...ation to this product Philips and the Philips Shield Emblem are registered trademarks of Koninklijke Philips N V and are used under license Contents Drivers User s Manual User s Manual www philips com welcome 使用产品前请阅读使用说明 保留备用 Monitor USB A B CD DVI VGA Different according to region Install the base 1 Place the monitor face down on a smooth surface Pay attention not to scratch or damage the screen...

Страница 8: ... downstream 11 USB downstream USB fast charger 12 Kensington anti theft lock Connect to PC 1 Connect the power cord to the back of the monitor firmly 2 Turn off your computer and unplug its power cable 3 Connect the monitor signal cable to the video connector on the back of your computer 4 Plug the power cord of your computer and your monitor into a nearby outlet 5 Turn on your computer and monito...

Страница 9: ...nce by the high speed signal of USB 3 2 devices which may result in a decreased efficiency of the radio transmission Should this happen please try the following methods to help reduce the effects of interference Try to keep USB2 0 receivers away from USB3 2 connection port Use a standard USB extension cable or USB hub to increase the space between your wireless receiver and the USB3 2 connection p...

Страница 10: ...rightness enter to the OSD to set DPS to OFF mode Main menu Sub menu Picture Input OSD Settings Setup Language Color Audio Picture Format Brightness Contrast Adaptive Sync Horizontal Vertical Transparency OSD Time Out Auto H Position Information English Deutsch Español Ελληνική Français Italiano Maryar Nederlands Português Português do Brasil Polski Русский Svenska Suomi Türkçe Čeština Українська ...

Страница 11: ...1920 x 1080 60 Hz When the monitor is powered on at a different resolution an alert is displayed on screen Use 1920 x 1080 for best results Display of the native resolution alert can be switched off from Setup in the OSD On Screen Display menu 4 Physical Function Tilt 35 5 Swivel 180 180 Height adjustment 150mm Pivot 90 90 0 0 ...

Страница 12: ... the monitor base to its maximum height 2 Place the monitor face down on a smooth surface Pay attention not to scratch or damage the screen Then lift the monitor stand 3 While keeping the release button pressed tilt the base and slide it out Note This monitor accepts a 100mm x 100mm VESA Compliant mounting interface VESA Mounting Screw M4 Always contact manufacturer for wall mount installation 100...

Страница 13: ...and sharpness of images to enhance the contents being displayed all in real time with the press of a single button How to enable SmartImage 1 Press to launch the SmartImage on screen display 2 Keep pressing to toggle among EasyRead Office Photo Movie Game Economy LowBlue Mode Off 3 The SmartImage on screen display will remain on screen for 5 seconds or you can also press OK to make confirmation Th...

Страница 14: ...Philips LowBlue Mode setting uses a smart software technology to reduce harmful shortwave blue light Off No optimization by SmartImage Note Philips LowBlue mode mode 2 compliance with TUV Low Blue Light certification you can have this mode by simply press the hotkey then press to select LowBlue Mode see above SmartImage selection steps 3 2 SmartContrast What is it Unique technology that dynamicall...

Страница 15: ...rames per second are reduced with v sync too AMD Adaptive Sync technology eliminates all of these problems by letting the GPU update the monitor the moment a new picture is ready leaving gamers with unbelievably smooth responsive tearing free games Followed by the graphic card that are compatible Operating system Windows 10 8 1 8 7 Graphic Card R9 290 300 Series R7 260 Series AMD Radeon R9 300 Ser...

Страница 16: ...nd proper detection please position yourself directly in front of your monitor If you choose to position yourself more than 100 cm or 40 inches from the monitor use the maximum detection signal for distances up to 120 cm or 47 inches Setting 4 Since some dark colored clothing tends to absorb infrared signals even when the user is within 100 cm or 40 inches of the display step up signal strength wh...

Страница 17: ...ntil it is readjusted or the default mode is recalled If you find that the PowerSensor is excessively sensitive to nearby motion for some reason please adjust to a lower signal strength Keep sensor lens clean if the sensor lens is dirty wipe it with alcohol to avoid reducing of distance detection ...

Страница 18: ...een use is likely to be better than a 15 minute break every two hours Looking at something varying distances after a long period focusing on the screen Gently closing and rolling your eyes to relax Conscious blinking often while working Gently stretch your neck and slowly tilt your head forward backward side for pain relief 3 Ideal working posture Reposition your screen to appropriate height and a...

Страница 19: ...gnal to automatically adjust picture quality settings Light Sensor uses a sensor to adjust the picture brightness depending on the room light conditions How to enable LightSensor 1 Press button on the front bezel to enter OSD menu screen 2 Press or button to select main menu LightSensor then press button OK 3 Press or button to turn on or off the LightSensor ...

Страница 20: ...Connectivity Signal Input Output HDMI 1 4 x 1 DisplayPort 1 2 x 1 DVI x 1 VGA x 1 USB USB UP x 1 upstream USB3 2 x 4 downstream with x 1 fast charge B C 1 2 Input Signal Separate Sync Sync on Green Audio In Out PC audio in headphone out Convenience Built in speaker 2 W x 2 User Convenience OSD Languages English German Spanish Greek French Italian Hungarian Dutch Portuguese Brazil Portuguese Polish...

Страница 21: ...9 BTU hr typ Off 1 02 BTU hr typ 1 02 BTU hr typ 1 02 BTU hr typ Off AC switch 0 BTU hr 0 BTU hr 0 BTU hr On Mode ECO mode 10 5 W typ PowerSensor 3 W typ Power LED indicator On mode White Standby Sleep mode White blinking Power Supply Built in 100 240V AC 50 60Hz Dimensions Product with stand WxHxD 613 x 537 x 205 mm Product without stand WxHxD 613 x 366 x 51 mm Product with packaging WxHxD 700 x ...

Страница 22: ...o 1060hPa Environmental and energy ROHS YES Packaging 100 recyclable Specific Substances 100 PVC BFR free housing Cabinet Color Black Finish Texture Note This data is subject to change without notice Go to www philips com support to download the latest version of leaflet ...

Страница 23: ...00 x 600 56 25 37 88 800 x 600 60 32 46 88 800 x 600 75 00 48 08 800 x 600 72 19 47 73 832 x 624 74 55 48 36 1024 x 768 60 00 56 48 1024 x 768 70 07 60 02 1024 x 768 75 03 44 77 1280 x 720 59 86 60 1280 x 960 60 63 89 1280 x 1024 60 02 79 98 1280 x 1024 75 03 55 94 1440 x 900 59 89 65 29 1680 x 1050 59 95 67 50 1920 x 1080 60 00 83 89 1920 x 1080 74 97 HDMI DP Note Please notice that your display ...

Страница 24: ...table shows the power consumption and signaling of this automatic power saving feature Power Management Definition VESA Mode Video H sync V sync Power Used LED Color Active ON Yes Yes 16 50 W typ 56 00 W max White Sleep Standby OFF No No 0 35 W typ White blink Switch Off OFF 0 W typ OFF The following setup is used to measure power consumption on this monitor Native resolution 1920 x 1080 Contrast ...

Страница 25: ...n higher quality standards for certain types or combinations of pixel defects that are more noticeable than others This policy is valid worldwide subpixel pixel Pixels and Sub pixels A pixel or picture element is composed of three sub pixels in the primary colors of red green and blue Many pixels together form an image When all sub pixels of a pixel are lit the three colored sub pixels together ap...

Страница 26: ... in a Philips flat panel monitor must have pixel or sub pixel defects exceeding the tolerances listed in the following tables Three adjacent lit sub pixels one white pixel Note A red or blue bright dot must be more than 50 percent brighter than neighboring dots while a green bright dot is 30 percent brighter than neighboring dots Black Dot Defects Black dot defects appear as pixels or sub pixels t...

Страница 27: ...Total bright dot defects of all types 3 BLACK DOT DEFECTS ACCEPTABLE LEVEL 1 dark subpixel 5 or fewer 2 adjacent dark subpixels 2 or fewer 3 adjacent dark subpixels 0 Distance between two black dot defects 15mm Total black dot defects of all types 5 or fewer TOTAL DOT DEFECTS ACCEPTABLE LEVEL Total bright or black dot defects of all types 5 or fewer Note 1 or 2 adjacent sub pixel defects 1 dot def...

Страница 28: ...epair and return service however the user will be responsible for all costs accrued If the Certified Service Partner cannot perform the required repairs under the offered extended warranty package we will find alternative solutions for you if possible up to the extended warranty period you have purchased Please contact our Philips Customer Service Representative or local contact center by Consumer...

Страница 29: ...Start Guide Check to see if the monitor cable has bent pins Make sure the computer is turned on AUTO button doesn t function The auto function is applicable only in VGA Analog mode If the result is not satisfactory you can do manual adjustments via the OSD menu Note The Auto Function is not applicable in DVI Digital mode as it is not necessary Visible signs of smoke or sparks Do not perform any tr...

Страница 30: ...urn in or after imaging or ghost imaging symptoms that will not disappear and cannot be repaired The damage mentioned above is not covered under your warranty Image appears distorted Text is fuzzy or blurred Set the PC s display resolution to the same mode as monitor s recommended screen native resolution Green red blue dark and white dots appears on the screen The remaining dots are normal charac...

Страница 31: ...and monitor together determine the available resolutions You can select the desired resolution under Windows Control Panel with the Display properties Q5 What if I get lost when I am making monitor adjustments via OSD Ans Simply press button then select Setup Reset to recall all of the original factory settings Q6 Is the LCD screen resistant to scratches Ans In general it is recommended that the p...

Страница 32: ... Ans Uninterrupted display of still or static images over an extended period may cause burn in also known as after imaging or ghost imaging on your screen Burn in after imaging or ghost imaging is a well known phenomenon in LCD panel technology In most cases the burn in or after imaging or ghost imaging will disappear gradually over a period of time after the power has been switched off Always act...

Страница 33: ...31 11 Troubleshooting FAQs Q14 Where can I find Important Information manual mentioned in EDFU Ans Important Information manual can be download on the Philips website support page ...

Страница 34: ... responsibility of Top Victory Investments Ltd and Top Victory Investments Ltd is the warrantor in relation to this product Philips and the Philips Shield Emblem are regis tered trademarks of Koninklijke Philips N V and are used under license Specifications are subject to change without notice Version M10272BE1T ...

Отзывы: